
Over the last couple of years, I’ve read a number of blog posts and articles about the Blockstream Satellite, and how to set up a simple node using cheap hardware to be able to receive bitcoin from space. There’s plenty of good reasons for using it instead of a regular bitcoin node (improved privacy, less internet traffic etc), but mostly I wanted to do it because it sounded like a fun project!
Most of the articles out there are US-centric, which affects the choice of frequencies and available hardware. I started out following the well-written instructions on the official Blockstream github, which has instructions for the whole world, but I thought it would be useful to share my experiences here.
Hardware
The components you’ll need to set up your node are not expensive, but some are a bit specialised, and suppliers can come and go. I’ve put links in wherever possible, but could well be out of date within days. I recommend reading the Blockstream article for some background before getting started.
- Host computer running Linux. You’ll need something that can stay up 24/7, so preferably something quiet that doesn’t use too much power. I ended up using a Raspberry Pi 3B+ that I had lying around spare. Using a Raspberry Pi is great in many ways as it’s small, silent and doesn’t use much power, but does make the software setup a bit more difficult later on.
- Sufficient storage for the entire bitcoin blockchain. Particularly if using a Raspberry Pi, you’ll need at least 500GB storage. A regular mechanical USB drive is perfectly adequate, just make sure the power supply for your pi can supply enough power if you use one without its own power supply.
- A satellite dish, Blockstream recommend at least 18”. I used a generic zone 2 satellite TV dish from eBay. This came with a generic LNB for use with Sky TV. Don’t use this, it can’t receive the frequency used by the blockstream satellite.
- Linear Polarisation PLL LNB - you’ll need a decent quality LNB that can reach the frequency range that the satellite link uses. I used one of these from Amazon: https://tinyurl.com/sofwafz. As it’s a universal LNB, it will switch between Horizontal and Vertical polarisation depending on the input voltage from the power inserter. More on this later. I got a kit including 10m of coax cable, a mounting kit and a tripod stand. The latter is optional, but useful if you’re uncertain where to put your dish (or if you just want a temporary setup)
- Power Inserter. Here’s where I found things a bit difficult. Most guides from the US recommend a DirecTV power inserter, which a) uses a different frequency range to the Telstar 11N satellite providing European coverage, and b) runs from the US 110v supply. I have no idea if this would work here, and the shipping fees for the examples that I could find were prohibitive. The best example I could find was this unit, again from Amazon: https://tinyurl.com/uayrx64 A lot of the similar items for sale here only cover a frequency range of 750-1000MHz, whereas we need something that will go up to 2400MHz. Note that the power supply that comes with this is 18v, which when connected to the LNB that I bought, forces it into Horizontal polarisation mode, where we need Vertical. To get Vertical polarisation, we need an input of 15v or less. I ended up taking a generic 12v power adapter with a terminal block output, such as this https://tinyurl.com/sgh53fq
Then you can take a length of coax cable, cut off one end, insert the centre core into the (+) terminal, and the shielding into the (-) terminal.
- Software defined radio - as mentioned on the Blockstream github, Telstar 11N users need an SDR module with a higher frequency range than their US counterparts. Searching eBay UK for “NooElec E4000” yielded several results for me. Mine already came with the F-type to SMA coax adapter needed to connect it to the power inserter. https://preview.tinyurl.com/un564bv
Hardware setup
- Assemble the satellite dish. If you’re installing it on a tripod to start with, ensure that it’s level. Use the setup tool on the Blockstream website to find the best location on your property for a view of the satellite:

Use the alignment tool to get the approximate elevation, azimuth and polarity for pointing the satellite dish from your address.For a better view, there’s a number of satellite finding apps that you can install on your phone. Then just stand at the point where you’re planning to site the antenna, and check that the satellite is in view:
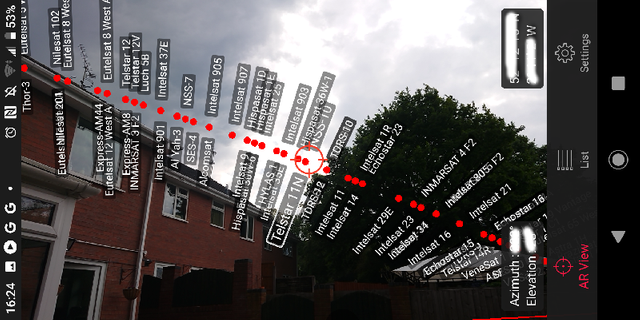
Not great, but hopefully just good enough!
Use the elevation and azimuth readings from the app to align the dish approximately, we will use the software to precisely align the dish later.
Now cable up the LNB, power inserter and SDR to the computer, taking care to use the correct ports on the inserter to avoid frying the SDR!

Software Installation
Now that the hardware is just about complete, it’s time to set up the software. As I mentioned earlier, I made my life a bit more difficult by using a Raspberry Pi. At this stage, it’s worth noting that you need the entire bitcoin blockchain up to the time that you start receiving over satellite to be stored on your device. This means running bitcoind conventionally to download all the blocks, which you can do on the same machine if you have something reasonably powerful, if you’re using a pi, you’ll want to do this on another machine and copy the blockchain across on your removable drive. The installation process itself is well documented in the Blockstream article - you need to install bitcoinfibre and the satellite software. Even on a pi, the satellite software can be installed directly from the repository, but you’ll have to compile bitcoinfibre from source. This was quite slow, but ultimately painless by following the instructions. I would also recommend installing the satellite interface on a laptop so you can use the GUI component outside while fine-tuning the satellite alignment. Once you’ve got the software installed, it’s time to use it to complete the satellite setup. First, you need the frequency to tune the SDR to in order to connect to the satellite. The calculations for this are on the Blockstream github, for the Telstar 11N satellite, and an LNB LO frequency of 9.75GHz (which mine was, it should be listed on the packaging of the LNB), you should be using a frequency of 1754020000Hz. Plug in the USB SDR to your laptop, plug in the power inserter, and run the command:
blocksat-rx-gui -f 1754020000 If the dish is reasonably well aligned, you should see something like this:
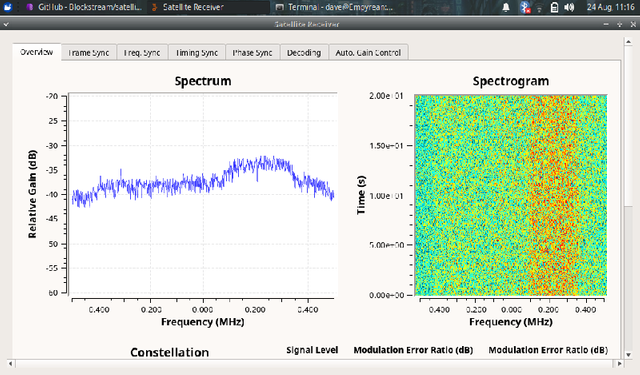
This is where some patience is required - you need to move the dish very very slowly on each axis, trying to maximise the peak of the spectrum graph. This is where having the satellite software on a laptop comes in, so you can watch the display change in real time as you move the dish. As well as watching the graph, also keep a watch on the signal strength indicator in the terminal window:
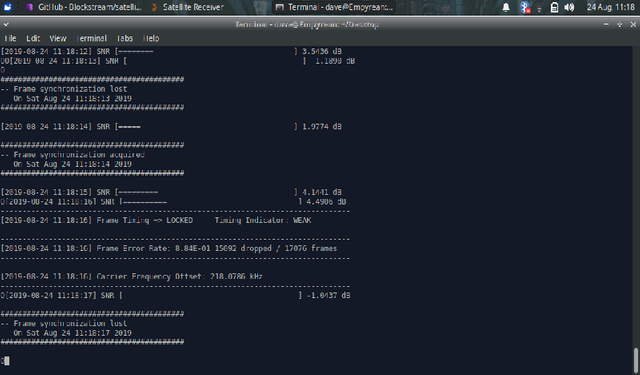
This is where things got frustrating for me. No matter how carefully I aligned the dish, I could never get the frame synchronisation to hold for more than a couple of seconds. I noticed that in the screenshot above, the frame sync is acquired with an offset of around 215kHz. So I tried adding that offset to the frequency value that I was passing to the application, on running it again:
blocksat-rx-gui -f 1754255000 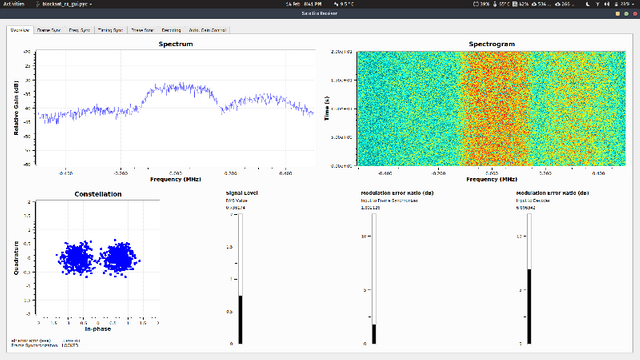
The GUI shows a nice strong peak centered on 0, with a symbol decoding map (bottom left). Looking at the terminal, we see a more stable, strong signal.
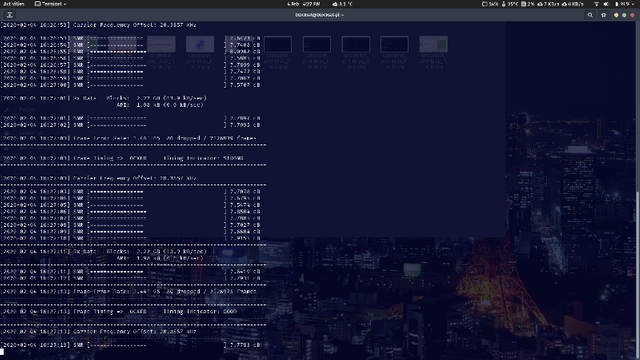
Excellent, we are now receiving good data from the satellite! Now it’s time to run bitcoinfibre to read the incoming data. Move the SDR device back to your permanent receiver machine, log in and run the blocksat receiver in headless mode:
blocksat-rx -f 1754255000 You should see the same output as when running on your laptop, with a stable signal being received. Periodically you should see a warning that the buffer is filling up and to check that bitcoinfibre is running. Don’t worry about this, we will take care of this next! Note: By this point, you need to have the complete bitcoin blockchain present on your receiver machine. Test by runningBitcoindFrom a terminal. This will start the bitcoin daemon conventionally, checking the integrity of the blockchain and will start receiving new blocks over the internet as normal. When you’re happy that it is up to date, stop the bitcoind process.Hint: check the status of bitcoind by monitoring the state of the log file with the command:
tail -f ~/.bitcoin/debug.logWhen up to date, you should see ‘progress=1.00000’ on each block as it comes in. Run bitcoind, specifying the buffer created by satellite-rx as the source:
bitcoind -fecreaddevice=/tmp/blocksat/bitcoinfibreBitcoind will start, check the last 6 blocks, which takes a few minutes, then will start looking for new blocks in the buffer populated by blocksat-rx. If this is all going well, you should start to see blocks coming in by looking at the log as before.
Congratulations, you now have a functioning bitcoin satellite receiver!
I hope you found this guide useful. If you want to send me some tips, please use the excellent Samourai Wallet and send a tip to my PayNym using the code below. My next task is to connect up the blockchain received via satellite to their Dojo node to provide a fully-functional private node :)

Congratulations @davidcarrington! You received a personal award!
You can view your badges on your Steem Board and compare to others on the Steem Ranking
Do not miss the last post from @steemitboard:
Vote for @Steemitboard as a witness to get one more award and increased upvotes!
Downvoting a post can decrease pending rewards and make it less visible. Common reasons:
Submit
I've never heard for this before, thanks for this :D
Downvoting a post can decrease pending rewards and make it less visible. Common reasons:
Submit
Congratulations @davidcarrington! You received a personal award!
You can view your badges on your Steem Board and compare to others on the Steem Ranking
Do not miss the last post from @steemitboard:
Vote for @Steemitboard as a witness to get one more award and increased upvotes!
Downvoting a post can decrease pending rewards and make it less visible. Common reasons:
Submit