Hi friends, after reading around I am interested in participating in an amazing challenge this week. The challenge is titled: Lesson #6 Functions. by Mr. @alejos7ven, following the contest link: Basic programming course: Lesson #6 Functions. [ESP-ENG]
Previously I also invited other friends such as Mr. @irawandedy, Mr @muzack1 , sir @sisol, sir @aneukpineung78 and my friend @cymolan.
.jpg)
| Tell us about your experience with programming, is it your first time? Do you find it complicated? What was your favorite part of the course? |
|---|
To be honest, I didn't like programs at first, but because I have continued to study in the informatics engineering study program until now, I continue to try to understand a little about programming. So it's clear, I know the program not for the first time, but I have known it since entering college in 2018 - until now. Indeed, I don't have a deep knowledge of all programming languages, but I only know them little by little. Of the many programming languages, the one I open most often and even often make projects is the PHP language, but in the past when I first entered college I also often learned java and c++, but not long after I chose to feel at home learning php alone.
Based on my experience in programming, so this is not my first experience with programming, although learning a new language always provides its own challenges. Of the 6 homework assignments given by Mr. @alejos7ven such as :
Lesson #1 - Introduction to programming
Lesson #2 - Variables and Data Types
Lesson #3 Operations
Lesson #4 Control structures. Part 1. Conditions.
Lesson #5 Control structures. Part 2. Cycle. and
Lesson #6 Functions.
So what I like the most is in this last lesson, which is given the task of making a simple calculator program and also an ATM simulator. Why do I like this, yes because I think this is a cool challenge and in the past I have learned and today I will repeat the student again, thank you teacher for holding this kind of contest.
| Add multiplication and division functions into the course calculator. Explain how you did it. |
|---|
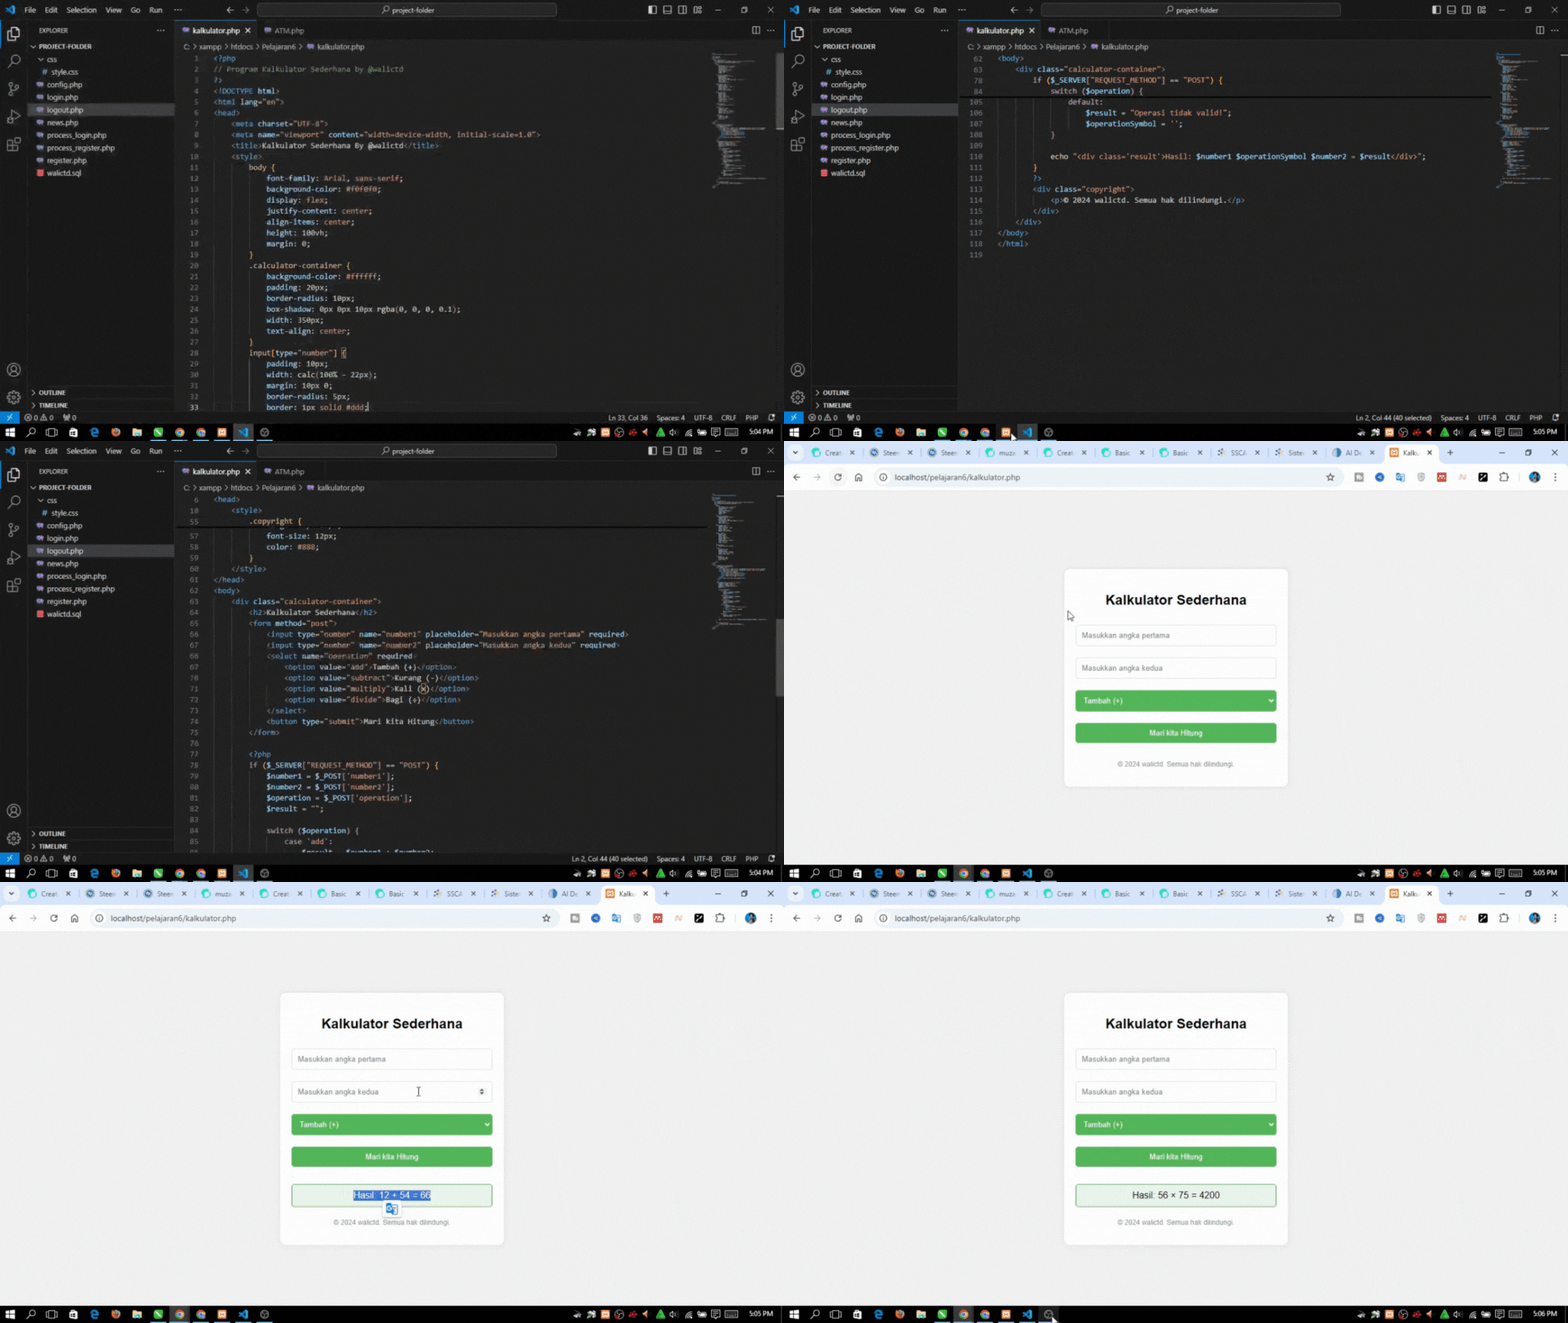
The first step is to create a php file called calculator.php. Here is the coding:

In the coding above, I also created an HTML Form with the intention as Input.
In the HTML Form, it is utilized so that it can receive an input from someone in the form of two numbers, namely number1 and number2, then there is a choice of operations where I choose only 4, namely (add, subtract, multiply, divide). After the input is entered, then all the values will be sent through the POST method to PHP in order to be processed.
Furthermore, there is PHP Logic which functions as a Calculation, which in the PHP Script is executed when the form is submitted. While $_POST is utilized in order to capture data from the form that has been entered, for example the first number, then the second number, and after that just the operation. The switch is utilized so that it can determine the appropriate operation:
- Addition, here the 'add' case functions to add two numbers.
- Subtraction, where the 'subtract' case functions to subtract the first number from the second number.
- Multiplication, this 'multiply' case functions to multiply the two numbers. and,
- Division, in this 'divide' case of course serves to divide the first number with the second number, but before dividing there is a check if the second number is zero to avoid errors.
Therefore, the result of the operation will be displayed in an HTML element with the result class.
Next, I also add CSS that functions for styling. In this section, head is utilized to make the form and calculation result look good. The styling must include the input size, button, color and background.
Lastly, I also add a copyright section that is located below the form with a smaller size but has a lighter color.
While the Output Result of this program is the calculation result that is displayed directly below the form after the user selects the operation and clicks the “Let's Calculate” button.
Here's a demo of the program above:

| FINAL TASK: Create an ATM simulator. Initially, the simulator should ask the user for an access pin, which is 12345678. Once the pin is successfully validated, the simulator should display a menu that allows: 1. view balance, 2. deposit money, 3. withdraw money, 4. exit. The cashier must not allow the withdrawal of more balance than they have. Use all the structures and functions you have learned. |
|---|

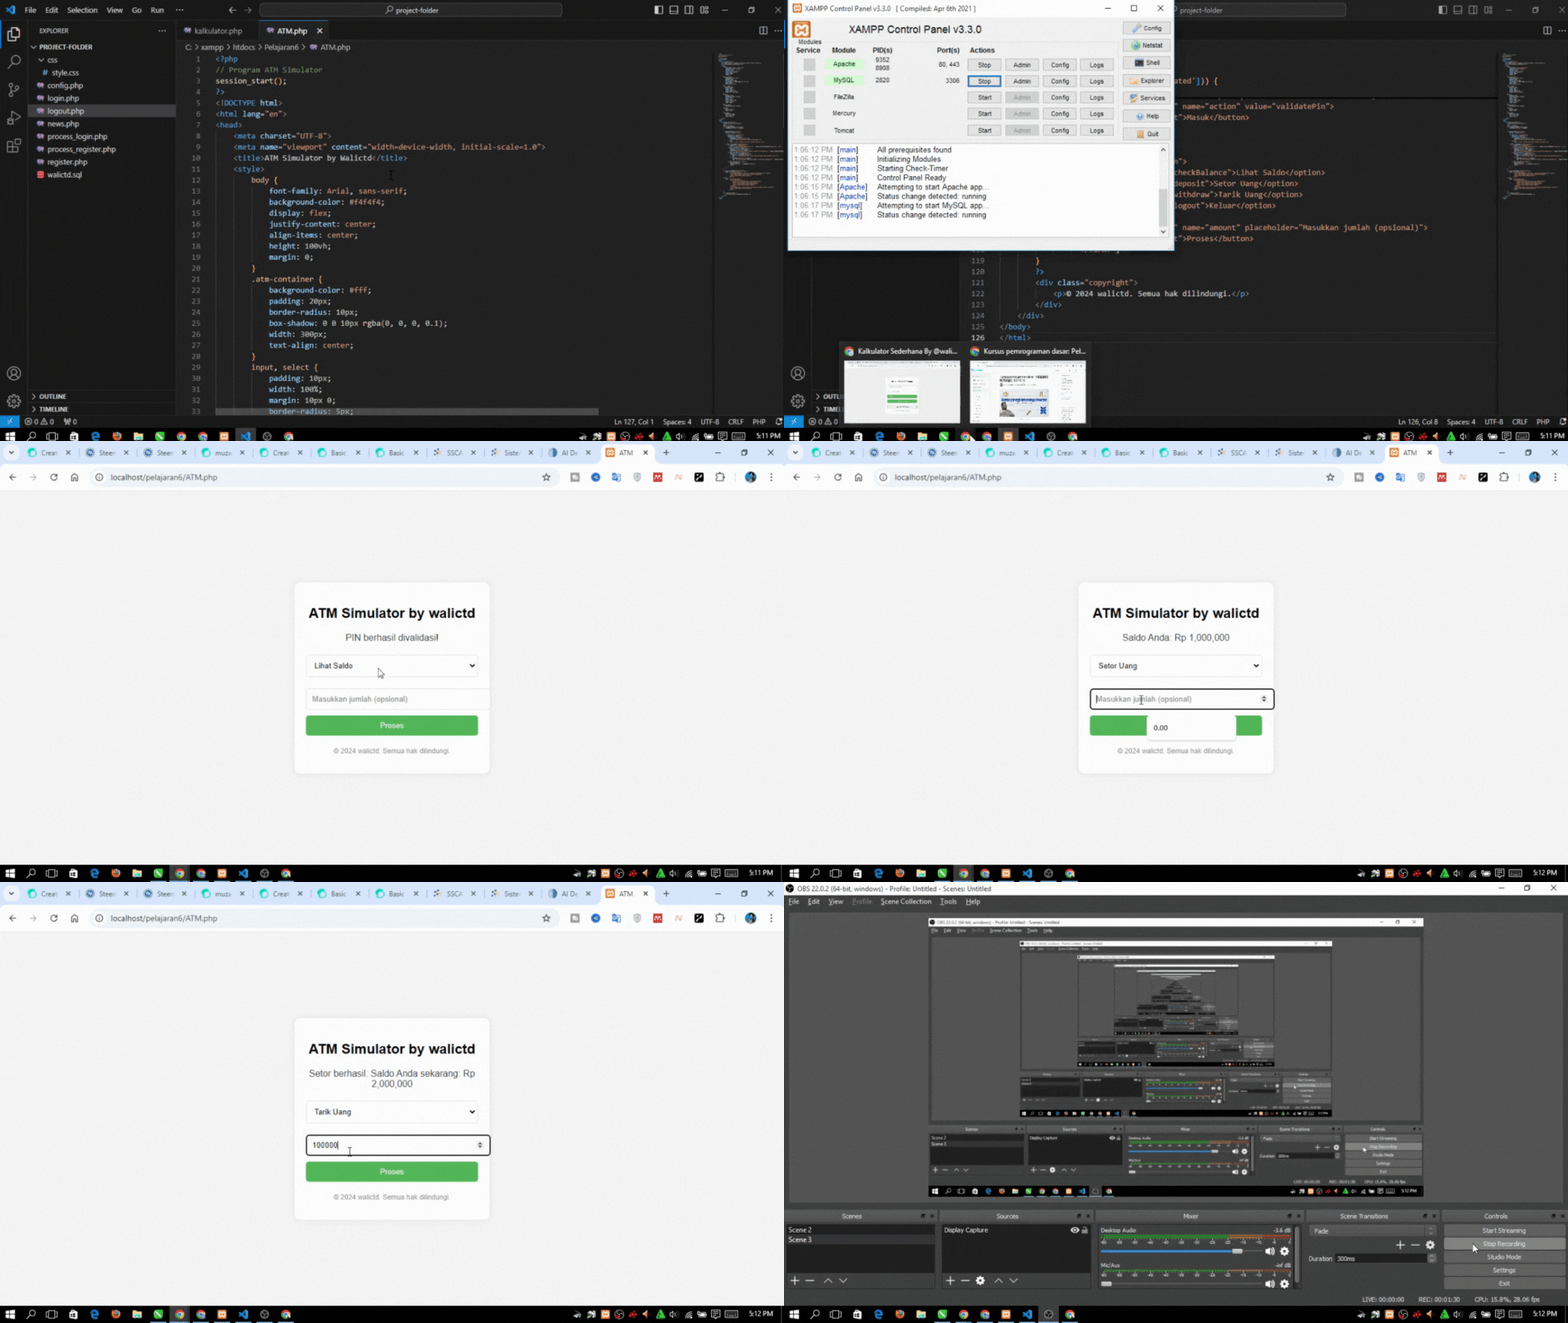
In the php coding above, the initial Setup and Session Usage:
In session_start(), it is usually utilized so that it can start a PHP session and then can store information about a person's balance and authentication status. The first time, we set the balance amount at Rp 1,000,000 by utilizing $_SESSION['balance'].
Next we will login by entering the PIN. One will be asked to immediately enter the PIN through the form provided there. Then the PIN that we have set is “12345678”. Then if we enter the PIN correctly, the $_SESSION['authenticated'] is set to true, which means we will be able to access the ATM menu. If you have not entered it correctly, it will automatically be told to enter it again.
Next on the ATM menu when we have logged in. If we successfully login, then the next step we will see several ATM menus available such as:
- Check Balance, which on this menu will display the contents of our current balance in rupiah.
- Deposit Money, in this menu we will take input by entering the amount we want to deposit into our balance.
- Withdraw Money, now in this menu will show the input of how much you want to withdraw. But before that, the program will also check first and make sure the balance is sufficient in order to avoid excessive withdrawals.
- Exit, in this last menu, which is to cancel the session (session_destroy()) with the aim of ending the ATM session, then we must log in again so that we can access the menu.
Now all of these options are utilized by different forms and buttons, as well as $_POST['action'] in order to determine the action we want to choose.
Not only that, the if and switch structures are also used for Action. There, the if structure is utilized to determine whether we have logged in or not (authenticated). Then from the action we have chosen, such as the balance will be displayed, or added (deposit), or vice versa, namely reduced (withdrawal), or even the last session will be destroyed (logout).
If our balance is not enough at the time of withdrawal, it will automatically display an error message.
Next, I again utilized CSS to move the appearance on the web. In addition, I also added Copyright at the bottom of the page.
Here's a demo of the application:
.gif)
source :
- https://steemit.com/devwithseven/@alejos7ven/basic-programming-course-lesson-6-functions-esp-eng
- https://www.gamelab.id/news/695-mudah-membuat-kalkulator-dengan-php
@walictd

Upvoted. Thank You for sending some of your rewards to @null. It will make Steem stronger.
Downvoting a post can decrease pending rewards and make it less visible. Common reasons:
Submit
https://x.com/walictd/status/1846512725159276894
Downvoting a post can decrease pending rewards and make it less visible. Common reasons:
Submit
This post has been upvoted/supported by Team 5 via @httr4life. Our team supports content that adds to the community.
Downvoting a post can decrease pending rewards and make it less visible. Common reasons:
Submit
Thankyou 🙏
Downvoting a post can decrease pending rewards and make it less visible. Common reasons:
Submit
Perfect 👏👍
Downvoting a post can decrease pending rewards and make it less visible. Common reasons:
Submit