The AppBar is the most noticeable widget for users, and its background color is based on the colors specified in ThemeData. The Flutter AppBar widget is also widely utilized in numerous applications by Flutter developers. It contains a search field, page navigation buttons, or the page title. But, Flutter provides a specialized widget for this purpose, as it is frequently used.
AppBar is a built-in widget in Flutter that provides a top-level structure for the app. It typically contains the toolbar and other standard action buttons, such as a back button. It is highly customizable but can be replaced with other widgets, such as a scrollable AppBar, to provide a more flexible structure.
Alternatively, custom app bars can be created from scratch by these programmers. When you open the new page of the project you just created, you might notice that the color of the back button differs from what you had configured for the theme colors of your app.
AppBar In Flutter: An Overview
The AppBar is a toolbar placed at the top of your app. It’s a necessary component that can be found in almost all applications. It typically contains items like a leading, title, and actions. The AppBar is a widget, allowing it to incorporate other widgets.
For example, an AppBar with a log-out button is embedded inside. Flutter AppBar is an interactive element that adheres to Material Design standards. It is typically located at the top of the screen and can incorporate other widgets in its design.
How to Create AppBar In Flutter?
In Flutter, AppBar is part of Scaffold. The Scaffold is a widget that contains your application. It contains different widgets(parts), but the main ones are the AppBar, body, bottom navigation bar, and the floating button. We can say that the Scaffold is the container of the AppBar.
The AppBar widget can contain various toolbar widgets such as menu, action, and icon buttons. Here is the process of creating the AppBar widget:
Step 1: Generate a New Flutter Application:
To begin your project, open a terminal window and type the below command to create the project. After creating it, please navigate to the project folder and open it with your preferred text editor/IDE.
flutter create flutter_appbar_tutorial
Step 2: Clear The Automated Generated Coding In Flutter App:
When working on a new project with Flutter, it is recommended to start by cleaning the main file in lib/main.dart. It involves removing all comments, deleting the counter button and associated code, and removing the title parameter of MyHomePage. Still, the goal is to have the code as simple as possible. Thus, Flutter generates a code that has a basic AppBar, only displaying text.
Step 3: Customization Scope In Appbar:
In this step, we will personalize the AppBar by changing its primary characteristics. Recall that Flutter functions using widgets, which can contain other widgets. The AppBar widget has three primary properties:
- The leading which can take a widget,
- The title can take a widget, and
- The actions can take a list of widgets.
We will investigate this in more detail in the subsequent step!
Step 4: Generate AppBar Activity In Flutter
Our goal in this step is to recreate the increment button, as seen in the auto-generated code. In order to accomplish this purpose, it is necessary to make a variable in _MyHomePageState and write two functions to adjust the state variable, one to increase its value and one to decrease it.
int _counter = 0; // Add 1 to the `_counter` void _incrementCounter() { setState(() { _counter++; }); } // Remove 1 to the `_counter` void _decrementCounter() { setState(() { _counter--; }); }
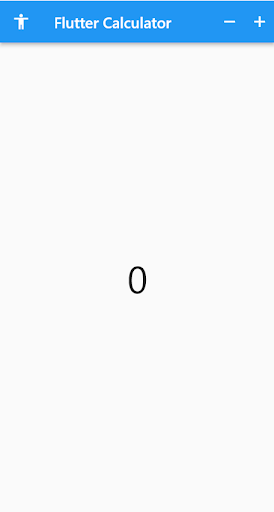
Once the logic has been set up, we can focus on the application’s design. We can update the leading to display an icon of our choice and update the title text and the body to show the counter value as text. Then, we can add two buttons to the actions list using the IconButton widget. The first button will increment the counter’s value, and the second will decrease it.
return Scaffold( appBar: AppBar( // Update the `leading` to have a better design leading: Icon(Icons.accessibility), // Change the app name title: Text("Flutter Calculator"), actions: <widget>[Text("First action")]), body: Center( // Update the body with a Text widget // to display the counter value child: Text( '$_counter', style: TextStyle(fontSize: 50.0), ), ), );</widget>
Finally, we can pass the two functions we created before as parameters of our onPressed properties.
actions: <widget>[ // First button - decrement IconButton( icon: Icon(Icons.remove), // The "-" icon onPressed: _decrementCounter, // The `_decrementCounter` function ), // Second button - increment IconButton( icon: Icon(Icons.add), // The "+" icon onPressed: _incrementCounter, // The `_incrementCounter` function ), //IconButton ],</widget>
Output

Change AppBar Color on Page Level In Flutter
You can alter the color of the app bar in Flutter by setting the backgroundColor property with the desired color. It will let you customize the styling of the AppBar. Let us explore the stepwise process to change the AppBar color, which Flutter developers use:
Step 1: Find the AppBar widget, usually located in your project directory’s lib/widgets folder.
Step 2: In the AppBar widget, use the backgroundColor argument to specify the desired background color. E.g., backgroundColor: Colors.deepPurpleAccent.
Step 3: To use the app, open it on your device and follow the instructions on the screen.
AppBar( centerTitle: true, title: Text('Hii'), backgroundColor: Colors.deepPurpleAccent, ),
Converting the Global AppBar Color
To have a consistent appearance across all the pages of your application, you can set the AppBar color at the app level. To do this, you can use the AppBarTheme widget and assign a specific color to the color parameter. This way, the color of the app bar will be the same for all the pages in the app.
Step 1: Find the MaterialApp widget at the Flutter app’s root.
Step 2: Add the ThemeData class as the theme parameter inside the MaterialApp widget.
Step 3: Add the appBarTheme parameter inside the ThemeData class and assign the AppBarTheme class to it.
Step 4: In the AppBarTheme, include a color property and assign a desired color.
MaterialApp( title: 'Flutter Demo', theme: ThemeData( primarySwatch: Colors.blue, appBarTheme: AppBarTheme( iconTheme: IconThemeData(color: Colors.black), color: Colors.deepPurpleAccent, //<-- SEE HERE), ), home: ChangeAppBarColorDemo(),);
Method To Add Color In AppBar In Flutter
There are three primary methods for adding color to the AppBar widget: a predefined color, a custom color, and a theme color.
Color(0xffF02E65): This is achieved by creating a custom color.
Colors.Red: To specify a particular color from a limited range of available colors.
Color. From RGB (255, 66, 125, 145): This uses the RGB (red, green, and blue) color model to create a range of colors by combining different levels of the primary colors.
Example: (change color using theme)
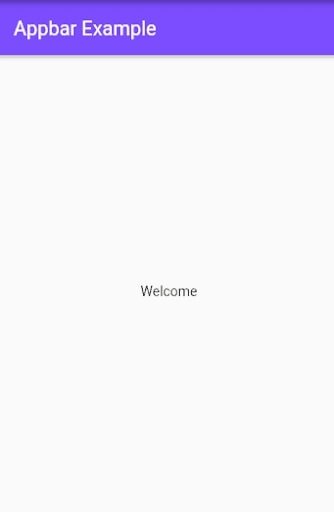
import 'package:flutter/material.dart';const Color darkBlue = Color.fromARGB(255, 18, 32, 47);void main() { runApp(MyApp());}class MyApp extends StatelessWidget { @override Widget build(BuildContext context) { return MaterialApp( theme: ThemeData( primarySwatch: Colors.blue, appBarTheme:const AppBarTheme( iconTheme: IconThemeData(color: Colors.black), color: Colors.deepPurpleAccent, ), ), debugShowCheckedModeBanner: false, home:Scaffold( appBar:AppBar(title : const Text("Appbar Example")), body : const Center( child :Text( "Welcome"),), ), ); }}
Example : (Change color using background color)
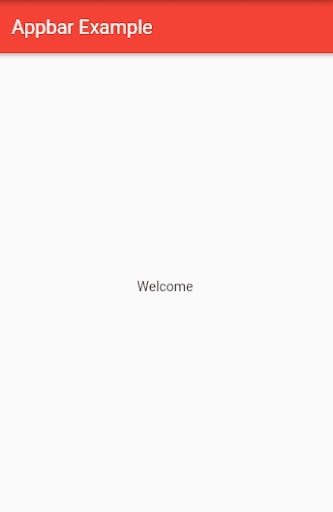
import 'package:flutter/material.dart';const Color darkBlue = Color.fromARGB(255, 18, 32, 47);void main() { runApp(MyApp());}class MyApp extends StatelessWidget { @override Widget build(BuildContext context) { return MaterialApp( debugShowCheckedModeBanner: false, home:Scaffold( appBar:AppBar(title : const Text("Appbar Example"), backgroundColor: Colors.red,), body : const Center( child :Text( "Welcome"),), ), ); }}
Output :

Conclusion
The AppBar is a frequently used component in many different applications by Flutter developers. It is beneficial for incorporating search fields, navigating between pages, or displaying the page title. Flutter has a particular widget that makes using an AppBar easier – the AppBar widget.
In this article, we explored the various ways to change the color of an AppBar in Flutter, such as at the page level or app level, and discussed the many different methods for adding colors.
Frequently Asked Questions (FAQs)
1. How do I change colors in the Flutter app?
Step 1: Find the file where you must put the Text widget.
Step 2: Inside the Text widget, add a style parameter and assign the TextStyle widget.
Step 3: Include a color parameter inside the TextStyle widget and set your favorite color.
2. How do I change the color of an AppBar drawer in Flutter?
Add the icon theme property inside the AppBar widget and assign IconThemeData to alter a drawer icon in Flutter.
3. What are the various types of Appbars available in Flutter?
AppBar’s layout comprised three elements: leading, title, and actions. However, the leading is placed in the leftmost position in AppBar, and the title and actions are in the right corner.
Originally Published At: https://flutteragency.com/change-appbar-color-in-flutter/
