With the launch of our real money version, I want to share a guide on setting up your own real money poker table on Basepoker.
Step 1: Sign up

To get started, sign up using your email, Google, or X.com account. You can also connect your Metamask wallet.
Step 2: Deposit crypto

Go to Cashier to deposit crypto. We currently support USDT only on Ethereum (ERC-20) and Polygon network.
Step 3: Create a table

Once you’ve signed up and logged in, click on the “Create Table” button.
Step 4: Customize your table

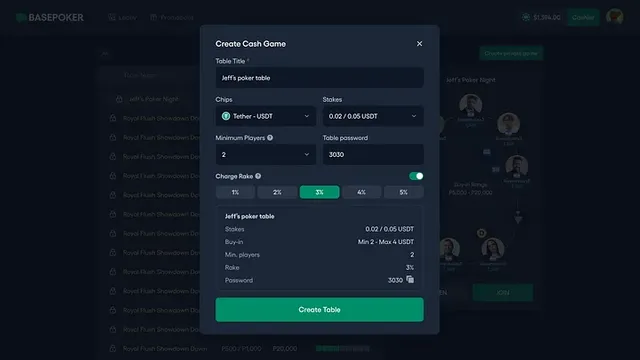
A modal will appear with several options to customize your table:
- Title: Choose a unique name for your table.
- Chips: Choose a currency you’d like to use (We currently support Play money and USDT)
- Stakes: Select the stakes for the game.
- Minimum Players: Specify the minimum number of players needed to start the game.
- Password: Set a 4-digit number that players will use to sit in your table. Note that setting a password is optional.
After filling out all the required fields, click the “Create Table” button. Your table will be created instantly.
Step 5: Buy-in

The host and players must buy in to join the table. The buy-in range is automatically determined based on the selected stakes, typically 50 to 100 times the blinds. For example, with 1/2 USDT stakes, the minimum buy-in would be 5 USDT and the maximum would be 20 USDT.
Step 6: Invite friends

Once your table is set up, you will see an invite link. You can share this link directly with your friends or instruct them to visit the Basepoker lobby, find your table.
That's it! Start the game!

As soon as the minimum number of players join the table, the game will automatically begin. Unlike play money, the host doesn’t need to approve or deny buy-ins. Players can buy-in as many times as they want. Just sit and enjoy the game!
Charge rake (Optional)

The host can charge rakes between 1% to 5% or turn off this feature for a rake-free experience.
For more information, visit our website at Basepoker.com
and join our community for the latest updates and features.