Fail2Ban is a free and open source intrusion prevention software tool written in the Python programming language that can be used to protects servers from different kinds of attacks. Fail2Ban works by continuosly monitoring various logs files (Apache, SSH) and running scripts based on them. Mostly it is used to block IP addresses that are trying to breach the system’s security. It can be used to block any IP address that are trying to make many illegitimate login attempts. Fail2Ban is set up to block malicious IP address within a time limit defined by administrator. Fail2Ban can be configured to send email notifications when someone’s attacking your server. Main purpose of Fail2ban is to scans log files for various services, such as SSH, FTP, SMTP, Apache and block the IP address that makes too many password failures.Here, we will learn how to install and configure Fail2ban to protect SSH and Apache service from brute force login attacks.
System Requirements
- Newly deployed Ubuntu 16.04 server.
- Apache server with basic password authentication configured on your server.
- A static IP address 192.168.15.189 is configured on your server.
Prepare the System for Deployment
Before starting with the Fail2Ban, your system should be up to date and all installed software is running the latest version.First, log in to root user and update your system by running the following command:
apt-get update -yapt-get upgrade -yInstall Fail2Ban
By default Fail2ban is available in Ubuntu 16.04 default package repository. So you can easily install it by just running the following command:
sudo apt-get install fail2banOnce installation is complete, you can proceed to configuring Fail2ban.
Configure Fail2Ban
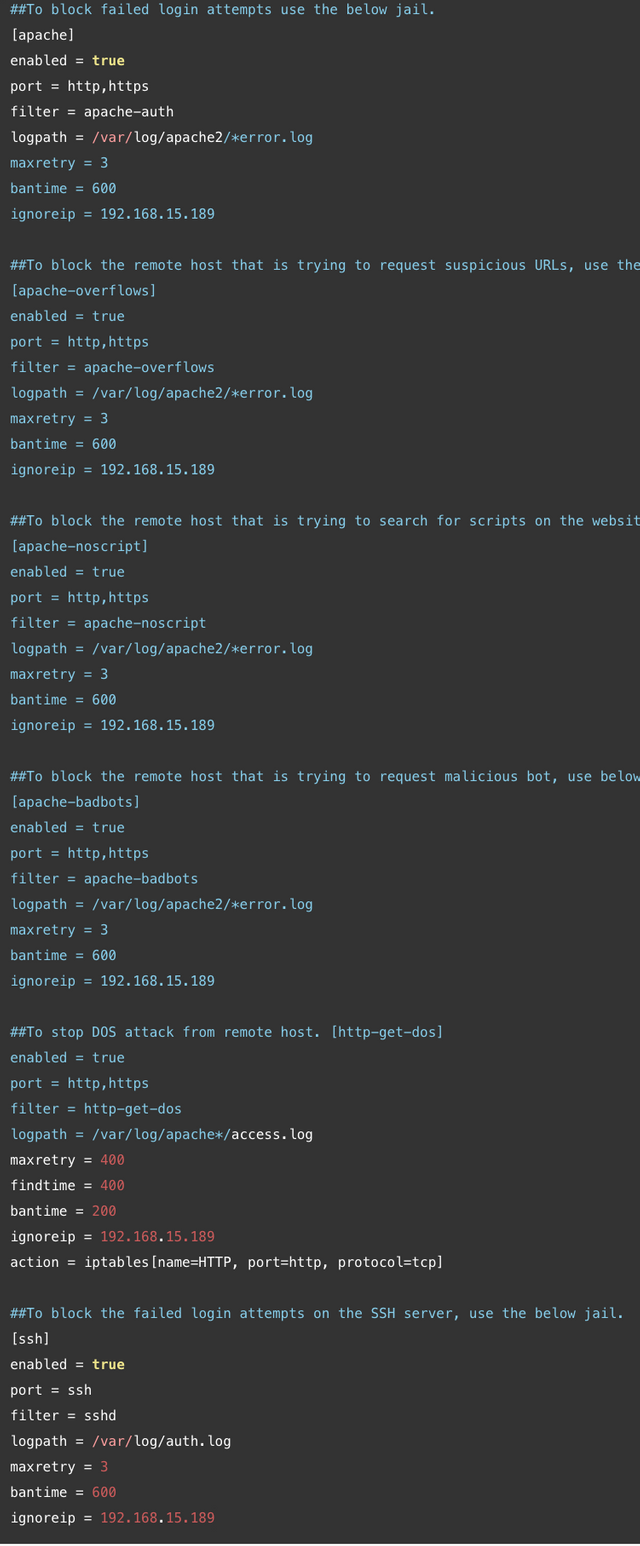
By default Fail2ban keeps all the configuration files in /etc/fail2ban/ directory. The main configuration file is jail.conf, it contains a set of pre-defined filters. It is recommended that you should not modify jail.conf itself, but override it by creating a new configuration file jail.local inside /etc/fail2ban/ directory.So let’s create a new jail.local file for Apache and SSH:
sudo nano /etc/fail2ban/jail.localAdd the following lines:

Save the file when you are finished.
Next, you will also need to create the filter file /etc/fail2ban/filters.d/http-get-dos.conf.
sudo nano /etc/fail2ban/filters.d/http-get-dos.conf
Add the following contents:

Save the file and restart the fail2ban service:
sudo systemctl restart fail2ban
Brief description of each configuration options are here:
logpath :Name of the logfile that fail2ban checks for failed login attempts.
maxretry :Maximum number of failed login attempts before a host is blocked by fail2ban.
bantime :Specifies the number of seconds that a remote host will be blocked by Fail2ban.
findtime :The time period in seconds in which we’re counting “retries”.
ignoreip :This is the list of IP addresses that can not be blocked by Fail2ban.
You can view the rules added by Fail2Ban using the following command:
sudo iptables -L
You should see all the rules as below:

You can also list out all the activated jails by running the following command:
sudo fail2ban-client status
You should see the following output:
Status

|- Number of jail: 5
`- Jail list: apache, apache-overflows, apache-badbots, apache-noscript, http-get-dos, ssh
Test Fail2Ban
Once everything is set up properly, it’s time to test Fail2Ban.Test Fail2Ban for Apache Failed Login AttemptsOn the remote machine, open your web browser and type the URL http://your-apacheserver-ip, you should be asked for authentication. Enter the wrong username and password repeatedly. Once you have reached the failed login limit, you should be blocked and unable to access the Apache web server for 600seconds.On the Fail2Ban server machine, check the banning status of Fail2Ban with the following command:
sudo fail2ban-client status apache
You should see your remote host IP address being blocked by Fail2Ban:

Test Fail2Ban for Apache DOS Attack
You can use ab (Apache Bench-mark tool) to test if it’s really working.
On the remote machine, open your terminal and run the following command:
ab -n 1000 -c 20 http://192.168.15.189/
The above command will send 1000 page-loads in 20 concurrent connections against your web server. When you have reached the limit, you should be blocked for 200 seconds.
On the Fail2Ban server machine, take a look in your /var/log/fail2ban.logfile you should see the following output:
tail -f /var/log/fail2ban.log
Output:
2017-01-31 20:51:08,417 fail2ban.actions: WARNING [http-get-dos] Ban 192.168.15.196
You can also verify fail2ban banning status with the following command:
sudo fail2ban-client status http-get-dos
You should see that your remote host IP address being blocked by Fail2Ban:

Test Fail2Ban for SSH Failed Login Attempts
On the remote machine, open your command line interface and try to ssh to the server IP address:
ssh 192.168.15.189
You should be asked to enter password. Enter the wrong password repeatedly. Once you have reached the failed login limit, you should be blocked for 600seconds.

On the Fail2Ban server machine, check the banning status of Fail2Ban with the following command:
sudo fail2ban-client status ssh
You should see that your remote host IP address being blocked by Fail2Ban:

If you want to unban the IP address of the remote host before the banning time limit expires, then run the following command on the server machine:
sudo fail2ban-client set ssh unbanip 192.168.15.196
sudo fail2ban-client set apache unbanip 192.168.15.196
Where, 192.168.15.196is the IP address of the remote machine.
a perfect explanation . fails2ban is easy to install but I find the explanation with d-dos attack perfect
thanks to the author Rapid7
source of the contribution : https://blog.rapid7.com/2017/02/13/how-to-protect-ssh-and-apache-using-fail2ban-on-ubuntu-linux/
Hi! I am a robot. I just upvoted you! I found similar content that readers might be interested in:
https://blog.rapid7.com/2017/02/13/how-to-protect-ssh-and-apache-using-fail2ban-on-ubuntu-linux/
Downvoting a post can decrease pending rewards and make it less visible. Common reasons:
Submit
yes, the author has explained it super. the source of the article is included in the article.
Downvoting a post can decrease pending rewards and make it less visible. Common reasons:
Submit