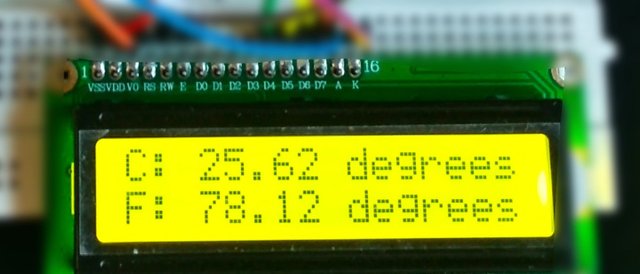
This is rather one of the simple Arduino project that is good to have in your house. But, before we proceed to the main part of this tutorial, let's define and know first what thermometer really is and what help it can give to us humans and our environment.
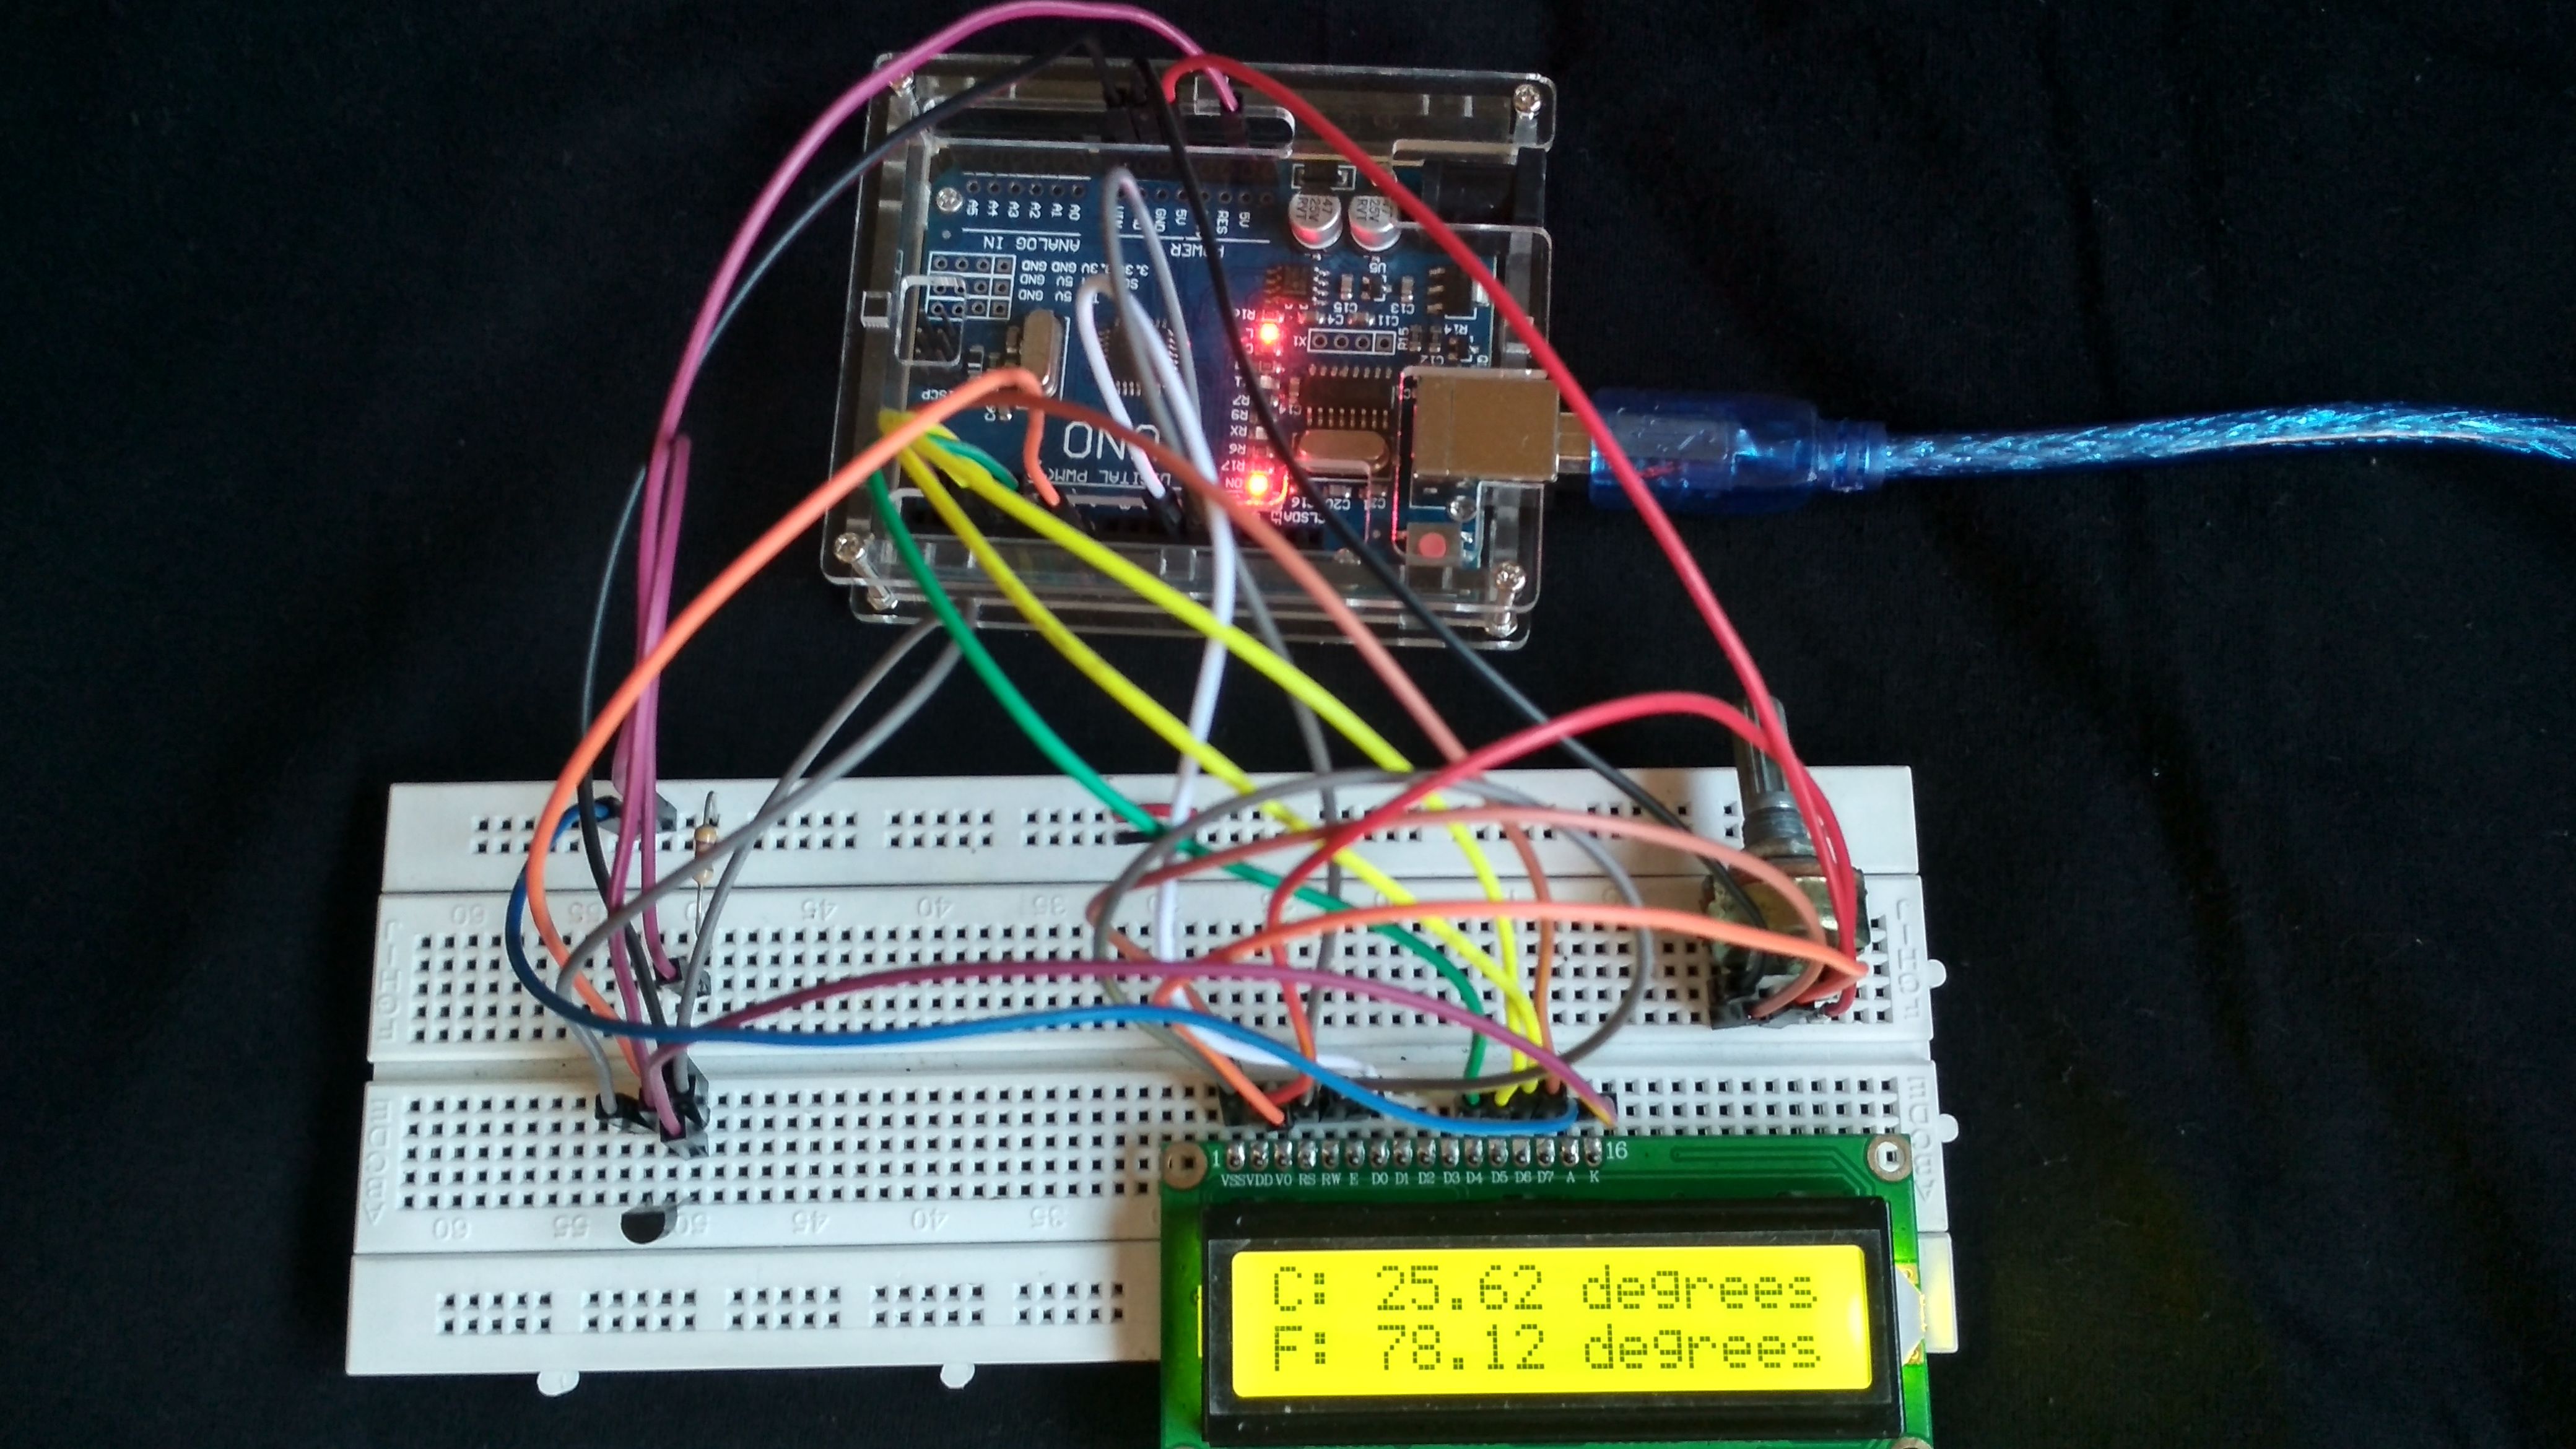
⚡ Short Summary (Picture of the final output)
✍ Objectives :
✔ To understand what is thermometer.
✔ To know the materials/components and softwares used in this project.
✔ To describe or define each of the materials/components used.
✔ To know the circuit connections in making this project using Fritzing and Arduino.
✔ The Arduino codes used.
✔ To show to you the final output(with videos) for us to understand well how this project works.
⚡ What is thermometer?
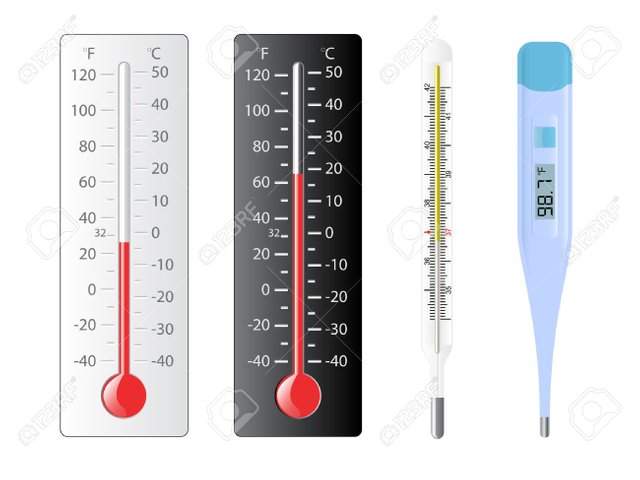
thermometer is an instrument for measuring temperature, often a sealed glass tube that contains a column of liquid, as mercury, that expands and contracts, or rises and falls, with temperature changes, the temperature being read where the top of the column coincides with a calibrated scale marked on the tube or its frame.
We cannot measure the temperature by touching only. Our sense of touch only helps us determine whether the object is hot or cold, but it can't really measure its temperature. We need a certain device that can measure temperature accurately, and this device is called thermometer. 🌡
Thermometers are very important in our daily lives. Why? Simply because through this device, we will be able to know our body temperature if it's normal or not. The normal body temperature of a healthy person is 37ºC and it's important for us to maintain that.
There are many important applications that thermometer has to offer. These includes the measuring of weather temperature, instant temperature reading of foods, liquids and semi-solid samples, indoor and outdoor temperature measurement, maintaining precise temperatures in storage rooms, laboratories, incubators, etc.
All health care professionals use thermometers. All health care facilities use thermometers. Most homes also have thermometers. It is basically one of the important device to have.
⚡ Materials/Components used
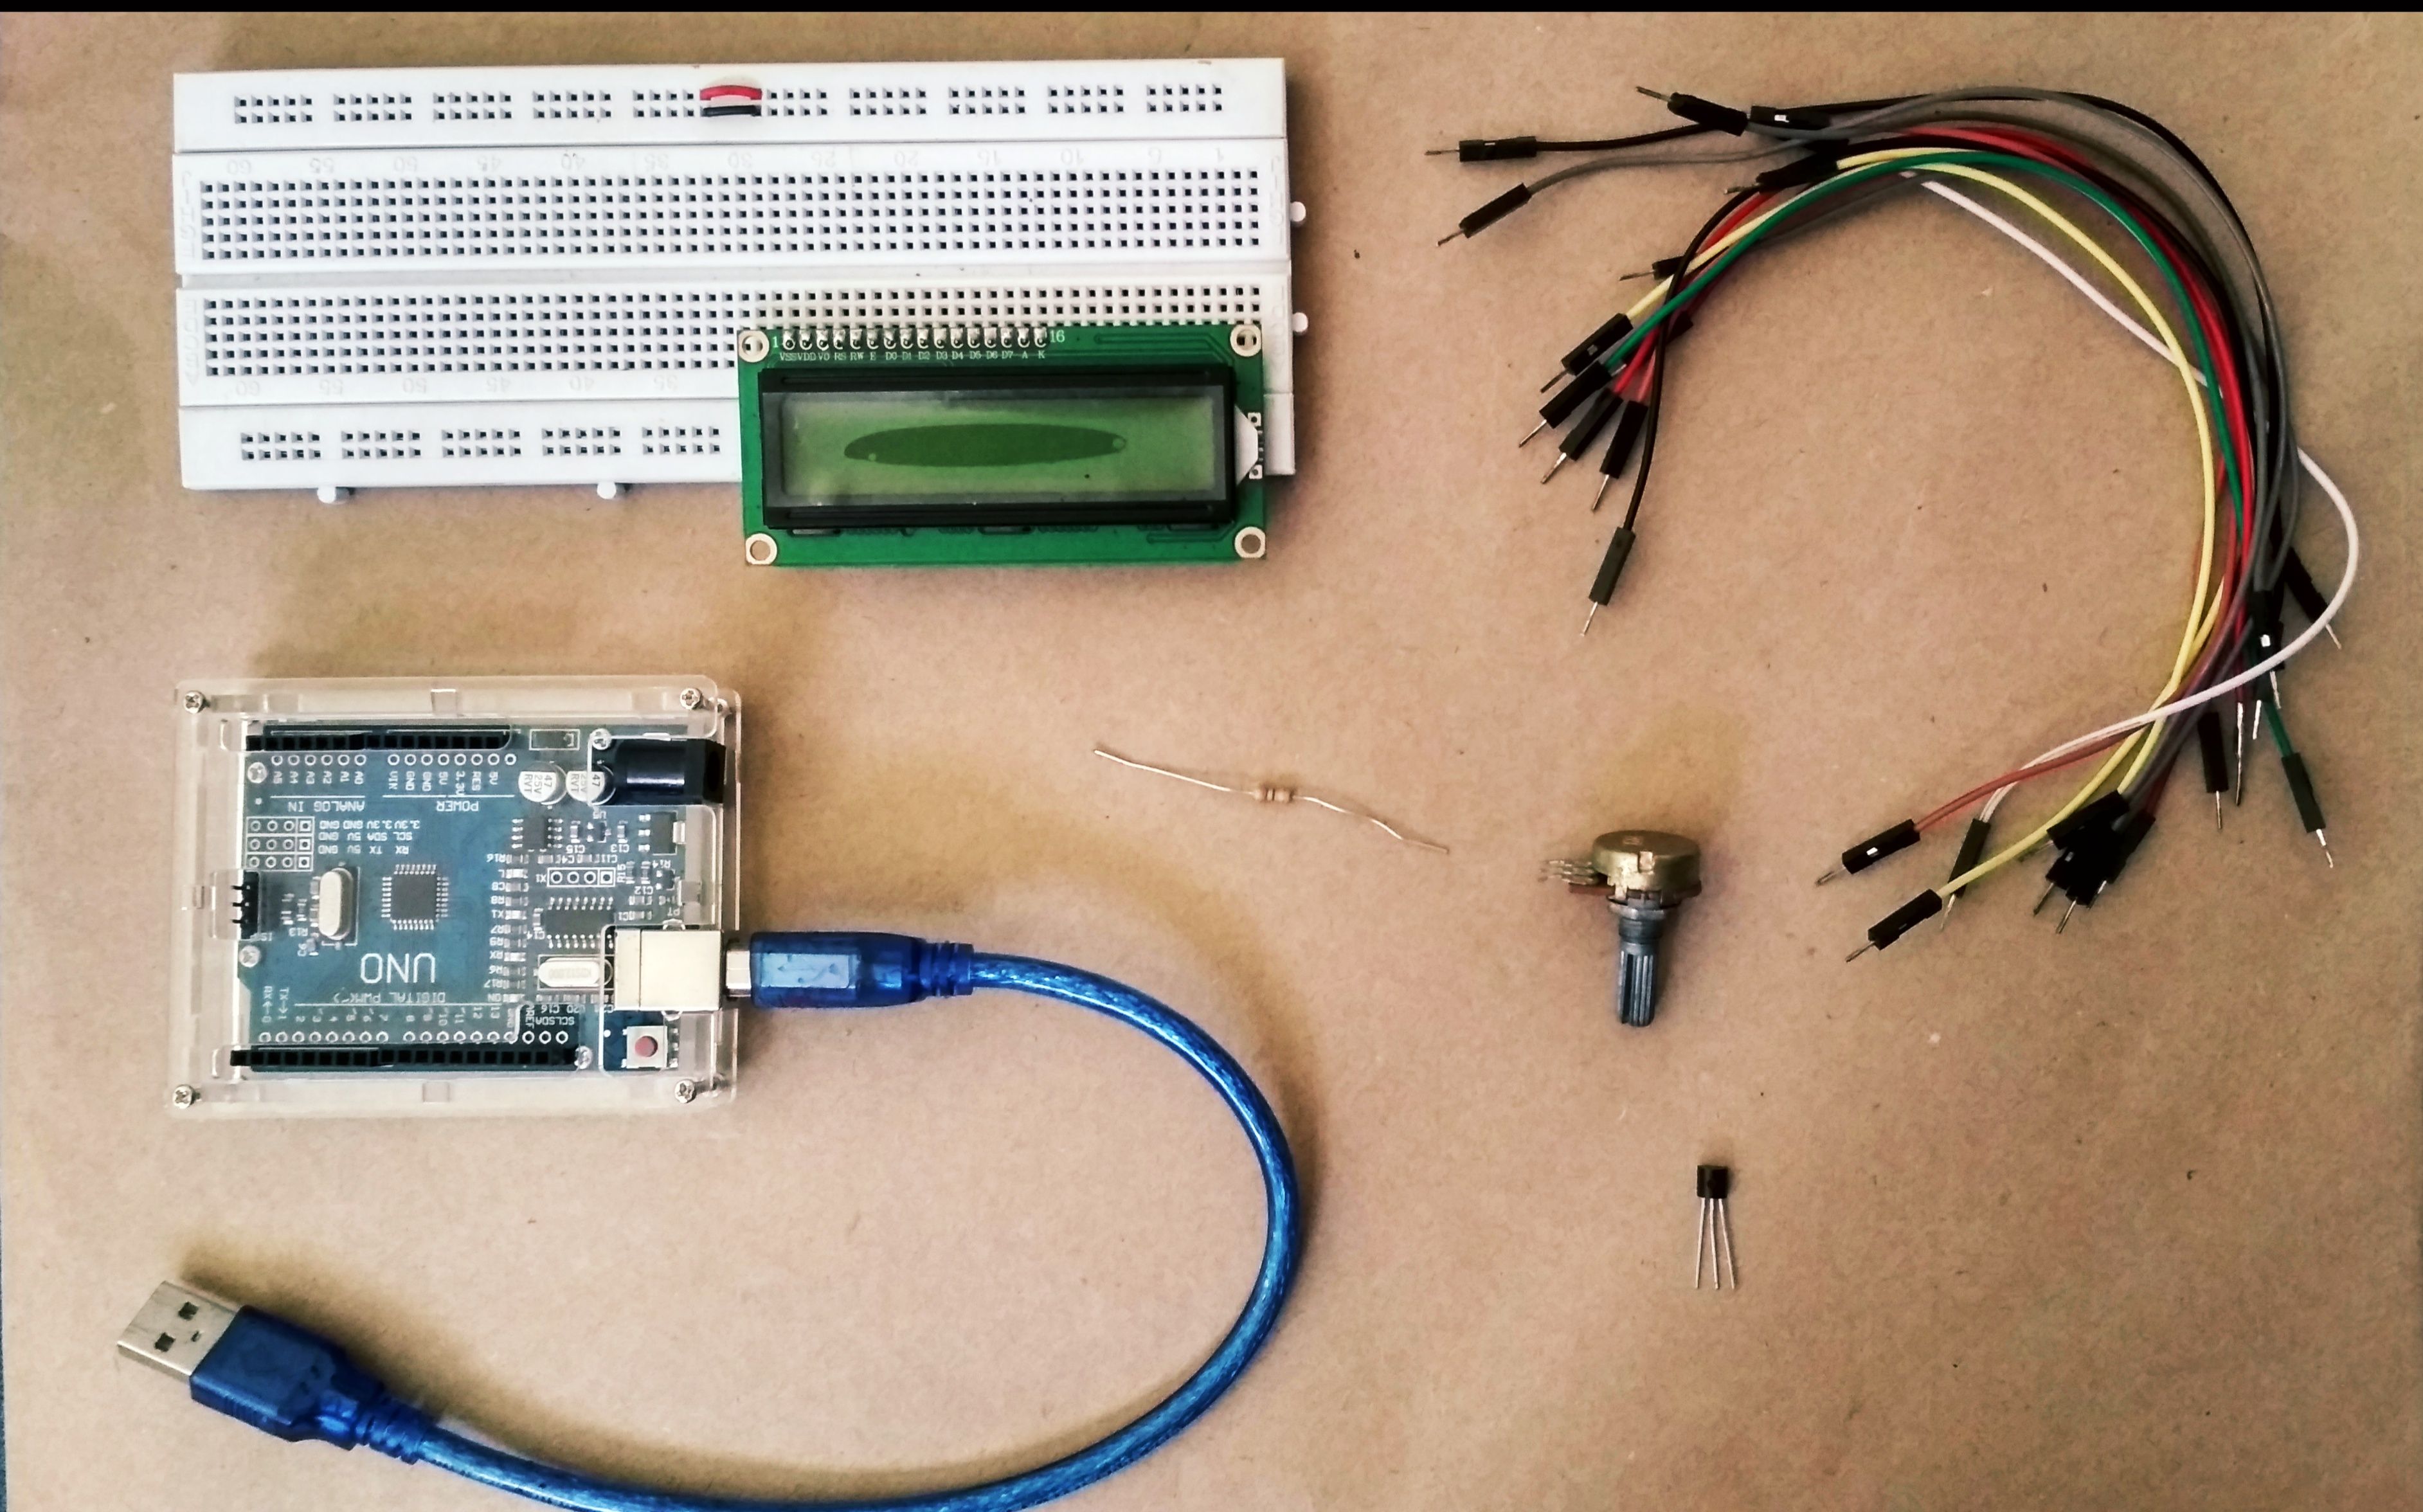
♦ Arduino Uno
♦ LCD (16x2)
♦ Temperature Sensor (DS18B20)
♦ Breadboard (for circuit testing)
♦ Potentiometer (100kΩ)
♦ Resistor (1pc. - 4.7kΩ)
♦ Jumper Wires (male to male)
⚡ Softwares used
♦ Fritzing
♦ Arduino - download here
⚡ Description of each materials/components
Arduino ➜ is an open source computer hardware and software company, project, and user community that designs and manufactures single-board microcontrollers and microcontroller kits for building digital devices and interactive objects that can sense and control objects in the physical world.
LCD ➜ Stands for "Liquid Crystal Display." LCD is a flat panel display technology commonly used in TVs and computer monitors. It is also used in screens for mobile devices, such as laptops, tablets, and smartphones.
Temperature Sensor ➜ measure the amount of heat energy or even coldness that is generated by an object or system, allowing us to “sense” or detect any physical change to that temperature producing either an analogue or digital output.
Breadboard ➜ is a solderless device for temporary prototype with electronics and test circuit designs.
Potentiometer ➜ is a three-terminal resistor with a sliding or rotating contact that forms an adjustable voltage divider. If only two terminals are used, one end and the wiper, it acts as a variable resistor or rheostat.
Resistors ➜ is a passive two-terminal electrical component that reduces current flow, adjust signal levels, to divide voltages, bias active elements, and terminate transmission lines, among other uses.
Jumper Wires ➜ are cables with connector pin at both end. They make components easier to connect.
♦ Pin Diagram of the 16x2 LCD
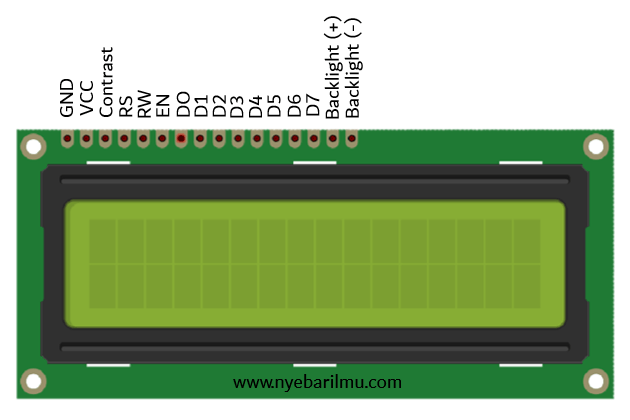
♦ Pin Description:
| Pin no. | Name | Function |
|---|---|---|
| 1 | Ground | Ground (0V) |
| 2 | Vcc | Supply voltage (5V) |
| 3 | VEE | Contrast adjustment using a variable resistor |
| 4 | Register select | Selects data register when high, and command register when low |
| 5 | Read/write | Read from the register when high, and write to the register when low |
| 6 | Enable | When a high to low pulse is given, it sends data to the data pins |
| 7-14 | D0-D7 | 8-bit data pins |
| 15 | Backlight Vcc (5V) | Led (Anode) |
| 16 | Backlight Ground (0V) | Led (Cathode) |
⚡ Circuit Connections
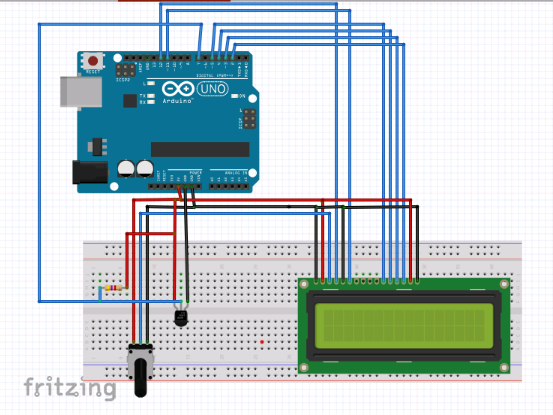
♦ Explanation
First, we will connect the 16X2 LCD to the Arduino Uno as follows :
- Connect the GND, RS, and Backlight (-) pins of the 16x2 LCD to the GND of the Arduino.
- Connect the Vcc and Backlight (+) pin of 16x2 LCD to the 5V output pin of the Arduino.
- Connect the RS and Enable pin of 16x2 LCD to Pin 12 and Pin 11 of the Arduino
- Connect the D4, D5, D6, D7 pins of 16x2 LCD to Pins 5, 4, 3, 2 of the Arduino.
- Connect the Contrast pin of the 16x2 LCD to the middle pin of the potentiometer.
- Connect other two pins of the potentiometer to the Vcc and GND.
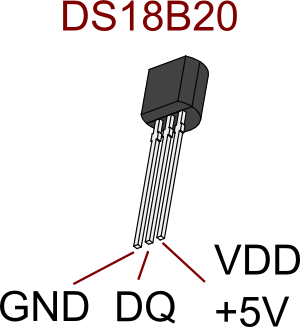
Here is the guide on how to connect the sensor to the Arduino:
- Connect left pin of DS18B20 to GND of Arduino.
- Connect right pin of DS18B20 to 5V output of Arduino.
- Connect middle pin of DS18B20 to Pin 7 of Arduino.
- Connect a 4.7KΩ resistor from middle pin of DS18B20 to 5V as pull up.
⚡ Arduino Codes
#include <OneWire.h>

#include <LiquidCrystal.h>
#include <DallasTemperature.h>

#define ONE_WIRE_BUS 7

OneWire oneWire(ONE_WIRE_BUS);

DallasTemperature sensors(&oneWire);

float tempC = 0;
float tempF = 0;

LiquidCrystal lcd(12,11,5,4,3,2);

void setup() {
  sensors.begin();
  lcd.begin(16,2);
  lcd.clear();
  pinMode(3, OUTPUT);
  analogWrite(3, 0);
  Serial.begin(9600);

}

void loop() {
  sensors.requestTemperatures();
  tempC = sensors.getTempCByIndex(0);
  tempF = sensors.toFahrenheit(tempC);
  delay(1000);

  Serial.println(tempC);
  lcd.setCursor(0,0);
  lcd.print("C: ");
  lcd.print(tempC);
  lcd.print(" degrees");
  lcd.setCursor(0,1);
  lcd.print("F: ");
  lcd.print(tempF);
  lcd.print(" degrees");
}
Before uploading this code to your Arduino, you need to manually add first the following libraries to Arduino IDE as it is not included by default.
Here are the steps for that :
- Download libraries
- Open Arduino IDE
- Go to Sketch ➣ Include Library ➣ Add .ZIP Library
- Then, select the downloaded ZIP file and press open.
⚡ Final Output (with videos)
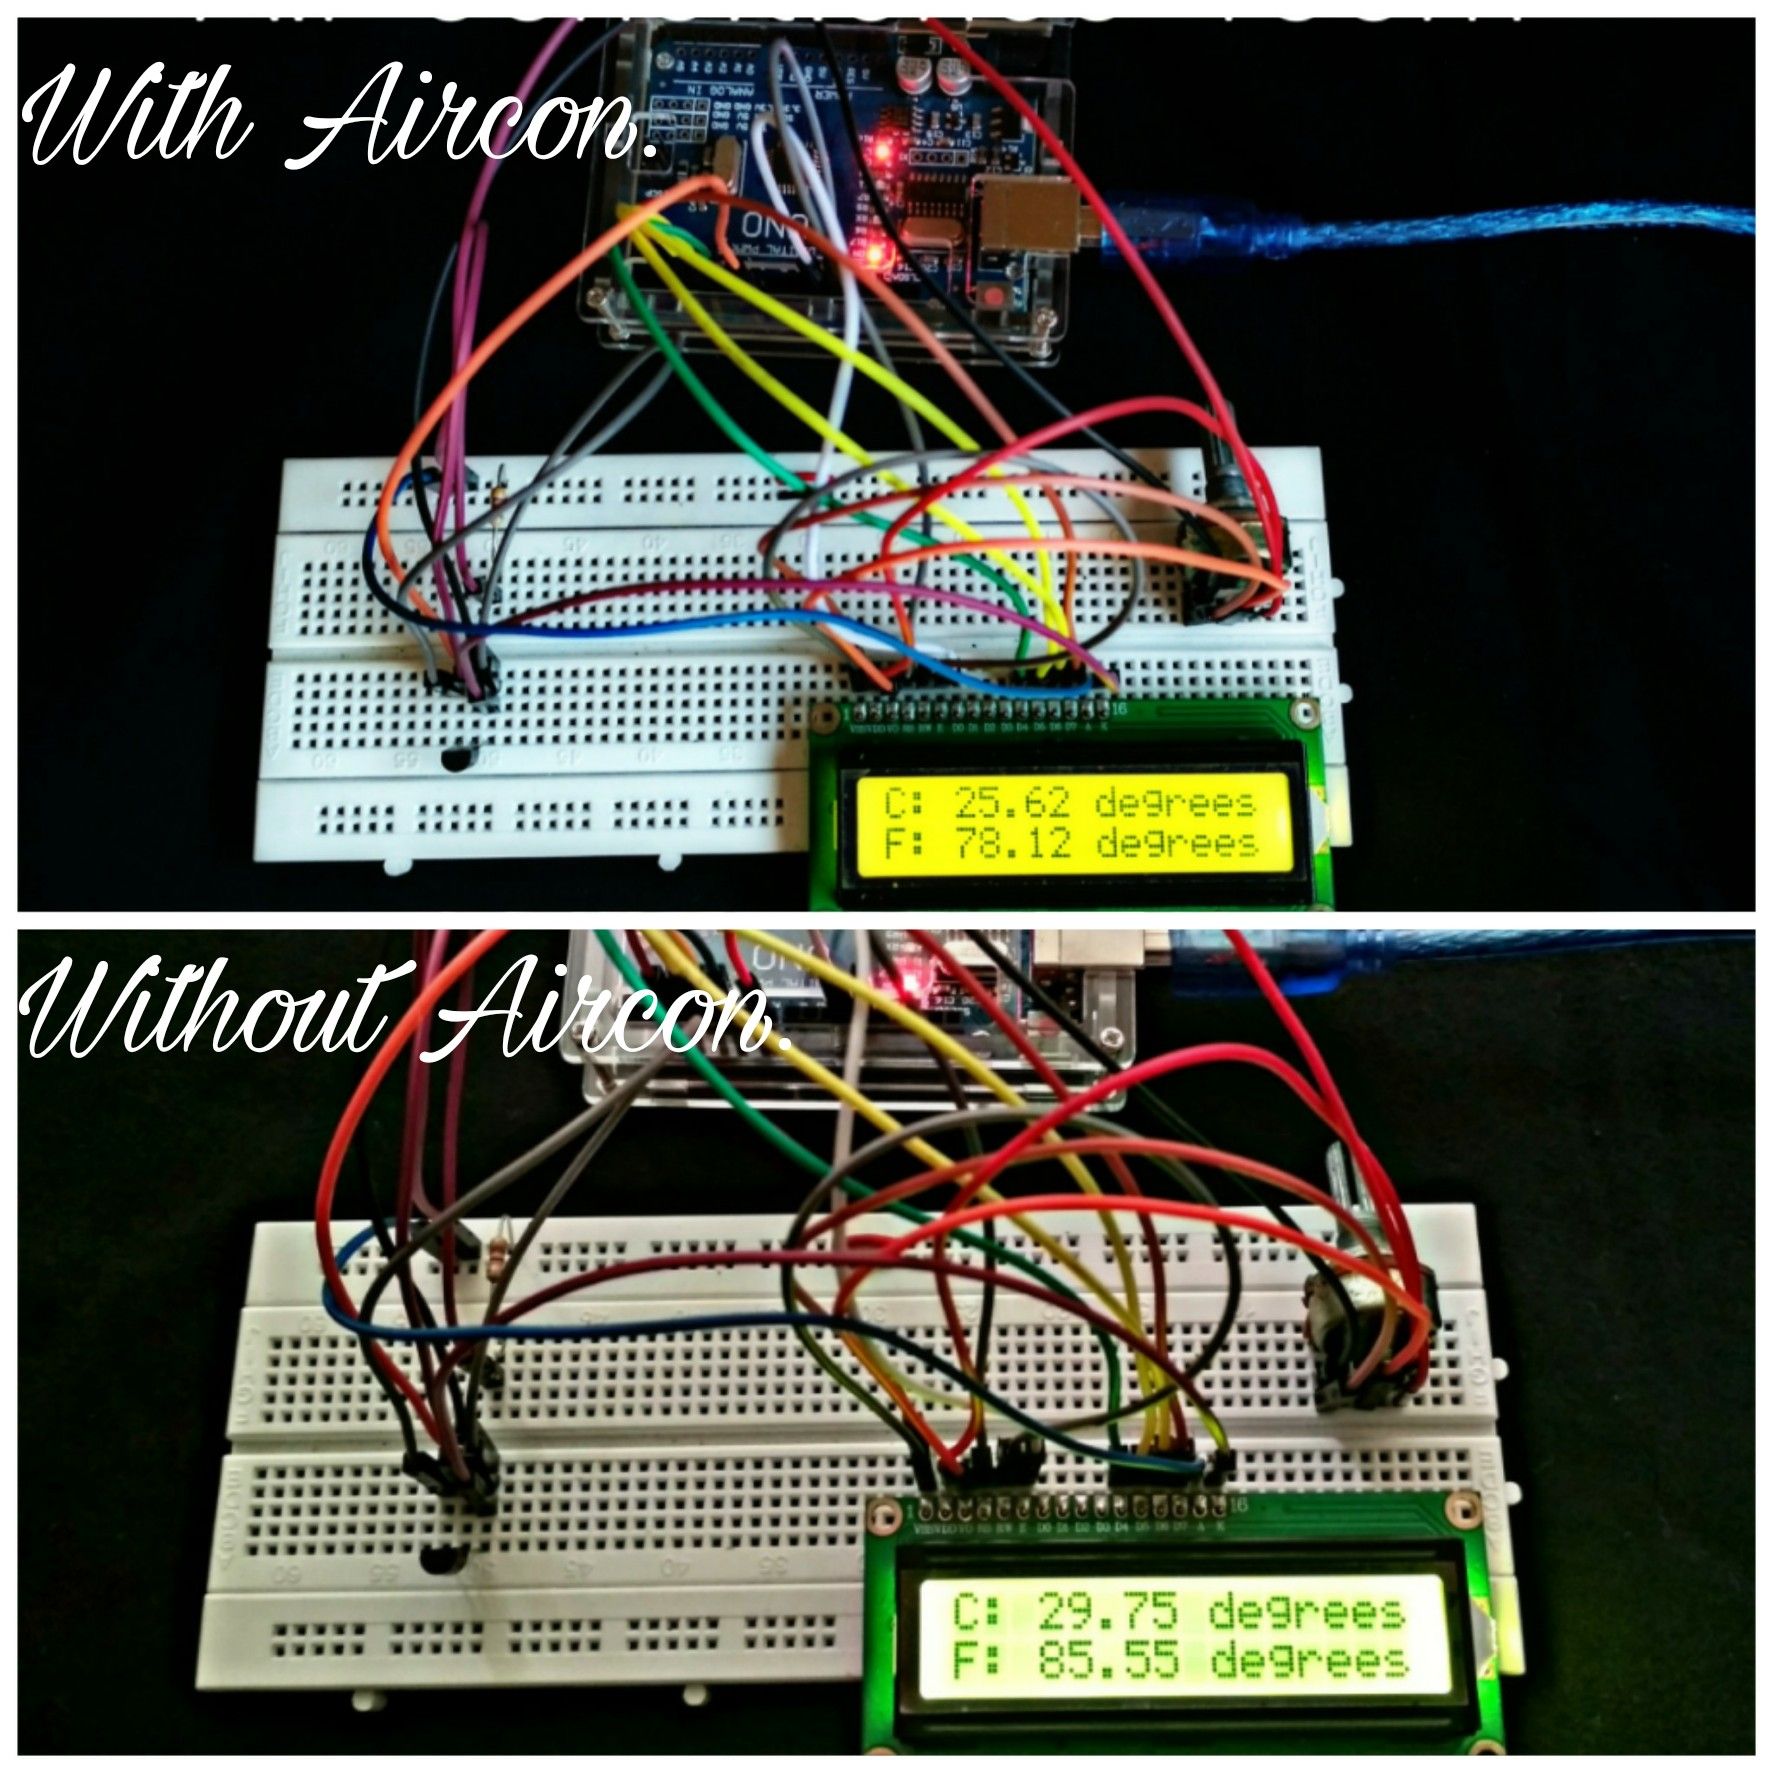
This was the result when I compared the temperature of two rooms. As you can see, each room hast its designated temperature. The air-conditioned room has around 25.62°C and the other room without air-conditioning has around 29.75°C.
♦ 1st Video: Adjusting the contrast of the LCD
♦ 2nd Video: Performance testing
⚡ Purpose of this post
The main purpose of this post is of course to share my little learnings about some Arduino projects and help my fellow steemians specially those who really loves electronics to know the steps and procedures in making this kind of project. Knowing this would surely improve your knowledge about arduino. Why? because this is one of the starting point in learning about Arduino deeply.
Hope you all appreciate my effort and would gain much learnings from this. 😊
Sincerely Yours,
@ruelx

Most of the people especially those who are not in the field of electronics would think of human temperature measurement upon hearing of a thermometer. Arduino temperature measurement mostly applies to industrial, automation and robotics applications. Great job my friend!
Downvoting a post can decrease pending rewards and make it less visible. Common reasons:
Submit
Thank you so much @elkusenero.
Downvoting a post can decrease pending rewards and make it less visible. Common reasons:
Submit
hey rulex , love the way you have organized the article flow.
Sensitivity will always be a issue with these sensors , but your code is simple to follow , also why dont you tr use raspberry pi for future projects , it will be fun.
Downvoting a post can decrease pending rewards and make it less visible. Common reasons:
Submit
Thanks a lot @theversatileguy. For appreciating my work. I'm planning also to move on with raspberry pi but I'll try first some Arduino projects for preparation.
Downvoting a post can decrease pending rewards and make it less visible. Common reasons:
Submit
Yea you can make progress slowly , also consider node mcu or esp8266 , you can do amazing stuff with that (iot).
Downvoting a post can decrease pending rewards and make it less visible. Common reasons:
Submit
Noted @theversatileguy. I'll keep that in mind. Thanks
Downvoting a post can decrease pending rewards and make it less visible. Common reasons:
Submit
Oh God yes! I want to make a digitizing card for the acquisition and multivariate analysis of electrophysiological data using this kind of technology but based on this post I think it`ll take YEARS for me to be able to master all the necessary information... Good works guys!
Downvoting a post can decrease pending rewards and make it less visible. Common reasons:
Submit
If there is a will there is a way. You can do it man , go ahead.
Downvoting a post can decrease pending rewards and make it less visible. Common reasons:
Submit
Thanks @khrisaeroth. Yeah I agree with @theversatileguy. You can do it!!
Downvoting a post can decrease pending rewards and make it less visible. Common reasons:
Submit
Congratulations @ruelx!
Your post was mentioned in the Steemit Hit Parade for newcomers in the following category:
I also upvoted your post to increase its reward
If you like my work to promote newcomers and give them more visibility on Steemit, feel free to vote for my witness! You can do it here or use SteemConnect
Downvoting a post can decrease pending rewards and make it less visible. Common reasons:
Submit
wow. Thank you so much @arcange. I'll be sure to check that out 👍
Downvoting a post can decrease pending rewards and make it less visible. Common reasons:
Submit
You got a 2.21% upvote from @allaz courtesy of @ruelx!
Downvoting a post can decrease pending rewards and make it less visible. Common reasons:
Submit
As a follower of @followforupvotes this post has been randomly selected and upvoted! Enjoy your upvote and have a great day!
Downvoting a post can decrease pending rewards and make it less visible. Common reasons:
Submit
Thank you so much @followforupvotes.
Downvoting a post can decrease pending rewards and make it less visible. Common reasons:
Submit
Just what I've been looking for. Thanks for a great article.
Downvoting a post can decrease pending rewards and make it less visible. Common reasons:
Submit
Congratulations! This post has been upvoted by SteemMakers. We are a community based project that aims to support makers and DIYers on the blockchain in every way possible. Find out more about us on our website: www.steemmakers.com.
If you like our work, please consider upvoting this comment to support the growth of our community. Thank you.
Downvoting a post can decrease pending rewards and make it less visible. Common reasons:
Submit