Planting out Guide
Autumn is a great time to plant out. The adequate rainfall and, consequently soil moisture levels at this time of year are perfect for the newly establishing plant roots. Although it may be cold above ground, the warmer soil temperatures make it possible for plant root growth to continue for longer and settle in before the spring growth bonanza.
Here's a step by step guide to planting out including a few things to consider before and after planting.
A few things to consider before planting
The best time to plant is when the soil is moist after a rain. If the soil is very wet, treading can cause compaction so avoid working on very wet soils particularly if you have clay.
In choosing the position for your plant bear in mind the light, fertility, water, temperature, space and community needs of the organism.
Consider the maximum size of the plant and how it will relate to the surroundings of the position you have chosen.
For plants that require cross pollination or are dioecious you will need to consider the pollination needs and make sure you have a pollinator in the vicinity.
If you are planting bare rooted plants ensure that the roots are not exposed to direct sunlight for too long and that they do not dry out.
Soak your plant roots well before planting. I have had no problems leaving the bare rooted plants submerged in water for up to 12 hrs. Cover so that sunlight cannot harm the roots when in the water.
Planting instructions
Dig your hole sufficiently big to allow some space around the root ball or roots i.e do not cram the plant into a small hole. Twice the diameter of your pot is adequate.
When digging, separate the top soil and sub soil layers. This is best achieved by placing two boards or tarps next to your hole. Dig the top soil out and pile it on one board/tarp, now dig the subsoil out and pile it on the second board/tarp.
Make sure the bottom and sides of your hole are not compacted from digging. If there are any smeared surfaces, scrap them loose with a fork. This ensures easier access into the soil for the establishing roots as well as providing good drainage and air spaces.
Water the empty hole well and allow time for the water to drain away. If your plant is in a container then rough up the sides of the root ball. The purpose of this is to ensure the fine roots make good contact with the soil when you infill the planting hole.
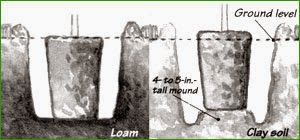
Due to the fast draining sandy loam I normally work with I plant a little lower than ground level to provide a dish for water to collect in. If you have poor draining soil (heavy clay) in an area of high rainfall and/or a high water table then you should consider planting higher then ground level.

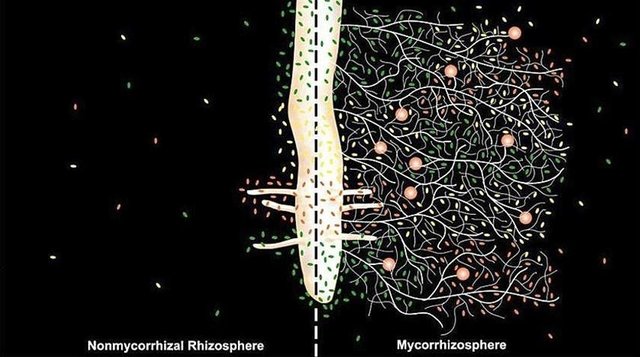
If your planting site has a history of intensive application of fungicides you should re-establish the Mycorrhizal community. Mycorrhizas are symbiotic relationships between fungi and plant roots (the term means literally 'fungus root'). They are very common on crop plants as well as in wild plant communities, and in several cases they have been shown to be important or even essential for plant performance. The fungus obtains at least some of its sugars from the plant, while the plant benefits from the efficient uptake of mineral nutrients (or water) by the fungal hyphae. You can reestablish the Mycorrhizal community by simply adding half a spade full of soil from a healthy soil ecosystem nearby which should contain many of the beneficial fungal organisms. Mix the healthy soil with your pile of top soil.

Picture shows how the plant can draw upon a much larger pool of soil resources with the assistance of mycorrhizal fungi
Back fill the hole with the sub soil first, pack the soil in firmly around the roots or root ball and then add the top soil, again tampering the soil firmly to ensure good contact is made between soil and roots. The idea behind keeping the soil layers in order is to create minimum disturbance to the existing soil ecology. It may just look like plain earth but there are a myriad of organisms at work in there.
You can remove surrounding vegetation to approx 50cm radius of the plant stem so you end up with a circle of bare earth approx 1m diameter with your plant in the centre. If your plant is small then you can make this area smaller.
Imagine which way the water would flow across the land surrounding your plant and pile up the organic matter you have scrapped away from the surface along with any left over soil to create a barrier that will block the water from moving away from the plant. You want to keep the water around the plant where it can drain into the soil slowly and soak through to the roots below ground. It may be that on flat ground you need a barrier surrounding the plant creating a dish in which the water fills. If you have a low water table, lots of rain in your area and poor draining clay soil then this is not advisable.

Water the plant again applying more water then you think you will need and watch to see how well the water stays around the plant root zone. If you see the water escaping make some amendments to your barrier.
Once the plant is watered apply mature compost, approx 2-3 cm deep, covering the bare earth and place wet card board sheets or old clothing or cloth over the compost. If more than one piece of cardboard is needed overlap the cardboard so there are no gaps. This layer provides a barrier to prevent weed seeds in the soil from germinating and will decompose to add extra fertility to the soil. You can also use proprietary organic mulch mats, i've heard they last a few seasons.
Cover the cardboard/cloth/mulch with a further 3cm of well matured compost and then cover this with a 10cm layer of straw mulch (or other seedless mulch).
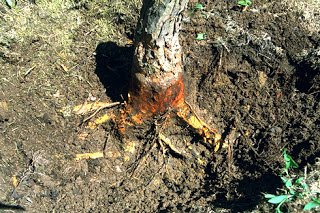
If trees are planted too deep or too much mulch is placed around the base of the tree, the constant moisture against the bark will create a condition called collar rot. Once the protective bark has rotted away, insects, micro organisms and fungi can easily enter the tree and begin to damage the plant. Make sure that the soil and mulch layers are not in direct contact with the bark around the base of the stem (the collar). Be sure to clear away the mulch and compost from that area so that you end up with a visible gap of at least 5 cm between stem and soil. You should check this every so often as the mulch usually makes its way back around the collar.

Collar Rot in a Apple Tree from - http://www.appleman.ca/korchard/treerots.htm
Aftercare considerations
If planted in Autumn it is likely that your new plants will not need watering until the mid spring. Keep an eye on your plant and water if you see/feel the soil below the mulch is dry. Its important to keep the plant from drying out in the first few years so plan time to monitor. 90% of all problems with newly-planted trees are because the steward didn't water them.
If planting a tree whip, according to some reports and contrary to popular belief, staking is not necessary. It is claimed to be counter productive and discourages a young tree from forming strong and secure anchor roots. Large container trees will however need staking.
Tree barriers are recommended to prevent herbivores committing planticide and according to the manufactures have many other purported benefits ;) I have never used these so cannot comment.
Check your plant from time to time and make sure the mulch has not made its way back around the stem collar. Keep the area weed free for a few years by topping up the cardboard and if you have planted a tree with high nutrient demands apply extra compost the following autumn.
Finally, enjoy your plant.