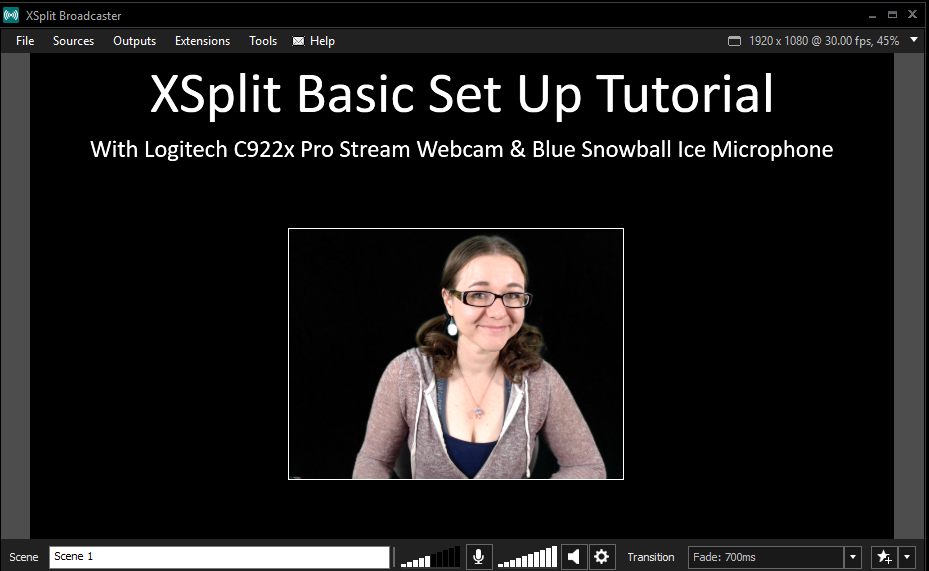
Greetings, Steemians!
This shall be my first tutorial on Steemit!
Amusingly, I'm the blind leading the blind. 👀 We (hubs and I @chrisroberts) just upgraded our computer and studio set up. (Woohoo!) I've been setting up and learning how to use everything.
Below you'll find screenshots and explanations on pretty much everything you'll need to get started on XSplit. Hope it helps!
✮✮✮✮✮✮✮✮✮✮✮✮✮
To begin (if you haven't already) launch XSplit. Once in you'll be looking at this:
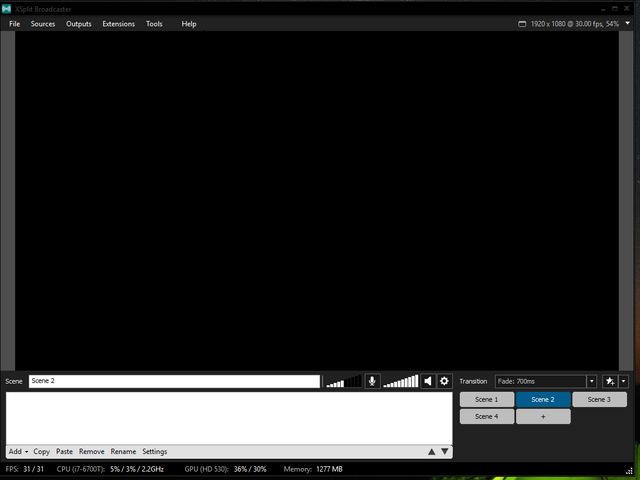
First things first. I need to connect my Blue Snowball Ice Mic and speakers. If you are only using the Logitech C922x (or another webcam) skip this step. Note: The mic on the C922x works pretty great.
At the top you will need to go to
TOOLS👉SETTINGS:
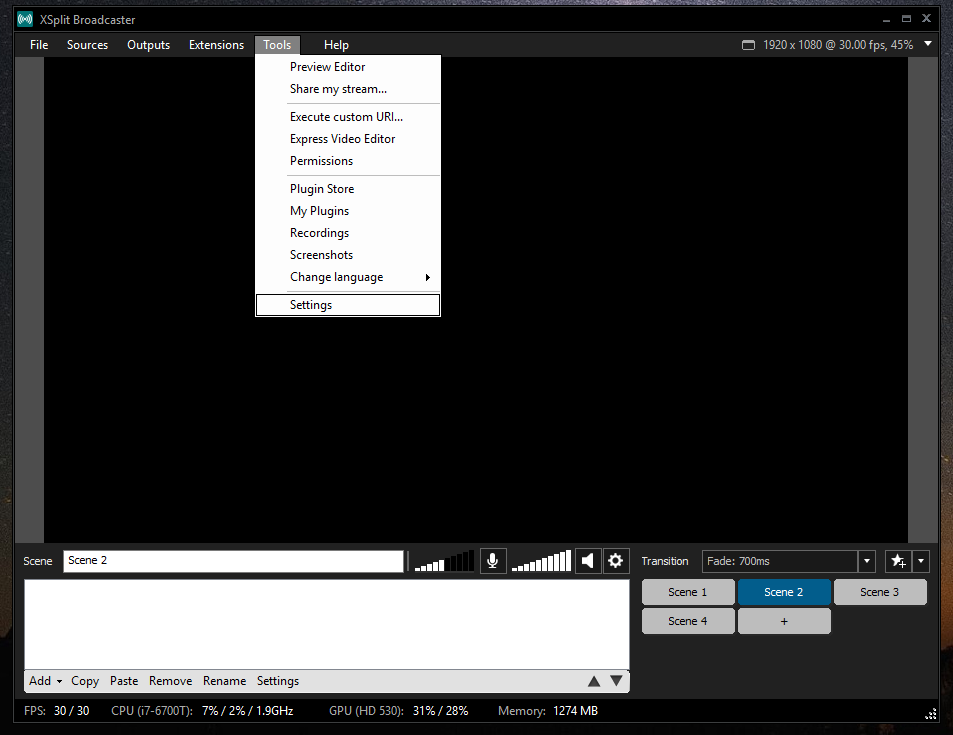
Then under General Settings switch to the 👉AUDIO tab. Here you can change the Sound System and Microphone.
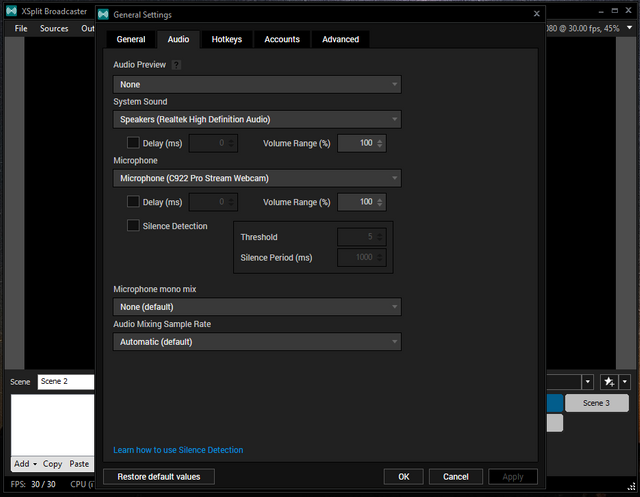
Use the drop down menu to choose.
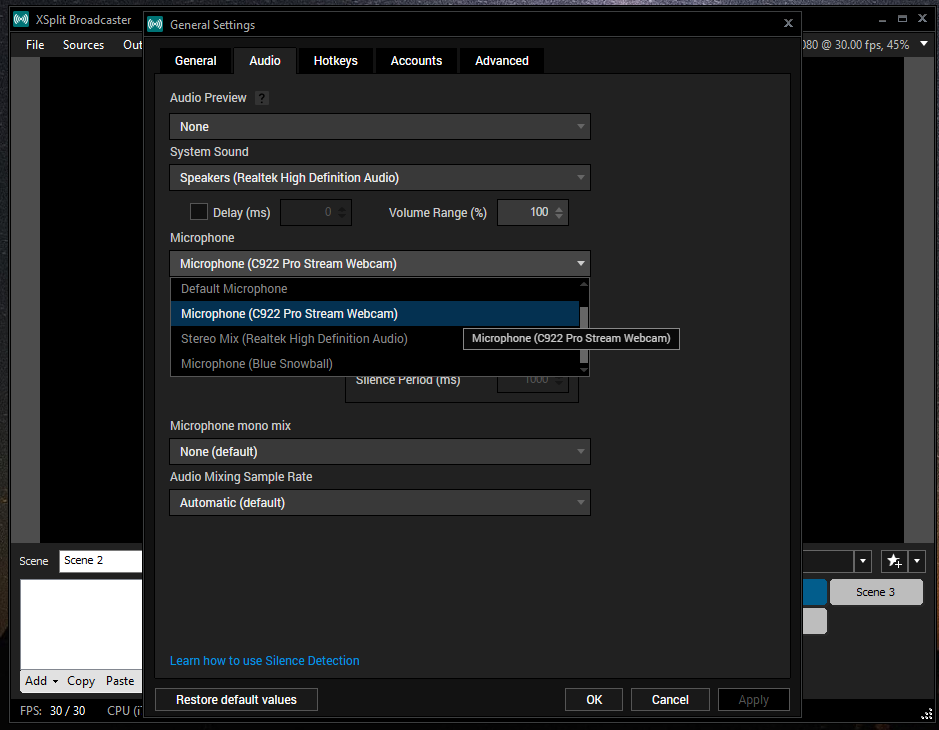
Next step, while still in General Settings switch to the next tab 👉HOTKEYS.
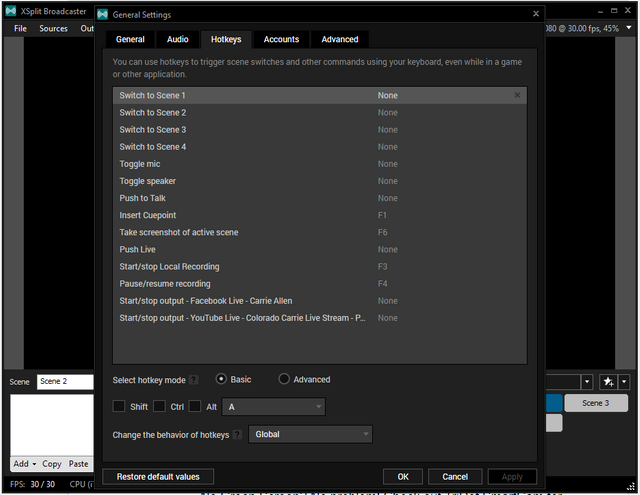
To assign your HOTKEYS simple click on one and choose your key in the drop down menu near the bottom. You can pretty much set up any key, including using Shift, Alt and Cntrl.
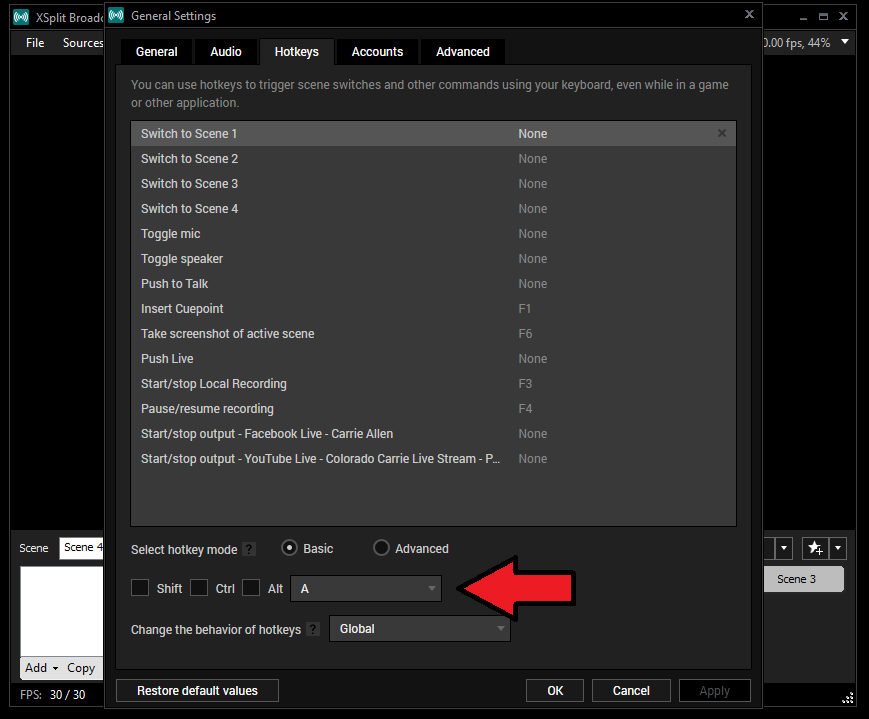
💫Time to set up your streaming services. 💫
At the top go to OUTPUTS 👉Set up a new Output.
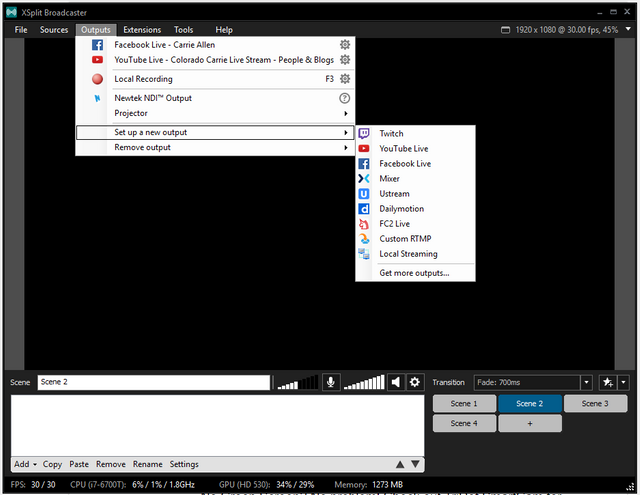
As you can see, they are all right there for ya. Once you click in they are pretty self-explanitory and easy to set up.
To find a list of your accounts you've already connected go to
TOOLS👉SETTINGS👉ACCOUNTS:
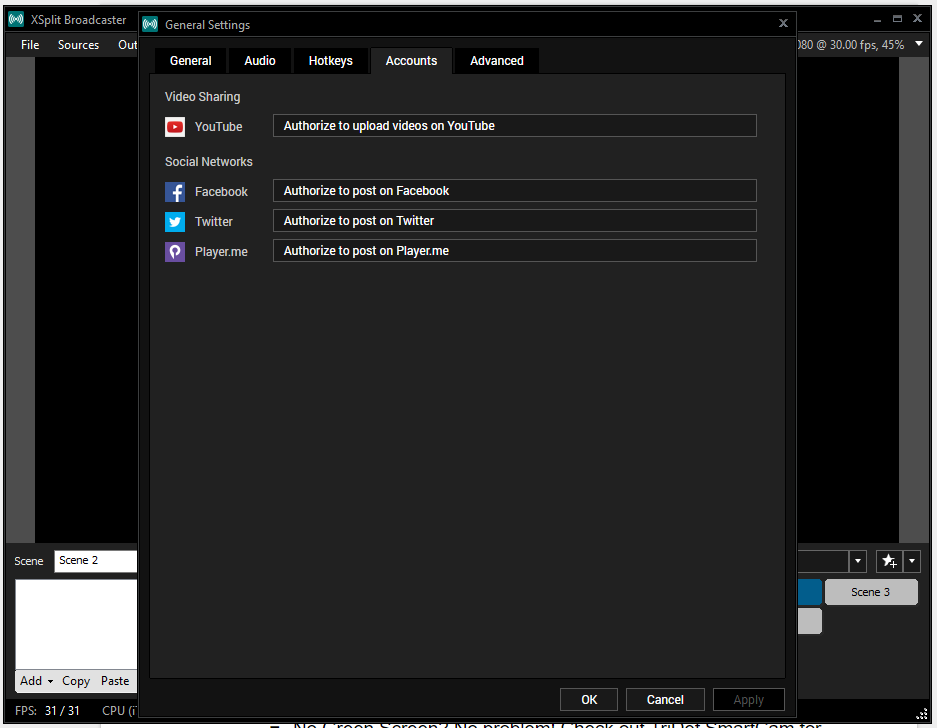
Finally, some fun stuff!
😁Let's get my face up there!😁
At the bottom, click
ADD👉DEVICES👉VIDEO👉 YOUR webcam
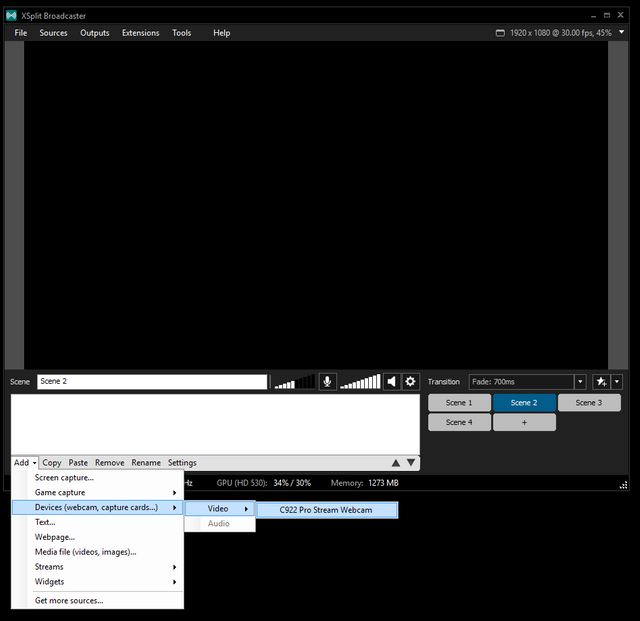
😜Oh my goodness! There I am!😜
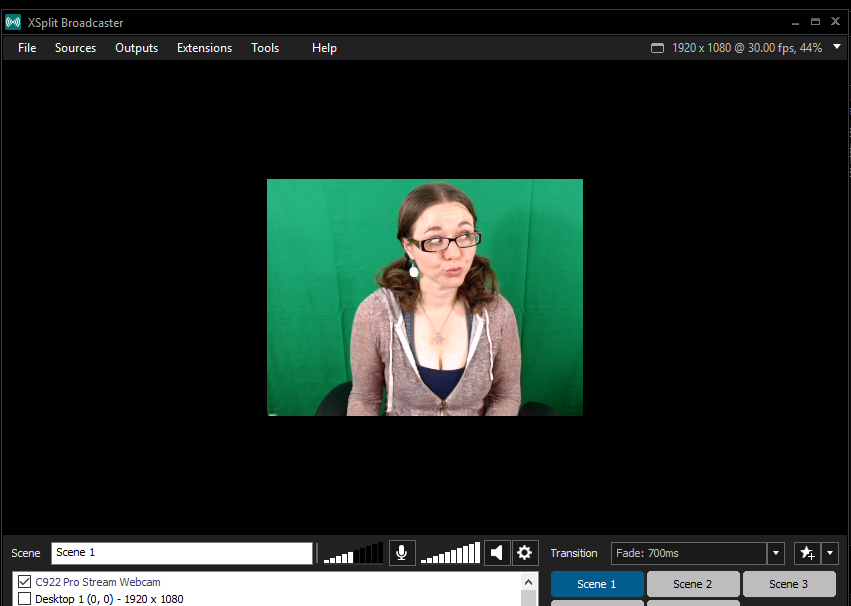
Let's get rid of that 💚Green Screen💚 Behind me. Shall we?
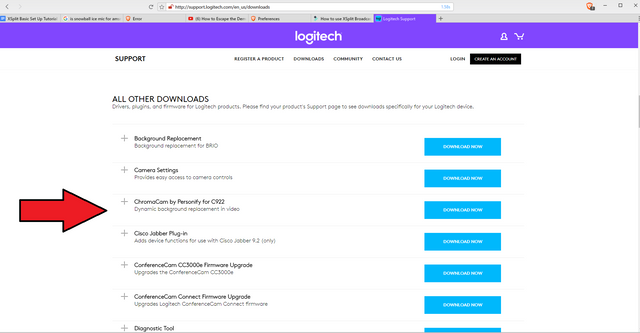
First you must download:
ChromaCam by Personify for C922: Dynamic background replacement in video.
Find download at: http://support.logitech.com/en_us/downloads
Back to me. 😘
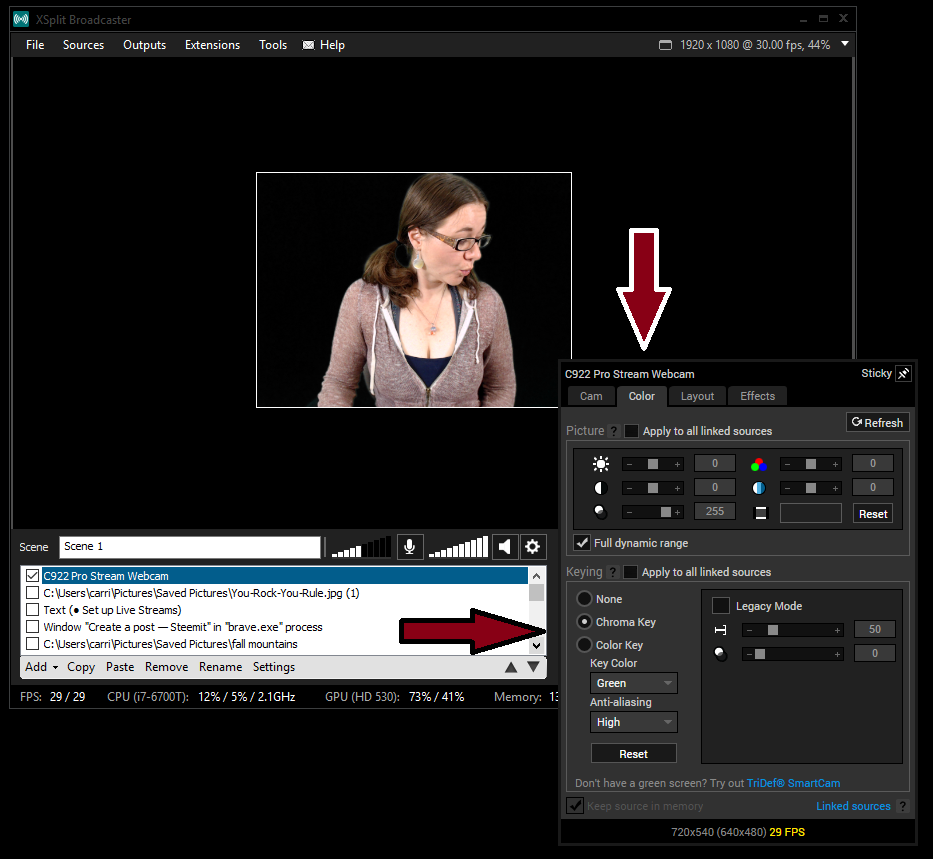
Right click on your video image.
Then go to 👉COLOR. Click CHROMA KEY and you're done! It's seriously that easy. 👏👏👏
😱 No Green Screen? No problem! 😃
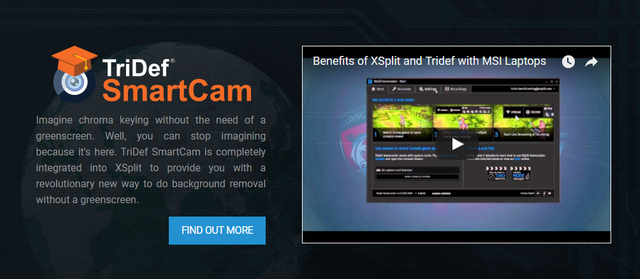
Check out TriDef SmartCam for Xsplit.
Free 7 day trial, then only $9.99!
This removes your background, no matter what is back there.
🌼Resizing, moving & cropping are pretty intuitive. 🌼
You can do all of these to images, screen captures, webcams and videos.
To RESIZE:
Click on a corner or side until any of these arrows ⤡ ⤢⟷↕ pop up. You'll be able to enlarge or shrink the size of the image. This works the same for all elements uploaded into the frame.
To MOVE:
Click anywhere INSIDE the frame and drag about.
To CROP:
Hover on the side you want to crop until the appropriate arrow pops up. Press and hold the alt button. A new arrow (⤒ ⤓⇤ ⇥) will pop up. Drag the side until you see fit. Repeat for other sides.
💥Now for the SCREEN CAPTURE!💥
As you may have guessed by now, at the bottom click
👉ADD👉SCREEN CAPTURE
Red lines pop up forming a cross. Click once on what screen you’d like to capture.
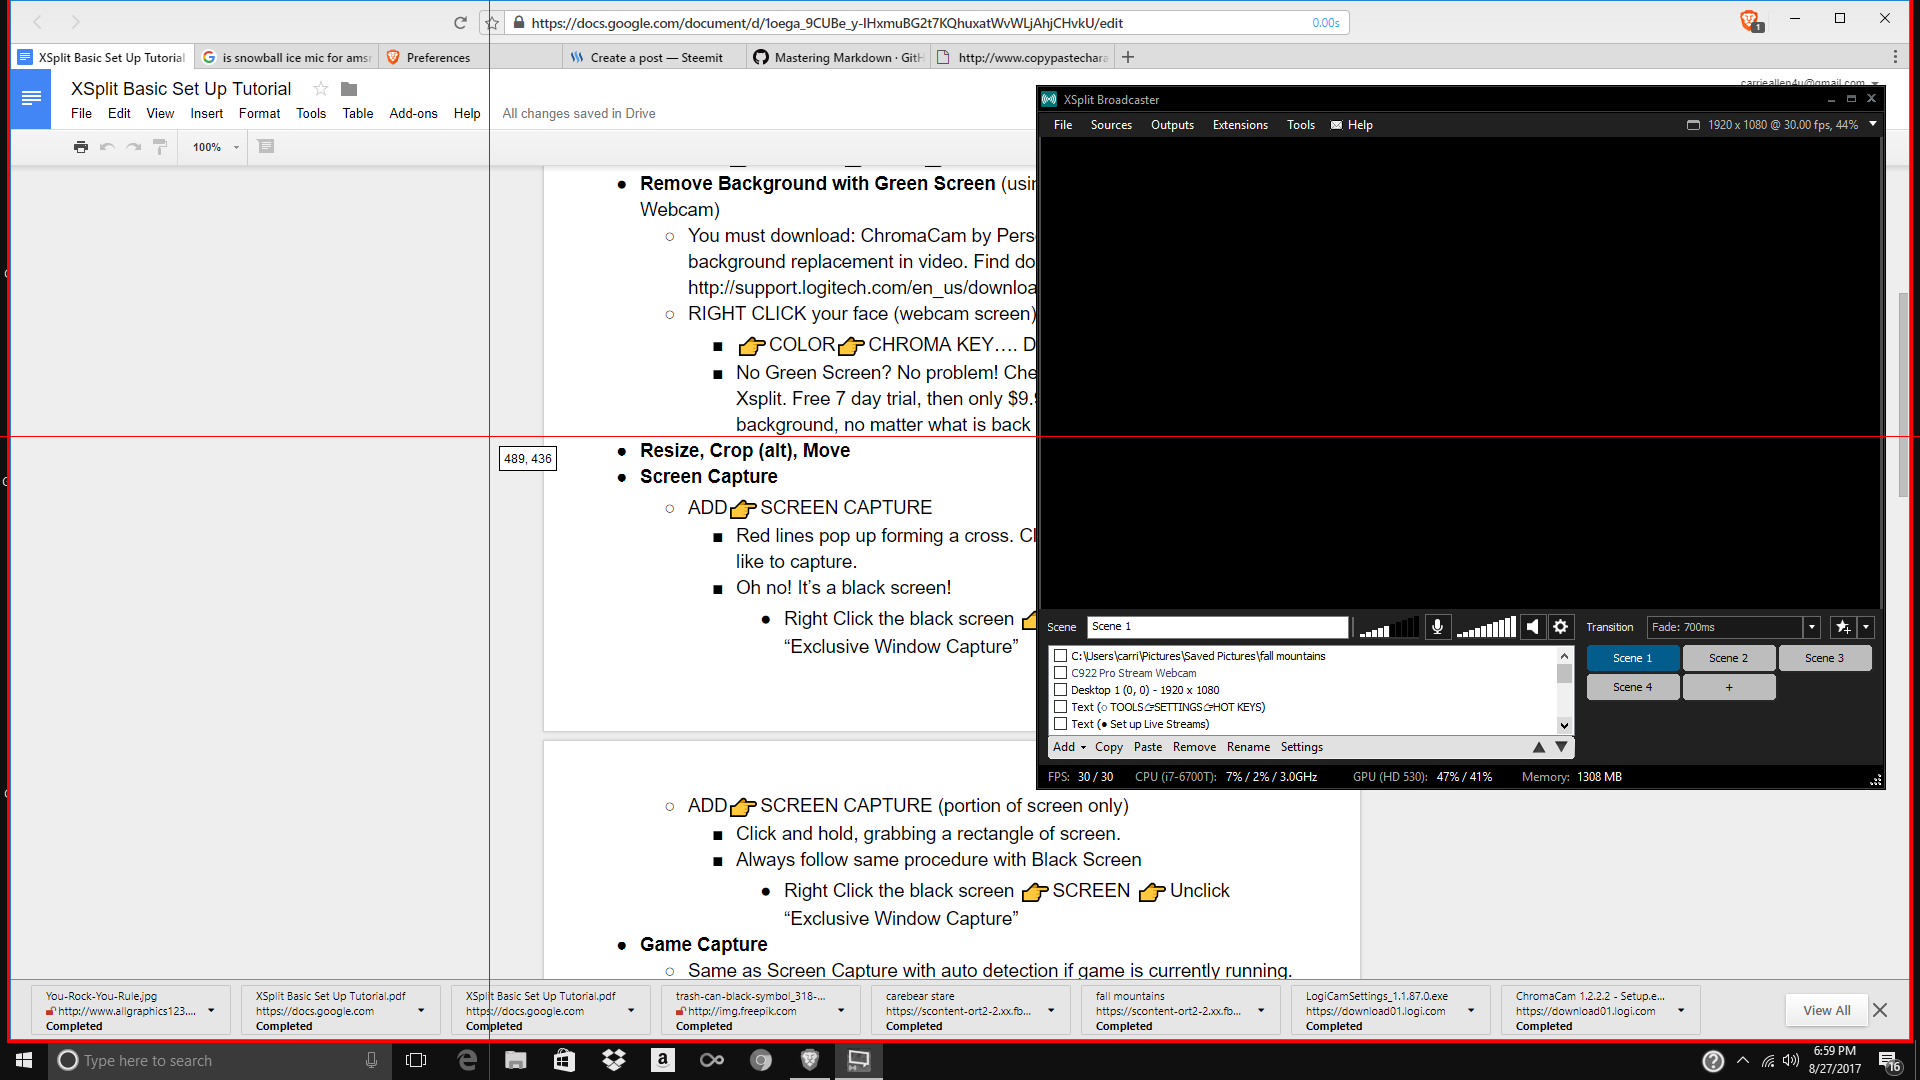
😱Oh no! It’s a black screen!😱
Easy fix:
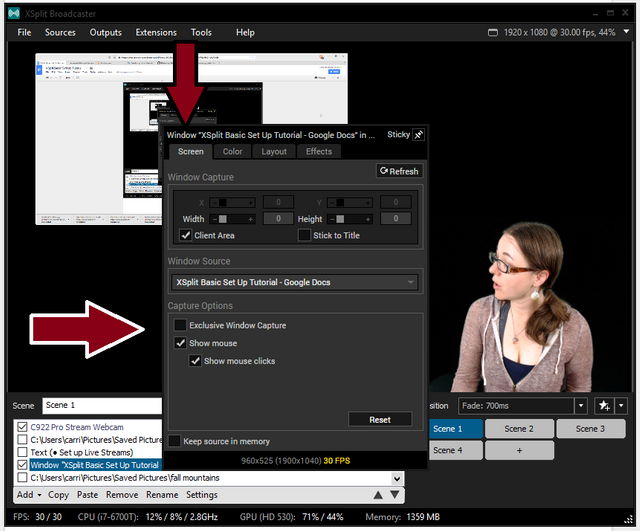
Right Click the black screen.
Be sure your are in the 👉SCREEN tab
👉Unclick “Exclusive Window Capture”
This magically fixes it. 🌟Yay!🌟
🎇Want to only capture PART of a screen?🎇
No problem!
Follow the same first steps
👉ADD👉SCREEN CAPTURE
This time when the red lines show up CLICK, HOLD and DRAG a box around the area you want to grab.
It will again show up in Black Screen. Just follow the same steps to fix. 😊
For those of you playing games and streaming:
🌌GAME CAPTURE. 🌌
This works the same as screen capture, but has a handy built in auto detection for games already open. Easy peasy.
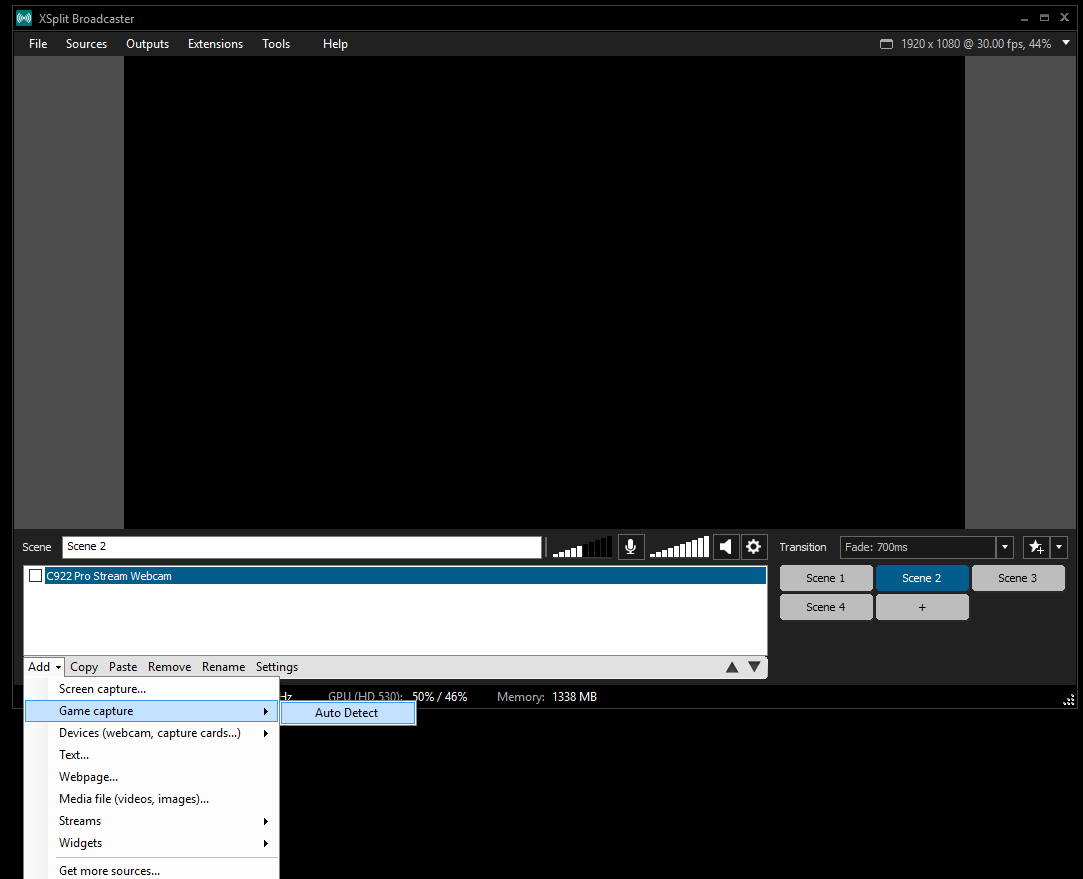
💻Okay. Let's add some media to our background!💻
This is where you'll upload images or videos.
👉ADD👉MEDIA FILES
It will open your computer drive. Once your image/video is in, you'll be able to resize, crop and move as described above. It's the most fun to make it your background, as you can see below. 👇
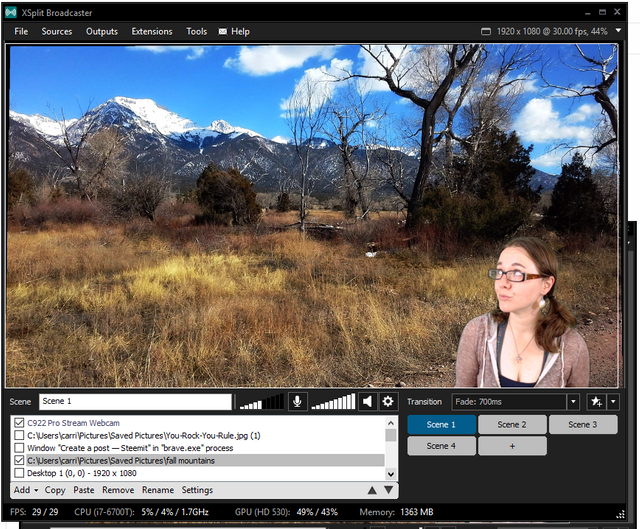
And finally, you can
Go to the bottom and click
👉ADD 👉TEXT.
The text box is located at the top.
You (as far as I can tell) can only have ONE LINE of text.
In the middle you'll find and be able to change the STYLE and COLOR of the FONT. You can also add an OUTLINE of a different color. In the image, the color boxes are white.
You can also do cool things like SCROLL and FADE.
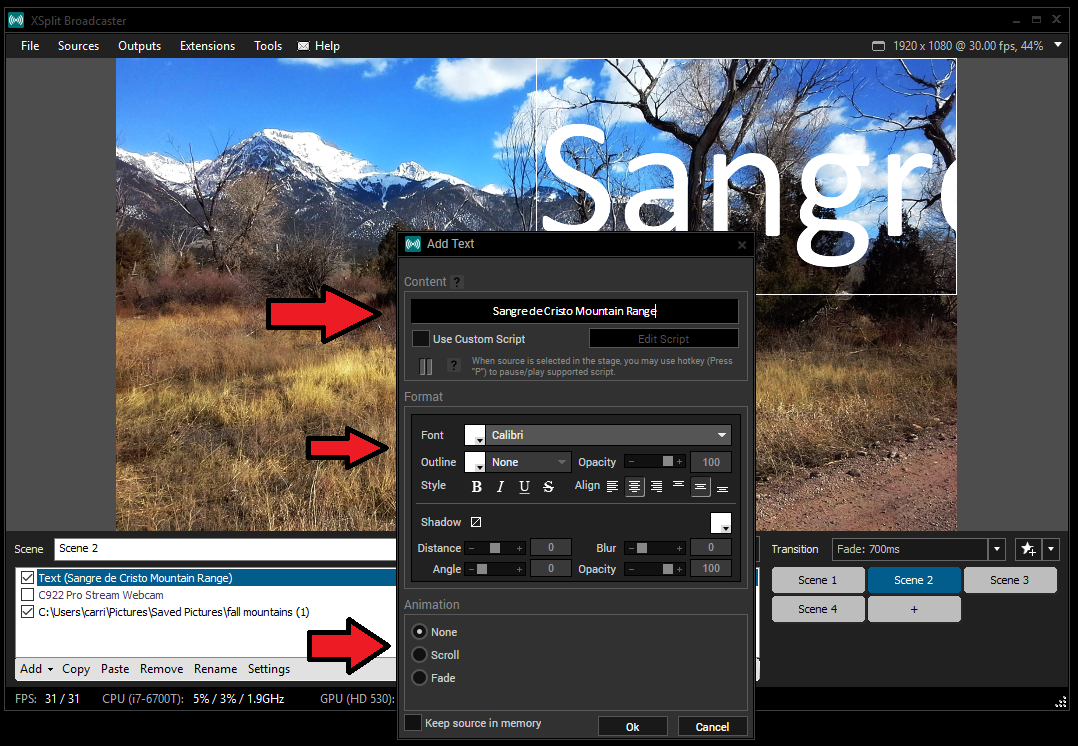
Once you've perfected your colors and font you must click OK.
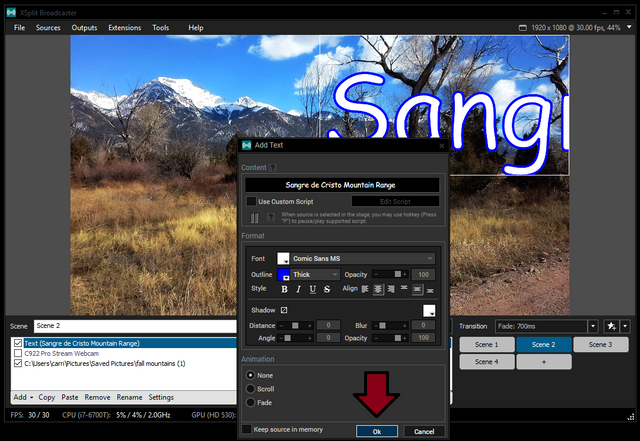
Now you'll be able to resize your text.
This can be a little tricky. Simply click and drag the corners or the sides until you reach your desired size.
To move, click in the center and drag.
You can also right click the text box (which opens its properties).
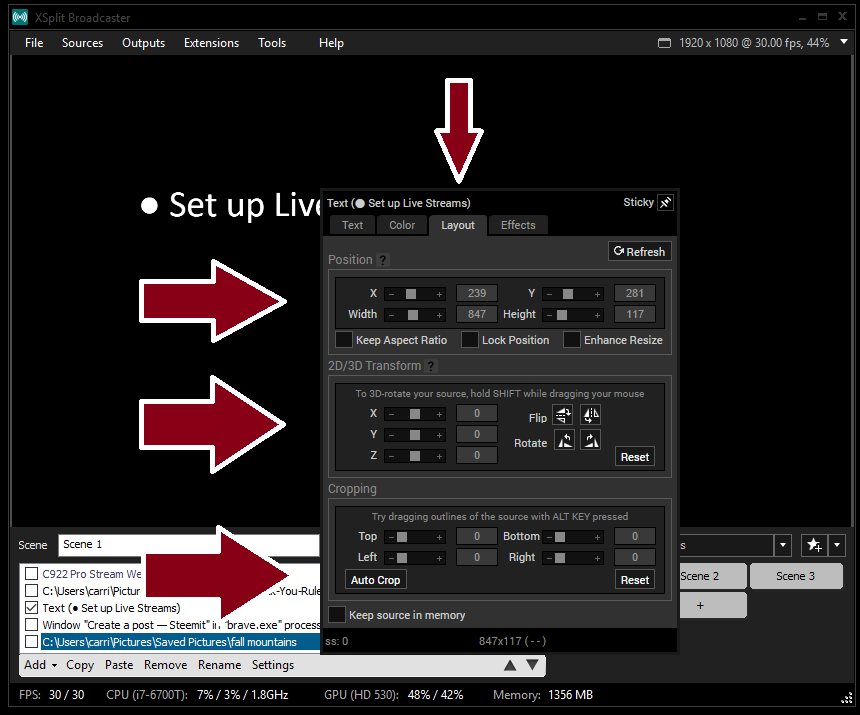
To change the position, move in 3D, or crop using the built in tool RIGHT CLICK the text box and switch to the 👉LAYOUT tab.
🌟How to ARRANGE, LAYER and DELETE elements🌟
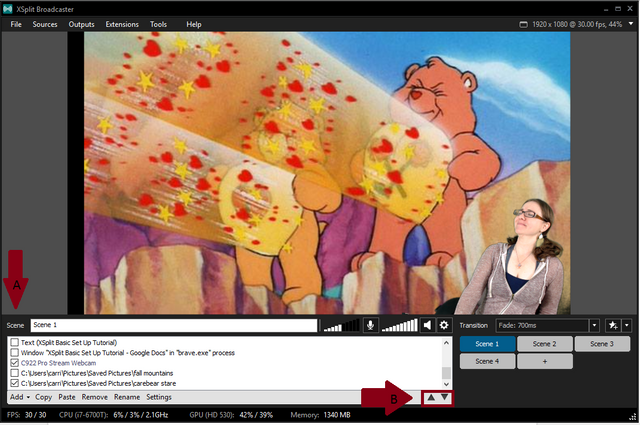
A- Arrow: To the side of each element is a box. If you UNCHECK it it disappears from the screen, but stays in your list for later use.
B- Arrow: To arrange the elements ON TOP OF or BELOW other elements, HIGHLIGHT the element you want to move and click the corresponding arrow until it's in the correct position.
To DELETE an element, highlight it and click REMOVE.
You can also COPY, PASTE and RENAME elements from this section.
That's it. You've done it. Now all that's left is RECORDING.
You can either record within XSplit or start streaming.
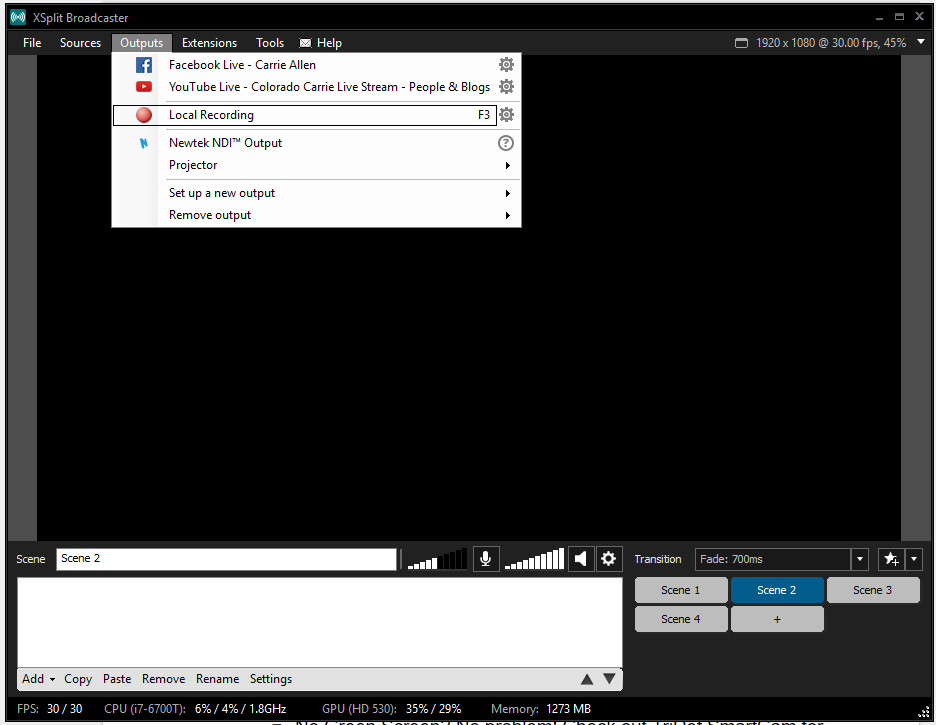
At the top go to
OUTPUTS👉LOCAL RECORDING or choose your channel.
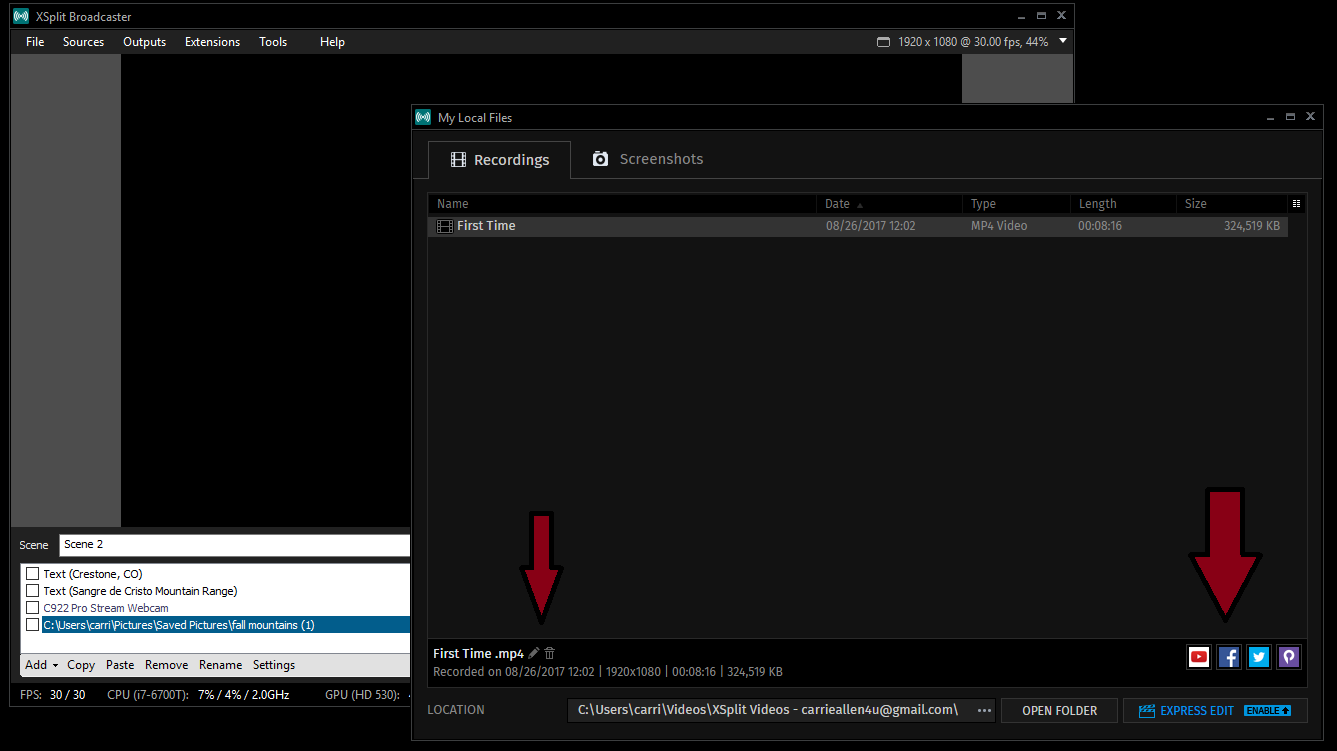
🎆Now you've recorded some amazing gem, but where is it?🎆
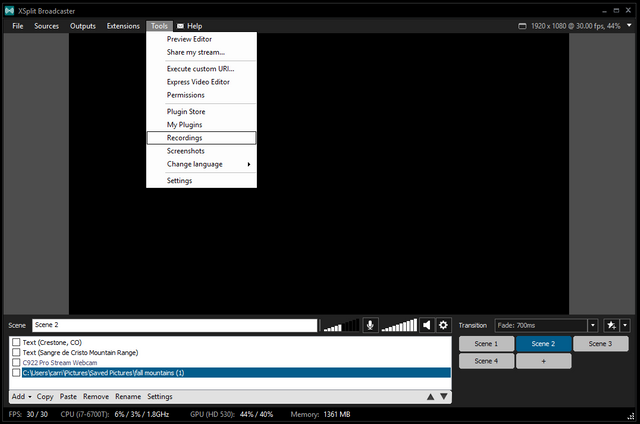
At the top click
👉TOOLS👉RECORDINGS
Double Click your new recording to PLAY (they will be labeled with a date and time).
Click the ✎ to change the name of the file.
To DELETE, highlight and click the tiny Trashcan icon bottom left.
You can easily share your finished video to your already connected video communities.
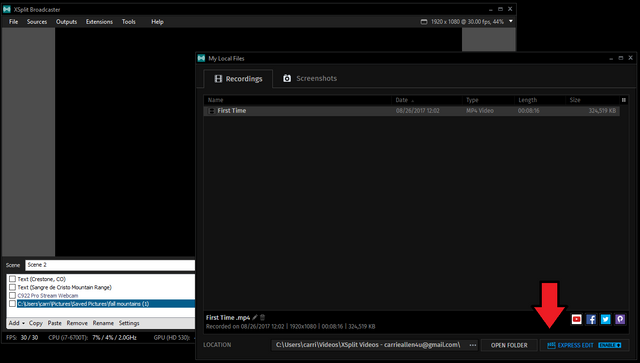
💎Can you edit your recorded videos within Xsplit?💎
Yes! With EXPRESS EDIT, though not in the free version.
Upgrade for only $14.95 for 3 months
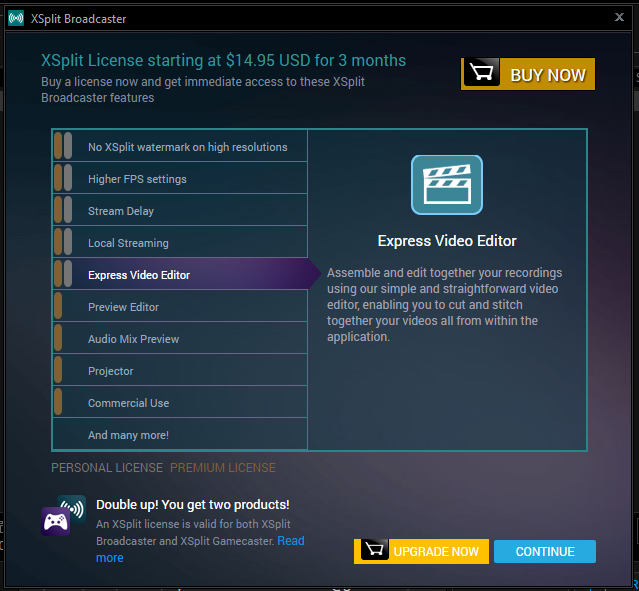
I received a FREE 6 months with my purchase of the Logitech C922x Pro Stream Webcam. I’m currently still running the free version.
✮✮✮✮✮✮✮✮✮✮✮✮✮
Whew! I thinks that's finally all of it. Have fun making videos!
Thanks for viewing!
Till next time.... Happy Trails!
😘 Carrie
Great tutorial!
Excited to see your future content with your studio new setup!
Downvoting a post can decrease pending rewards and make it less visible. Common reasons:
Submit
Thank you so much! I'm excited too! I can't believe this is top in tutorials!
I got up this morning with the intention to work on my 'IntroduceYourself' post (totally haven't done that yet) to see this post doing well. 💖
Have a great 'steemin' day!
Downvoting a post can decrease pending rewards and make it less visible. Common reasons:
Submit
As i answered you in the @kid4life post from yesterday with bellyrubchallenge:
how to put a link with different text
i loved this post, which present a simple setup for making a video with all the cool stuff.
Lol, even the lady with the gesture was fun presenting it :-). Hehe fun and learn!
I kinda love to present in the same manner things that i encounter in my digital life. Nice to see another one doing with even more passion.
gg for all the enthusiasm!
Downvoting a post can decrease pending rewards and make it less visible. Common reasons:
Submit
Me two!!! LOVE IT!
Ty both for helping out!
STEEM ON!
BTW join the new #bellyrubchallenge later today as you are the winner of the previous one;)
Cheers!
Downvoting a post can decrease pending rewards and make it less visible. Common reasons:
Submit
:-)
Downvoting a post can decrease pending rewards and make it less visible. Common reasons:
Submit
Woohoo! I always knew I was a winner. 🙃
Downvoting a post can decrease pending rewards and make it less visible. Common reasons:
Submit
Greetings, Again!
Thank for for answering my question on the other post... AND for reading and enjoying this one.
I'm the lady in the post. 😜 So look forward to more of my craziness.
I've followed you too! Thanks for the support❤️
Downvoting a post can decrease pending rewards and make it less visible. Common reasons:
Submit
Still laughing from the other post and here too... 😂
Thanks for that!
Cheers
Downvoting a post can decrease pending rewards and make it less visible. Common reasons:
Submit
nice blog good luck
Downvoting a post can decrease pending rewards and make it less visible. Common reasons:
Submit
This post has received a Bellyrub and 1.20 % upvote from @bellyrub thanks to: @kid4life. Send SBD to @bellyrub with a post link in the memo field to bid on the next vote, every 2.4 hours. Be sure to vote for my Pops, @zeartul, as Steem Witness Hope you enjoyed your bellyrub!
Downvoting a post can decrease pending rewards and make it less visible. Common reasons:
Submit
Woohoo! I've been rubbed!😍😍😍
Thank you!
Downvoting a post can decrease pending rewards and make it less visible. Common reasons:
Submit
Very nice tutorial. Keep it up.
Downvoting a post can decrease pending rewards and make it less visible. Common reasons:
Submit
Thank you! ❤️
Downvoting a post can decrease pending rewards and make it less visible. Common reasons:
Submit
informative...thank you
Downvoting a post can decrease pending rewards and make it less visible. Common reasons:
Submit
Thank you for reading! ❤️
Downvoting a post can decrease pending rewards and make it less visible. Common reasons:
Submit
Good KB...Upvote for this!!!
Check this out and upvote/comments.
https://steemit.com/heath/@feel.good/power-yoga-surya-namaskar
Downvoting a post can decrease pending rewards and make it less visible. Common reasons:
Submit
Congratulations @carrieallen! You have completed some achievement on Steemit and have been rewarded with new badge(s) :
Click on any badge to view your own Board of Honor on SteemitBoard.
For more information about SteemitBoard, click here
If you no longer want to receive notifications, reply to this comment with the word
STOPDownvoting a post can decrease pending rewards and make it less visible. Common reasons:
Submit