I've been on YouTube for quite some time now creating video game development tutorials. I'm not a huge fan of writing these out. They are just easier to follow along with in a video, however, there do seem to be a few of you out there that prefer this way of learning. In this first issue, I'll be kicking things off with part 1 of Creating point with Unity and walking through the initial setup. All assets can be downloaded on my blog The Weekly Coder
So without further delay, lets get started.
I'm hoping that by reading this tutorial, you've already downloaded and are somewhat familiar with Unity. If you haven't, no worries, you can download Unity for free at http://unity3d.com
Ok, so assuming you've got Unity installed lets go ahead an launch Unity and create a new project. You'll need to be sure to select the 2D option, basically have a look at the screenshot below and make sure your settings are matching mine.
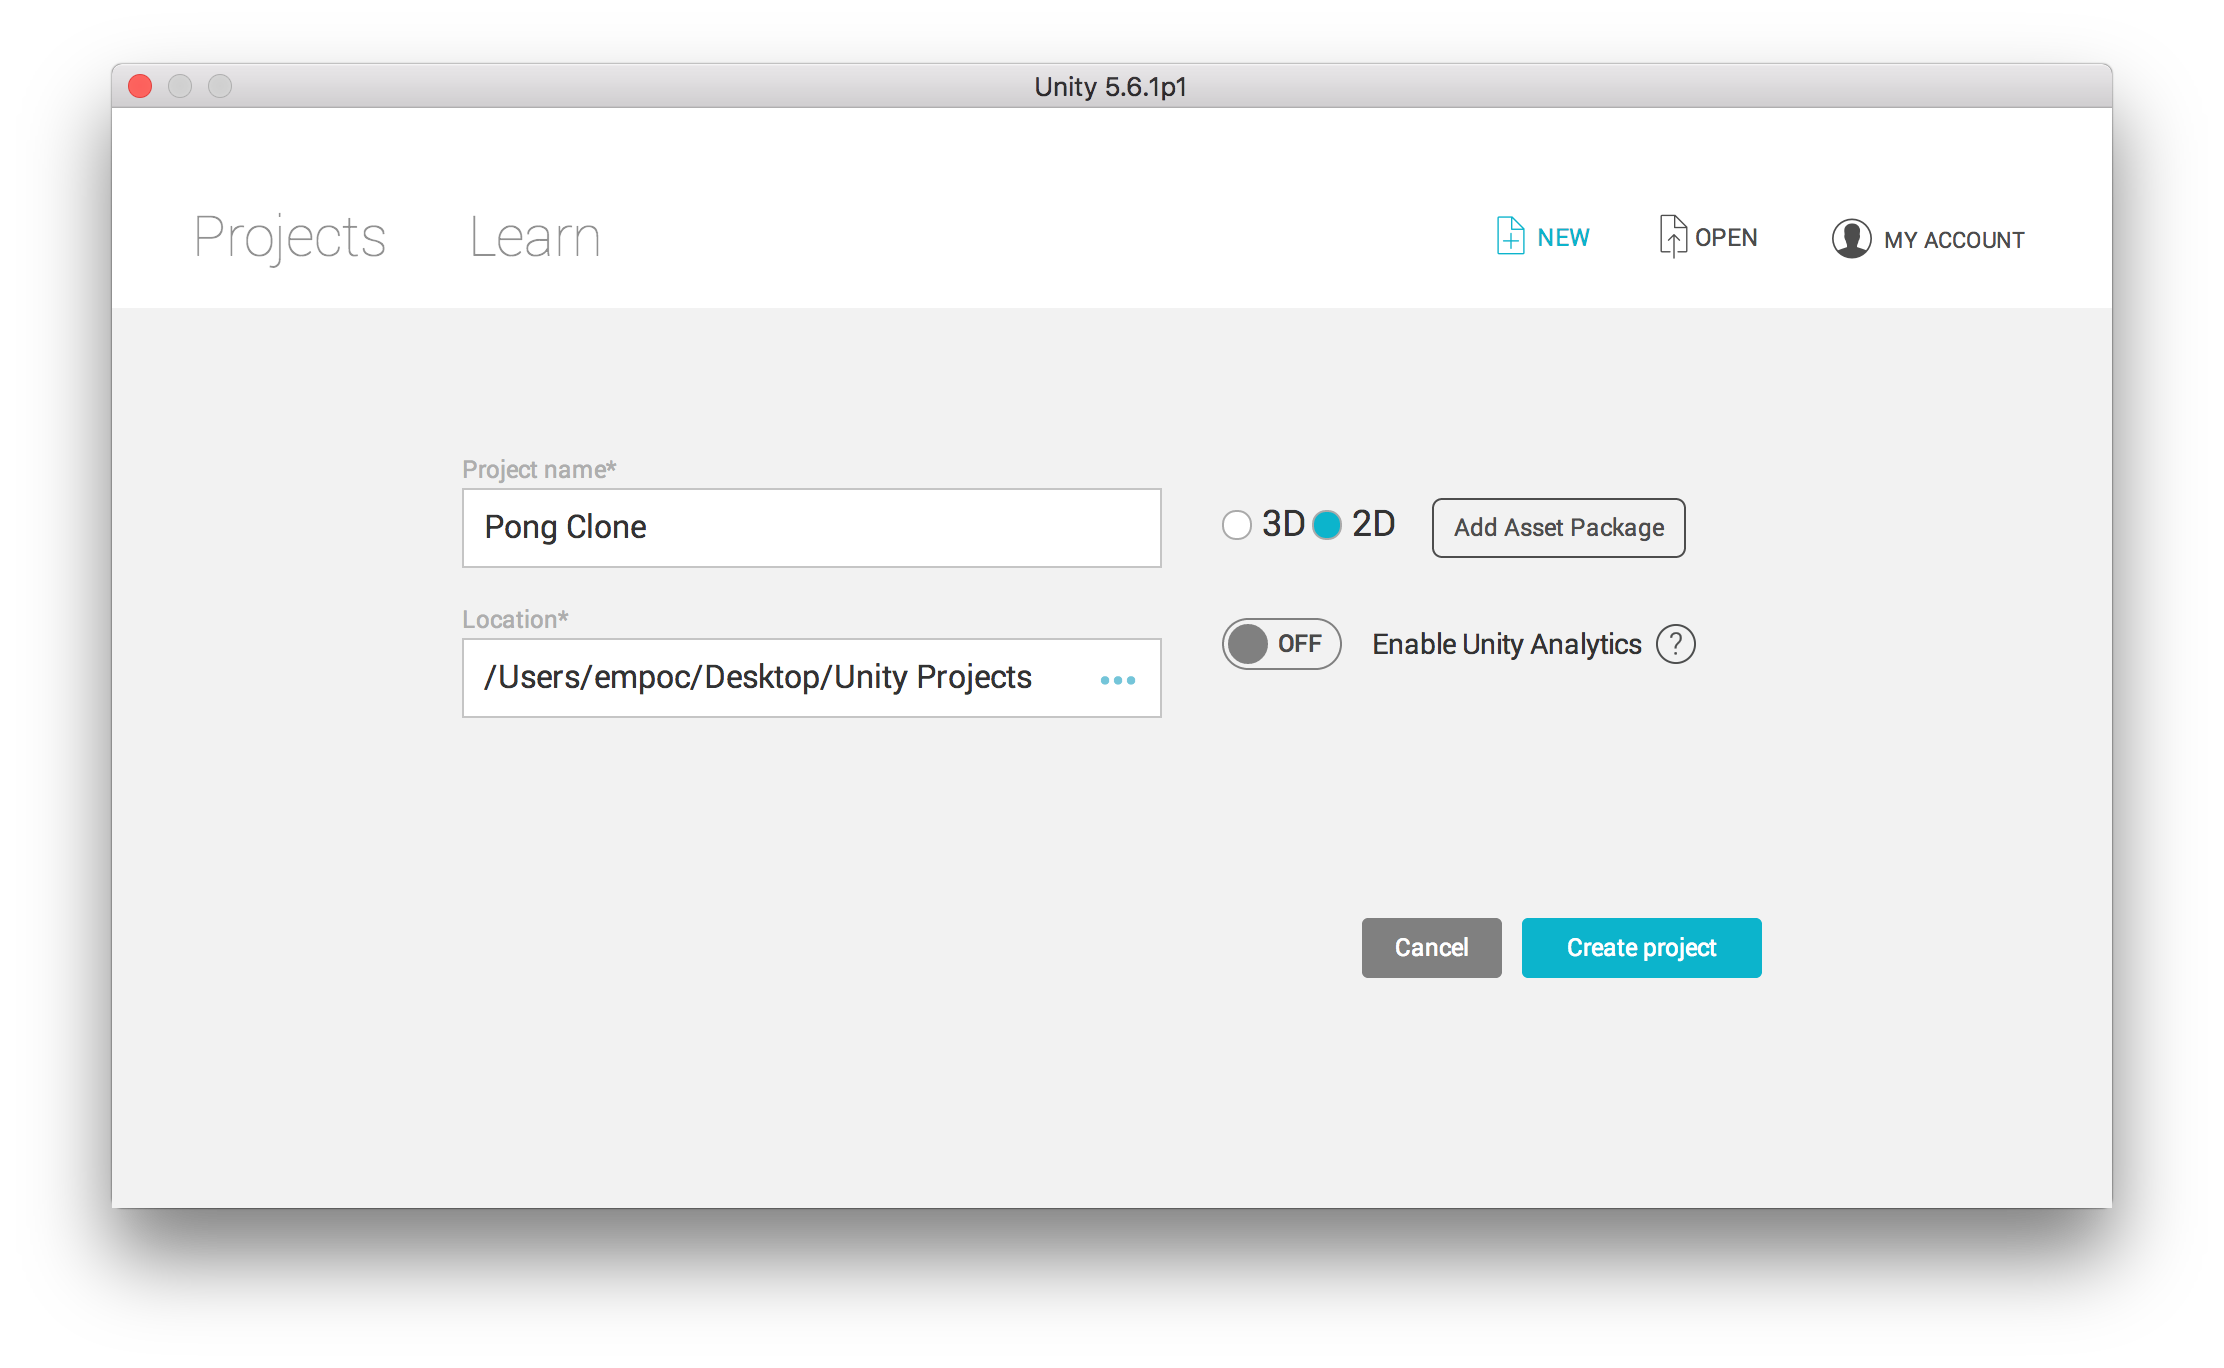
Once you click on Create project, Unity should launch and you should be presented with the Unity interface. Before we go any further, you'll need to download the assets for this tutorial.
After the file finishes downloading you'll have a folder with 4 files.
- 8_bit_party.ttf
- ball.png
- paddle.png
- pongbg.png
These 4 files will need to be added to Unity but before we do that, lets create a folder structure in Unity.
Back in the Unity interface, right click on Assets and then select Create -> Folder
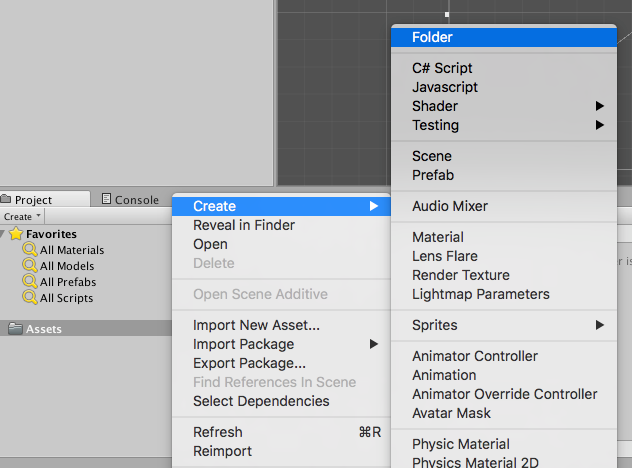
You'll need to create the following folders:
- Graphics
- Scripts
- Scenes
- Fonts
- Resources
- Resources -> Prefabs
When you are done creating folders, your folder structure should look like the structure below:
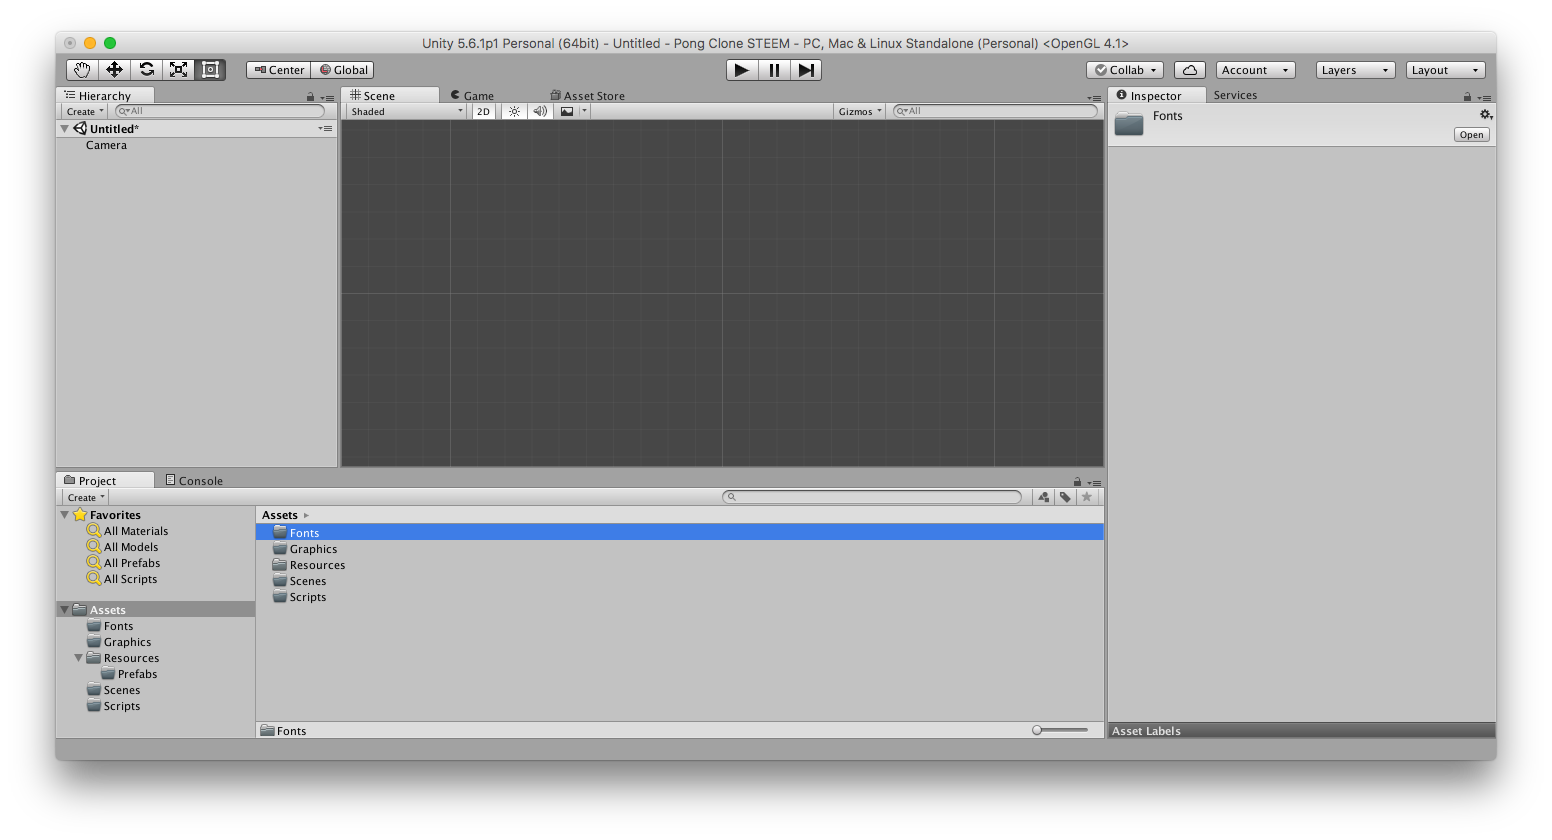
You can now drag the assets we downloaded earlier to their respective folders. Drag the ball.png, paddle.png and pongbg.png files to the Graphics folder and the 8_bit_party.ttf file to the Fonts folder.
Now that we've got our assets situated, lets create some scripts. For now we are just going to create them, we will go back and fill them with code later on.
Create the following scripts by Right clicking on the Scripts folder and selecting Create -> C# Script, name them as follows:
- Ball.cs
- Computer.cs
- Game.cs
- Hud.cs
- Player.cs
Now we need to make some adjustments to our graphics assets that we imported earlier.
Next lets save our scene and project. Even though we haven't done anything yet, I like to get that out of the way.
Click on File -> Save Scene As
The Save dialog box opens, be sure to select the Scenes folder.
Lets call our scene Level and then click on Save. You should now see the Level scene in the Scenes folder.
Now click on File -> Save Project
You'll want to get into the habit of click on Save Scenes and Save Project every so often so that in case Unity crashes you aren't losing too much of your work.
Lets adjust our graphics so that they'll look right in the game.
In the graphics folder click on the pongbg graphic and in the inspector set Pixels Per Unit to 10 and set Filter Mode to Point (no filter). Do the same for ball and paddle. Then click on Apply
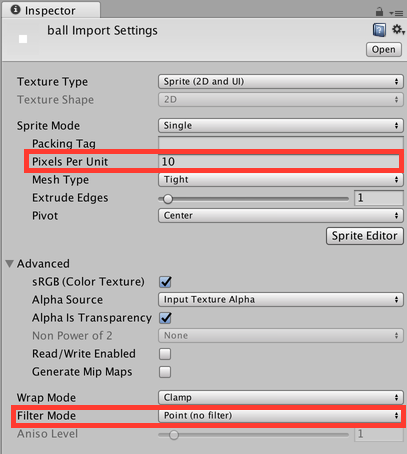
What the pixels per unit setting tells us is that every 10 pixels of the graphic equals 1 Unity unit. This makes it easy for us to place objects. Note that I chose 10 pixels per unit because of the size that I created my graphics in. There are times when you would use 16 for instance. If you are working on a tile based game and all of your tiles are 16x16, setting your pixels per unit to 16 then would make each of your tiles 1 unit in size.
Next verify that your camera settings match mine. Click on the Main Camera and have a look at the inspector.
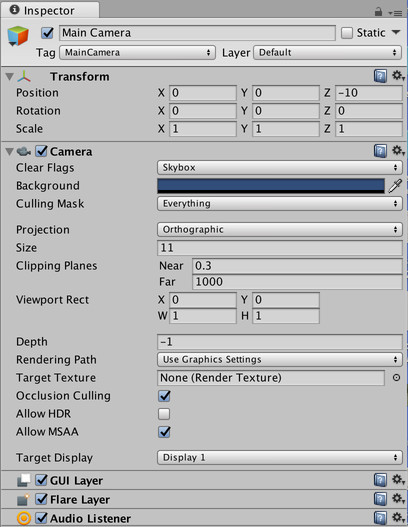
Aside from the camera settings, you'll want to go and verify that the Display ratio is set to 4:3. You can find this setting in the Game Tab
Next we need to actually add our assets to the scene in Unity. The easiest way to do this is to drag the graphics, one at a time into the Hierarchy panel or into the scene panel. The choice is yours.
After the graphics have been added to the scene, look at the hierarchy panel. Duplicate the paddle graphic by right-clicking and then selecting Duplicate. Rename both of the paddle graphics.
- computer_paddle
- player_paddle
Position the computer_paddle and player_paddle game objects.
Select the player_paddle in the Hierarchy and in the Inspector under the Transform component, change the Position property to X: -13, Y: 0, Z: 0
Change the Order in Layer to 1
Click on the Add Component button in the Inspector. In the Search field type player. Select the player script. This will add the player.cs script component to the player_paddle game object.
Select the computer_paddle in the Hierarchy and in the Inspector under the Transform component, change the Position property to X: 13, Y: 0, Z: 0
Change the Order in Layer to 1
Click on the Add Component button in the Inspector. In the Search field type computer. Select the computer script. This will add the computer.cs script component to the computer_paddle game object.
Select the pongbg in the Hierarchy and in the Inspector under the Transform component, change the Position property to X: 0, Y: 0, Z: 0
Ensure that the Order in Layer is 0
Select the ball in the Hierarchy and in the Inspector click on the Add Component button, in the search field enter ball and select the ball script. The ball script component should now be a part of the ball game object.
Create an Empty Game Object.
- Right-Click in the Hierarchy
- Click Create Empty
- Rename the Empty Game object to Game
- Select the Game game object
- In the Inspector click on Add Component
- In the search field type game
- Select the game script
You should now have a new empty in the Hierarchy named Game with the Game script component added.
Select the computer_paddle game object in the Hierarchy and drag it to the Resources->Prefabs folder. Do the same for the player_paddle and ball. These should be blue now.
Delete the ball game object from the Hierarchy by right-clicking on the ball game object and clicking Delete. Your setup should look identical to the screen shot below:
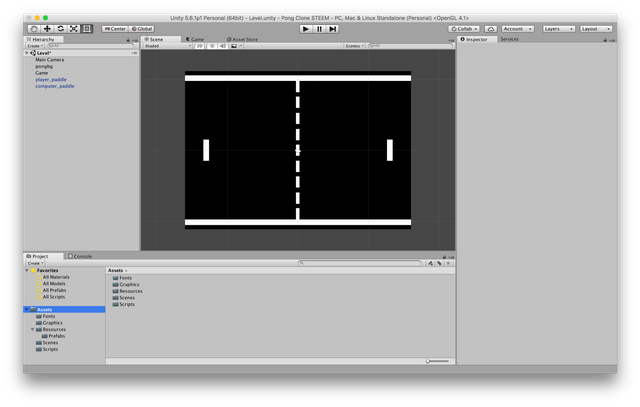
At this point you should make sure to save your scene and your project because we are done with part 1. Be sure to check back next week for part 2. Don't forget to follow and if you have questions please comment below. See you next week.