I play a fair amount of what would now be considered retro PC games, the ones that came in Big Boxes and with manuals as thick as your head. If you're lucky, a game might have some patches or tweaks you can do to get it running under Windows 10, but generally they just don't work. I've even found that buying the same game through Steam can be just as troublesome, and so to keep me ticking over before I setup my retro machine from old parts that I've hoarded over the years, I've decided to setup a Virtual Machine running Windows 95.
If you want to follow along, all you need is VirtualBox (completely free and developed by Oracle), a Windows 95 ISO file and a bootable disk image. If you're like me, you'll have one or two discs lying around that you can use, but if you've lost yours or don't want to go through the hastle of creating your own ISO, you can download a copy here. For this tutorial, we'll be using the Windows 95 OSR1 (OEM) (ISO), which is the second option on that link.
You're also going to need that bootable disk image because the Windows 95 disc isn't bootable, so head on over to AllBootDisks and download the Windows95a.img file if you're using the ISO image for the site above. If you have a OSR2 copy, you'll need the Windows95b.img file to boot. There's some technical differences between OSR1 and OSR2, however OSR2 wasn't sold at retail as it was OEM only. This tutorial will be using OSR1 as it's the one you'll likely already have and is perfectly suitable for retro gaming.
Before we get started, go ahead and install VirtualBox which you should have downloaded using the official link above. Got it installed? Great, let's get into it then.
Step One: Create the Virtual Machine
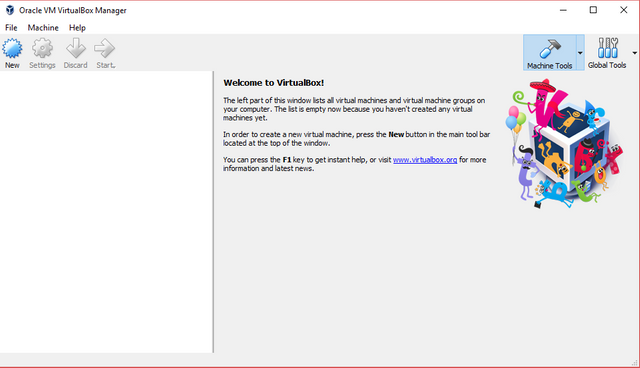
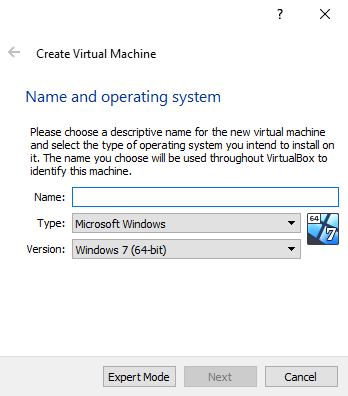
Open up VirtualBox, and you'll be greeted by the Manager window. Let's go ahead and create that virtual machine, so hit the New button in the top left corner. You'll see a window like the one to the right here, where we're going to tell VirtualBox what operating system you intend to use, as well as name your new machine. If you call it Windows 95, VirtualBox will automatically select the type and version for you.
Next you'll be asked to set the size of the RAM you want this new machine to have, and by default it'll be automatically set at 64MB. That's fine, but this version of Windows 95 can handle a bit more than that. So, let's set it to 256MB so that we have plenty of memory for gaming.
Once you've set the memory, click next and you'll be asked if you want to add a virtual hard disk to your new machine. We want to be able to install things, so let's go ahead and create a virtual disk. On the next screen, leave the Hard Disk file type set at VDI and click on Next. The next screen gives you the choice of having a dynamically allocated file or one that is created at it's maximum file size. The choice is yours, I'll be clicking on dynamically allocated just because I don't have that much space left on this machine. If you choose a fixed size file, it may be slightly quicker to use.
Once you've selected the storage file type, click Next and you'll be asked to name the new virtual disk and set the size. 2GB is the limit for OSR1, but if you're using OSR2 then FAT32 file formats are supported. With your disk named and the storage size set, click create for the wizard to create the file. That should be it, and onto the next step.
Step Two: Prepare the Virtual Machine
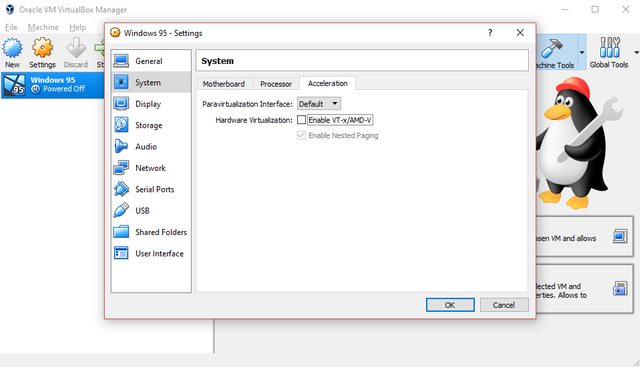
Your new Windows 95 virtual machine should be listed on the Manager. Before you go ahead and click it, we need to change a couple of the settings first. Right click on your machine, and select Settings. You'll now see the settings window, looking like the one above, so let's start by going into System and then select the Acceleration tab. We want to untick the Enable VT-x/AMD-V hardware virtualization option here because if you leave this option enabled, you’ll be able to install Windows 95, but it will just show a black screen when it boots up afterwards.
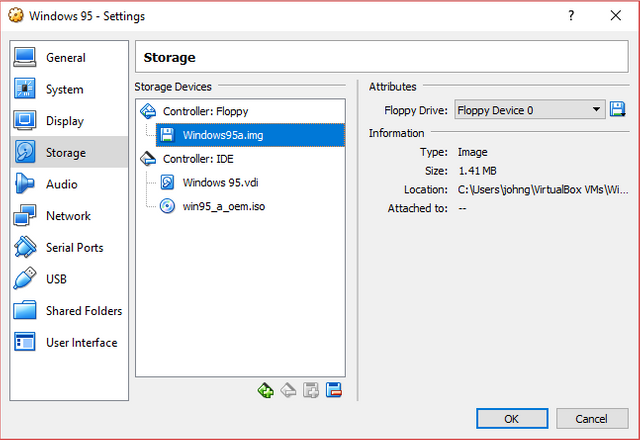
After that, click on Storage and here we want to virtually insert our bootable disk image and the Windows 95 Setup disc image. First, let's select the virtual drive under the Floppy controller and click the floppy disk button to the right of Floppy Drive. Click Choose Virtual Floppy Disk File in the menu and browse to where you've stored the boot disk .img file and select it.
That's the floppy in, time for the CD. Select the Empty disc drive under the IDE controller, click the disc icon to the right of Optical Drive, and click Choose Virtual Optical Disk File. Now browse to your Windows 95 ISO file and select it and... that's the settings done! Click ok to save the new settings, and you're ready to switch on your virtual machine for the first time. Feel the nostalgia flowing over you.
You can now spin up your machine by double clicking it in the Manager window, and you'll see a trusty DOS prompt. Before we can go ahead and install Windows 95, we need to do a couple of things in preparation. First of all, we need to create a partition for the virtual disk that we created earlier. In the command-line, type the following:
fdisk
What this command does is creates a partition on the empty drive so that we can start installing Windows. You'll see a whole host of options, but for this process we'll just use all the default settings. Just hit enter three times after launching fdisk to create a DOS partition, create a primary partition, and agree that you want to use the maximum size of the drive and make the partition active.
Once the fdisk process is complete, you'll be told you need to restart the machine. If the mouse focus is in the virtual machine, press the Right CTRL key on your keyboard so that you can use your mouse and keyboard outside of the virtual machine. Click on Input > Keyboard > Insert Ctrl-Alt-Del on the top bar in VirtualBox. Your machine will now restart.
Next we need to format the newly partitioned C: drive, so once you can see the DOS prompt again type in the following:
format c:
You'll be warned that you'll lose any data on that drive, which is fine because there isn't any yet. Type Y to accept, and then name the volume. You can call it anything you want, or nothing at all. Hit enter once you're done labeling the drive.
Normally, you'd install the OS directly from the drive, but doing so with Windows 95 in a Virtual Machine often ends in bugs and errors. What we're going to do is copy all the setup files from the disc to our hard drive to avoid problems. Enter the following code into the command-line:
xcopy R:\ C:\WIN95SETUP\ /S
If your disc drive is not R:, you can find out what it is as the machine boots up. You can use the CTRL-ALT-DLT command from the top menu again if you need to restart the machine. The process will start, and once it's finished you can switch to your C: drive and launch the setup program from the INSTALL folder. Type the following three lines, one at a time into the prompt:
c:

cd WIN95SETUP

setup
Can you feel it? It's time, time to install Windows 95 ready to play some classic games! Step Three!
Step Three: Setup and Install Windows 95
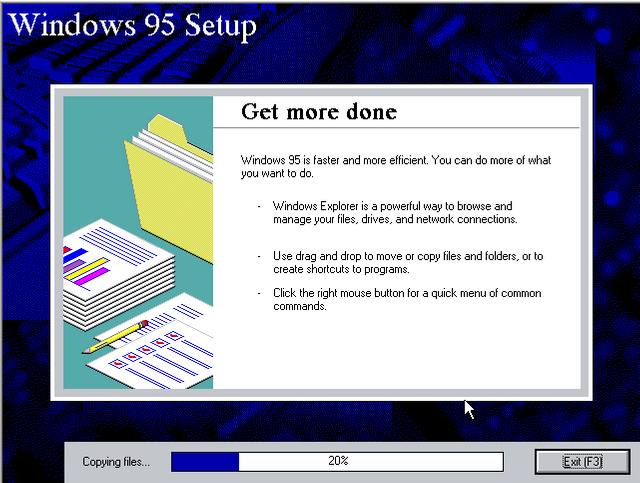
If you screwed up your computer a fair few times in the 90s, the following screens will be very familiar. They certainly bring back memories for me, but before we can get lost in a game of Hover, we need to install Windows. You should be seeing the graphical setup interface, and just follow the prompts to install Windows 95 on your new machine. You'll be asked for your serial number, which you need as Windows 95 is still under Microsoft's copyright. If you can't find yours, they are posted online in places, or come find me on Discord. Typical options are fine for this setup.
Setup will attempt to auto detect any connected devices, then you'll be asked if you want to create a startup disk. We won't need that, so select No and click next. You'll be seeing the above screen as Windows 95 is installed, and once it's done you need to eject the bootable disk image from the virtual floppy drive. Press RIGHT CTRL to free up your mouse, and go up to Devices and eject the disk. You can now click OK, and the machine will restart.
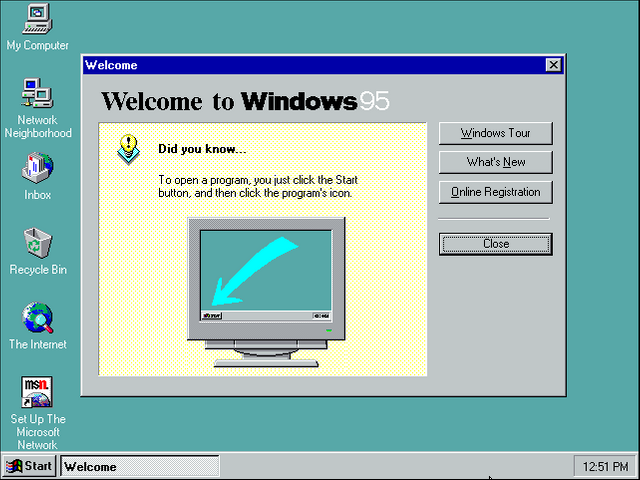
You'll need to set a workgroup name, and Windows will do a bit more detecting for devices. Next set your timezone and don't worry about email and fax, we won't be needing any of that.
You should now see the Welcome screen and good ol' Windows 95 desktop. Congratulations, you did it! If you want to install your old games, just make an ISO image of the discs, mount them in your virtual machine and away you go.
Step Four: Profit!

That's really it, but if you really want to take a trip down memory lane, open up File Explorer and navigate to C:\WIN95SETUP and take a look in the fun stuff folder. Plenty of things to keep you occupied, I know I'll be playing some Hover tonight.
I hope you found this tutorial useful, and if you have any problems then feel free to reach out to me in the comments or on Discord. As always ladies and gentlemen, make sure to follow me for the latest Technology, Internet and Pop Culture updates and until we meet again, take it easy!
P.S. If you're new here, you might want to check out my Ultimate Beginner's Guide To Steemit, which covers everything you need to know to get started making money and meeting new people on Steemit.
If this post is older than 7 days, please support me by upvoting my latest post Latest post
Sources:
The Windows 95 logo is property of Microsoft, the VirtualBox logo is property of Oracle
All other images are screenshots, and are the property of their respective owners
Hello John,


Wanted to let you know I found these today :
https://steemit.com/@johngreenfie1d
https://steemit.com/@johngreentopbot
https://steemit.com/@johngreenfield66
They were a few hours old when I found them. They were taken care of quickly.
Please be aware they want to impersonate you badly.
Maybe its time to do another post to warn your friends?
You can thank @themarkymark for doing the pull request quickly.
Downvoting a post can decrease pending rewards and make it less visible. Common reasons:
Submit
Could have at least made it johngreenfield666 , so lazy.
Downvoting a post can decrease pending rewards and make it less visible. Common reasons:
Submit
I might go register that one myself!
Downvoting a post can decrease pending rewards and make it less visible. Common reasons:
Submit
It's strange, I was thinking just this morning how quiet it had been recently. Many thanks for bringing it to my attention, I've just resteemed @themarkymark's post which should be enough. Any regular followers are aware of the situation, and the best strategy seems to be just to speak to people when they inevitably comment on one on my posts about being flagged. I'd add something to my profile description like before, but sadly people tend not to notice.
Thanks again for letting me know, although I won't be losing any sleep over this. I'm just left feeling genuinely concerned for the individual, if they were some spiteful rich kid somewhere they'd be able to put some Steem behind their accounts. The sheer amount of time and energy put into this endeavour is a little heartbreaking, they're clearly a damaged individual.
Downvoting a post can decrease pending rewards and make it less visible. Common reasons:
Submit
Will you be doing one on Hyper-v also? I use to use virtualbox just because I know shit works then , well have not booted for a bit , but docker required Hyper-v with windows 10, the only benefit is that Hyper-v is basically already on the system and docker think they are soooo smart.
What I really like about virtualbox is how simple things are to get working and it was pretty cool to see an entire other pc on my work network running from inside another own ip and everything . haha those little damn this is cool moments.
Great resource for others who feel nostalgic or want to take linux for a spin ;) ... speaking of I really should try https://arcolinux.com/ as for retro games I just like watching other people lose their shit when they struggle.
Downvoting a post can decrease pending rewards and make it less visible. Common reasons:
Submit
I wasn't planning to, but I've been meaning to play around with Hyper-V so I'll dig out my Win10Pro box and see if I can get it to work. I'll let you know how I get on.
I've always used VirtualBox because it's so easy, especially for Linux. I hadn't used it for a few years just because I have so many machines lying around the house, I tend to just use them.
A friend recommended ArcoLinux to me a little while ago, I've been meaning to see how it compares so I might give it a go this weekend. I've been meaning to brush up on my linux skills anyway.
Thanks for the comment!
Downvoting a post can decrease pending rewards and make it less visible. Common reasons:
Submit
NEW TIER UPVOTES user guide
Current price is 0.150 or 0.151 SBD for 200%, 250%, or 300% upvote based on tier level.
200% ($0.30) - Bronze Level - No requirements
250% ($0.37) - Silver Level - SteemAuto Upvote of 100% or $0.02 (whichever is possible)
300% ($0.45) - Gold Level - SteemAuto Upvote of 100% or $0.02 AND 50 SP delegation
50 SP --- 100 SP --- 200 SP --- 500 SP --- 1000 SP
That being said...
Investors who delegate SP to @thundercurator are entitled to 75% of @thundercurator income after curation. Get on-board early and grow with us!
Downvoting a post can decrease pending rewards and make it less visible. Common reasons:
Submit