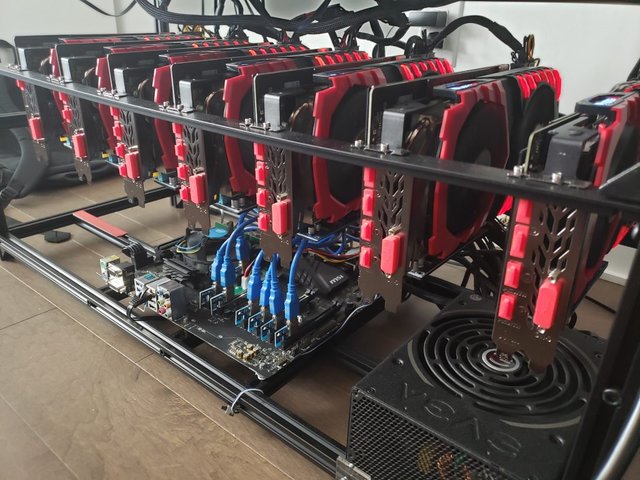
What Is a GPU Mining Rig & Why?
The simplest way to explain a GPU Mining Rig is that it is basically a Desktop PC with more than one Graphics Card plugged in it. It uses the computational power that the Graphic Cards produce to hash through the blocks solving complex equations and securing the blockchain in return of a little fee which is paid out to the miners.
Pros
- Really Fun & Interesting
- Generate Money With Minimal Maintenance
- An Opportunity To Join The Modern Day 'Gold Mine'
Cons
- The Heat & Noise Is Inconvenient
- Can Be Very Hazardous If Done Incorrectly
- Electricity Can Be Expensive Based on Location
Parts Needed To Build a GPU Mining Rig
Let's run down a list of the parts we need to assemble a rig, We will be linking Amazon Affiliate Links on the products and it should automatically take you to the Amazon website that is linked to your region, feel free to use them to support the article and support the website as a whole, thank you!
The Amazon products will all be put together neatly in the bottom of the article, We pick them based on 'bang for the buck' and the most efficiency to running the optimal rig.
Here is the list...
- Motherboard
- Processor (CPU)
- Memory (RAM)
- Power Supply (PSU)
- Graphic Card (GPU)
- Storage
- PCI-E Risers
- Internet Connectivity (WiFi Adabter Or Ethernet)
- Rack Or Case
- Zip-ties
Motherboard
Connector for every component, make sure to get the right socket and generation for your CPU, other than that you don't need to be picky here, although some models have much more support for mining and provide more PCI-E lanes resulting the capability to add more GPUs.
Processor (CPU)
The Brains of the PC. Don't get a high end one, a cheap one would do, the more GPUs you will connect to the rig the bit of a higher price CPU you'd need so it isn't too jumpy when setting it up. Make sure it fits the motherboard socket. New ones have CPU Fans included used one does not.
Memory (RAM)
Random Access Memory, not very effective in mining rigs, a 4 GB stick would do great, but for the future you might need to go with 8 GB Stick or 2x4 GB Sticks.
Power Supply (PSU)
The only part you don't want to be cheap on, they rank through White rated to Titanium, the closer to Titanium the more efficient it is and wastes less Watts, make sure to get enough wattage for your rig, preferably get more than you need incase you want to add more GPUs down the line.
Graphic Card (GPU)
Your bread and butter for your entire mining operation, here you can buy your preferred choice, We will give my personal favourites ( The Most Efficient) then feel free to pick and choose which one fits your budget, they don't all need to be the same GPU, but if they are, it is very eye pleasing.
Storage
Wherever you'd like to download your Operating System, either if it is Windows or Linux. We recommend going with Windows since they have much more supported drivers for the new Graphic Cards, Linux can be a bit hard to work with.
PCI-E Risers
Extensions to the PCI-E Lane in your Motherboard that connect to the Graphic Cards. Always have backup, incase one breaks down you can always swap it, no downtime.
Internet Connectivity
Going with WiFi Adabters can get expensive if you own a couple of rigs, but it is also preferred to go with Ethernet so you avoid any unnecessary delay, disconnectivity.
Rack
Buy or Build a rack of your own, it will be your support system for all the components, there are 4, 6, 8, etc, GPU Racks. The one bellow is great because of the rigid build quality, stackable, and it also comes included with a power button.
Booting It For The First Time
Now assuming you accumulated all the parts, time to build it together. Most of the set up is common PC building way, so make sure you take all precautions, don't hold anything from the gold pins, and ground your self (do it on wood, wear a static bracelet) so you don't static chock your components.
Building The PC
I will only lightly go over the steps for assembling the parts, and We will also link to a video that describes it pretty well. assemble your rack, put the CPU in the Motherboard make sure it is put correctly and in the right angle, a rice grain size thermal paste on the top of the CPU, put your included CPU fan on it and make sure it is installed correctly, plug in your RAM Dimm, if your Motherboard has 2 slots of RAM plug it in the first one, if it has 4 slots, plug it in the 2nd one, connect your SSD to the motherboard via SATA, and then connect it to the PSU, afterwards plug in the button included in with the rack to the 'pwr on' 2 pins on the motherboard, refer to the manual for more information.
Unplug GPU's Except One
Graphic Cards get pretty buggy if you plug all of them in at once in your first boot, so plug only one in make sure it is in the first slot (the first PCI-E x16), connect it to the HDMI/VGA to your monitor then change the settings to make it more efficient for mining, We will provide the information in the upcoming post Setting Up Your Mining Rig.
Hi! I am a robot. I just upvoted you! I found similar content that readers might be interested in:
https://miningchamber.com/how-to-build-a-mining-rig/
Downvoting a post can decrease pending rewards and make it less visible. Common reasons:
Submit