This tutorial I will discuss JSON (JSON Web Token). JWT brings a familiar concept to those of you who often play with APIs, our JWT system wraps data in tokens. so any action that requires authentication we attach the token to match with the tokens in the serve. and here I will use it on Slim. how to do it, we just start this tutorial. Because this tutorial is a continuing series of Slim API, I suggest you follow the tutorial series I put in the curriculum.
What Will I Learn?
- Use Postman for JWT
- Use JWT for user token
- Make response JSON
- Encode data to JWT
Requirements
- Composer
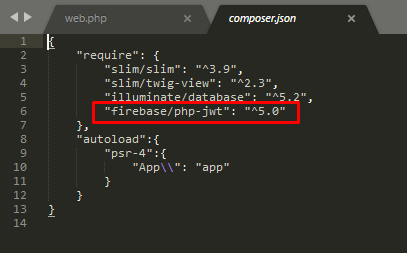
- Package firebase/JWT
- Localhost (Xampp, Wampp or etc)
- Slim
- Intermediate OOP PHP
Difficulty
- Intermediate
Preparation
The first step we have to install package from firebase / JWT. we install from composer.json, open the command prompt in your project.
composer require firebase/php-jwt

If there is no error then you will the see in the composer. firebase / JWT has been registered. if something goes wrong please check your internet connection.
Make API for JWT
Then we will create a fire route to point to the login which we will use JWT for user authentication system. Open the web.php file located in the routes folder.
<?php
$app->group('/api',function(){
$this->post('/login', 'App\controllers\userController:login');
});
$app->group('/api',function(){} : We create a group route to make it look neater and elegant, so later on every fire-related routing, we'll create a prefix /api
$this->post('/login', 'App\controllers\userController:login'); We use the method post because We do not want the information to be seen. : /login is the name of the route we will use for the system login and userController is the name of the controller that functions responsible for the login function.
Database
| Name | Type | Length/value | Indeks |
|---|---|---|---|
| id | INT | 100 | Primary |
| username | Varchar | 100 | -- |
| password | Varchar | 100 | -- |
INSERT INTO forum.users (id, username, passoword) VALUES (NULL, 'jhon doe', 'pass123'), (NULL, 'Helewt arold', 'pass1234');
Model user.php
<?php
namespace App\models;
use Illuminate\Database\Eloquent\Model;
class user extends model {
protected $table = "users";
}
<?php
use App\models\user;
class userController
{
protected $c;
public function __construct(ContainerInterface $container){
$this->c = $container;
}
public function login($request,$response){
var_dump($request->getParsedBody());
}
}
protected $c; : Provide a variable that will be used later to accommodate $container. I will put the container in the __construct function. __Construct is the function that will first be called.
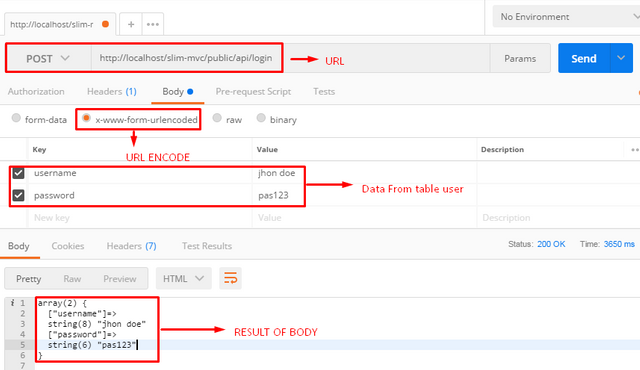
var_dump($request->getParsedBody()); : I will make a little test in here. I will see the contents of $request, using getParsedBody(), So we can see the contents of the body we have sent from the postman.
 )
)
URL: is the URL of the API we have created, we pair with POST method so that the data we send can't be seen.
x-www-urlencoded : If using post method we provided body to send data like in website.
Key and Value: We input user data in the user database we have created earlier.
Result of the body: Because in the controller we use var_dump to see the power form that we send through postman, so the result we will see in the form of an array.
Generate Token JWT
We will create a function to generate JWT token, this is the code from userController.php
<?php
namespace App\Controllers;
use Interop\Container\ContainerInterface;
use App\models\user;
use \Firebase\JWT\JWT;
class userController
{
protected $c;
public function __construct(ContainerInterface $container){
$this->c = $container;
}
private $key = "secretkey";
public function login($request,$response){
$username = $request->getParsedBody('username');
$password = $request->getParsedBody('password');
$user = user::where('username',$username)->where('password',$password )->first();
if(empty($user)){
return $response->withJson([
'success' => false,
'message' => "Username or Password false"
]);
}
$token = [
"iss" => "utopian",
"iat" => time(),
"exp" => time() + 60,
"data" => [
"user_id" => $user->id
]
];
$jwt = JWT::encode($token, $this->key);
return $response->withJson([
'success' => true,
'message' => "Login Successfull",
'jwt' => $jwt
]);
}
}
Use Package JWT
use \Firebase\JWT\JWT;
Set Secret Key
private $key = "secretkey"; : This must be unique but in case i simple added string "secretkey" .
Make Variable from Body
$username = $request->getParsedBody('username');
$password = $request->getParsedBody('password');
We can get value and keep in the variable , so we can use in another code block.
Find user
$user = user::where('username',$username)->where('password',$password )->first();
We can add some logic and We can match the data that is in the body with the existing data in our database, as the initialization table using the user::.
Make validate user
if(empty($user)){
return $response->withJson([
'success' => false,
'message' => "Username or Password false"
]);
}
We can add simple logic if username and password are wrong if(empty($user)),Then we will return response message error.
Create Token
$token = [
"iss" => "utopian",
"iat" => time(),
"exp" => time() + 60,
"data" => [
"user_id" => $user->id
]
];
I store the token in the $token variable.
"iss" => "utopian", : It's issuer . The person who issued the token.
"iat" => time(), : It's issue at , The time when this token was created, I make time() it's mean this time.
"exp" => time() + 60, : The expired token , Units in minutes.
"data"=>["user_id" => $user->id] : The data you want to add , in this case i just add the user_id , the value from $user->id.
Generate Token
Then we can generated tokens in this way :
$jwt = JWT::encode($token, $this->key);
We have two parameters, the first is the data token, and the second is the secret key that we created earlier in the $key.
Return JWT
 return $response->withJson([
  'success' => true,
  'message' => "Login Successfull",
  'jwt' => $jwt
  ]);
And finally we can return the response token that has been successfully generated.
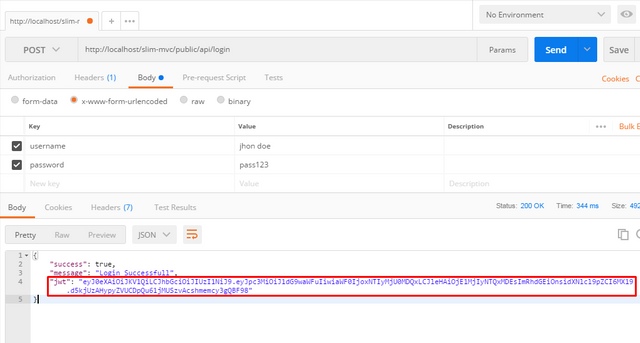
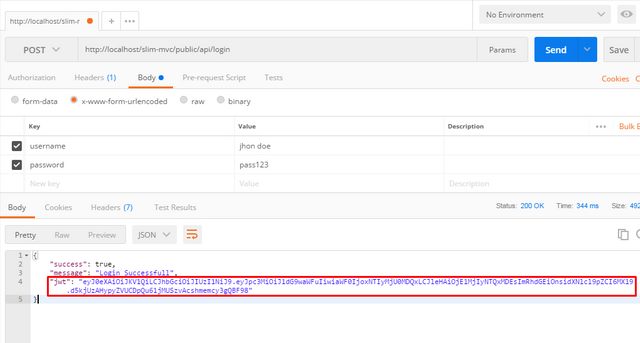
We can open the Xampp to run localhost and open the Postman to show the result.

and finally, we can see the result of the generated token that we have successfully created, so much of me. hopefully, this tutorial can help you thank you. if you get confused, you can see my previous tutorial series.
Curriculum
Posted on Utopian.io - Rewarding Open Source Contributors
Your contribution cannot be approved because it does not follow the Utopian Rules.
You can contact us on Discord.
[utopian-moderator]
Downvoting a post can decrease pending rewards and make it less visible. Common reasons:
Submit
Hey @miguepersa, I just gave you a tip for your hard work on moderation. Upvote this comment to support the utopian moderators and increase your future rewards!
Downvoting a post can decrease pending rewards and make it less visible. Common reasons:
Submit
What the means writing styel should be professional and clear, could you make a example? Where the the part is not understood??
Downvoting a post can decrease pending rewards and make it less visible. Common reasons:
Submit