What Will I Learn?
- Integrate the Showcase library via gradle
- Implement Simple Single Showcase
- Implement Custom Showcase
- Implement Sequence Showcase
- How to reset the specific and all showcases
Requirements
- Android Studio (3.0 recommended)
- Basic understanding of Android Studio tools
- Understanding of Java Programming language
- Understanding of xml layout or design in Android development
- Undestanding how to include dependency on an Android app
Difficulty
- Intermediate
Tutorial Contents
What is MaterialShowcaseView?
Showcase is a situation to show to user what, where or how is the function of a specific view. MaterialShowCaseView is a library using material design that provide showcase view, so we can tutor users to help better understanding of an android app like to guide where is the buy button, what is the function of filter button, etc.
Integrate the project via gradle
First, go to your build.gradle (the project gradle as shown below).
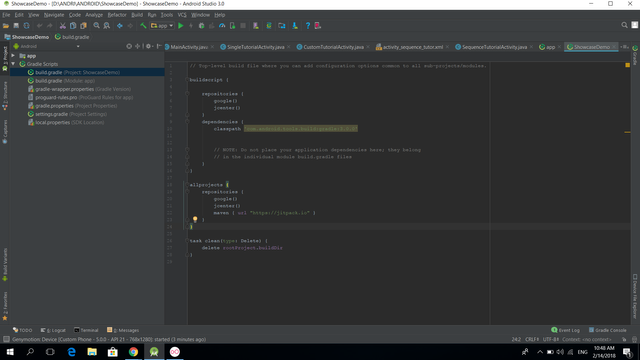
In the allprojects section add this line maven { url "https://jitpack.io" }. This is the allprojects section be like.
allprojects {
    repositories {
        google()
        jcenter()
        maven { url "https://jitpack.io" }
    }
}
After that, we are going to include the dependecy via module:app gradle as shown below.
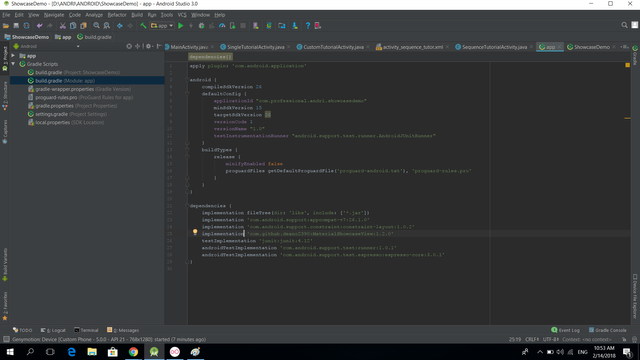
Add this line in the dependency section to include the material showcase dependency implementation 'com.github.deano2390:MaterialShowcaseView:1.2.0'
Your dependency section should look like this.
dependencies {
    implementation fileTree(dir: 'libs', include: ['*.jar'])
    implementation 'com.android.support:appcompat-v7:26.1.0'
    implementation 'com.android.support.constraint:constraint-layout:1.0.2'
    implementation 'com.github.deano2390:MaterialShowcaseView:1.2.0'
    testImplementation 'junit:junit:4.12'
    androidTestImplementation 'com.android.support.test:runner:1.0.1'
    androidTestImplementation 'com.android.support.test.espresso:espresso-core:3.0.1'
}
Once you've done, sync the project and wait until finish. After the gradle has completed the sync, you can use the library on your project.
Creating the buttons to go to simple, custom and sequence showcase
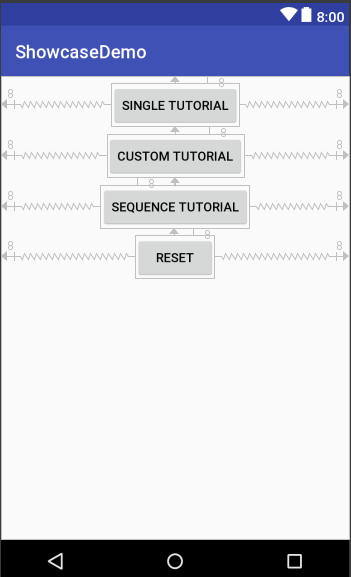
First, we create the layout by dragging 4 buttons that contains simple, custom, sequence showcase and reset all the showcase like something below. Don't forget to set the constraint if you are using constraint as its parent.
After that, go to the MainActivity.java class to get the reference of each button using findViewById like code below.
mSingleButton = findViewById(R.id.single_button);
mCustomButton = findViewById(R.id.custom_button);
mSequenceButton = findViewById(R.id.sequence_button);
Then, we add the listener for the mSingleButton to go to SingleTutorialActivity using intent using code below.
mSingleButton.setOnClickListener(new View.OnClickListener() {
            @Override
            public void onClick(View view) {
                Intent intent = new Intent(MainActivity.this, SingleTutorialActivity.class);
                startActivity(intent);
            }
        });
Once you've done, we're going to make the SingleTutorialActivity class.
Implementing the Simple Single Showcase
First, we are going to create the activity using these steps:
- Right click on our package in java folder and create new activity as shown below.
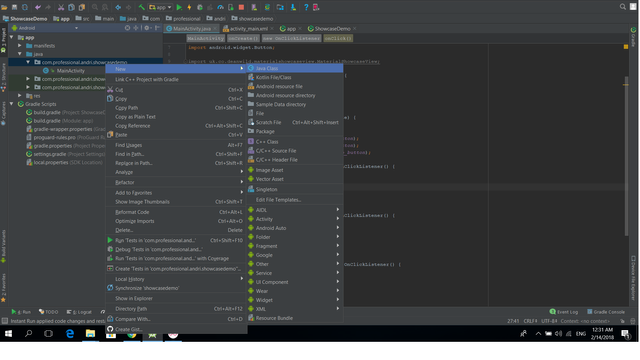
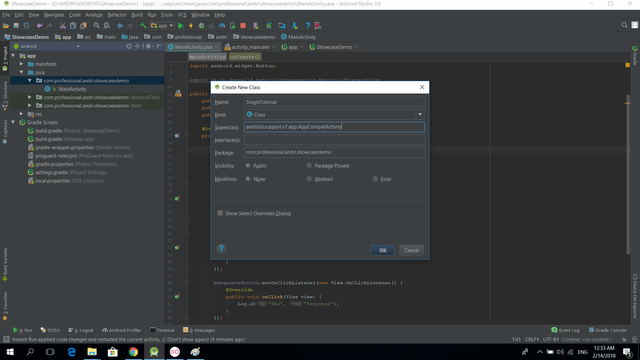
- Name your class as shown below, in this case i named id SingleTutorialActivity. Don't forget to extends the superclass using AppCompatActivity for compability reason. After that, click OK.
- Don't forget to add this line to AndroidManifest.xml file to prevent crash when opening the activity.
<activity android:name=".SingleTutorialActivity"/>
inside the application tag as shown below.
<?xml version="1.0" encoding="utf-8"?>
<manifest xmlns:android="http://schemas.android.com/apk/res/android"
    package="com.professional.andri.showcasedemo">

    <application
        android:allowBackup="true"
        android:icon="@mipmap/ic_launcher"
        android:label="@string/app_name"
        android:roundIcon="@mipmap/ic_launcher_round"
        android:supportsRtl="true"
        android:theme="@style/AppTheme">
        <activity android:name=".MainActivity">
            <intent-filter>
                <action android:name="android.intent.action.MAIN" />

                <category android:name="android.intent.category.LAUNCHER" />
            </intent-filter>
        </activity>
        <activity android:name=".SingleTutorialActivity"/>
    </application>

</manifest>
After the SingleTutorial has been created, we need to make the layout so we can use it on this SingleTutorialActivity class. Follow this steps:
- Click to expand the res folder and right click the layout resource directory as shown below to place under the layout resource directory.
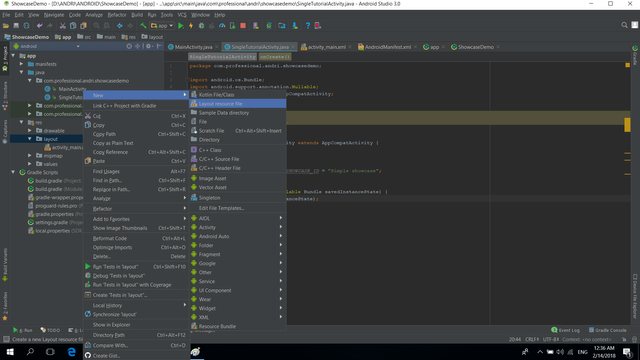
- Then, name the layout resource file and click OK.
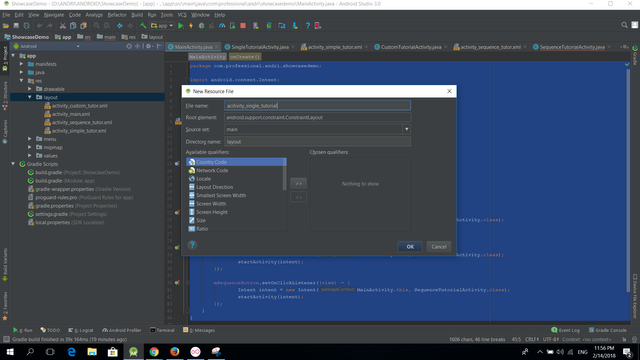
Once the layout has been created, drag and set the constraints or create the 2 buttons using xml depends on your like. The buttons are show single tutor button and reset the specific tutor button. Give them id to refer in the SingleTutorialActivity later. Your single tutorial layout should look like this.
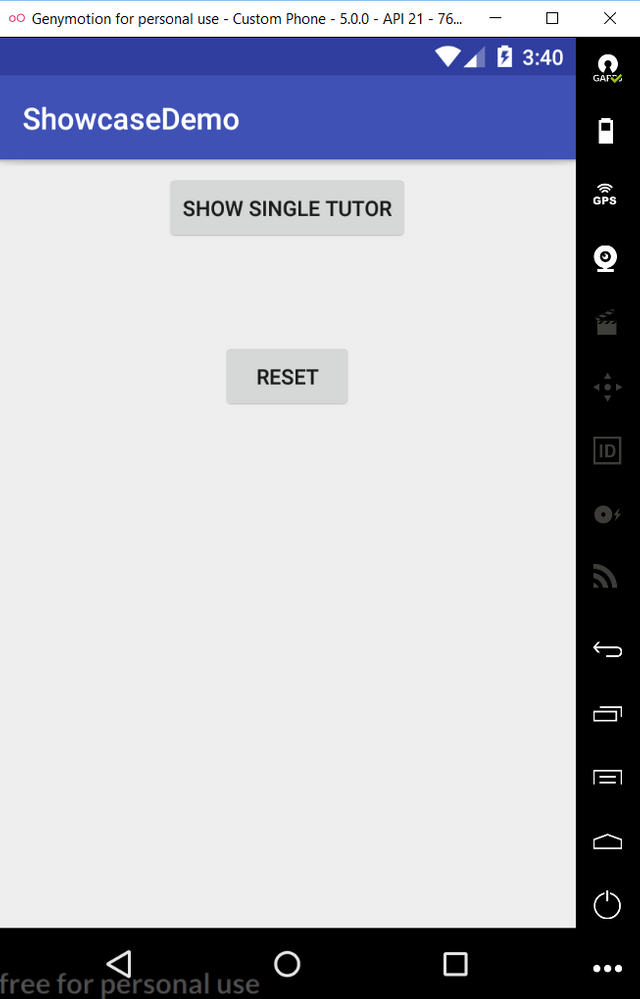
And the single tutorial xml should look like this.
<?xml version="1.0" encoding="utf-8"?>
<android.support.constraint.ConstraintLayout
    xmlns:android="http://schemas.android.com/apk/res/android"
    xmlns:app="http://schemas.android.com/apk/res-auto"
    android:layout_width="match_parent"
    android:layout_height="match_parent">

    <Button
        android:id="@+id/show_tutor_button"
        android:layout_width="wrap_content"
        android:layout_height="wrap_content"
        android:layout_marginEnd="8dp"
        android:layout_marginStart="8dp"
        android:layout_marginTop="8dp"
        android:text="@string/show_single"
        app:layout_constraintEnd_toEndOf="parent"
        app:layout_constraintStart_toStartOf="parent"
        app:layout_constraintTop_toTopOf="parent" />

    <Button
        android:id="@+id/reset_button"
        android:layout_width="wrap_content"
        android:layout_height="wrap_content"
        android:layout_marginEnd="8dp"
        android:layout_marginStart="8dp"
        android:layout_marginTop="8dp"
        android:text="@string/reset"
        app:layout_constraintEnd_toEndOf="parent"
        app:layout_constraintStart_toStartOf="parent"
        app:layout_constraintTop_toBottomOf="@+id/show_tutor_button" />
</android.support.constraint.ConstraintLayout>
After done, we'll create the reference to our activity class to member variable. First, declare the two buttons and create the showcase id constant to use later to reset the tutorial using these code.
private Button mShowTutor;
private Button mResetTutor;

private static final String SHOWCASE_ID = "Simple Showcase";
The next thing to do is override the onCreate method, then setContentView to the corresponding layout, get the buttons reference and set the listener for show single tutorial button. Write down these code.
@Override
    protected void onCreate(@Nullable Bundle savedInstanceState) {
        super.onCreate(savedInstanceState);
        setContentView(R.layout.activity_simple_tutor);
        mShowTutor = findViewById(R.id.show_tutor_button);
        mResetTutor = findViewById(R.id.reset_button);

        mShowTutor.setOnClickListener(new View.OnClickListener() {
            @Override
            public void onClick(View view) {
                showTutor(500);
            }
        });

    }
In the onClick method, i called the showTutor function with 500 value as paramater which is integer data type. Write down this showTutor function and read the description of each comment that describes the detail.
private void showTutor(int millis){
        new MaterialShowcaseView.Builder(this) // instantiate the material showcase view using Builder
                .setTarget(mShowTutor) // set what view will be pointed or highlighted
                .setTitleText("Single") // set the title of the tutorial
                .setDismissText("GOT IT") // set the dismiss text
                .setContentText("This is the choose option button") // set the content or detail text
                .setDelay(millis) // set delay in milliseconds to show the tutor
                .singleUse(SHOWCASE_ID) // set the single use so it is shown only once using our create SHOWCASE_ID constant
                .show();
    }
After done, run your app, go to the single tutorial in the main page and click the "SHOW SINGLE TUTOR BUTTON" and it will display something like this.
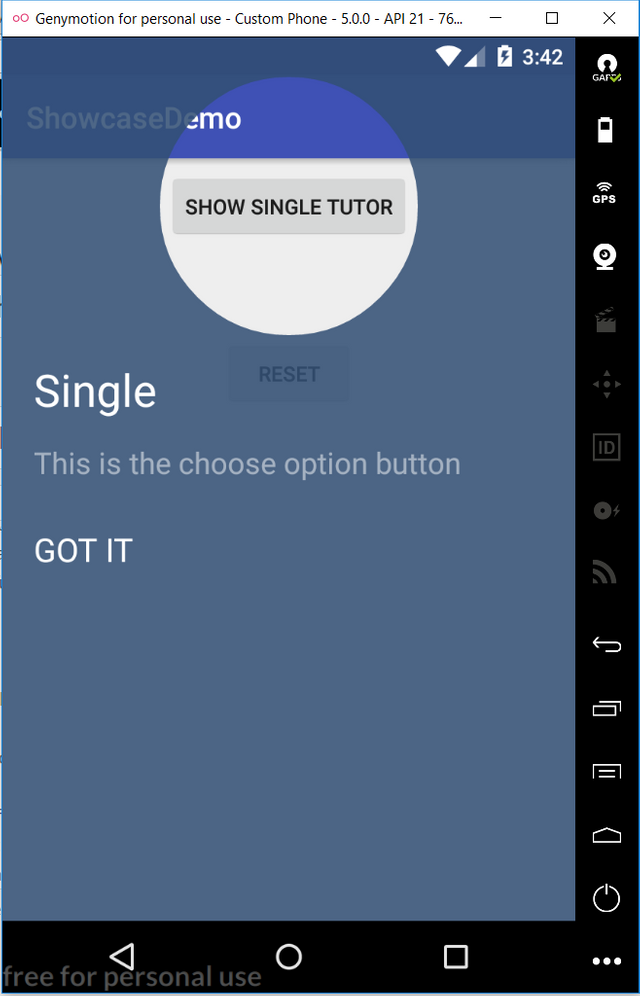
Press the "GOT IT" button to dismiss the showcase. But, notice that the second time you click the "SHOW SINGLE TUTOR" button it doesn't do anything because we set the single use parameter using our constant. This could be very useful when you are dealing with the users so that the showcase doesn't show up every time user open an app on any pages. Nevertheless, sometimes in a specific situation you need to reset the tutorial just in case forgot the functionalities. To do so, on our onCreate method set the listener for mResetButton and reset the single use showcase, then toast to the user that the showcase has been resetted using these code.
 mResetTutor.setOnClickListener(new View.OnClickListener() {
            @Override
            public void onClick(View view) {
                MaterialShowcaseView.resetSingleUse(SingleTutorialActivity.this, SHOWCASE_ID);
                Toast.makeText(SingleTutorialActivity.this, "Simple showcase has been resetted", Toast.LENGTH_SHORT).show();
            }
        });
After you created the reset button functionality to reset. Run your app again show tutor and then click reset. Then, click show tutor again and it will show the tutorial again. Your final SingleTutorialActivity class will look like this.
package com.professional.andri.showcasedemo;

import android.os.Bundle;
import android.support.annotation.Nullable;
import android.support.v7.app.AppCompatActivity;
import android.view.View;
import android.widget.Button;
import android.widget.Toast;

import uk.co.deanwild.materialshowcaseview.MaterialShowcaseView;

/**
 * Created by Andri on 2/14/2018.
 */

public class SingleTutorialActivity extends AppCompatActivity {
    private Button mShowTutor;
    private Button mResetTutor;

    private static final String SHOWCASE_ID = "Simple Showcase";

    @Override
    protected void onCreate(@Nullable Bundle savedInstanceState) {
        super.onCreate(savedInstanceState);
        setContentView(R.layout.activity_simple_tutor);
        mShowTutor = findViewById(R.id.show_tutor_button);
        mResetTutor = findViewById(R.id.reset_button);

        mShowTutor.setOnClickListener(new View.OnClickListener() {
            @Override
            public void onClick(View view) {
                showTutor(500);
            }
        });

        mResetTutor.setOnClickListener(new View.OnClickListener() {
            @Override
            public void onClick(View view) {
                MaterialShowcaseView.resetSingleUse(SingleTutorialActivity.this, SHOWCASE_ID);
                Toast.makeText(SingleTutorialActivity.this, "Simple showcase has been resetted", Toast.LENGTH_SHORT).show();
            }
        });
    }

    private void showTutor(int millis){
        new MaterialShowcaseView.Builder(this)
                .setTarget(mShowTutor)
                .setTitleText("Single")
                .setDismissText("GOT IT")
                .setContentText("This is the choose option button")
                .setDelay(millis)
                .singleUse(SHOWCASE_ID)
                .show();
    }
}
Okay, we've done with the simple single tutorial. Let's continue on custom example.
Implementing the custom showcase
The process is almost the same with the simple single showcase. We are using the same layout, so you can copy the layout and renamed to activity_custom_tutor or something like that depends on your need. You can change the text to "SHOW CUSTOM TUTOR". The same thing go to activity class, you can rename it to CustomTutorialActivity and don't forget to add to AndroidManifest using this line <activity android:name=".CustomTutorialActivity"/>.
Now, we are going to create a menu layout that will be used for options menu. Follow these steps:
- Right click the android res directory and create new Android resource directory as shown below.
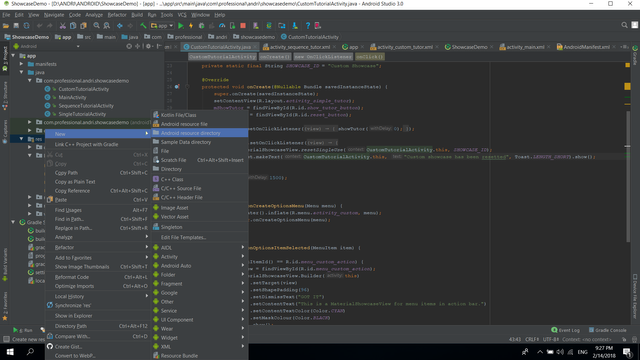
- Choose the resource type to menu and click OK. The menu resource directory will be created.
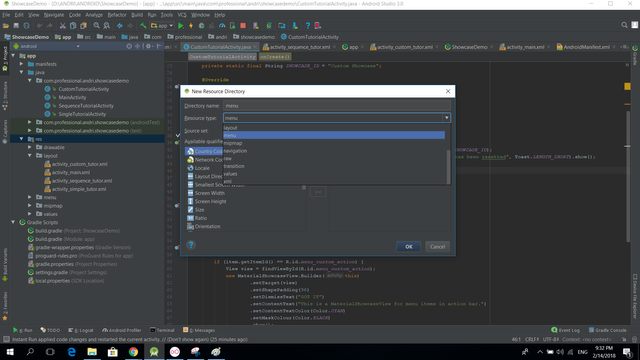
- Create the menu resource file by right click on the menu resource directory and click new -> menu resource file.
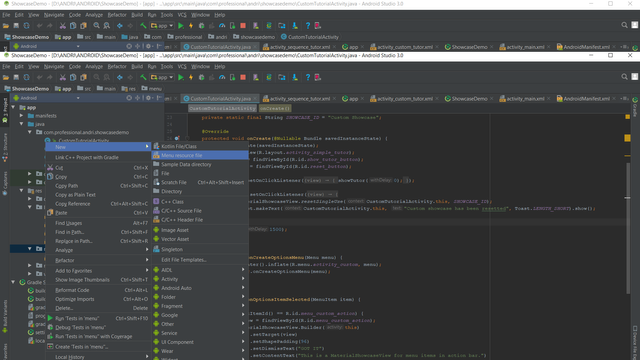
- Name it menu_custom, open up the file and replace with this code
<?xml version="1.0" encoding="utf-8"?>
<menu xmlns:android="http://schemas.android.com/apk/res/android"
    xmlns:app="http://schemas.android.com/apk/res-auto">

    <item
        android:id="@+id/menu_custom_action"
        android:icon="@mipmap/ic_launcher"
        android:title="Action"
        app:showAsAction="always"
        />

</menu>
Go to your CustomTutorialActivity class, override the onCreateOptionsMenu method and inflate our created menu_custom before using this code.
@Override
    public boolean onCreateOptionsMenu(Menu menu) {
        getMenuInflater().inflate(R.menu.menu_custom, menu);
        return super.onCreateOptionsMenu(menu);
    }
Then, we need to override the onOptionsItemSelected using this function to show the showcase when the menu option is clicked. Write these code and read the description of each line
@Override
    public boolean onOptionsItemSelected(MenuItem item) {

        if (item.getItemId() == R.id.menu_custom_action) { //check if the specific button, then will run the statement below
            View view = findViewById(R.id.menu_custom_action); //get the reference
            new MaterialShowcaseView.Builder(this) //instantiate the material showcase view
                    .setTarget(view) // set target to view
                    .setShapePadding(96) // set the padding
                    .setDismissText("GOT IT") // set the dismiss text
                    .setContentText("This is a MaterialShowcaseView for menu items in action bar.") // set the content text
                    .setContentTextColor(Color.CYAN) //set the content text color.
                    .setMaskColour(Color.BLACK) // set masking color
                    .show();
        }

        return super.onOptionsItemSelected(item);
    }
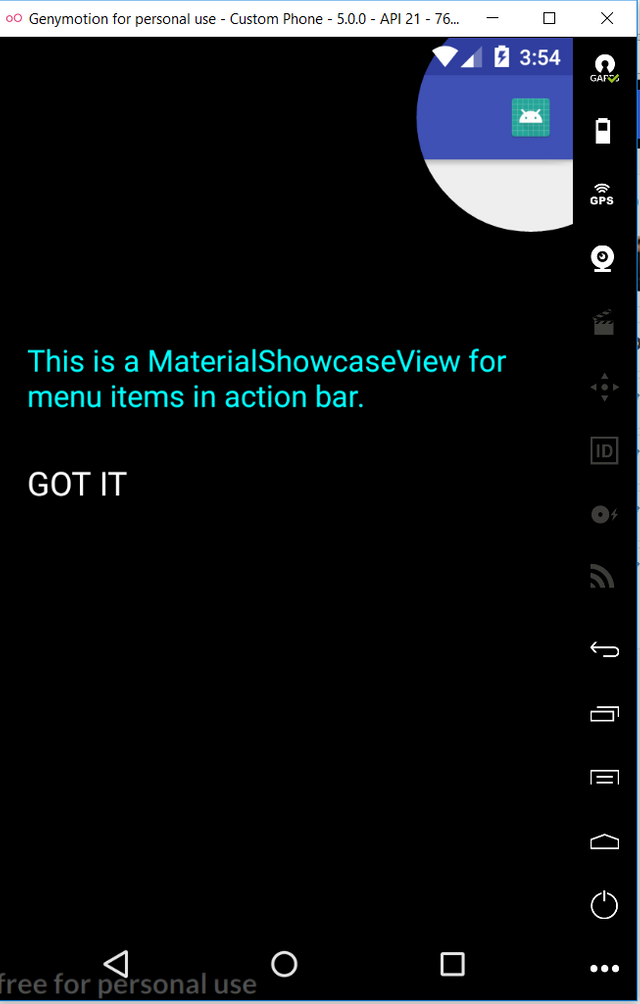
Once you've done, run the app and click the menu button on the top right screen. It will display something like this.
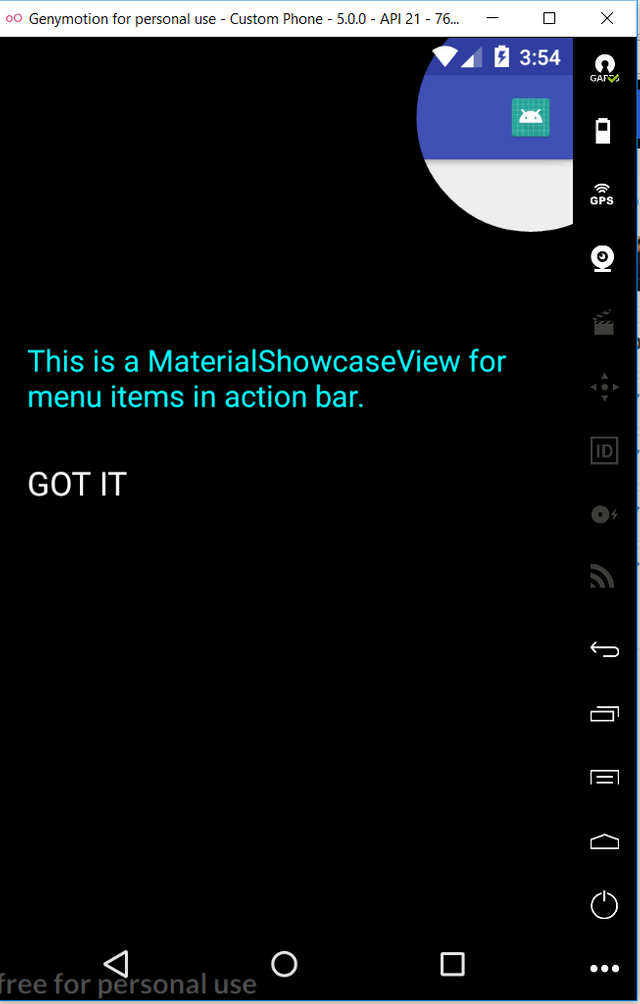
This is the final CustomTutorialActivity.java class.
package com.professional.andri.showcasedemo;

import android.graphics.Color;
import android.os.Bundle;
import android.support.annotation.Nullable;
import android.support.v7.app.AppCompatActivity;
import android.view.Menu;
import android.view.MenuItem;
import android.view.View;
import android.widget.Button;
import android.widget.Toast;

import uk.co.deanwild.materialshowcaseview.MaterialShowcaseView;

/**
 * Created by Andri on 2/14/2018.
 */

public class CustomTutorialActivity extends AppCompatActivity {
    private Button mShowTutor;
    private Button mResetTutor;

    private static final String SHOWCASE_ID = "Custom Showcase";

    @Override
    protected void onCreate(@Nullable Bundle savedInstanceState) {
        super.onCreate(savedInstanceState);
        setContentView(R.layout.activity_custom_tutor);
        mShowTutor = findViewById(R.id.show_tutor_button);
        mResetTutor = findViewById(R.id.reset_button);

        mShowTutor.setOnClickListener(new View.OnClickListener() {
            @Override
            public void onClick(View view) {
                showTutor(0);
            }
        });

        mResetTutor.setOnClickListener(new View.OnClickListener() {
            @Override
            public void onClick(View view) {
                MaterialShowcaseView.resetSingleUse(CustomTutorialActivity.this, SHOWCASE_ID);
                Toast.makeText(CustomTutorialActivity.this, "Custom showcase has been resetted", Toast.LENGTH_SHORT).show();
            }
        });
    }

    @Override
    public boolean onCreateOptionsMenu(Menu menu) {
        getMenuInflater().inflate(R.menu.menu_custom, menu);
        return super.onCreateOptionsMenu(menu);
    }

    @Override
    public boolean onOptionsItemSelected(MenuItem item) {

        if (item.getItemId() == R.id.menu_custom_action) {
            View view = findViewById(R.id.menu_custom_action);
            new MaterialShowcaseView.Builder(this)
                    .setTarget(view)
                    .setShapePadding(96)
                    .setDismissText("GOT IT")
                    .setContentText("This is a MaterialShowcaseView for menu items in action bar.")
                    .setContentTextColor(Color.CYAN)
                    .setMaskColour(Color.BLACK)
                    .show();
        }

        return super.onOptionsItemSelected(item);
    }

    private void showTutor(int withDelay) {
        new MaterialShowcaseView.Builder(this)
                .setTarget(mShowTutor)
                .setContentText("This is the magic button")
                .setDismissOnTouch(true)
                .setContentTextColor(getResources().getColor(R.color.colorPrimary))
                .setMaskColour(getResources().getColor(R.color.colorAccent))
                .setDelay(withDelay) // optional but starting animations immediately in onCreate can make them choppy
                .singleUse(SHOWCASE_ID) // provide a unique ID used to ensure it is only shown once
                .show();
    }
}
Okay, we've done with the custom tutorial showcase. We will continue to the sequence tutorial
Implementing the sequence showcase
First of all, we need to create the layout. You can drag the elements or design using xml like below. We create the 2 buttons to show and reset the showcase. Then, we create another button, a textview and a checkbox for the sequence later.
<?xml version="1.0" encoding="utf-8"?>
<android.support.constraint.ConstraintLayout
    xmlns:android="http://schemas.android.com/apk/res/android"
    xmlns:app="http://schemas.android.com/apk/res-auto"
    xmlns:tools="http://schemas.android.com/tools"
    android:layout_width="match_parent"
    android:layout_height="match_parent">

    <Button
        android:id="@+id/show_tutor_button"
        android:layout_width="wrap_content"
        android:layout_height="wrap_content"
        android:layout_marginEnd="8dp"
        android:layout_marginStart="8dp"
        android:layout_marginTop="8dp"
        android:text="@string/show_sequence"
        app:layout_constraintEnd_toEndOf="parent"
        app:layout_constraintStart_toStartOf="parent"
        app:layout_constraintTop_toTopOf="parent" />

    <Button
        android:id="@+id/reset_button"
        android:layout_width="wrap_content"
        android:layout_height="wrap_content"
        android:layout_marginEnd="8dp"
        android:layout_marginStart="8dp"
        android:layout_marginTop="8dp"
        android:text="@string/reset"
        app:layout_constraintEnd_toEndOf="parent"
        app:layout_constraintStart_toStartOf="parent"
        app:layout_constraintTop_toBottomOf="@+id/show_tutor_button" />

    <Button
        android:id="@+id/view1"
        android:layout_width="wrap_content"
        android:layout_height="wrap_content"
        android:layout_marginEnd="8dp"
        android:layout_marginStart="8dp"
        android:layout_marginTop="8dp"
        android:text="View 1"
        app:layout_constraintEnd_toEndOf="parent"
        app:layout_constraintStart_toStartOf="parent"
        app:layout_constraintTop_toBottomOf="@+id/reset_button" />

    <TextView
        android:id="@+id/view2"
        android:layout_width="wrap_content"
        android:layout_height="wrap_content"
        android:layout_marginEnd="8dp"
        android:layout_marginStart="8dp"
        android:layout_marginTop="8dp"
        android:text="View 2"
        app:layout_constraintEnd_toEndOf="parent"
        app:layout_constraintStart_toStartOf="parent"
        app:layout_constraintTop_toBottomOf="@+id/view1" />

    <CheckBox
        android:id="@+id/view3"
        android:layout_width="wrap_content"
        android:layout_height="wrap_content"
        android:layout_marginEnd="8dp"
        android:layout_marginStart="8dp"
        android:layout_marginTop="8dp"
        android:text="View 3"
        app:layout_constraintEnd_toEndOf="parent"
        app:layout_constraintStart_toStartOf="parent"
        app:layout_constraintTop_toBottomOf="@+id/view2" />
</android.support.constraint.ConstraintLayout>
Your sequence layout should look like something like this.
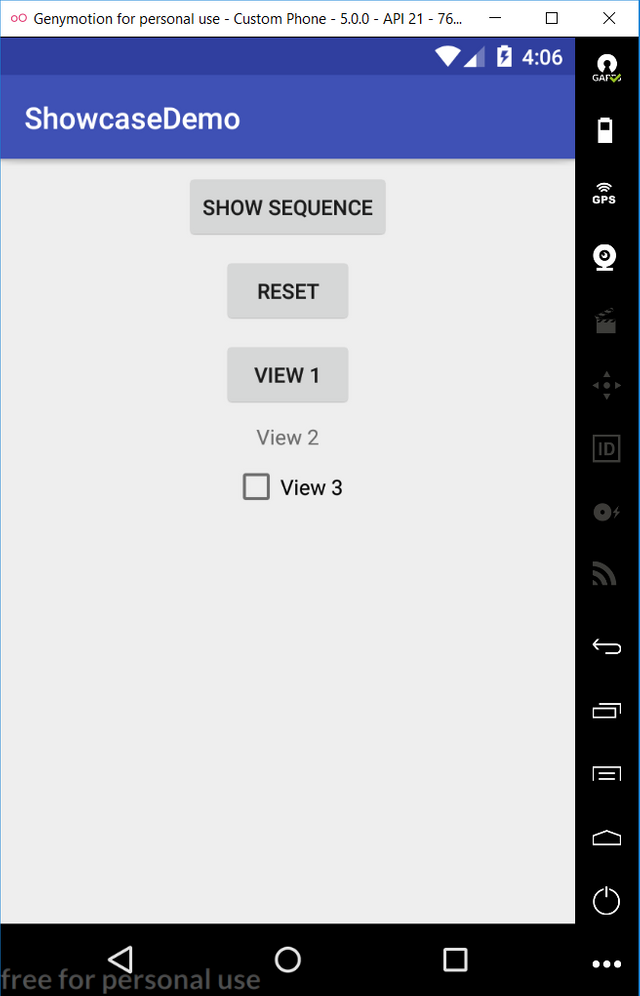
Then, create the SequenceTutorialActivity and add it to AndroidManifest.xml.
<?xml version="1.0" encoding="utf-8"?>
<manifest xmlns:android="http://schemas.android.com/apk/res/android"
    package="com.professional.andri.showcasedemo">

    <application
        android:allowBackup="true"
        android:icon="@mipmap/ic_launcher"
        android:label="@string/app_name"
        android:roundIcon="@mipmap/ic_launcher_round"
        android:supportsRtl="true"
        android:theme="@style/AppTheme">
        <activity android:name=".MainActivity">
            <intent-filter>
                <action android:name="android.intent.action.MAIN" />

                <category android:name="android.intent.category.LAUNCHER" />
            </intent-filter>
        </activity>
        <activity android:name=".SingleTutorialActivity"/>
        <activity android:name=".CustomTutorialActivity"/>
        <activity android:name=".SequenceTutorialActivity"/>
    </application>

</manifest>
Go to the SequenceTutorialActivity class and write as the following code to get reference and set listeners.
package com.professional.andri.showcasedemo;

import android.graphics.Color;
import android.os.Bundle;
import android.support.annotation.Nullable;
import android.support.v7.app.AppCompatActivity;
import android.view.Menu;
import android.view.MenuItem;
import android.view.View;
import android.widget.Button;
import android.widget.CheckBox;
import android.widget.TextView;
import android.widget.Toast;

import uk.co.deanwild.materialshowcaseview.MaterialShowcaseSequence;
import uk.co.deanwild.materialshowcaseview.MaterialShowcaseView;
import uk.co.deanwild.materialshowcaseview.ShowcaseConfig;

/**
 * Created by Andri on 2/14/2018.
 */

public class SequenceTutorialActivity extends AppCompatActivity {
    private Button mShowTutor;
    private Button mResetTutor;
    private Button mView1;
    private TextView mView2;
    private CheckBox mView3;

    private static final String SHOWCASE_ID = "Sequence Showcase";

    @Override
    protected void onCreate(@Nullable Bundle savedInstanceState) {
        super.onCreate(savedInstanceState);
        setContentView(R.layout.activity_sequence_tutor);
        mShowTutor = findViewById(R.id.show_tutor_button);
        mResetTutor = findViewById(R.id.reset_button);
        mView1 = findViewById(R.id.view1);
        mView2 = findViewById(R.id.view2);
        mView3 = findViewById(R.id.view3);

        mShowTutor.setOnClickListener(new View.OnClickListener() {
            @Override
            public void onClick(View view) {
                showTutorSequence(0);
            }
        });

        mResetTutor.setOnClickListener(new View.OnClickListener() {
            @Override
            public void onClick(View view) {
                MaterialShowcaseView.resetSingleUse(SequenceTutorialActivity.this, SHOWCASE_ID);
                Toast.makeText(SequenceTutorialActivity.this, "Sequence showcase has been resetted", Toast.LENGTH_SHORT).show();
            }
        });

    }
}
In the above code we call the showTutorSequence function with 500 value as parameter in milliseconds to become the interval of each sequence tutorial. Write this function and read the descriptions.
private void showTutorSequence(int millis) {

        ShowcaseConfig config = new ShowcaseConfig(); //create the showcase config
        config.setDelay(millis); //set the delay of each sequence using millis variable

        MaterialShowcaseSequence sequence = new MaterialShowcaseSequence(this, SHOWCASE_ID); // create the material showcase sequence

        sequence.setOnItemShownListener(new MaterialShowcaseSequence.OnSequenceItemShownListener() {
            @Override
            public void onShow(MaterialShowcaseView itemView, int position) {
                Toast.makeText(itemView.getContext(), "Item #" + position, Toast.LENGTH_SHORT).show();
            }
        }); // set the listener of the sequence order to know we are in which position

        sequence.setConfig(config); set the showcase config to the sequence.

        sequence.addSequenceItem(mView1, "This is a button made for the first sequence", "GOT IT"); // add view for the first sequence, in this case it is a button.

        sequence.addSequenceItem(
                new MaterialShowcaseView.Builder(this)
                        .setTarget(mView2)
                        .setDismissText("OK")
                        .setContentText("This is a textview made for the second sequence")
                        .withRectangleShape(true)
                        .build()
        ); // add view for the second sequence, in this case it is a textview.

        sequence.addSequenceItem(
                new MaterialShowcaseView.Builder(this)
                        .setTarget(mView3)
                        .setDismissText("UNDERSTAND")
                        .setContentText("This is the checkbox made for the third sequence")
                        .withCircleShape()
                        .build()
        ); // add view for the third sequence, in this case it is a checkbox.

        sequence.start(); //start the sequence showcase

    }
Now, run your project and choose the sequence tutorial. Click the show sequence button and it will display something like this.
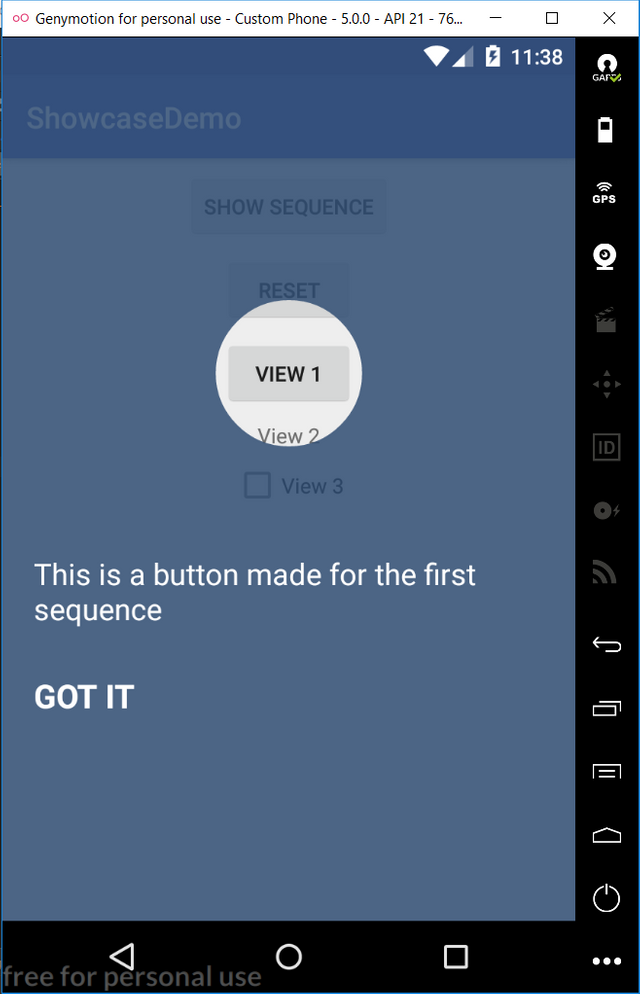
Click the "GOT IT" and wait 500 ms, the next sequence will appear like this.
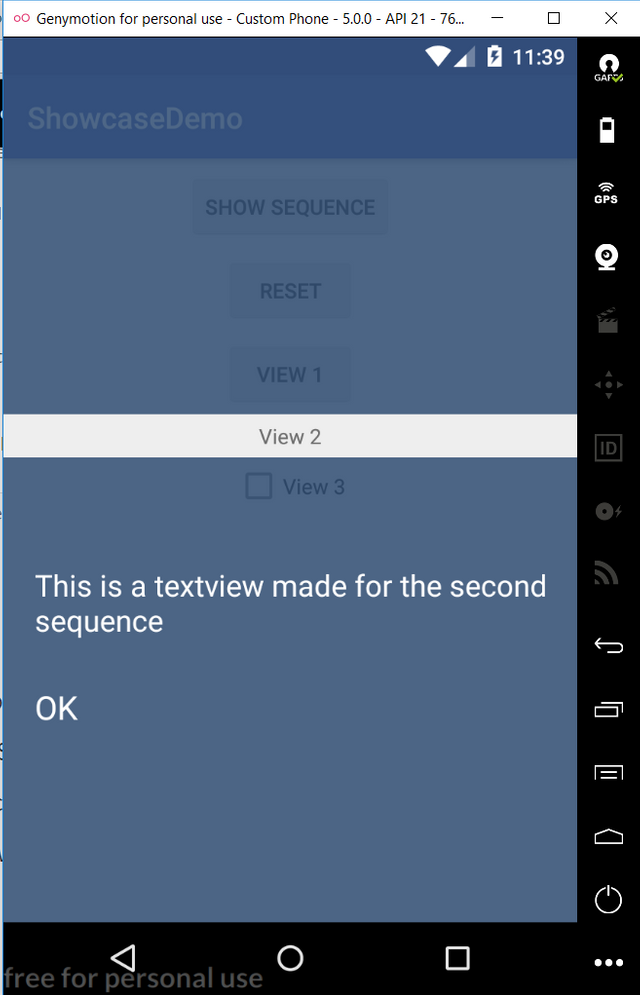
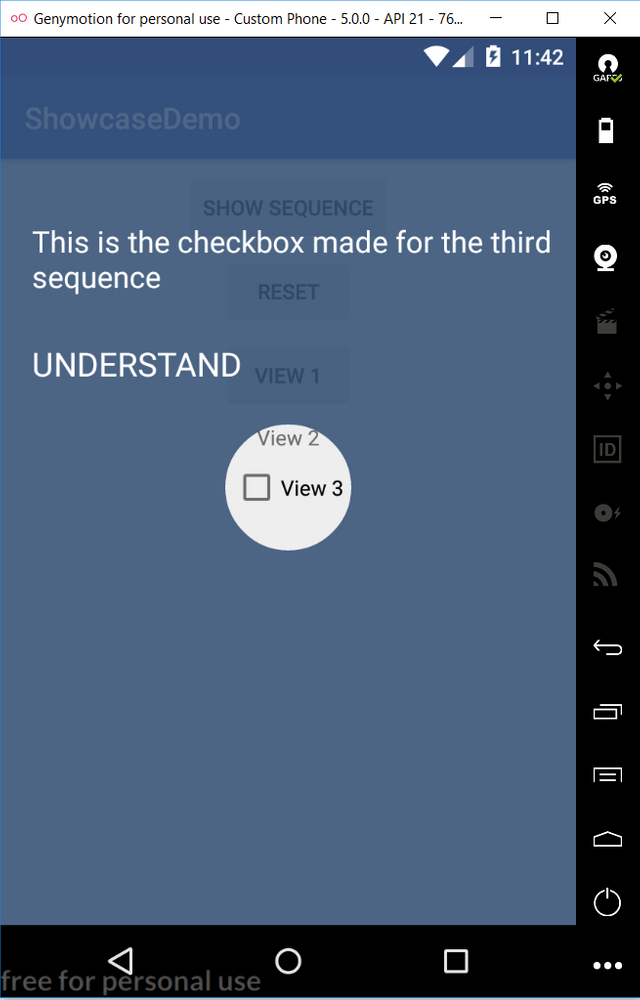
Click the “OK” and wait 500 ms again, the third sequence will be appeared as shown below.
This is the final SequenceTutorialActivity.
package com.professional.andri.showcasedemo;

import android.graphics.Color;
import android.os.Bundle;
import android.support.annotation.Nullable;
import android.support.v7.app.AppCompatActivity;
import android.view.Menu;
import android.view.MenuItem;
import android.view.View;
import android.widget.Button;
import android.widget.CheckBox;
import android.widget.TextView;
import android.widget.Toast;

import uk.co.deanwild.materialshowcaseview.MaterialShowcaseSequence;
import uk.co.deanwild.materialshowcaseview.MaterialShowcaseView;
import uk.co.deanwild.materialshowcaseview.ShowcaseConfig;

/**
 * Created by Andri on 2/14/2018.
 */

public class SequenceTutorialActivity extends AppCompatActivity {
    private Button mShowTutor;
    private Button mResetTutor;
    private Button mView1;
    private TextView mView2;
    private CheckBox mView3;

    private static final String SHOWCASE_ID = "Sequence Showcase";

    @Override
    protected void onCreate(@Nullable Bundle savedInstanceState) {
        super.onCreate(savedInstanceState);
        setContentView(R.layout.activity_sequence_tutor);
        mShowTutor = findViewById(R.id.show_tutor_button);
        mResetTutor = findViewById(R.id.reset_button);
        mView1 = findViewById(R.id.view1);
        mView2 = findViewById(R.id.view2);
        mView3 = findViewById(R.id.view3);

        mShowTutor.setOnClickListener(new View.OnClickListener() {
            @Override
            public void onClick(View view) {
                showTutorSequence(500);
            }
        });

        mResetTutor.setOnClickListener(new View.OnClickListener() {
            @Override
            public void onClick(View view) {
                MaterialShowcaseView.resetSingleUse(SequenceTutorialActivity.this, SHOWCASE_ID);
                Toast.makeText(SequenceTutorialActivity.this, "Sequence showcase has been resetted", Toast.LENGTH_SHORT).show();
            }
        });

    }

    private void showTutorSequence(int millis) {

        ShowcaseConfig config = new ShowcaseConfig();
        config.setDelay(millis);

        MaterialShowcaseSequence sequence = new MaterialShowcaseSequence(this, SHOWCASE_ID);

        sequence.setOnItemShownListener(new MaterialShowcaseSequence.OnSequenceItemShownListener() {
            @Override
            public void onShow(MaterialShowcaseView itemView, int position) {
                Toast.makeText(itemView.getContext(), "Item #" + position, Toast.LENGTH_SHORT).show();
            }
        });

        sequence.setConfig(config);

        sequence.addSequenceItem(mView1, "This is a button made for the first sequence", "GOT IT");

        sequence.addSequenceItem(
                new MaterialShowcaseView.Builder(this)
                        .setTarget(mView2)
                        .setDismissText("OK")
                        .setContentText("This is a textview made for the second sequence")
                        .withRectangleShape(true)
                        .build()
        );

        sequence.addSequenceItem(
                new MaterialShowcaseView.Builder(this)
                        .setTarget(mView3)
                        .setDismissText("UNDERSTAND")
                        .setContentText("This is the checkbox made for the third sequence")
                        .withCircleShape()
                        .build()
        );

        sequence.start();

    }
}
And this the final MainActivity class.
package com.professional.andri.showcasedemo;

import android.content.Intent;
import android.os.Bundle;
import android.support.v7.app.AppCompatActivity;
import android.view.View;
import android.widget.Button;

public class MainActivity extends AppCompatActivity {
    public Button mSingleButton;
    public Button mCustomButton;
    public Button mSequenceButton;

    @Override
    protected void onCreate(Bundle savedInstanceState) {
        super.onCreate(savedInstanceState);
        setContentView(R.layout.activity_main);
        mSingleButton = findViewById(R.id.single_button);
        mCustomButton = findViewById(R.id.custom_button);
        mSequenceButton = findViewById(R.id.sequence_button);

        mSingleButton.setOnClickListener(new View.OnClickListener() {
            @Override
            public void onClick(View view) {
                Intent intent = new Intent(MainActivity.this, SingleTutorialActivity.class);
                startActivity(intent);
            }
        });

        mCustomButton.setOnClickListener(new View.OnClickListener() {
            @Override
            public void onClick(View view) {
                Intent intent = new Intent(MainActivity.this, CustomTutorialActivity.class);
                startActivity(intent);
            }
        });

        mSequenceButton.setOnClickListener(new View.OnClickListener() {
            @Override
            public void onClick(View view) {
                Intent intent = new Intent(MainActivity.this, SequenceTutorialActivity.class);
                startActivity(intent);
            }
        });
    }
}
That all about this materialshowcase tutorial. This showcase is designed to help and teach user better understanding of an app functionality, design and user experience. Thanks for following this guide.
Posted on Utopian.io - Rewarding Open Source Contributors
Thank you for the contribution. It has been approved.
You can contact us on Discord.
[utopian-moderator]
Downvoting a post can decrease pending rewards and make it less visible. Common reasons:
Submit
Hey @andrixyz I am @utopian-io. I have just upvoted you!
Achievements
Suggestions
Get Noticed!
Community-Driven Witness!
I am the first and only Steem Community-Driven Witness. Participate on Discord. Lets GROW TOGETHER!
Up-vote this comment to grow my power and help Open Source contributions like this one. Want to chat? Join me on Discord https://discord.gg/Pc8HG9x
Downvoting a post can decrease pending rewards and make it less visible. Common reasons:
Submit