Install WordPress in Unmanaged VPS is not as fast as it used to be until I finally got acquainted with Webuzo. What is Webuzo? Webuzo is one of the VPS control panels such as zPanel and Kloxo which is currently in great demand by VPS users because of its ease when installed and it looks user friendly. In addition, webuzo integrates directly with the Softaculous auto installer script so that we can install various web applications such as WordPress, Joomla, Opencart and so on.
For you new users of Webuzo, maybe in your mind you will be wondering how to add new wordpress in Webuzo? The way is quite simple just brothers, just like installing new wordpress in shared hosting. Namely Add new domain, change DNS domain, last install WordPress.
Only that ? yes that's it, no longer need to enter ssh terminal using putty. My assumption friends using webuzo premium version, if the free version, yes .. WordPress not included in the line of script auto installer script in webuzo free version.
ok, go ahead, Login first to Webuzo panel
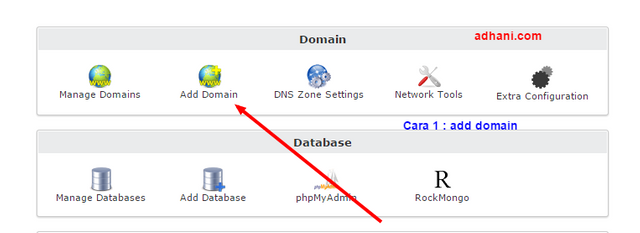
Add Domain on Webuzo
Click add domain in the "Add New Domain"
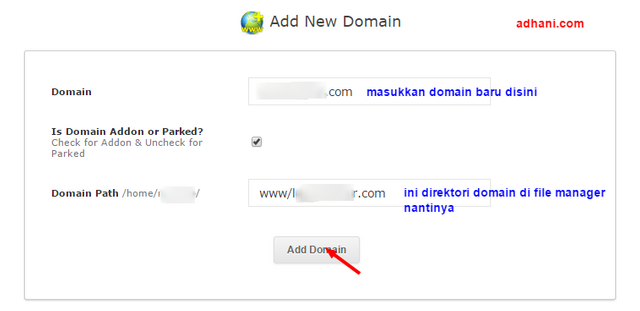
Enter a new domain in the "domains" section
In the "Added or parked Domain" section, leave it unchecked for the addon and uncheck options for the parked domain
In the "domain path" section will be automatically generated or you can set it yourself. This is the domain directory in the file manager later.
Furthermore, already add domain in webuzo go to next step, that is DNS domain setting. For that, we must make the domain is connected to the server and need to register the nameservers in the registrar where we buy the domain.
There are two real ways, first using Cloudflare or second way, pointing domains to the ip server.
DNS domain settings
Method 1: Wear Cloudflare
For Cloudflare itself, if you already have an account there, just add a domain. Then Cloudflare will scan the newly added domain. If successful Cloudflare will have Ada setting up DNS using his own DNS. We live only in registrar domain using Cloudflare DNS. Done.
Way 2: Register the nameserver in the domain registrar it resides
On this occasion I use namecheap, the same way when using another domain registrar.
First of all, you need to login to namecheap, and choose the domain you want to point to the IP server
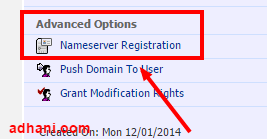
In the "Advanced Options" section click on "Nameserver Registration"
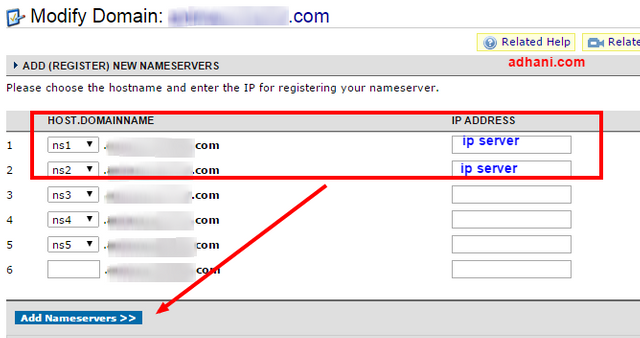
Enter the server IP in the "IP Address" section, then click "Add Nameservers"
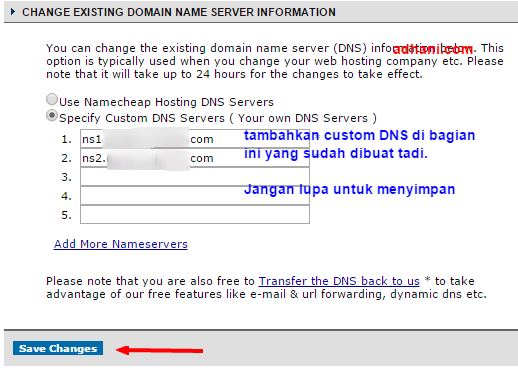
Then, go back to "Domain Name Server Setup" fill in with your ns1.domain.com and ns2.yourdomain.com that you pointed to the previous server ip. Do not forget to save (save changes)
Wait a few minutes, then check on the browser page by typing the domain. If it looks like the image below, it's a sign of your domain successfully pointing to your VPS server ip.

Additional info:
- Each new domain is added in webuzo,
DNS settings will use the custom DNS
domain. For example, we have a
domain that is located at
testdomain.com then its DNS will be
ns1.testdomain.com and
ns2.testdomain.com. How to make it
like that, as I mentioned before.
Install WordPress
Go back to the Webuzo panel, click "Blogs" then choose "WordPress"
Perform configuration according to the wishes of each, if it is click "Install"

If successful, it will look like this.
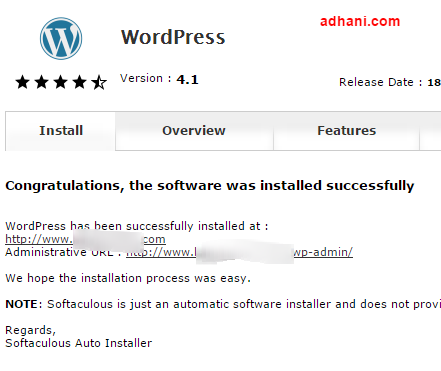
Please login to WordPress dashboard, set themes and plugins as you like, then post your first article.
Good luck and hopefully useful.
Thank you very much
Posted on Utopian.io - Rewarding Open Source Contributors
Your contribution cannot be approved because it does not follow the Utopian Rules, and is considered as plagiarism. Plagiarism is not allowed on Utopian, and posts that engage in plagiarism will be flagged and hidden forever.
Source
You can contact us on Discord.
[utopian-moderator]
Downvoting a post can decrease pending rewards and make it less visible. Common reasons:
Submit