Repository
https://github.com/facebook/react
Welcome to the Tutorial of Creating Responsive Web Apps Using ReactJS, NodeJS and ReactiveX
What Will I Learn?
- You will learn how to create a Complete Responsive Web Application using React,js, Node.js and ReactiveX.
- You will learn how to build a Sketching app that is scalable and robust.
- You will learn how to create your own stack.
- You will learn how to connect the server from the web sockets.
- You will learn how to publish a timer over the web socket.
- You will learn how to spend a Socket in React.
Requirements
System Requirements:
- Node.js 8.11.1
- Yarn
- Visual Studio Code or any similar editor for code editing
- A computer with basic functionalities and Web browsers
OS Support:
- Windows 7/8/10
- macOS
- Linux
Difficulty
- Intermediate
Resources
Required Understanding
- You need a good knowledge of HTML, CSS and JavaScript
- A fair understanding of Node.js and React.js
- A thirst for learning and developing something new
Description
In this tutorial we will study how to combine React, Socket.IO, Node.js and ReactiveX into a real-time stack and then connect them to the RethinkDB. You will understand how they are able to work in concert to attain close to real-time behavior on the project. You will also figure out how to think of scaling your own stack, along with manage failing situations. You are going to leverage the power of the stack and enable it perform a lot of heavy lifting for you.
Although we will be developing a collaborative sketching application which can be scaled horizontally along with complete failover functionality, all of the server-side program code will stay in a single file having lower than hundred lines of code. Although the client will manage it gracefully when it seems to lose a connection to the service
Architecture Of Our App?
Whenever you consider app architecture, you most likely imagine some kind of UI, whether it's HTML or native mobile, and a service this UI uses. During the last 10 years or so, these kinds of services had been mainly developed using HTTP and REST. For instance, you open an application, and also the UI code calls the service over HTTP to obtain a listing of restaurants within your location along with rankings for every restaurant. The thing is that the UI makes a decision to call the service then makes the results. The user interface is within control. This requests the actual service to return restaurants within the location. The user interface will certainly choose when to call the service yet again to get an up-to-date list
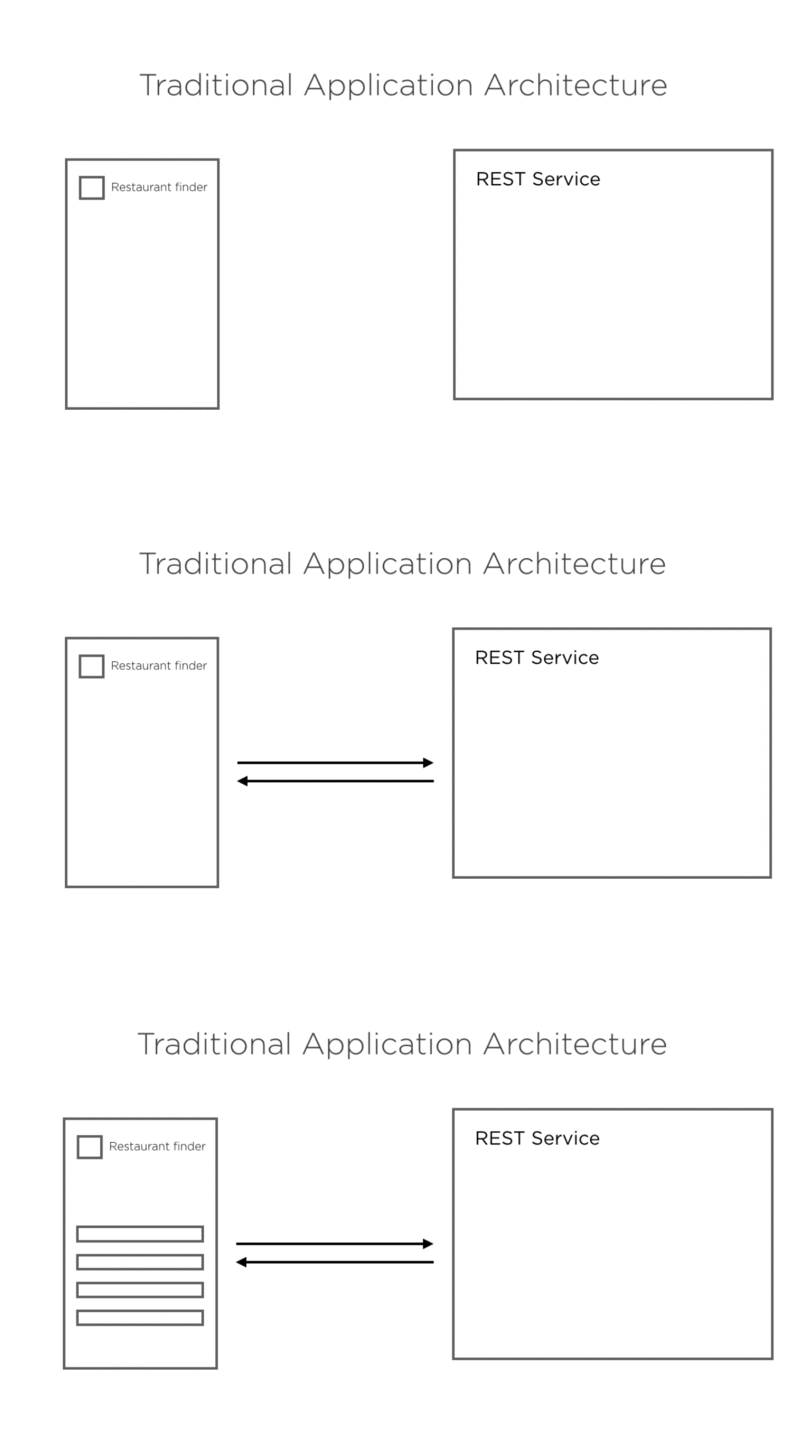
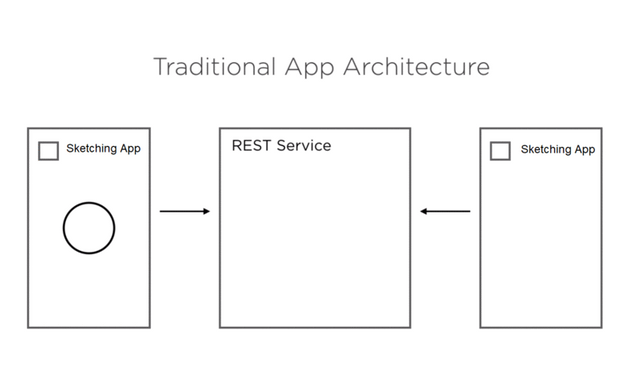
But in case of our sketching app this would be very hard to develop having an HTTP and REST service since the application would continuously have to call the server for info, even though no information altered. Each time the user would likely experience latency like a new request will be sent to the server prior to the response comes back. This too puts a lot of extra load on the service since you have clients continually pining to get changes. Our application will be much better designed on a real-time stack in which the UI leads a system connection to the service by utilizing WebSockets, allowing the service to deliver events to it when they occur, permitting the application to up-date within close to real-time
Setting up the Environment:
Once you have installed Node.js and Yarn into your system, we will proceed to the development of our react app. Which we have created using create-react-apprepository.
Some of the main steps are listed below:
Type this command to create react app;
npx create-react-app sketching-app
It is going to make a directory named sketching-app inside the current folder.
Within that directory, it will create your initial project structure and install the transitive dependencies:
sketching-app
├── README.md
├── node_modules
├── package.json
├── .gitignore
├── public
│   └── favicon.ico
│   └── index.html
│   └── manifest.json
└── src
    └── App.css
    └── App.js
    └── App.test.js
    └── index.css
    └── index.js
    └── logo.svg
    └── registerServiceWorker.js
I have uploaded the package.json file in the project directory, but you can also create your own package.json file if required by executing some commands like:
npm init
npm init –yes
The client part contains the react code of our application and server part contains the logic.
Starting Our Project:
Now we will code up our React application to show a date value which it gets from the server of the WebSockets. This particular date value is going to be generated on the server and will always update with time.
You have to install the required packages for the client and the server. Therefore cd in to the client folder, and also run the yarn command.
After this run yarn command in the server folder as well. Now that you have the packages installed, run yarn start in the client. You should see the application setting up and launching in the web browser on port 3000
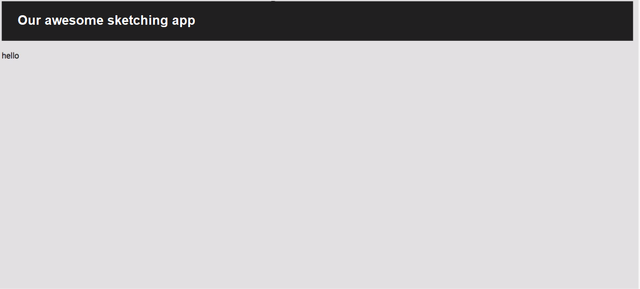
Additionally, run yarn start in the server folder. That uses nodemon to make sure that when you make a change in the server code, that its reload instantly.Open up the folder in Visual Studio Code or any other editor.
Publish Date Over the WebSocket:
First thing you'll certainly be doing is build a timer over the WebSocket from the server. Open the index.js file within the server folder. Almost all our server-side code is going to be done in this file throughout this project. You intend to publish a date over the WebSocket to the client based on a timer, which means you have to pull in Socket.IO
const io = require('socket.io')();
Make a const named io, and set that to the result of needing Socket.IO.You must also call the resulting function with this line. Now set a constant named port to 8000, as well as inform your WebSocket server to listen on this port by calling the particular listen function on it.
const port = 8000;
io.listen(port);
Finally, simply log out, note that this service is listening within the port which you specified. So that is actually how you setup a WebSocket service
console.log('listening on port ', port);
However right now this particular service is not doing anything at all. Type the following code below where you need Socket.IO. Call the on function upon io, and define that you will be interested in a new connection being created from the client
io.on('connection', (client) => {

}
You have to provide a function callback for this, so generally this is handling a new connection being created, also it passes you a client which you can use to send events for this connected client as well as respond to events that have been sent using this specific connected client.
Now specify that you would like to respond to an event using this client by calling the on function on the client reference by itself, therefore notice now you are going to respond to an event from this particular client. You are interested in an event named subscribeToTimer, that you will give off from your React app afterwards, another side of this socket. Once again, you need to specify a callback function. This function expects an interval parameter to get passed to it from the client. This parameter will come through the client side.
  client.on('subscribeToTimer', (interval) => {
    console.log('client is subscribing to timer with interval ', interval);
}
In this function, add a console log which writes out some information just to enable you to check that it's operating when you test it. So we log out client is subscribing to timer with interval, and that we pass the interval in there.
setInterval(() => {
      client.emit('timer', new Date());
    }, interval);
Now start a setInterval call, that will generate and emit our changing date value to the client. Add a function for that logic, and in here you call the emit function within the client object. Specify an event name, in this case timer, and send through a date as the parameter. You use the interval parameter which you obtained from the client event as the interval for this timer.
Now the code for the index.js file will look like this;
// index.js//
const io = require('socket.io')();

io.on('connection', (client) => {
  client.on('subscribeToTimer', (interval) => {
    console.log('client is subscribing to timer with interval ', interval);
    setInterval(() => {
      client.emit('timer', new Date());
    }, interval);
  });
});

const port = 8000;
io.listen(port);
console.log('listening on port ', port);
There exists a basic pattern going on right here. You apply the on function to reply to events, both on the io object by itself for events related to client connection and on the client reference to manage events pertaining to a specific client.

You utilize emit to create an event onto the other end of the socket, which, in such a case, is the client. So on for handling events and emit for publishing events.
Utilizing Socket into React:
Thus we have dealt with a connection from the client, and you also emit a date value to the client based on the interval. The service is actually publishing a date based on a timer, however, you need to go induce this logic and subscribe to the timer on the client. Open up the client folder within your editor. Make a file called api.js in the source folder. This is when you will put all the code that communicates along with the server socket.
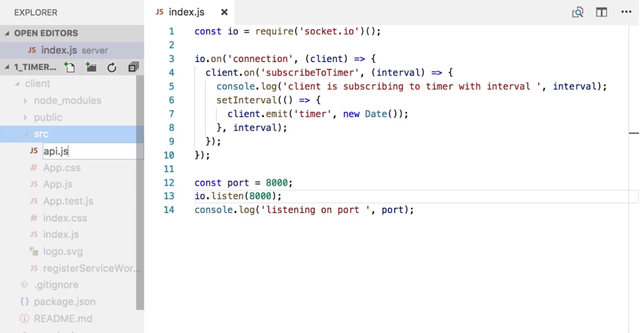
Import the Socket.IO client on to a variable called openSocket, and after this assign a constant called socket to the result of calling this function, providing it with a URL to the socket which you setup prior, that is localhost:8000.
import openSocket from 'socket.io-client';
const socket = openSocket('http://localhost:8000');
You now have to create a function that you can call from the React code to load the timer on the service and subscribe to the values coming from the service. Call this particular function subscribeToTimer just to correlate to the event that will emit, and make it get one parameter, a function which will be called each time an up-to-date timestamp is obtained on the socket. Now here in the client, you will follow the exact same pattern you had on the server. When you need to handle an event, you use the on function on the socket, and you will want to subscribe to the event called timer simply because that is whatever you used on the emit on the server.
function subscribeToTimer(cb) {


}
So call on, and specify that you would like to handle the timer event. This expects a function to handle this event. For this, simply pass in the function which was passed on the parameter to the subscribeToTimer function. So you're subscribing to the timer event, but if you look into the service code all over again over here, you will see that the timer will not fire till the server gets a subscribeToTimer event that contains an interval. Therefore head over to the client code, here you can emit an event by calling the emit function and specifying subscribeToTimer because this is what the server expects. Keep in mind, the server expects to obtain an interval since the payload of this event, so you pass in 1000, that translates to One second.
socket.on('timer', cb);
  socket.emit('subscribeToTimer', 1000);
Interesting that you subscribed for the timer event before you emitted the subscribeToTimer event. That is because if you made it happen vice versa, you may have run into a race condition in which the server starts giving out data for the client, however the client have not subscribed yet.
export {
  subscribeToTimer,
};
Okay, now export this function through the file so that you can utilize it inside of your React component.
Now api.js file after updating the code will look like this;
import openSocket from 'socket.io-client';
const socket = openSocket('http://localhost:8000');

function subscribeToTimer(cb) {
  socket.on('timer', cb);
  socket.emit('subscribeToTimer', 1000);
}

export {
  subscribeToTimer,
};
Displaying Timestamp Through App.js:
Open the App.js file. You're going to show the value coming from the server inside of this component. First, import the subscribeToTimer function that you just created from the api module.
import { subscribeToTimer } from './api';
Put in a constructor to this component. Make sure to specify the props parameter and to call super using the props. Now you can subscribe to the timer by calling the imported function. Pass it a callback function. This specific function will receive the timestamp through the server. Inside this callback function, call the component's setState function and set it on a variable called timestamp. I am assuming that you know sufficient about React to realize that this is a way that you set state on a component to force it to rerender.
constructor(props) {
    super(props);

    subscribeToTimer((timestamp) => {
      this.setState({
        timestamp
      });
    });
Because you are depend on this state variable, it's a good idea to give some default state for this component, so assign some default state and provide it a timestamp value having a message that no value has been set yet.
state = {
    timestamp: 'no timestamp yet'
  };
At this point change your render function to render a message with your timestamp, something like this.
This is the value of the timer timestamp: {this.state.timestamp}
Open up the application in the browser. You see how the timestamp updates? That's due to the server producing a new value on the timer and sending it via a WebSocket to the client. The client sets the updated value on state evoking the component to rerender with the latest value.
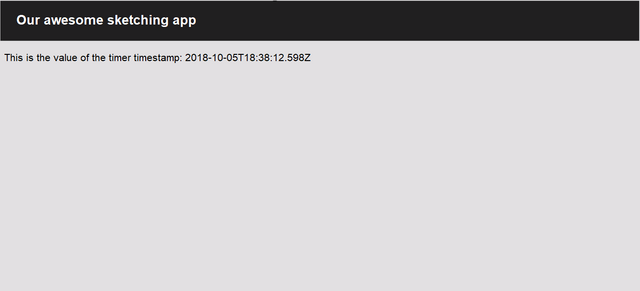
* After timestamp updates app.js file will be like this;*
import React, { Component } from 'react';
import './App.css';
import { subscribeToTimer } from './api';


class App extends Component {
  constructor(props) {
    super(props);

    subscribeToTimer((timestamp) => {
      this.setState({
        timestamp
      });
    });
  }

  state = {
    timestamp: 'no timestamp yet'
  };

  render() {
    return (
      <div className="App">
        <div className="App-header">
          <h2>Our awesome sketching app</h2>
        </div>
        This is the value of the timer timestamp: {this.state.timestamp}
      </div>
    );
  }
}

export default App;
Summary:
In this tutorial, we discussed the real-time stack and the setup for your environment. We furthermore went over the WebSocket development with Socket.IO. While you observed, there exists a certain pattern that you follow. You use .emit on the socket to publish an event to another side of the socket, and you also use .on to subscribe to events from the other side. On both you have to provide an event date there. Whenever you emit, you can also define data to be emitted to another side. So when you're dealing with an event with on, you should pass a function which handles the event. In the next tutorial, you will add RethinkDB into the mix and start using its live query features to publish values on the socket as soon as they appear in the DB. You'll build on this concept to keep a list of sketches, which updates automatically when new sketches are saved to the database.
Source Code:
//index.js//

const io = require('socket.io')();

io.on('connection', (client) => {
  client.on('subscribeToTimer', (interval) => {
    console.log('client is subscribing to timer with interval ', interval);
    setInterval(() => {
      client.emit('timer', new Date());
    }, interval);
  });
});

const port = 8000;
io.listen(port);
console.log('listening on port ', port);
//App.js//

import React, { Component } from 'react';
import './App.css';
import { subscribeToTimer } from './api';


class App extends Component {
  constructor(props) {
    super(props);

    subscribeToTimer((timestamp) => {
      this.setState({
        timestamp
      });
    });
  }

  state = {
    timestamp: 'no timestamp yet'
  };

  render() {
    return (
      <div className="App">
        <div className="App-header">
          <h2>Our awesome sketching app</h2>
        </div>
        This is the value of the timer timestamp: {this.state.timestamp}
      </div>
    );
  }
}

export default App;
//api.js//

import openSocket from 'socket.io-client';
const socket = openSocket('http://localhost:8000');

function subscribeToTimer(cb) {
  socket.on('timer', cb);
  socket.emit('subscribeToTimer', 1000);
}

export {
  subscribeToTimer,
};
Project Repository
- Complete Source Code of Sketching-App
Congratulations @engr-muneeb! You have completed some achievement on Steemit and have been rewarded with new badge(s) :
Click on any badge to view your own Board of Honor on SteemitBoard.
To support your work, I also upvoted your post!
For more information about SteemitBoard, click here
If you no longer want to receive notifications, reply to this comment with the word
STOPDownvoting a post can decrease pending rewards and make it less visible. Common reasons:
Submit
Thank you for your contribution.
Link to the Answers of the Questionnaire -
Click here
Need help? Write a ticket on https://support.utopian.io/.
Chat with us on Discord.
[utopian-moderator]
Downvoting a post can decrease pending rewards and make it less visible. Common reasons:
Submit
Hey @engr-muneeb
Thanks for contributing on Utopian.
We’re already looking forward to your next contribution!
Contributing on Utopian
Learn how to contribute on our website or by watching this tutorial on Youtube.
Want to chat? Join us on Discord https://discord.gg/h52nFrV.
Vote for Utopian Witness!
Downvoting a post can decrease pending rewards and make it less visible. Common reasons:
Submit