Repository
https://github.com/meteor/meteor
Welcome to the Tutorial of Web App Development Using MeteorJs, Babel and ReactJs
What Will I Learn?
- You will learn how to develop Complete Web Applications using Meteor.js, Babel and React.js.
- You will learn how to install Meteor.js and Node.js as well as their plug-ins and their integration.
- You will learn about the Initial Project setup of our App using Command Line.
- You will learn about file creation of our meteor.js app and connect it to local host server.
- You will learn about how to inject components into JavaScript.
- You will learn how to add materialize CSS styles and themes into our app.
Requirements
System Requirements:
- Node.js and Meteor.js for building our web application
- Atom and Sublime Text 3 for code editing
- Command Prompt or Terminal
OS Support:
- Windows 7/8/10
- macOS
- Linux
Difficulty
- Intermediate
Resources
https://materializecss.com/getting-started.html
www.github.com/google/material-design-icons
https://fonts.google.com/specimen/Roboto
Required Understanding
- You just need a good knowledge of HTML, CSS and JavaScript
- A fair understanding of React.js is a plus
- A thirst for learning and developing something new
Tutorial Contents
Description
Meteor.js and React.js undoubtedly are a giant blend. Meteor.js provides you with a quick, simple-to-use solution to get data managing around clients and servers, along with React offers you ways to design your app's UI through used components. The particular mixture enables you to develop your desire applications: dynamic, information driven, as well as cross-platform. This tutorial course walks you step-by-step with the progress of an entire React/Meteor app meant for managing players and performance of an worldwide Cricket team.
We build a player view within React.js, utilize Meteor's back-end abilities that will code player as well as team logic, develop charts to track player statistics, and add end user enrollment. In addition also, learn to maintain code safe having server methods and employ CSS for styling the final application.
What is MeteorJs and ReactJs ?
Meteor JS will get you a posture in web development as well as assist you to develop that personalized project you have been hoping to see. Meteor is the amazing platform for developer productiveness; it really is bar-none the quickest technology you may use to create fast and exciting web apps in just a few hours.
ReactJS is a effective JavaScript library developed by Facebook to deal with end user interfaces regarding web apps. It enables designers to manage the main difficulties confronted when developing UI for dynamic web apps. Its among the hottest technology on the market which is important for any web developer
Setting up the Environment
After we have download the required Node.js and Meteor.js.We have to download the code editor, I prefer to download Atom or Sublime Text 3 to be used however you can use any other code editor as well.
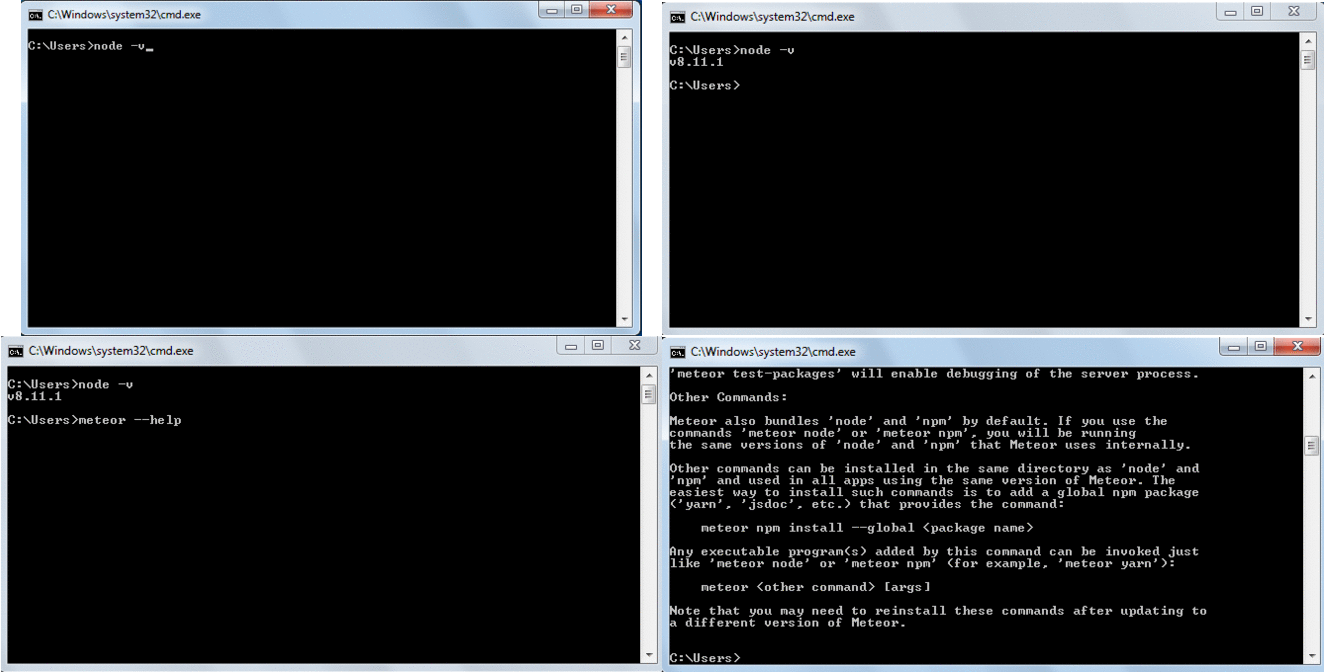
Now, at this stage we have installed these packages to check and verify that everything is ok; below I have mentioned the steps to follow.
Open the Command Line:
Type in here the two commands node -v and meteor --help.
node –v:
This command will tell you the version of the node.js which you have installed and using
meteor --help:
This command will open up the help menu of meteor.js package which means that you have installed meteor.js correctly and everything is fine.
Initial Project Setup For Our Application:
So let's start with Meteor, the first thing you need to do is to make sure that we're on the desktop. I'm actually going to create the project on the desktop. Feel free to create it wherever you want. Do run a cd Desktop command. Go ahead and create a new Meteor application. So, you do Meteor, create, and then the name of your application. In this case, cricket app.
meteor create cricket-app:
This command will create a cricket-app folder on the desktop or you can change the directory if you want to, before running this command.
Then next thing we want to do is to make sure that we install React. So, first go into the directory of your application you'll see that we have now a folder called Cricket App. And if we go to our desktop, we're going to see the Cricket App right here, like so.
Now let's install React, and you do that by doing a Meteor, npm, and you can also do npm on its own without Meteor, that's fine as well, and then do save React, and React dom
cd desktop/cricket-app:
Now first change the directory to our app directory then;
meteor npm install –save react react-dom:
This will install npm and react also react dom,
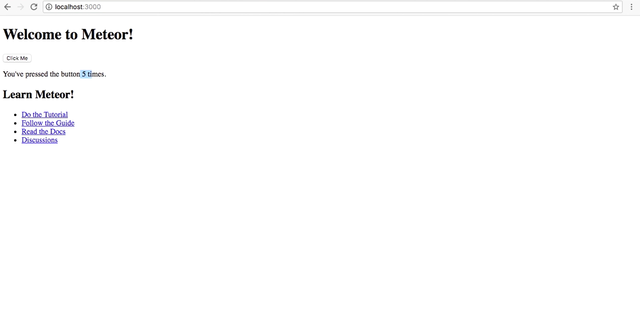
At the Terminal start the application by doing Meteor Once the application is running, you have to go to localhost port 3000. So let's go inside of our browser, and do localhost port 3000, and this is your Meteor application shown above, so if you click it's actually going to show you how many times you click, and so on, so forth
Now if we open cricket-app into the Atom editor. You can see there are two main folders client and server. After opening the client folder we will see that there are three files main.css ,main.html and main.js
CLIENT SIDE:
client main.html
<head>
  <title>cricket-app</title>
</head>

<body>
  <h1>Welcome to Meteor!</h1>

  {{> hello}}
  {{> info}}
</body>

<template name="hello">
  <button>Click Me</button>
  <p>You've pressed the button {{counter}} times.</p>
</template>

<template name="info">
  <h2>Learn Meteor!</h2>
  <ul>
    <li><a href="https://www.meteor.com/try" target="_blank">Do the Tutorial</a></li>
    <li><a href="http://guide.meteor.com" target="_blank">Follow the Guide</a></li>
    <li><a href="https://docs.meteor.com" target="_blank">Read the Docs</a></li>
    <li><a href="https://forums.meteor.com" target="_blank">Discussions</a></li>
  </ul>
</template>
client main.js
import { Template } from 'meteor/templating';
import { ReactiveVar } from 'meteor/reactive-var';

import './main.html';

Template.hello.onCreated(function helloOnCreated() {
  // counter starts at 0
  this.counter = new ReactiveVar(0);
});

Template.hello.helpers({
  counter() {
    return Template.instance().counter.get();
  },
});

Template.hello.events({
  'click button'(event, instance) {
    // increment the counter when button is clicked
    instance.counter.set(instance.counter.get() + 1);
  },
});
SERVER SIDE:
Server main.js
import { Meteor } from 'meteor/meteor';

Meteor.startup(() => {
  // code to run on server at startup
});
Creating File Structure For The App
For this project we'll use Materialize UI which is basically using or leveraging Materialize CSS styles and creating components with it. So we're basically going to use both. One is for the components and the other we're going to use for the CSS Styles.
Let's make sure that we are in the right directory first .Now type:
meteor npm install –save material-ui
Now continue with our code and open up in the client the main.html here and what we're going to do is clean this up a little bit so we don't need the template here anymore so let's remove that and we don't need the template at the bottom either so we can remove that as well and then remove the info and hello
<head>
 <title>cricket-app</title>
</head>

<body>
<div id="render-target"></div>

</body>
So let's insert a new div with an id that will do a render-target and that's going to be used by React. So basically what we're doing here we're actually rendering the React stuff in here so once we start doing some components in React and the application starts it will look for that render-target and then render the React components for us. And let's close our tag and then save.
Adding Material CSS:
We do need to add a few things here so we need to add the material icons, we need to add a font called Roboto and that's what we're going to do now. So let's go to our browser and then go to materializecss.com and add the css-styles from there to our code. We have also add some materialize icons. After addition of materialize css and icons our app file will look like this.
<head>
 <title>Cricket App</title>
 <link href="https://fonts.googleapis.com/icon?family=Material+Icons"
     rel="stylesheet">
 <link href="https://fonts.googleapis.com/css?family=Roboto" rel="stylesheet">
 <link rel="stylesheet" href="https://cdnjs.cloudflare.com/ajax/libs/materialize/0.100.2/css/materialize.min.css">
</head>

<body>
 <div id="render-target"></div>
</body>
Injecting Into Main.jsx File:
We will setup our folder structure and after that inject a couple of things in to our main.jsx file. First of all we are going to do is actually cleanup the project which Meteor provides. So we will close the main.html. Remove the main.js after which make a completely new file named main.jsx. Then we are going to create a folder within the root folder known asimports.
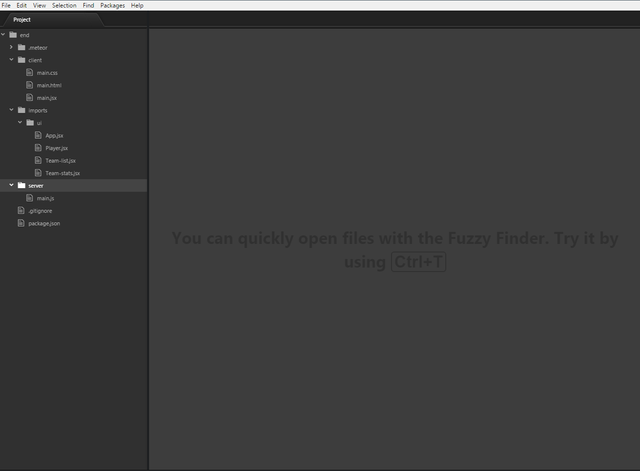
Within this folder, we will create 2 more folders. One is going to be called UI along with the other will be named API.
So just why are we making these types of folders?
The 1st cause would be to separate context in to our own file structure. The second purpose, as we work with our application, we are going to import some other files utilizing the ES6 module approach. So that as it develops the app, Meteor just bundles files imported. Therefore, when we never import the team.jss file, it will not include it in to the app.
So, into the UI folder, we have to create a few files:
app.jsx:
This is where most of our code will reside.
player.jsx:
As you have already guessed it, this is where our view of player is going to be placed
team-list.jsx:
This is where we're going to list the players.
team-stats.jsx:
In this is where we're going to have the stats for the team at the end of our tutorial..
import React from 'react';
import { Meteor } from 'meteor/meteor';
import { render } from 'react-dom';
import injectTapEventPlugin from 'react-tap-event-plugin';

import App from '../imports/ui/App.jsx';

injectTapEventPlugin();

Meteor.startup(() => {
  render(<App />, document.getElementById('render-target'));
});
So next, we're going to go into our main.jsx file and basically set up our project with a Meteor startup and also import a few things from React to make it work. So we'll open up main.jsx and get started, obviously, by importing React. So we import React from react
Then we're going to import Meteor because we need to import Meteor into that file as well from meteor/meteor’, and finally, we're going to import the render method fromReact-dom`.
React tap event plugin:
We are going to import dependencies React tap event plugin that into this file because we're going to inject it at the top of our project, which is this file.
Meteor startup():
Meteor startup is basically a method that you can run anywhere in your project where if you run it in a client, it's going to run those files into the client. If you run into the server, it's going to run those files into the server. So because we're at the top and in the client, this is going to be run at the client
injectTapEventPlugin():
We use this function because it injects into the that project we're using the React render method to import our app component at the top and then basically run this get element by ID by rendering app on the main.jsx, is basically targeting, on the main, this ID here, which we're going to insert into our get element by ID.
This basically runs the React app into this section here by doing the render method here. So we're going to finish this, get element by ID, and then select render target, like so. So this completes our main.jsx setup and running it this way, we'll be able to see whatever we're rendering from this component into our Meteor app.
Importing Theme From Material UI:
So this time we open the app.js file and start importing react and meteor as we did it earlier and then we are going to add material theme.
rt React, { Component } from 'react';
import MuiThemeProvider from 'material-ui/styles/MuiThemeProvider';
import RaisedButton from 'material-ui/RaisedButton';

export default class App extends Component {
  render() {
    return (
      <MuiThemeProvider>
        <RaisedButton label="Oh Yeah we did it!" />
      </MuiThemeProvider>
    )
  }
}
This is the best way to import the theme into the app and inject it and make sure that all the components that we're selecting from material UI is going to show. And then we're going to import a button called a raised button from material UI, and this will allow us to verify that everything that we've done so far is working. And then we're going to create our very first class, our very first component into app.jsx
export default class App extends Component:
We export default, class, the name of the component, extends component. So what we're doing, we're taking the component piece from React, and creating a class called app, which is the component. Then inside of it, we'll have the render method, as usual.
And then return the component elements. So if you look at this structure, this is how our React component is created, every single time. So the last thing we're going to do is insert our raised button and add a label of **Oh Yeah we did it!**
Let’s save that file. If we save this and run our project, it should actually show a button and that button should have a label of Oh Yeah we did it! So let's run our project. Go to a terminal and run with Meteor.
We are in the right directory So, we have to go to the browser and call the localhost:3000to check that our app is running.
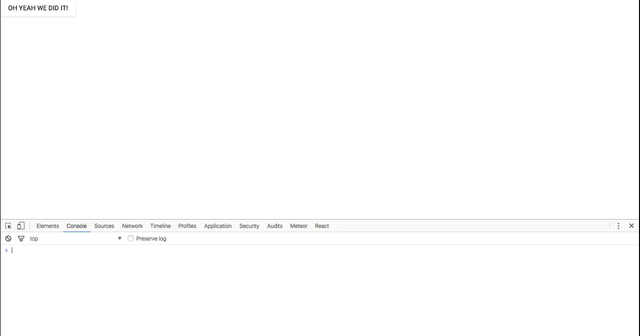
You can see in the above picture that the server restarted and rebuilt the files. And there we go, the button Oh Yeah we did it! shows up on our component.
Curriculum
This is the first part of this tutorial,when next tutorials will created they will be placed here.
Summary
In this tutorial we have learned about the Web App Development using Meteor.js, Babel and React.js. We learned how to completely integrate Node.js, Meteor.js and other plug-ins. We see how to connect our cricket-app to the local host and then how the process of file creation occurs in our project. We have also developed our very first app and then add components into our app. In the last we have also integrated materialize CSS into our app with material theme also. In the next tutorial we will see how we design the player’s view of our cricket-app and then add static data to our application.
Proof of Work Done
https://github.com/engr-muneeb
Thank you for your tutorial work.
Please make sure not to rely on external sources as you did for now, as this could be deemed plagiarism.
Similar content was already found under https://www.linkedin.com/learning/building-an-app-with-react-js-and-meteorjs
Need help? Write a ticket on https://support.utopian.io/.
Chat with us on Discord.
[utopian-moderator]
Downvoting a post can decrease pending rewards and make it less visible. Common reasons:
Submit
Very good article, and still in 2019 ReactJs is used by many big web application development company, because its completely opensource.
Downvoting a post can decrease pending rewards and make it less visible. Common reasons:
Submit