Today I will be starting a tutorial series on ASP.NET MVC5 framework. ASP.NET MVC5 is an open source web framework for building modern web apps and services with .NET
For the sake of redundancy, I would not be making a standalone tutorial on setting up your project nor explaining the file structure. I would include all of that in this initial tutorial to cater for those that are not familiar with it before now.
What Will I Learn?
- You will learn how to install and set up the ASP.NET MVC5 project template.
- You will learn the basics of, and understand the folder structure of the project template.
- You will learn to set up your database using entity framework code first approach
- You will learn how to seed a database with data
- You will create an application to that keeps record of all your steemit followers and sort/filter them based on certain criteria
Requirements
- Visual Studio IDE (2015 or 2017 preferably)
- Browser
- Basic knowledge of Web development
Difficulty
- Intermediate
Tutorial Content
For this tutorial, we are going to build an application that gets all your steem followers, search within them and filter them using specific properties that you want to group them with. However, we won't be using real steem followers. We are going to use dummy data that I have created here for this tutorial. In a subsequent tutorial, we would learn how to fetch actual data using the Steem API
Installing and Setting Up the MVC project
Open Visual studio, select File->New->Project
Select ASP.NET Web Application (.NET Framework)
Give it a name and click Ok I'm calling mine SteemitUtopianTutorial
Select the MVC template in the next window
Do not change the authentication. Leave it the way it is
Click Ok
MVC5 Project Folder structure
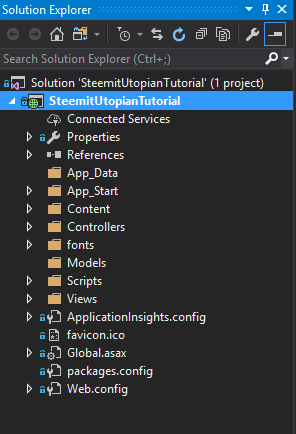
The three main folders that would normally concern you are the Model, View and Controller folders, for obvious reasons, and they are pretty straight forward.
Models folder houses your entity models which map to database tables.
Controllers house the controller classes that perform business logic and sends information in the form of models to views.
Views displays the information to the user.
App_Data folder is where portable database files in form of .mdf files are stored
App_Start contains configuration files for the application startup.
Content contains stylesheets and static files such as images(if you wish to put them here)
fonts obviously stores glyphicon fonts
Scripts contain the script files majorly javascript
Web Config file stores general configuration settings for the application.
Just so I don't stray so far from the purpose of this tutorial, I would stop here. This should be enough to get you to understand the file/folder structure in front of you.
Setting Up the Database
Definitely to develop any reasonable application that does the least of interactions, you need to be able to store data in a database. Microsoft provides different approaches to setting up your database - Code First, Database First, Design First.
However, for this tutorial, we are going to use Code First Approach which allows you set up a database from your models without having to actually write any SQL command. EntityFramework takes care of all the implementation and mapping, by the relationships you define in your models.
But first we have to install EntityFramework.
Right Click on your solution and select Manage Nuget Packages for Solution then search for EntityFramework under the browse tab and install
Defining Our Model
Now we want to define our SteemFollower model. This means that we are going to define the properties that a Steem user has. The following properties are some of the important ones that came to my mind. Of course, you can define more for your consumption.
   public class SteemFollower
    {
        public int Id { get; set; }
        public string UserName { get; set; }
        public int Reputation { get; set; }
        public int SteemPower { get; set; }
    }
Create a Database Context
A database context is a class that interfaces your application to your database. It is that connection with which you can query your database using code.
Right click on your project and add a new folder. Thereafter, add your new database context class in that folder. I called mine SteemFollowerContext
Add the following code to the new class
public class DatabaseInitializer : System.Data.Entity.DropCreateDatabaseIfModelChanges<SteemFollowerContext>
{
    protected override void Seed(SteemFollowerContext context)
    {
        var steemFollowers = new List<SteemFollower>
        {
            new SteemFollower{UserName="johnesan", Reputation= 52, SteemPower=9592123.311},
            new SteemFollower{UserName="udestine", Reputation= 33, SteemPower=35.433},
            new SteemFollower{UserName="sqerter", Reputation= 76, SteemPower=33323.235},
            new SteemFollower{UserName="title32", Reputation= 44, SteemPower=29.432},
            new SteemFollower{UserName="googler33", Reputation= 19, SteemPower=14.904},
            new SteemFollower{UserName="steemwitness", Reputation= 53, SteemPower=175.335},
            new SteemFollower{UserName="utopian-io", Reputation= 64, SteemPower=39034.895},
            new SteemFollower{UserName="aser991", Reputation= 67, SteemPower=1023452.432},
            new SteemFollower{UserName="eddiejones", Reputation= 28, SteemPower=29.235},
            new SteemFollower{UserName="packman5499", Reputation= 34, SteemPower=312.905},
            new SteemFollower{UserName="owerfre", Reputation= 47, SteemPower=35.553},
            new SteemFollower{UserName="oterwd", Reputation= 51, SteemPower=3228.345},
            new SteemFollower{UserName="lordrahl", Reputation= 43, SteemPower=1189.02},
            new SteemFollower{UserName="flaggedman", Reputation= 8, SteemPower=6.325},
            new SteemFollower{UserName="underlin21", Reputation= 52, SteemPower=2266.78},
            new SteemFollower{UserName="cunrered", Reputation= 60, SteemPower=41000.22},
            new SteemFollower{UserName="curie", Reputation= 77, SteemPower=239009.221},
            new SteemFollower{UserName="sycochika", Reputation= 71, SteemPower=37623.325},
            new SteemFollower{UserName="anonym", Reputation= 60, SteemPower=3109235.27},
            new SteemFollower{UserName="retris000", Reputation= 58, SteemPower=3599.78},
            new SteemFollower{UserName="eadde", Reputation= 43, SteemPower=8908654.24},
            new SteemFollower{UserName="realfew123", Reputation= 38, SteemPower=322.675},
            new SteemFollower{UserName="justinwerth", Reputation= 25, SteemPower=25.44},
            new SteemFollower{UserName="resteemed", Reputation= 48, SteemPower=90.3},
            new SteemFollower{UserName="esteem", Reputation= 41, SteemPower=3889.235},
            new SteemFollower{UserName="unidentified", Reputation= 65, SteemPower=97667.5},
            new SteemFollower{UserName="jaff8", Reputation= 62, SteemPower=1700.234},
            new SteemFollower{UserName="pleasth", Reputation= 55, SteemPower=425811.867},
            new SteemFollower{UserName="comings4wel", Reputation= 72, SteemPower=55894.36},
            new SteemFollower{UserName="striken329", Reputation= 28, SteemPower=16.657},
        };
        steemFollowers.ForEach(s => context.SteemFollowers.Add(s));
        context.SaveChanges();

    }
}
This is all just some random data I created on my own for tutorial purposes. None if it has any real world significance or implication. Its only just useful to seed the database with something so we could work with.
Note that, in a real life scenario, this data would be fetched from the steem API (I would make a tutorial on this later)
Adding Connection String
All we've done so far is write the codes that will be executed to scaffold our database. We haven't actually made any connection to the database itself. This process is done with a connection string. A connection string tells the application which, and how to connect to the database.
Open Web.Config file in the root,
Just before the "appsettings" element, add a "connectionStrings" element
 <connectionStrings>
    <add name="SteemFollowerContext" connectionString="Data Source=USER\SQLEXPRESS;Initial Catalog=SteemFollowerDb;Integrated Security=True" providerName="System.Data.SqlClient"/>
  </connectionStrings>
Note that the data source of your connection string would differ from the one I have here. "USER" would be the name of your computer or server(for production purposes). Get more information on connection strings here.
One more thing...
We havent specified anywhere that the database context should use that seed initializer class.
Head on to that same web.config file and add this within the EntityFramework
<contexts>
      <context type="SteemitUtopianTutorial.Data.SteemFollowerContext, SteemFollowerContext">
        <databaseInitializer type="SteemitUtopianTutorial.Data.DatabaseInitializer, SteemFollowerContext" />
      </context>
    </contexts>
This tells EntityFramework to use the database initializer class when the database context is created.
Build the Solution
Creating The Controllers and Views
Now that the database is all set up, let's create our controllers and view and thereafter implement searching within our steem followers.
Right click on the Controllers folder, select Add, then click New Scaffolded Item.
** In the Add Scaffold dialog box, select MVC 5 Controller with views, using Entity Framework. Then click Ok**
Add the following details appropriately as shown in the screenshot
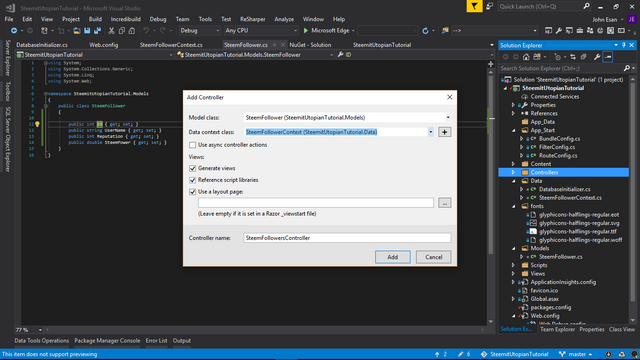
Click Add
EntityFramework scaffolds for you, a CRUD controller along with the corresponding views. After that is done, Run the application
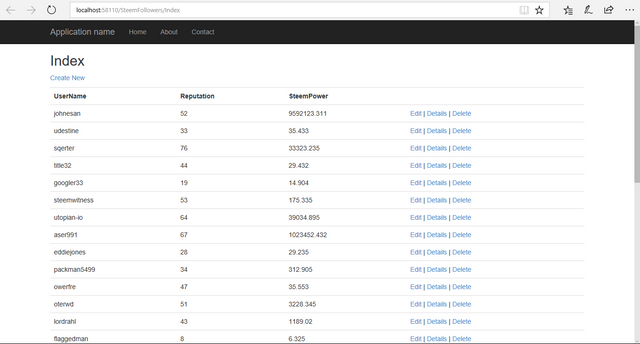
Now navigate to "http://localhost:58110/SteemFollowers" You should see the seed data we inputted
Adding Search Functionality
The first thing to think of when dealing with a search, is the "search string". That string is what is going to be used to query the database and deliver related results.
We are going to perform a get request to our Index method of the SteemFollowerController, but this time with a search string to indicate to the database that we want specific data.
To achieve this
we pass in a parameter to the method, and using that parameter, we query the database with LINQ
Now edit the index action of your controller to this:
   public ActionResult Index(string searchString)
        {
            var steemFollowers = from s in db.SteemFollowers
                                 select s;
            if (!String.IsNullOrEmpty(searchString)) {
                steemFollowers = steemFollowers.Where(s => s.UserName.ToUpper().Contains(searchString.ToUpper()));
            }
            return View(steemFollowers.ToList());
        }
Now we have to find a way to let the user pass in their search string and send it to the controller for action
In your Views Folder, open the Index.cshtml file in the SteemFollowers folder
Just before the table, add this chunk of code
@using (Html.BeginForm())
{
    <p> Find by name: @Html.TextBox("SearchString") <input type="submit" value="Search" /></p>
}
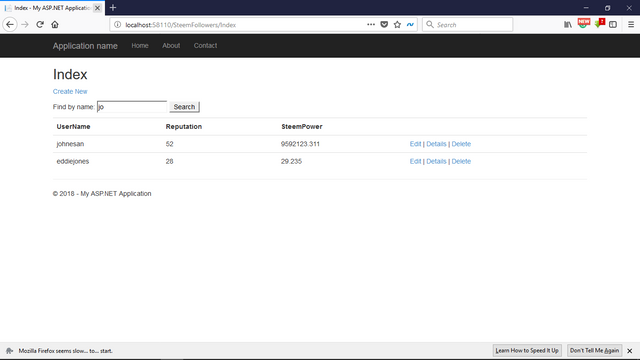
Run the application and try to search. You should get results from your steem Followers list containing the string.
Filtering Users using their Steem Power and Reputation
To filter users, we want to provide "minimum" and "maximum" range values to the controller.
Also, we want to filter users using either their Steem power or Reputation.
In your Index.cshtml View, add the following code just after your search box
@using(Html.BeginForm("Index", "SteemFollowers", FormMethod.Get))
{
    <p>
        <b>Filter By:</b> @Html.RadioButton("FilterBy", "SteemPower", true) Steem Power
        @Html.RadioButton("FilterBy", "Reputation") Reputation
        <input type="number" name="Minimum"/>
        <input type="number" name="Maximum" />
        <input type="submit" value="Filter" />
    </p>
}
Now for the code that actually does the filtering,
Update your Index Controller Action to the following
  public ActionResult Index(string searchString, string FilterBy, int? Minimum, int? Maximum)
        {
            var steemFollowers = from s in db.SteemFollowers
                                 select s;
            if (!String.IsNullOrEmpty(searchString)) {
                steemFollowers = steemFollowers.Where(s => s.UserName.ToUpper().Contains(searchString.ToUpper()));
            }

            if (!String.IsNullOrEmpty(FilterBy))
            {
                if(FilterBy == "SteemPower")
                {
                    steemFollowers = steemFollowers.Where(s => s.SteemPower >= Minimum && s.SteemPower <= Maximum);
                }
                if (FilterBy == "Reputation")
                {
                    steemFollowers = steemFollowers.Where(s => s.Reputation >= Minimum && s.Reputation <= Maximum);
                }
            }
            return View(steemFollowers.ToList());
        }
Run the Application again
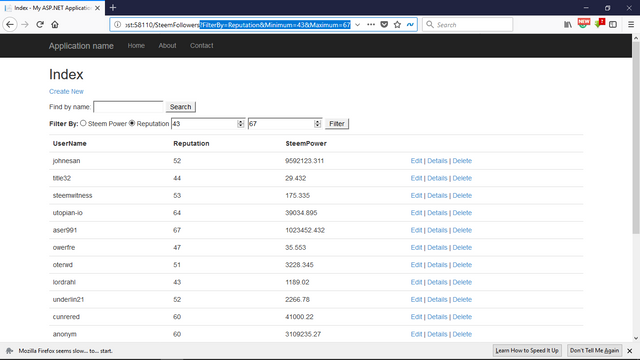
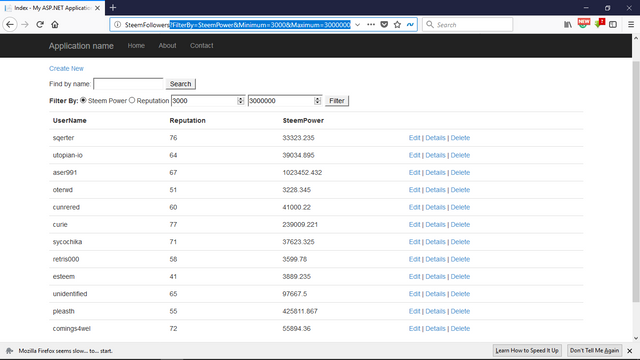
Notice how you can select to filter by "SteemPower" or "Reputation" . Also, notice how the Url contains the parameters as a query.
You can take this functionality and plug it anywhere, to suit your needs.
This is the first tutorial of this series. Subsequently, I would be giving similar tutorials on technical aspects of developing using ASP.NET MVC5. Also, I will start another tutorial series for those interested in mobile development with Xamarin.
Posted on Utopian.io - Rewarding Open Source Contributors

Thank you for the contribution. It has been approved.
You can contact us on Discord.
[utopian-moderator]
Downvoting a post can decrease pending rewards and make it less visible. Common reasons:
Submit
@johnesan, No matter approved or not, I upvote and support you.
Downvoting a post can decrease pending rewards and make it less visible. Common reasons:
Submit
Dope idea
Downvoting a post can decrease pending rewards and make it less visible. Common reasons:
Submit
This work deserves to be approved. But don't worry, keep steeming
Downvoting a post can decrease pending rewards and make it less visible. Common reasons:
Submit
Hey @johnesan I am @utopian-io. I have just upvoted you!
Achievements
Suggestions
Get Noticed!
Community-Driven Witness!
I am the first and only Steem Community-Driven Witness. Participate on Discord. Lets GROW TOGETHER!
Up-vote this comment to grow my power and help Open Source contributions like this one. Want to chat? Join me on Discord https://discord.gg/Pc8HG9x
Downvoting a post can decrease pending rewards and make it less visible. Common reasons:
Submit