Introduction
One of the most powerful open source computational and mathematics -oriented syntax tools alternative for MatLab software is GNU-Octave. The syntax language is similar to MatLab software which is comfortable for users which have experienced MatLab software. This series of tutorials deal with GNU-Octave and its different libraries including Fuzzy systems, Genetic Algorithms, etc. Problem-based GNU-Octave examples have been given in simple and easy way to make your learning fast and effective.
What Will I Learn?
On the first lesson, we start with fundamentals of GNU-octave, installation, configuration, explanation of menu bar and simple coding, then we continue with the professional applications and its built in functions in future Lessons.
Requirements
• A PC or Laptop with at least 1Gb ram and 400 MB memory
• Gnu-Octave software downloadable from https://www.gnu.org/software/octave/
Difficulty
This lesson is for beginners who has no knowledge about programming in Octave environment
Tutorial Contents
Installation:
After downloading GNU-Octave installer from the above mentioned link, follow the on-screen installation prompts to install the software properly. Please be inform that the installation path does not include spaces or non-ASCI characters.
Understanding the Octave Environment
After installation you can click on the following shortcut on your desktop to run the program.

Figure 1. Octave GUI shortcut on desktop
When you click on the shortcut, the Octave environment will be opened as shown in Figure 2.
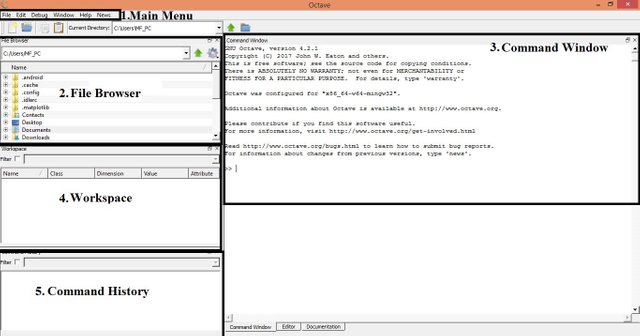
Figure 2. Octave Environment
As can be seen from Figure 2, default Octave environment includes main menu where you can open or edit a file, open help documentation and change default environment windows. The default windows consist of file browser, command window, workspace and command history which is shown as number 2 to 4 in Figure 2. To change the default to your desirable environment, click on the "window" on the menu and select different windows as shown in Figure 3.
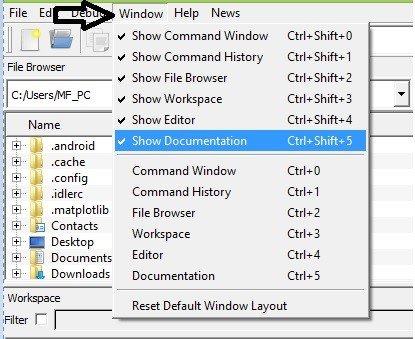
Figure 3. Different windows of octave environment
It is possible to move each window by drag and drop inside the octave environment.
You can also access to the “Editor” and “Documentation” windows by clicking on these items placed under command window as shown in Figure 4.
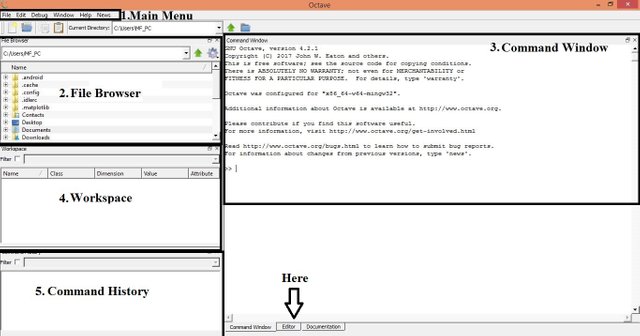
Figure 4. Access to different window from default environment
Now after some this introduction of Octave environment it is the time to know from where we can start our first line of code.
There are two ways to write codes in Octave. The first one is to use command window and write your code on the >> command prompt as shown in Figure 5.
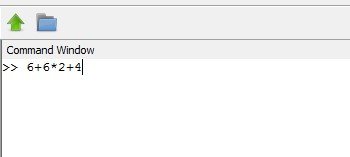
Figure 5. writing command at command prompt.
If you press the Enter key the result immediately shows in command window (Figure 6).

Figure 6. Results of the command of figure 5.
This way is very simple but how we save our code or write a program? It is not possible to use command line to save or edit our program so the second way to write your code is to use Editor window and save your codes in a script file for future access. Figure 7 shows you how to access Editor window by using Editor tab on the bottom of the command window.
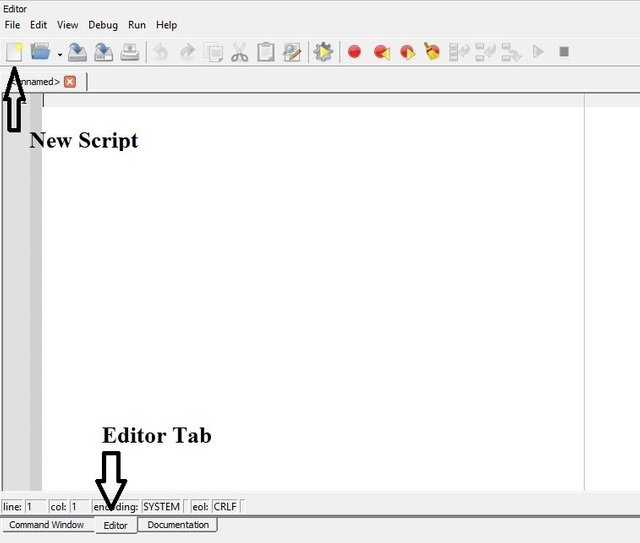
Figure 7. Access to Editor window and open a new script.
On the Editor tab, click on “New Script” as shown in Figure 7 to open an empty area for writing your codes. you can save your program by clicking on run and save button as shown in Figure 8 and name the program as you want.

Figure 8. run and save button on the Editor window
Please be sure that you use an acceptable name for your program. Octave do not accept program name with spacing e.g. “My code” as shown in figure 9. So please do not use any space in your program name. you can name it as “MY_code” to be valid in Octave.
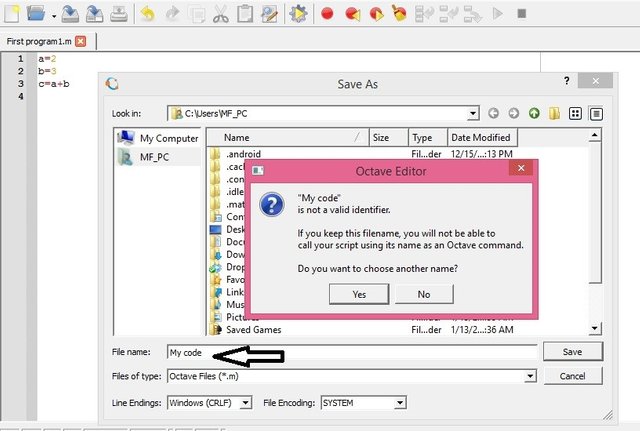
Figure 9. using space in program name make this error. And you cannot run your program by Octave.
During your coding you maybe need to access the output of the program in some specific steps to see that is it work properly or not. In such cases you need to have access to command window in your environment. My suggestion is to configure your environment by drag and drop windows based on Figure 10 to simply access to most important windows.
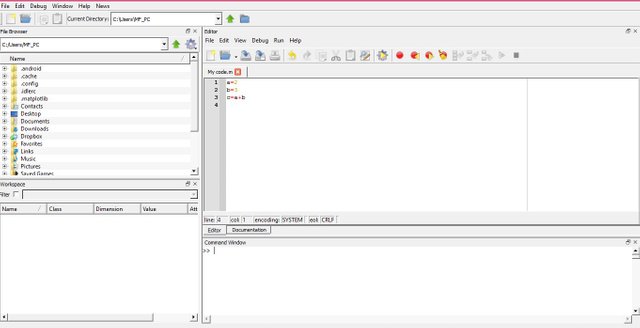
Figure 10. An environment sample including File browser, Workspace, Editor and Command windows.
There are two most usable command to remove any previous result from workspace and command windows which I suggest that you write it on top of each program. These two command are clc and clear. clc is used to remove any command in command window and clear is used to remove any variable value in workspace.
Octave is an interpreted environment. In other words, you give a command and Octave executes it right away. One of the most important difference between Octave and other languages is that in Octave you no need to define a variable before using it. It means that when you give a number or a matrix of numbers to a variable, Octave can release it and no need to define it as integer or etc. Here, I write a simple program to sum the value of two variable and place them in a new variable.
Please use semicolon at the end of each line. If you don’t use semicolon, Octave shows the result of each line in the command window. Figure 11 shows the program output with and without semicolons.

Figure 11. Output of the program with and without semicolons
In this first lesson we learned Octave software installation, configuration and how to write a simple program and save it for future purposes. Next lesson deals with more details on programming in Octave software. If you have any question please comment below this post.
Curriculum
This is the first lesson of a series of tutorials about the Octave software.
Posted on Utopian.io - Rewarding Open Source Contributors
Your contribution cannot be approved because it does not follow the Utopian Rules.
Violated Rule:
My Opinion:
It mainly shows ubiquitous functions and simple on-screen instructions.
A tutorial must be informative and explanatory, but also "tutor". This tutorial lacks "tutor"ing, and it is nothing more than an explanation of a documentation.
We prefer tutorials as a whole as possible instead of dozens of parts. So, next time, please merge some topics together.
You can contact us on Discord.
[utopian-moderator]
Downvoting a post can decrease pending rewards and make it less visible. Common reasons:
Submit
Thank you for your advise. Actually as I explained this is the first lesson which is not going deep to programming parts. Next lessons will be done regard to utopian rules.
Downvoting a post can decrease pending rewards and make it less visible. Common reasons:
Submit
So, if you'd included some technical matters, that could have changed the result. Sorry about that, rules are rules and as moderators, we are bound to apply them. Also be careful about the topic of the lesson. Instead of slicing it unnecessarily, try to collect same concepts under a general topic. By that way, you can teach many concepts on the same topic. I'm awaiting your next contributions, good luck.
Downvoting a post can decrease pending rewards and make it less visible. Common reasons:
Submit
No need to excuse. I knew the rules but for beginning there is no choice to explain software itself. I do my best to write more informative posts. Thank you
Downvoting a post can decrease pending rewards and make it less visible. Common reasons:
Submit