WordPress is a free and open-source content management system (CMS) based on PHP and MySQL. Features include a plugin architecture and a template system. It is most associated with blogging but supports other types of web content including more traditional mailing lists and forums, media galleries, and online stores.
Formally, WordPress is a free and open-source content management system(CMS) which is being used by billions of people across the web to run blogs and dynamic websites.
In the previous article, we discussed How to install LAMP on Ubuntu 18.04?
If you haven’t read the previous article then this can be hard for you, go to the above link read that first and continue from here. Please Share My articles and posts on steemers & upvote if you like it :)
WordPress is easy to install & learn. Those who can not afford hosting and domain registration this article can be perfect for you. In this article we’re installing wordpress on localhost so you do not have to worry about hosting and domain you can try those features in localhost.

1. My SQL Setup For WordPress
In the previous article, We already installed mysql server and now we’re installing mysql client by running following command.
sudo apt-get install mysql-client
Now The database server deployment is not yet secure, for this reason, issue the following command to harden it’s security:
sudo mysql_secure_installation
Now after running mysql_secure_installation you’ll be asked to validate_password now type y/yes in my system I already set up so I’m not changing the default and if you do not want default password press n/no.
2. Install WordPress
Download the latest WordPress Package and extract it by running following command.
wget http://wordpress.org/latest.tar.gz
Extract the downloaded packages using tar command given below.
tar -xvzf latest.tar.gz
Move extracted packages to /var/www/html/ by running following command.
rsync -av wordpress/* /var/www/html/
Set correct permission on the website directory, that gives ownership of the wordpress files to the web server as follows
sudo chown -R www-data:www-data /var/www/html/
sudo chmod -R 755 /var/www/html/
3. Create Database For WordPress
Open terminal, Goto mysql shell and enter password you set up previously. Command for opening mysql is given below.
mysql -u root -p
Now enter root password and press Enter , My SQL shell is now ready to use. Create database for your WordPress by running following command.
mysql> CREATE DATABASE wp_linuxblog;

mysql> GRANT ALL PRIVILEGES ON wp_linuxblog.* to 'your_username'@'localhost' IDENTIFIED BY 'Your_Password_Here';

mysql> FLUSH PRIVILEGES;

mysql> EXIT;
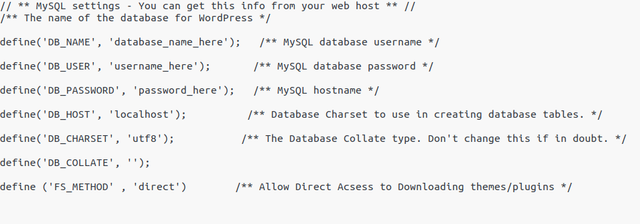
Creation of database is now successful. Goto /var/www/html/ directory and move wp-config-sample.php to wp-config.php where wp-config-sample.php is a default and another one we’re going to create/move it from existing, by running following command.
mv wp-sample-config.php wp-config.php
then update it with your database name, password under wp-config.php

fig. wp-config setup
Set Up as shown in figure after you’ve done that restart the web server and mysql service using the commands below:
service apache2 restart

service mysql restart
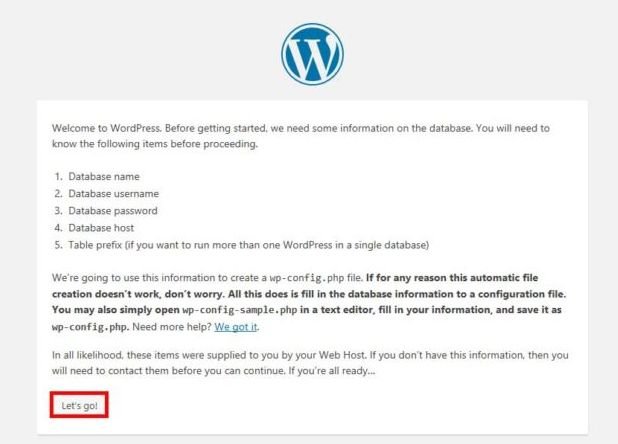
Now Open up the web browser and Goto http://localhost now you get the welcome page below. Read through the page and click on “Let’s go!” to proceed further and fill all requested on screen information .

I Hope that everything went on just fine, you can now enjoy WordPress on your system. However, if you’ve occurred any problems let us know in the comments. That’s it in this article good day 🙂

Thanks for the instructions! I am hesitating to switch from Ubuntu 16 to Ubuntu 18. On Ubuntu 16, I have LAMPP/XAMPP running with Wordpress as Bitnami package. Works very well, with several WP instances running one along another. Do you have any experience with Bitnami packages?
Downvoting a post can decrease pending rewards and make it less visible. Common reasons:
Submit
sure, its okay to use bitnami i used a lot when i was just switch linux from windows. But i recommend this for your knowledge how it works and all that stuff.
Downvoting a post can decrease pending rewards and make it less visible. Common reasons:
Submit