How would you like to have multiple, isolated, Linux desktops in your browser. One per tab. Just like this:

The purpose of this article is to show you how to rapidly deploy new environments for running each of your Altcoin wallets. Generally speaking, we want to run each of the Altcoin wallets in its own isolated user space so that it can't affect other wallets or programs you have running on your computer.
This article will show you how to create multiple Ubuntu Desktop environments on your Windows desktop using Docker containers. With this setup you will be able to create many new Ubuntu desktops (for free), very quickly, and isolated from any other desktop. This way you can host each wallet in its own environment. The article is geared towards Windows but can easily be adapted for a base Linux environment (Docker runs on both and the code provided is portable to either).
Requirements
- Windows 10 Professional (yes, unfortunately this requires Professional edition because we will be using Hyper-V) or your favorite OS that supports Docker.
- Docker for Windows (Docker for Windows is free and can be downloaded here: https://docs.docker.com/docker-for-windows/install/ )
Once you have acquired Win 10 Pro and installed Docker, you may have to go through a few steps (and restarts) to turn Hyper-V on and get Docker working in your environment. Once this is complete you will execute the following steps to setup your environment.
I have created a Dockerfile that automates all of the steps necessary to create your environment. The Dockerfile starts with a vanilla Ubuntu image from the Docker hub and deploys each of the steps from scratch. This was explicit and intentional so that you don't have to put your trust within me and a particular image I am providing. However it does put the onus on you to audit the source code if you wish (their is an included Python script with some custom code). It also may introduce future break points as the image isn't self contained and each time we use the Dockerfile it is pulling packages from repositories and code from Github (which both could change).
DISCLAIMER:
- This Tutorial is really meant for test environments and is most likely not the best approach and long term storage solution for your wallets. Find a smart way of storing your private keys
- These environments have not been security hardened. I leave those steps up to you. However at the end of this article you will find steps for adding password protection to NoVNC
- Follow through all the way to Step #9. One thing to make you aware: Docker containers are not permanent unless you commit the image. MAKE SURE YOU DO THIS.
Step 1 - Load up Powershell and pull the Ubuntu image from Docker Hub
Press the windows key and type in 'Powershell' to load up Powershell. Once loaded go ahead and type:
docker pull ubuntu
This will pull the latest version of Ubuntu Linux from the public Docker hub. This image for Ubuntu doesn't come with a desktop environment built in, so we will spend the next set of steps setting up the desktop environment and making it accessible through your web browser.

Step 2 - Verify you have correctly downloaded the Ubuntu image
You should see the Ubuntu image in your list of Docker images. Type the following to check:
docker images

Step 3 - Create Dockerfile from github
Next let's navigate to my Github repository where you can get the code for the Dockerfile. You can find it here:
https://github.com/SeanMikha/docker-ubuntu-vnc-desktop-fromscratch
This github site includes all of the configuration files and code we will be executing in our new environment (the only other Github site which is used in the Dockerfile is: https://github.com/novnc/noVNC). Now scroll down on the page and click on the file Dockerfile. This will take you to the Dockerfile page with the code you need. Click on the button in the upper righthand corner titled 'Raw' and copy the text. Your screen should look like the following:

Step 4 - Create the Dockerfile on your desktop
Open Windows Explorer and create the directory C:\docker. Once there, open up notepad and paste all of the text you copied in the last step. Save the file in notepad as 'dockerfile' with no extension in the C:\docker folder. When saving the file make sure to select 'Save As Type' as 'All Files (.)' . See the screen shot below.

Step 5 - Run the Dockerfile
Now that we have everything setup, let's run the dockerfile. Go back to Powershell and run the follow two commands:
cd c:\docker
docker build -t ubuntu-lxde-vnc-base:latest .
This step is going to take some time, so let it run. In this step the Dockerfile will automate taking a vanilla Ubuntu image and installing all the necessary software and configuration files to get it working with a Desktop and access through a web browser. If everything goes according to plan, you should end up with a screen that looks close to the following:

Step 6 - Run container off of base image
Now that we have our base image created lets go ahead and create a container out of it. To create a container from this image put the following into Powershell:
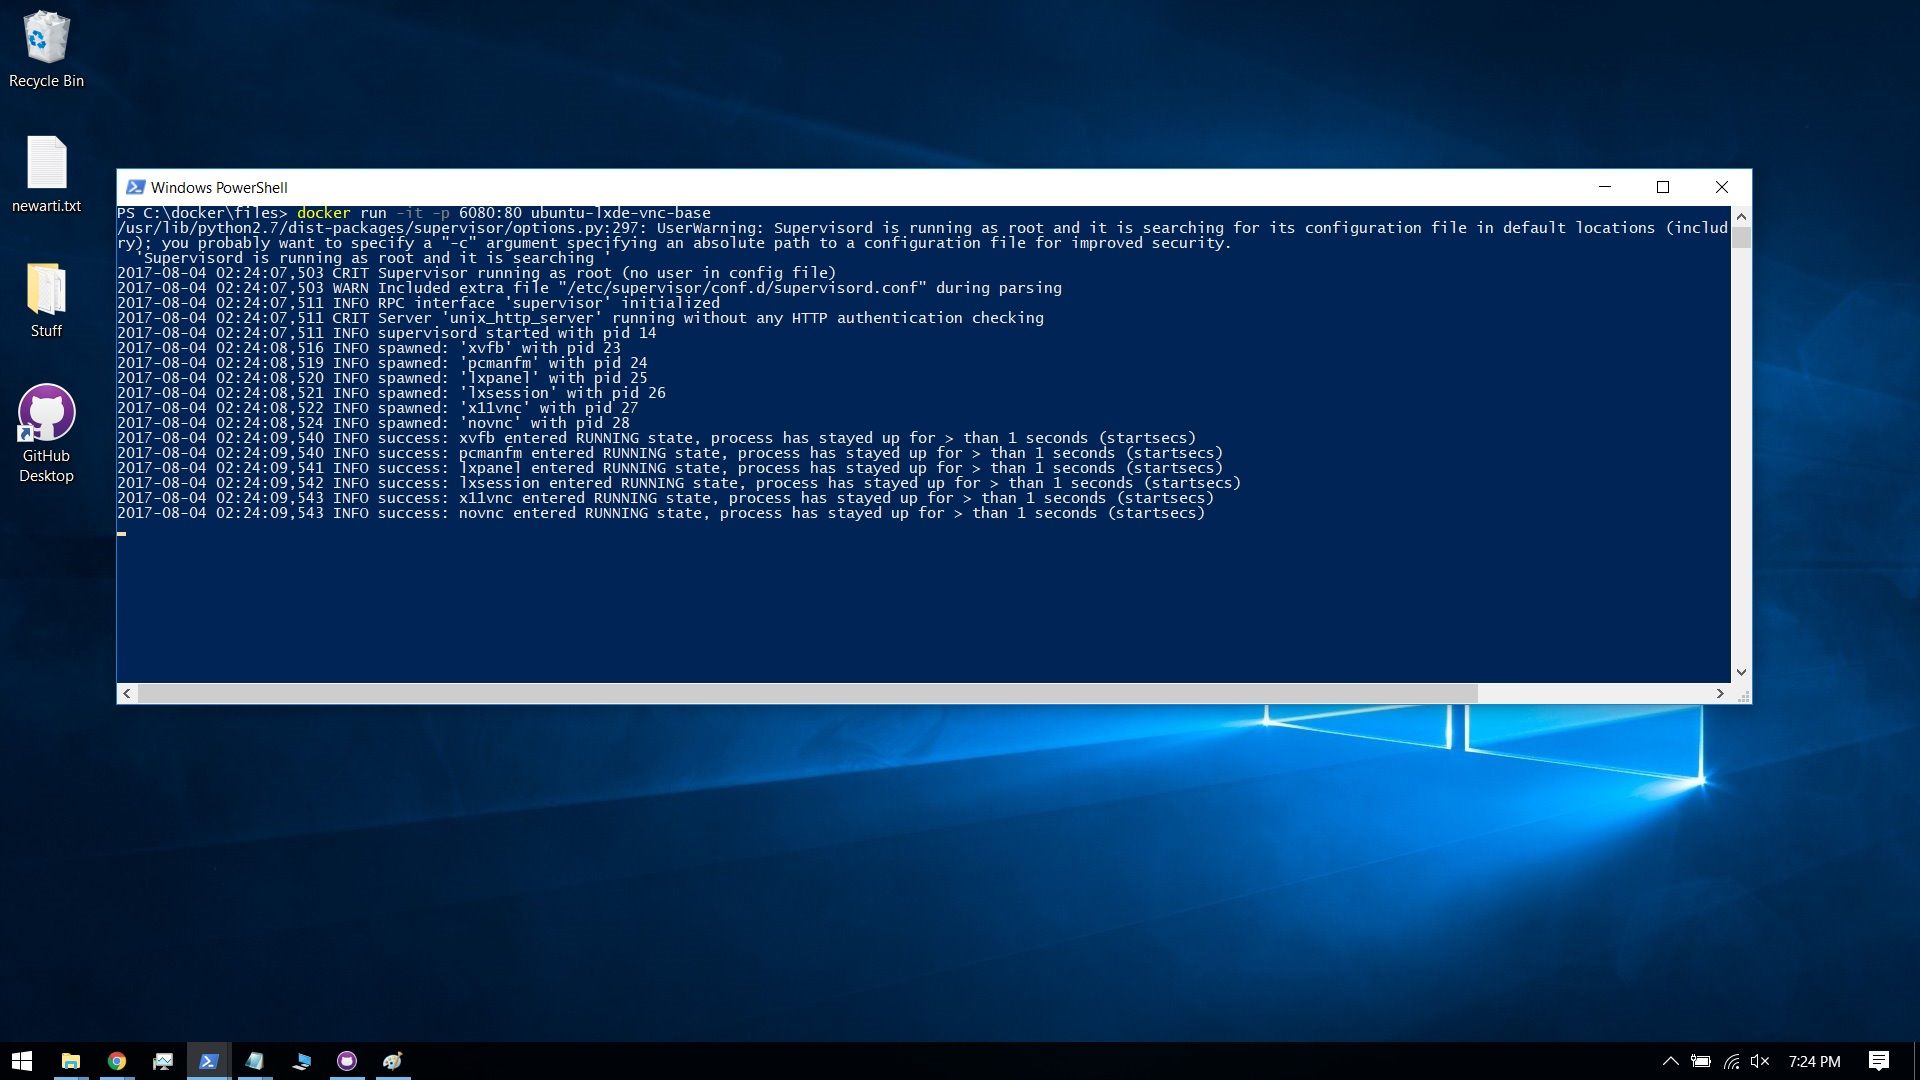
docker run -it -p 6080:80 ubuntu-lxde-vnc-base
This will startup the container and run the start script. You should see the following output in Powershell:

Step 7 - Login to your new environment with web browser
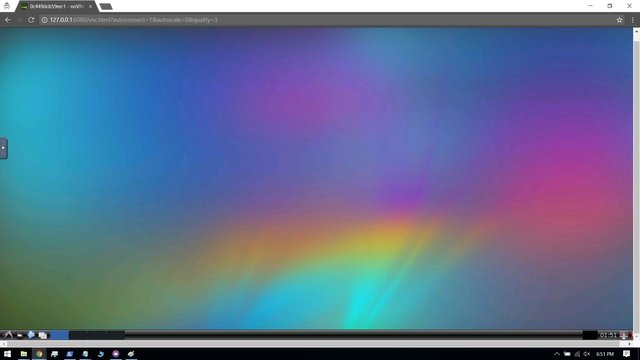
Now that we have the container running, let's login! Open up your favorite web browser (i'm using and recommend Chrome Incognito, but have not tested others) and navigate your browser to http://127.0.0.1:6080/ This should now load up the environment and you will see the following screen:

Step 8 - Setup password protection (optional-replaces step #6)
To setup password protection for this environment forward VNC service port 5900 to host by running the following in Powershell when creating the container:
docker run -it -p 6080:80 -p 5900:5900 ubuntu-lxde-vnc-base
You will need to set the environment variable VNC_PASSWORD. You can do this before the if block in the /root/startup.sh script in the Docker image.
Step 9 - Last and final step. MOST IMPORTANT!
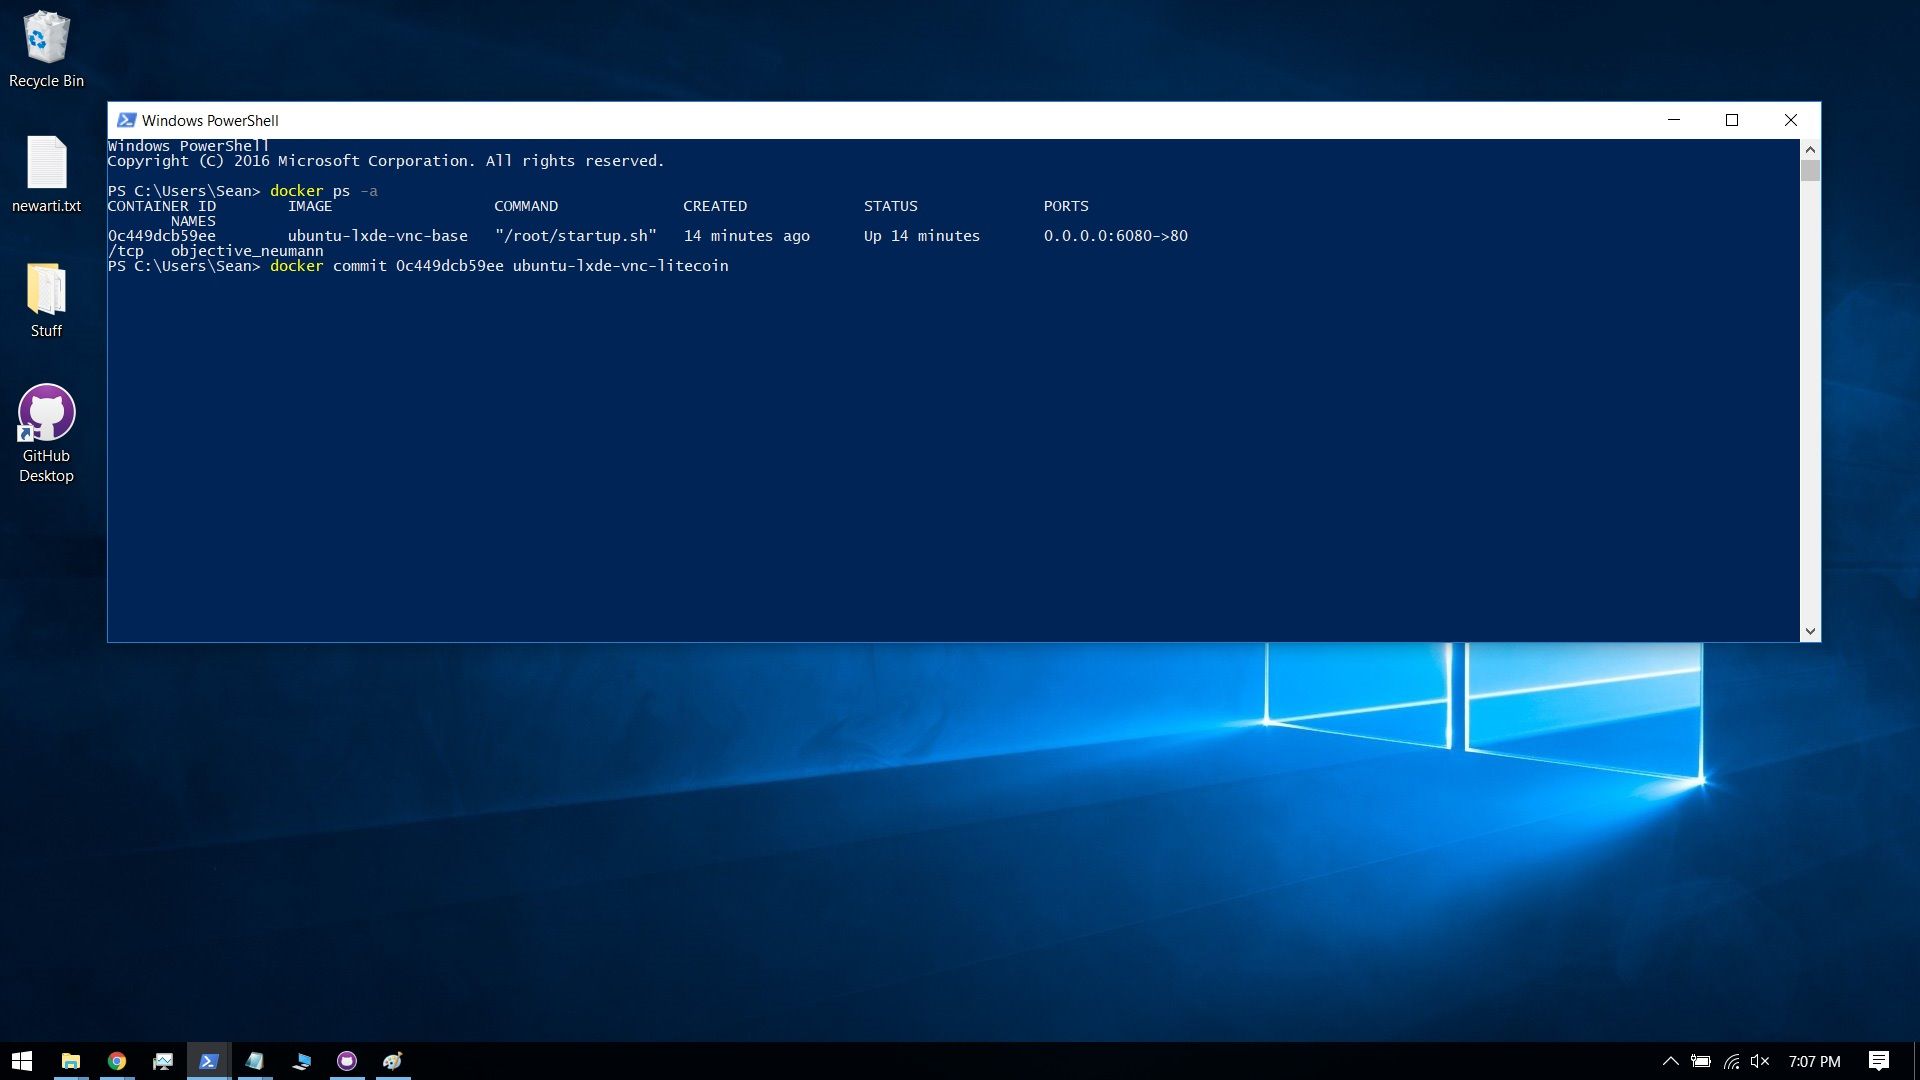
Before you exit the environment or close the existing window in Powershell make sure you save your container as a new image. You won't be able to recover your information in your container if you do not do this so BE CAREFUL!. Open up a new Powershell window and type the following:
docker ps -a
This will pull up a list of all the currently running containers. Find the container you are running (their should only be 1 at this point) and find its Container ID (a series of letters and numbers) and then run the following command to save your container to a permanent image:
docker commit 0c449dcb59ee ubuntu-lxde-vnc-litecoin
This will save the image (with the new name). Notice i've added the suffix 'litecoin` to the image name. This is the typical scenario. You start with the base image, load it up, install a wallet, then commit the image with an additional name of the Altcoin which is hosted within it.

Step 10 - Sharing with host computer (optional)
If you want the additional option for permanence you can also map a directory on the host machine to a directory inside of the Docker container. This is achieved with the following -v command:
docker run -it -v c:/docker/dir/litecoin:/litecoin -p 6080:80 -p 5900:5900 ubuntu-lxde-vnc-base
The first path after -v maps to the host drive (notice the forward slash for a Windows path), and the second maps to the Docker container environment.
Important notes
- If you want to setup multiple environments, just open up multiple Powershell windows and when creating each container provide a different port number. So in the example above after using port 6080, you can try 6081, 6082, and so on (just make sure the ports you use are not taken by another process).
Special thanks to DoroWu (https://github.com/fcwu) for providing the original source code I forked from.
Congratulations @seanmikha! You have completed some achievement on Steemit and have been rewarded with new badge(s) :
Click on any badge to view your own Board of Honor on SteemitBoard.
For more information about SteemitBoard, click here
If you no longer want to receive notifications, reply to this comment with the word
STOPDownvoting a post can decrease pending rewards and make it less visible. Common reasons:
Submit
This is a great guide! I didn't realize you could have a desktop environment inside docker containers and connect with VNC. I have just used it for server type tasks.
Thanks for sharing this.
Downvoting a post can decrease pending rewards and make it less visible. Common reasons:
Submit
Congratulations @seanmikha! You have completed some achievement on Steemit and have been rewarded with new badge(s) :
Click on any badge to view your own Board of Honor on SteemitBoard.
For more information about SteemitBoard, click here
If you no longer want to receive notifications, reply to this comment with the word
STOPDownvoting a post can decrease pending rewards and make it less visible. Common reasons:
Submit
This is why steem upsets me. This is an awesome post, and I'm sure it took you quite a bit of time to write this, proof it, check it, research it, all of that, and here you got 7 lousy up-votes and a couple of comments. This is truly a good addition, and I'm personally going to bookmark it. But things like this go unnoticed, while BS gets pumped through the feed getting major money sent through their up-voting. Thanks for posting this.
Downvoting a post can decrease pending rewards and make it less visible. Common reasons:
Submit
Congratulations @seanmikha! You received a personal award!
You can view your badges on your Steem Board and compare to others on the Steem Ranking
Vote for @Steemitboard as a witness to get one more award and increased upvotes!
Downvoting a post can decrease pending rewards and make it less visible. Common reasons:
Submit