Full instructions Detailed AMAZON RDP – How to get a free Windows VPS for a YEAR
A lot of people ask us for a good VPS that they can use for their copy of Mass Planner, if you want to keep your account posting 24/7 but don’t want to keep your computer on all day long the easy solution is to use a Windows VPS and move Mass Planner on that server.
Most of you are asking for a cheap VPS and most of you use Mass Planner with one or two accounts so this will be the best solution for you – a free Windows VPS that you can use for a year at 0 costs. It’s not very powerful but it’s decent enough and Mass Planner will run on it with a couple of accounts quite well.
This is not for people that need a powerful machine and use a lot of accounts, for that you will need a better server and there are a lot of places where you can get that online, you should know better if you’re at that level so we’re not going to get into that.
In this article we’re going to cover the following:
- How to get a free windows VPS for 1 year
- How to connect to your VPS using remote desktop on Windows
- How to connect to your VPS using remote desktop on Mac OS X
- How to use your local drive in remote connections(or how to copy data from your PC to the VPS)
- How to use your local drives in remote connections(or how to copy data from your Mac OS X to the VPS)
- How to install and start using Mass Planner on your new VPS
- How to disable IE Enhanced Security in Windows Server 2012
- Final notes
1. How to get a free windows vps for 1 year
Some of you might know but most of you probably don’t – Amazon offers everybody that wants to test their services a free vps for a year. They make it a little hard to navigate through all their settings and signup pages so here’s a short tutorial on how to do it fast and easy.Here is what you will need:
- a credit card, it will not be billed and the vps is free but they require you to enter one
- a telephone number – they will call to verify your identity(call is automated not human)
- 5-15 minutes of your time depending on how fast you are filling up forms and following instructions.
- 1Gb of RAM
- 30Gb Hdd ( you’ll have around 11Gb free after the OS is installed)
- 1 virtual processor at 2.49Ghz
- OS: Microsoft Windows Server 2012 R2 Standard.
- 1GB monthly free traffic ( if you go over they will charge you $0.12 per 1Gb which is almost free as well ? )
If you want to go ahead and get your own server like the one above, just go over to Amazon at : http://aws.amazon.com/free/. You will see this server being referred to as AWS account( it means Amazon Web Services account).
You can read a lot more information on their page about the free plan, you can go ahead and read that or if you just simply want to continue, click the yellow “Get started today” button that looks like this :
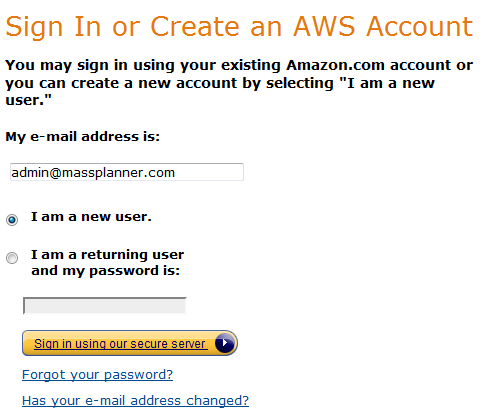
Now you will be taken to the signup page for the AWS service, go ahead and create a new account by selecting “I am a new user” and entering your email like this:
After filing in the above click the yellow “Sign in using our secure server” button and you will be taken to another form to complete the signup process.
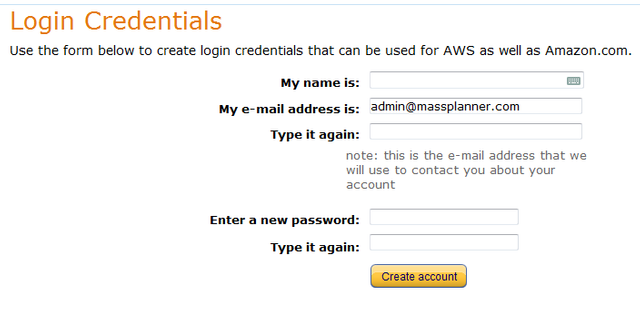
Go ahead and fill these too with your name, email as before and select a new password. After you’re done click the “Create account” button. You will then be redirected to another page that will require you to actually sign up to AWS after creating your account:
Click the “sign up for AWS” link and you will be redirected to a page that will ask for your details( the AWS console signup page). You will need to fill this up in order to proceed to the next step.
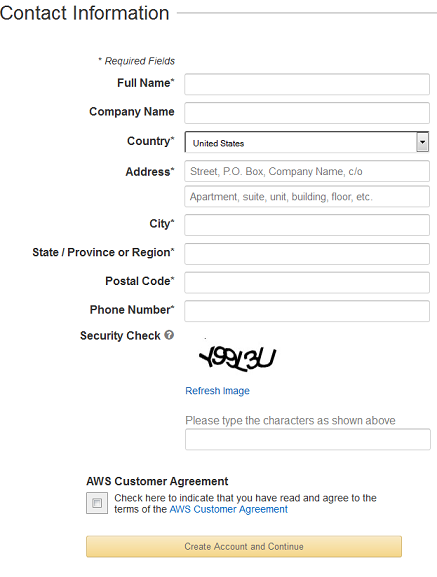
Fill everything up correctly, don’t make stuff up but fill in your real name and address as you will also have to enter your credit card information later and if they don’t match you might get denied and done all this for nothing. So fill in your Full name, company( if any), select your country, enter address, city, state, postal code, phone number, the security code and finally check the AWS customer agreement. After everything is filled in nicely click the Create Account and Continue button. You will be redirected to the page where you need to enter your credit card details:
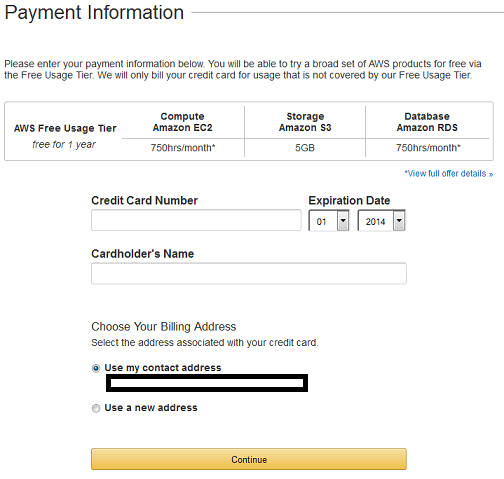
Fill in your credit card number and select the expiration date. Enter you name as before, either leave the address that you already entered(as I did) or select a new one, after that press “Continue”. You will be redirected to the Identity verification step:
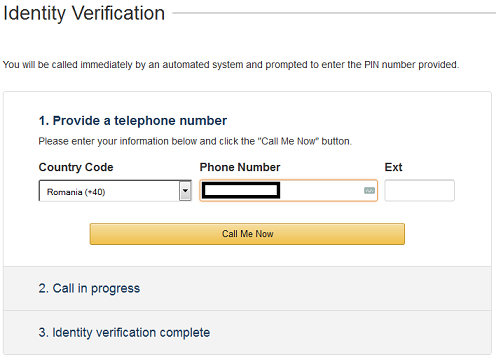 Now they want to verify that you are who you say you are so you are going to get an automated call from Amazon and will need to enter the provided PIN number in order to proceed. Make sure again that you entered your phone number correctly, have your telephone close by and click the “Call me now” yellow button.
You should immediately receive a call from Amazon, they will also display a PIN number on your computer screen you will need to enter that PIN number on your telephone keypad or just say it loud one digit at a time. If/When successful you will receive a message on your screen stating that your identity verification is complete:
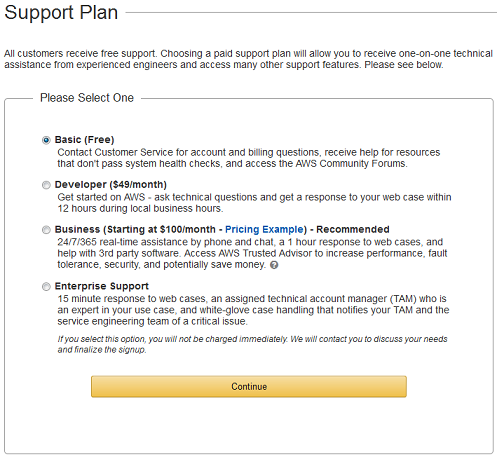
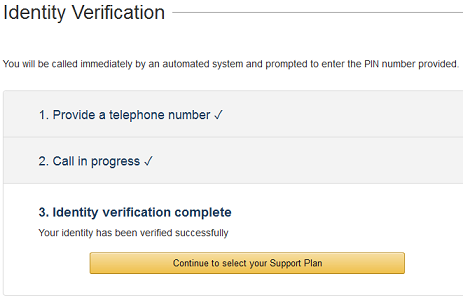 Now just click the “Continue to select your Support Plan” button. You will need to select the support plan for your VPS:
This one should be quite simple, if Basic(Free) is already selected leave it like this, if something else is selected just select Basic(Free) and click Continue and you finally have your Amazon Web Services account:
Congratulations, you have you AWS account, now all you need to do is set up your Windows VPS. In order to do that just click on the yellow “Launch Management Console”
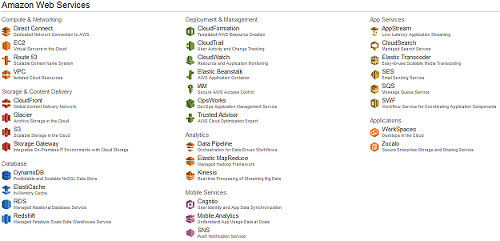
 At this point you might be prompted to enter your AWS password again, the one that we created a few steps above when we started. Go ahead and enter that and login again to the AWS management console. Don’t mind all the services amazon is providing here, there are a lot of them and someone that is new to this might feel a little lost, here’s how the management console looks like:
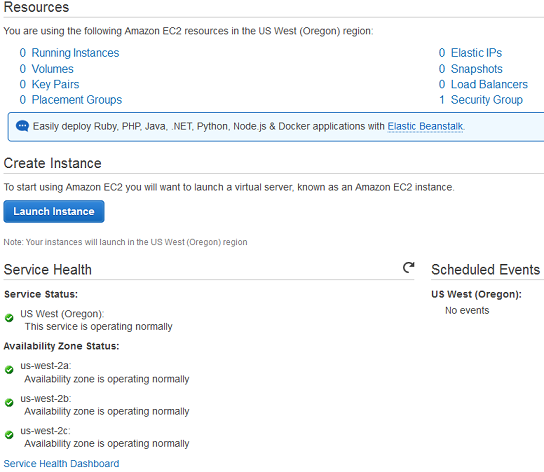
Again, don’t mind them all, just click on EC2(Virtual Servers in the Cloud), should be the second from top to bottom in the left column. You will be taken to another screen that again is full with a lot of information that might be overwhelming ( Amazon did not make this easy at all for beginners ? ).
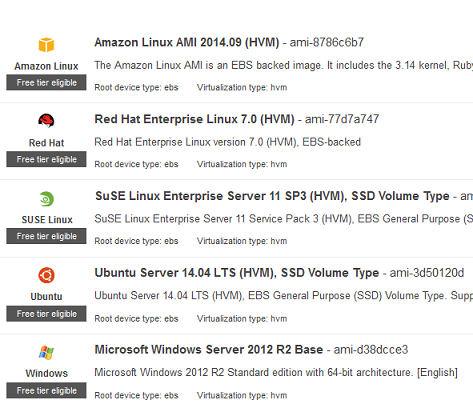
Just click the blue “Launch Instance” button and you will be redirected to a page where you will need to choose what operating system to install on your VPS:
As you can see there are several choices of operating systems, if you are doing this in order to use it with other software at this point you can choose either linux or windows. As we have created this tutorial to use a Windows VPS with Mass Planner ( as it does not currently work on linux) we’ll be continuing by choosing the last item in this list “Microsoft Windows Server 2012 R2 Base”. In order to proceed click the blue “Select” button to the right of the Windows items:
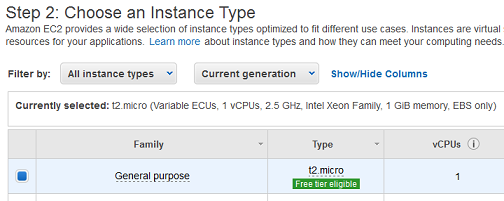
 Now you will be taken through a couple of steps in order to select the specs of your new VPS. In order to keep it free, always select the one that has the green “Free tire eligible” text :
It should already be selected, if not select the first item, General purpose t2 micro which is the only one that is free. Now, you can either go through the rest of the steps and see what each offers you, or just simply click the blue “Review and Launch” and jump to the end:
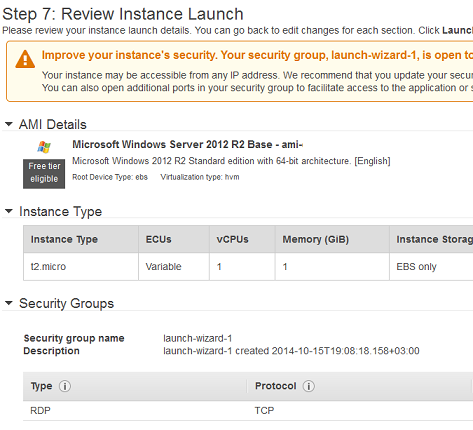
If you’ve pressed the Review and Launch button you should be at step 7, Review instance launch, they’re just giving you a lot more information about the server, you can skip everything and click the blue “Launch” button in the bottom right corner.
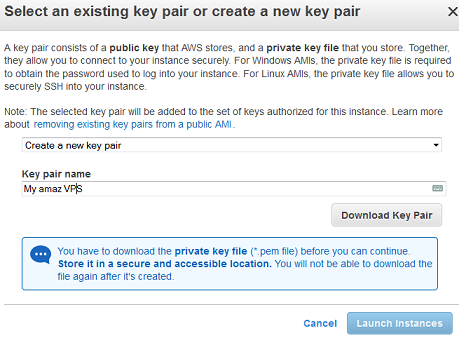
 You will be prompted to select a new key pair or create one. This will be useful in case you loose your password and need to login to your VPS, as you have just created a new account you won’t have one already, so select to create a new key pair and enter a name for it.
After entering the name for your key pair click on “download key pair” and your browser should prompt you to download a new file to your computer, it will be named as the name you gave it above, without spaces and with a .pem extension. Save it somewhere on your computer and keep it safe just in case.
Now the blue “Launch instances” button should be usable, so click it and after a little setup wait time you should receive a message that your new instance is launching:
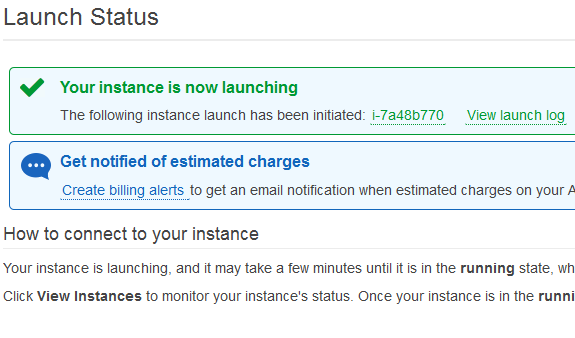 Click on the blue button and you will be taken back to the AWS console where your newly created VPS instance will be listed, it should look something like this :
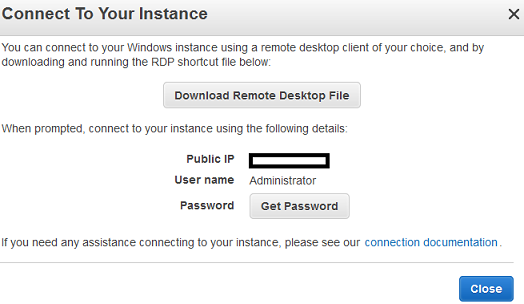
You will see your VPS with the status of running. Notice the Connect button above it, click that and another window should appear with instructions on how to connect to your VPS. It looks like this:
 I know it’s been a long signup but we’re almost there and the good news is you only have to do this once for a whole year of free VPS.
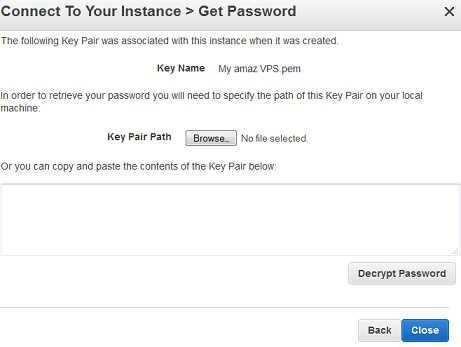
First, click on “Download Remote Desktop File” and save that file somewhere on your computer, it’s what you will use to connect to your VPS. Next, you will need a password so click the Get Password button. You will now need to provide the Key Pair that you created earlier in order to get your password:
Either upload your .pem file or copy its content in the provided field and click decrypt password. As soon as you do you should see your VPS password, write it down somwhere as that’s what you’ll use every time you connect to your VPS.
I can’t believe I’m going to say this and I think you were all waiting for this: You’re done. Now you have your free Windows VPS up and running for a whole year, you have your .rdp file which you will be using to connect to it and you have your password. In case you used a VPS before you should now know how to proceed. In case this is your first time, just read on.
Also I just want to re-iterate, this was a one time setup process, from now on, you have your VPS ready and running at all times, all you need to do is connect to it.
2. How to connect to your VPS using remote desktop
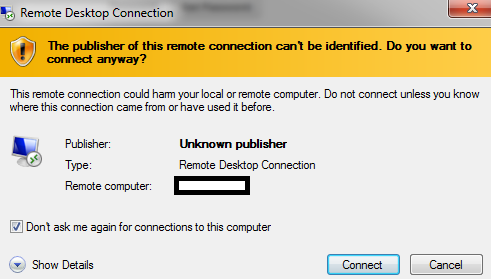
Connecting to your newly created VPS through remote desktop is quite simple, if you did not have the .rdp file that you downloaded earlier you would have had to create your connection manually and enter the ip of your vps. This is not the case though, just double click the .rdp file, the name should be something like the-ip-of-the-vps.rdp ( something like 192.168.1.1.rdp …just an example). When you double click it for the first time something like this will appear:
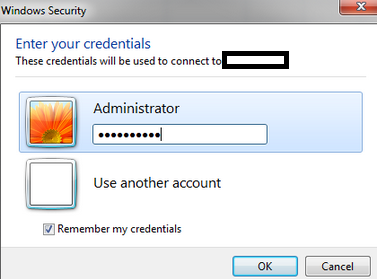
Make sure to check the “Don’t ask me again for connections to this computer” checkbox so you don’t need to do this every time and skip an extra step and click “Connect”. Now you will be presented with the login screen where you need to enter your password:
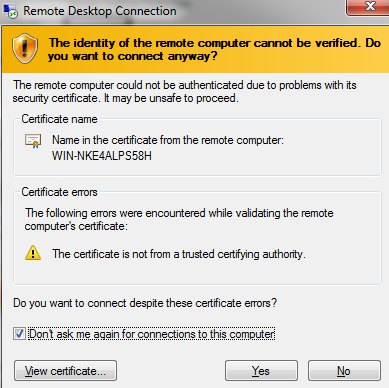
Enter you password under Administrator and click ok. Also check the “Remember my credentials” checkbox underneath so you don’t need to enter your password every time. After that click OK. Again, the first time you will do this you will have an extra window appear :
Just check the “Don’t ask me again for connections to this computer” checkbox and click Yes and this will never show up again. Once you click Yes, you will enter you VPS. You are now connected to your new Windows VPS machine and can do anything you want with it. Just use it as you would use any other computer, install programs on it. It will run 24/7 and you don’t need to worry about anything. By the way, congratulations for getting your very own free windows vps, you deserver it after all this work!
Again, you will have to do all these steps only once when you first set everything up, after that you will only need to double click your .rdp file and you will be automatically logged in to your VPS, so just place that file somewhere where you can easily access it like your desktop.
3.How to connect to your VPS using remote desktop on Mac OS X
If you followed the above tutorial, you now have your .rdp file which you will be using to connect to the windows VPS. However you are on Mac and things will be a little different, though not so much.
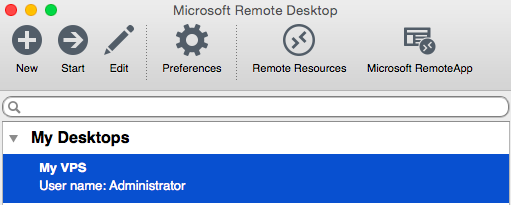
First of all you will need to install a remote desktop connection client, I installed Microsoft Remote Desktop which is easy to use and it’s free (you can find it in the App Store), here’s now it should look like :
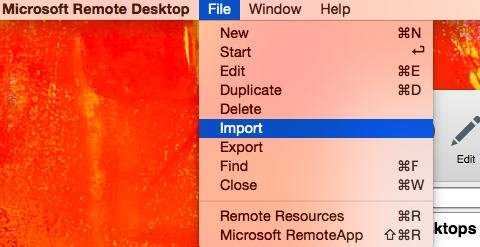
After you install the application you need to create your connection. If you have the .rdp file at hand and so you don’t waste time setting everything up manually, just import it using the “Import” option in the menu bar:
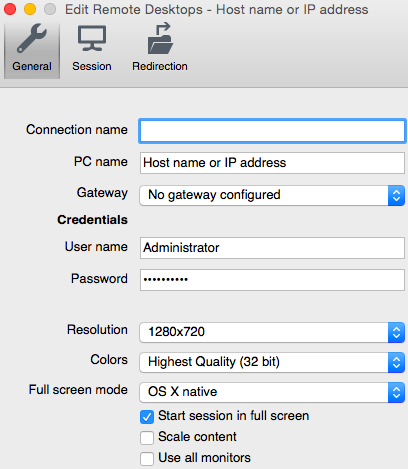
In case you did not have the .rdp file, you had to manually create your connection, by entering the ip of your VPS, the user name and password as show below:
As long as we’re on this screen let’s make a few more tweaks too. If you imported the .rdp file, edit the imported connection and make sure you add the password (so you don’t have to enter it every time you connect) and choose the optimal resolution depending on your screen. Make sure to save everything and you are done setting everything up.
Once the configuration is done, you just have to double click on your newly created connection and you can start massplanning.
4. How to use your local drives in remote connections(or how to copy data from your PC to the VPS)
Depending on what you want to setup on your VPS you might find the need of using one of your local drives in remote desktop connections. This will help move data from your computer to the VPS like installers, folders with posts or the whole massplanner folder if you already had that running on your computer. It’s not a hard task although it’s a little hidden and not everybody know that this can be done.
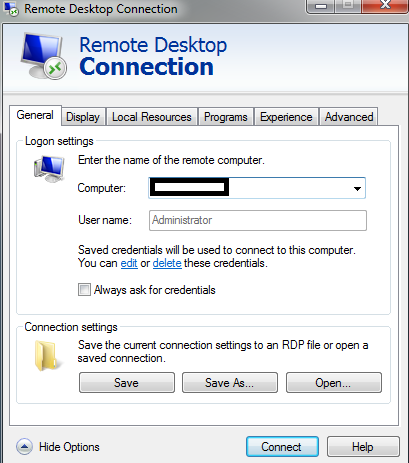
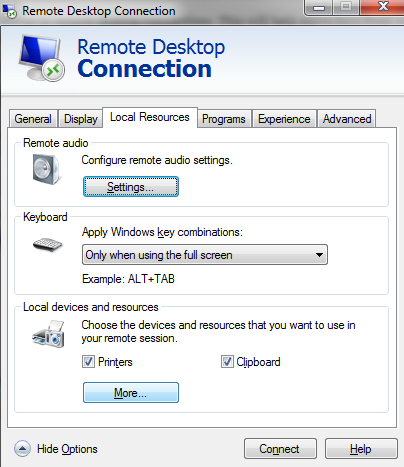
Ok, so let’s get started, right click on your amazon vps .rdp file and select edit, the remote connection options should show up like this :
Here click on Local Resources, and on that tab, at the bottom under Local Devices and resources click More..
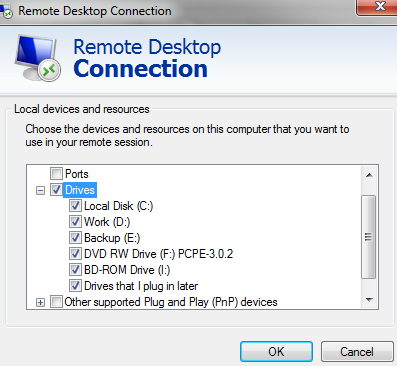
Now click on the + sign besides Drives and all your local drives will show up. Either select a few of them that you want to make available when you connect to the VPS or just select them all. Your drives are available on the VPS only when you are connected and only one person can connect at a time so your data is completely safe. After selecting one or more drives, click on OK. will you get back to the Local resources tab, now you need to save the changes that you made to the remote connection so go back to the General tab and click Save.
After this you can connect as you would normally do and you will notice in My computer that you also have access to your local drive when you’re inside your VPS.
If you want to move Mass Planner to your VPS you will find the files in : c:UsersyouruserAppDataRoamingMassPlanner – change youruser with the user you are using on your computer. Here are the full instructions about that.
5. How to use your local drives in remote connections(or how to copy data from your Mac OS X to the VPS)
If you want to share folders with files between your Mac and your new VPS machine, you just have to follow these simple steps:
1. First, open the Microsoft Remote Desktop application that you installed in the previous step.
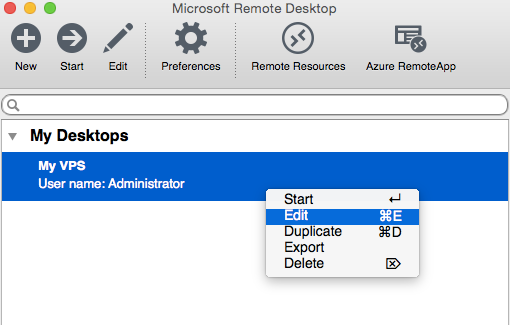
You will see your previously created connection, like in the picture below:
2. Right-click on your connection and choose Edit
Or you can select your VPS connection and click on the Edit button in the menu. The Edit window will appear with the 3 tabs: General, Session and Redirection.
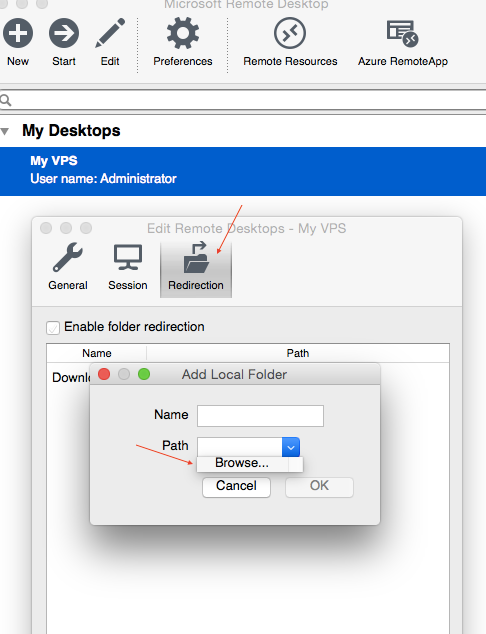
3. Click on the Redirection tab and add a local folder
From the Redirection tab, click on the “+” button, and you will be able to add a new local folder to your VPS. You just have to give it a name and select the target folder by entering the Path in the corresponding field (or simply choose Browse and select the wanted folder).
4. See your shared folder in the VPS machine
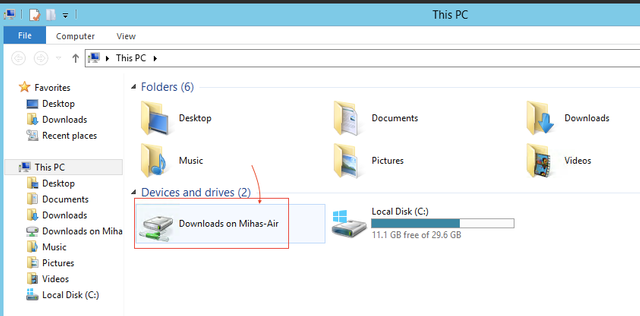
Now you can close the Edit window, and go ahead and double-click on the VPS connection to connect. Here, open the File Explorer and, in the Devices and Drivers section, you will see the selected folder form your Mac machine.
Now you just have to repeat these steps for all the folders you need for your work and you’re all set.
6. How to install and start using Mass Planner on your new VPS.
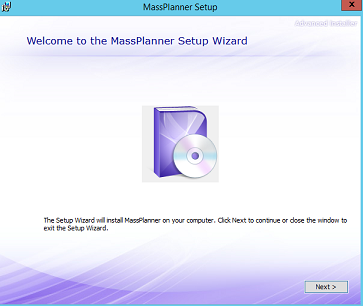
Installing Mass Planner or the vps is the same as installing it on any Windows based computer, all you need to do is double click the installer and you will be guided through the steps that you need to take before installing it. In order to get the installer on your VPS either use your local drives on your VPS as explained in the previous step or just download the installer directly on your server. In case you don’t have the instructions email that you received when subscribing to Mass Planner at hand, here’s a quick link to the installer.
After downloading the installed on your VPS double click it and start the installation process, click next, next a couple of time and it should be installed, after that all is left for you to do is enter your credentials and start using it as you would use it on your own computer. It will be always running, 24/7 so you can set it up and let it post for you. Just use the remote desktop connection to check up on it from time to time to see everything is in order.
You should already know how to use Mass Planner if you reached this point, however if you’re just starting, the best way to learn to use it is by watching our video tutorials.
7. How to disable IE Enhanced Security in Windows Server 2012
This might not seem very important to you, until you open up the only browser available on your new VPS – Internet Explorer in order to browse the web, access and download stuff and see that it’s not working. For some reason Microsoft thought it would be a smart idea to create the “IE Enhanced Security” which basically blocks you from browsing any website, not even Google is accessible unless you do 5-7 clicks first and add it to the safe list. If you do a search on google then it’s a new website/page and you need to add that as well and so on. Crazy fun, you might decide you can do this for a little while until you download Firefox or a better browser but it’s easier to disable this feature as it’s not really hard but it requires you to know exactly where to look for it.
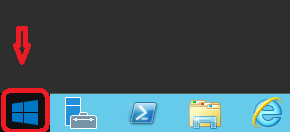
So let’s get started, first you will need to click on the start menu in the bottom left corner:
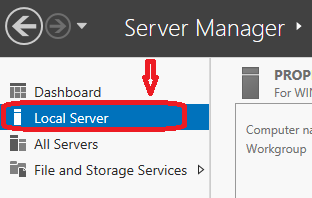
From the popup menu that shows up select Server Manager, should be the first one in the top left corner. After the Server Manager is loaded click on Local Server:
After you have clicked on Local server look on the right side now and notice the IE Enhanced security configuration area and that is is turned on:
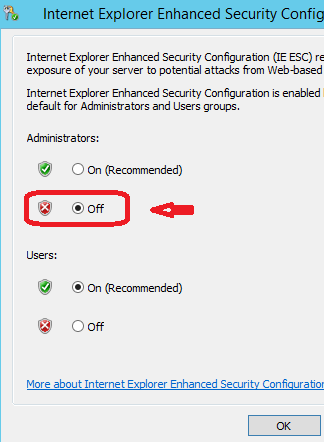
Click on “On” and more setting will appear where you can actually disable that setting. Here’s what it will look like:
As you can see I have already selected Off for Administrators – that’s what you should do too. If you want you can do the same for Users, though if you’re the only one that you’ll be using the VPS that is really not necessary. After selecting Off click on OK. Now you’re back in Server Manager and you will notice that it still says On for the IE security, just press F5 now to refresh the window and it will correctly say Off:
And you’re done. You can close the Server Manager and open IE and see that it works normally now, no more crazy prompts. use it to do your bidding or just download your favorite browser and use that ?
8. Final notes.
It took a few steps but now you have a fully functional windows vps that you can use however you want for one whole year. We have tested it with Mass Planner with 2 accounts for Facebook, 2 for Twitter and 2 for Pinterest with a posting rate of 10-30 posts for each account per day and 1-3 tools enabled for each account and it worked without any problems for over a month(it’s still working, we just waited for a month to see everything is in order before making this tutorial).
Depending on how much you use it it should also work for you if you use it moderately without any problems. If you’re looking to post hundreds and hundreds of posts per day with several accounts it might be slower but might still work. If you are looking for even more posting power you should change to a paid vps that provides more resources. We think however that this setup is decent enough for most of our moderate users.
You can also use this server for anything else, if you have other sofware that doesn’t require a lot of resources and that you want to keep online 24/7 this will work. Keep in mind though that there are a few limitation to the server and you have your Credit Card entered, the way Amazon works is that if you go over the traffic limit or any other limit it charges you for the extra usage. Although the rates are really affordable I just wanted to make sure you know about this and don’t over-do use your VPS ( like installing a software that crawls and downloads a lot of big images and that will create a lot of traffic….just an example)
Let us know what you think, is this free server working good for you, do you have another way of getting a good reliable free vps? Did you encounter any problem with the signup process or everything was a breeze and you just want to say thanks for sharing this with you? You can also share this with your friends using the below buttons ?
No related posts.
