Hello, and welcome to this Android development tutorial. This is part one on how to make a file manager application.
If you will enjoy reading and contributing to the discussion for this post, will you please join us on the YouTube video above and leave a comment there because I read and respond to most comments on YouTube?
If you find anything helpful in this video or funny, will you please leave a like because you will feel great helping other people find it?
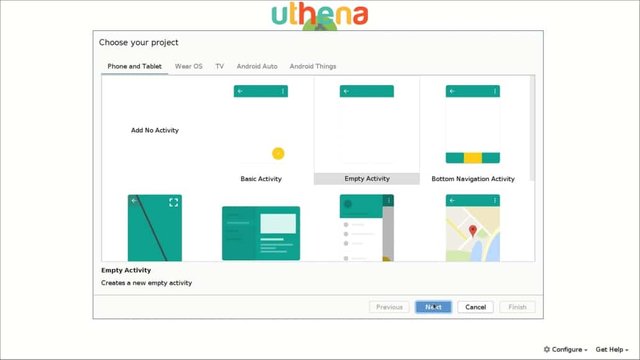
We open Android Studio then we click on start a new Android studio project. If we select an empty activity, click on the next one.
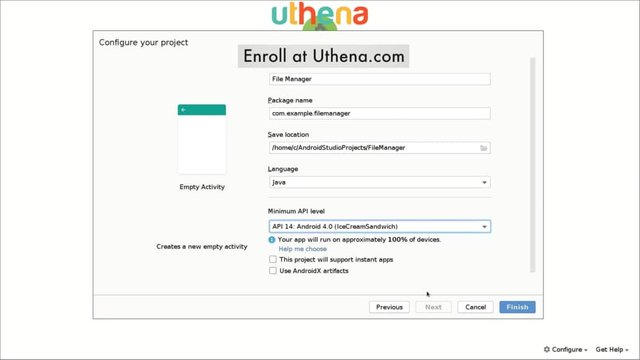
As per the name, we will change it to File Manager. We will make sure that Java is set as a language and the minimum API level is at least 14. We will click on the finish and we will wait for the project to be loaded.
This file manager will enable us to search through directories and files and different file types. We’ll be adding features and improving the UI and so on. While the project loads, we can say that this project will be very, very interesting because we will learn how to use ListViews which are kind of scrolling views in which we will display all your files, folders, and all that kind of stuff. We will also use Java logic and mainly everything will be done in Java or in XML.
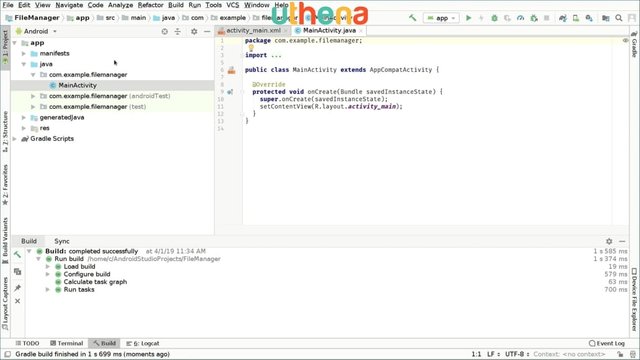
The first thing we will do is open the res folder under the layout folder and we will find the activity_main.xml file. We will click on it correctly and click on delete.
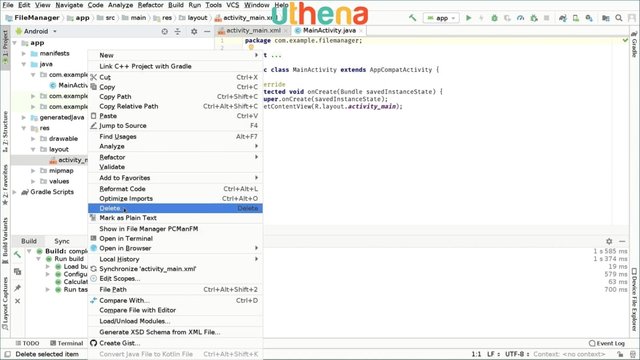
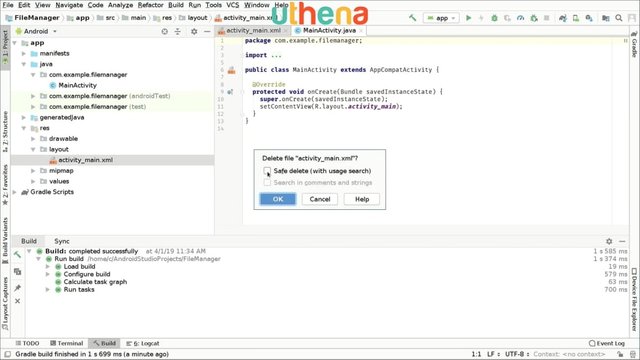
We will uncheck this if you have them checked and then we will click on okay.
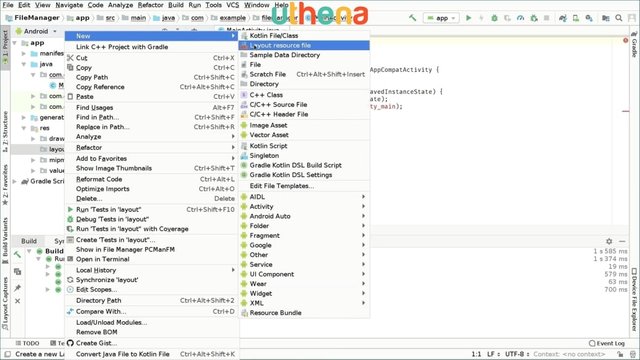
Right now we will go and right click on layout, new and layout resource file, and we will create a new file.
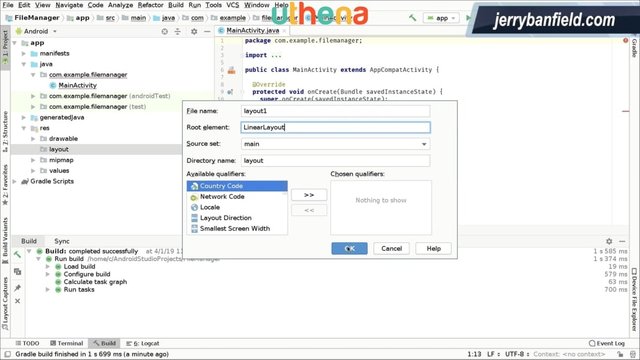
We will call it layout1. The root element of this layout will be the linear layout and we will click on it okay.
Right now, we will switch the design view to Textview and we can open the preview right here in order for us to know what’s going on i n the UI of our application.
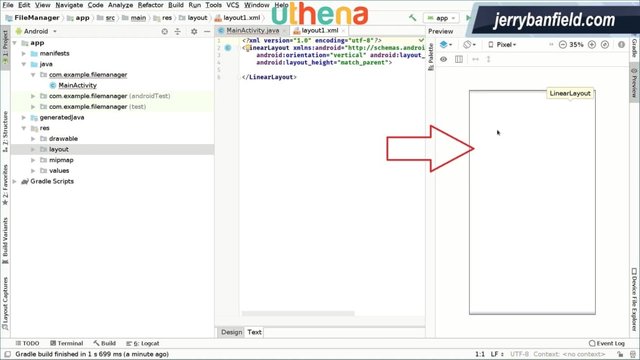
Here we can start designing this UI we have, so if we have a file manager we would like to have a place in which we can show the files and folders, and the easiest way to do it is with a ListView. We will do that a little bit later but now we will just create kind of the architecture of this file manager.
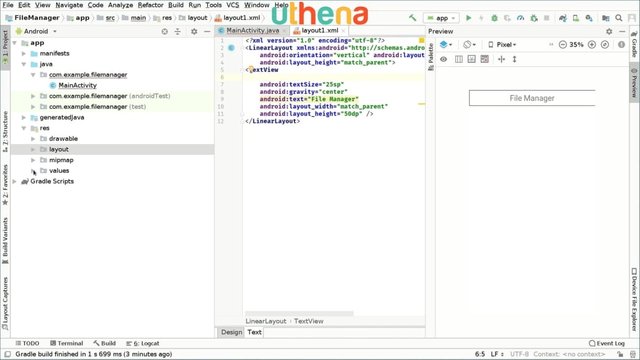
For example, if we create a Textview right here, we type Textview with match_parent. height can be maybe 15 DP, and we want to do with this something very simple. For example, we set a text to File Manager, so this will basically just display the title of our application. Now, we will increase the text size by specifying the text size attribute to 25 SP, and we will center the text in the Textview by specifying the gravity to center.
We can change the background of the view if we want. For example, if we want to create a black background. First we will create a color for this.
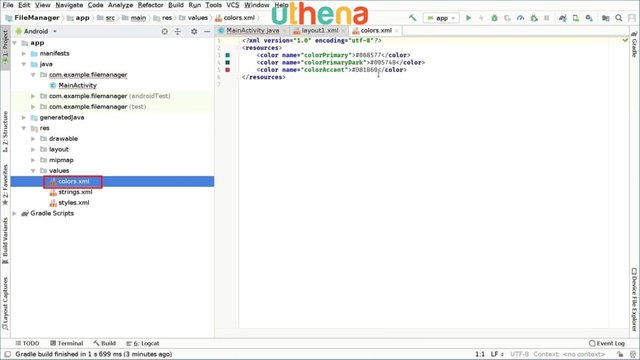
For that, we go to the left side, we open the values folder, and under that, we will find the colors.xml file. We have opened these files, you can see there are already some colors created by default, but we will add a new color.
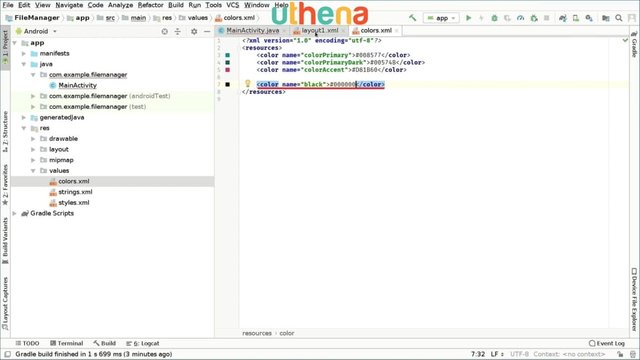
We will type a new element color and we will create a black color. So we type black. We close the element and inside the element we type number sign or hash tag, whatever you want to call it, and six zeros. We will follow the hash tag with six zeros. Now we have defined the black color.
Now if we go back to layout1.file we can set the background of this Textview to black, and the background is black.
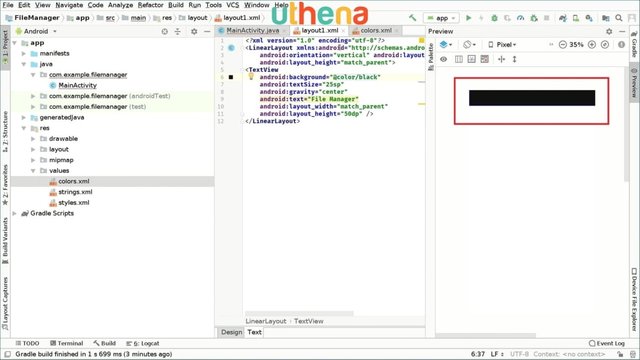
Now, we want to define a kind of white color, not that white, but we will call it light color. So were going to create a new color and name of the color will be light or just light color. Maybe we can specify it as LightColor and the value of this color will be six B’s. You can go and do it with uppercase because that’s kind of more readable if you like but it doesn’t really matter. So six B’s. Now we will set the text color attribute to light color and we can see that our file manager has a light color.
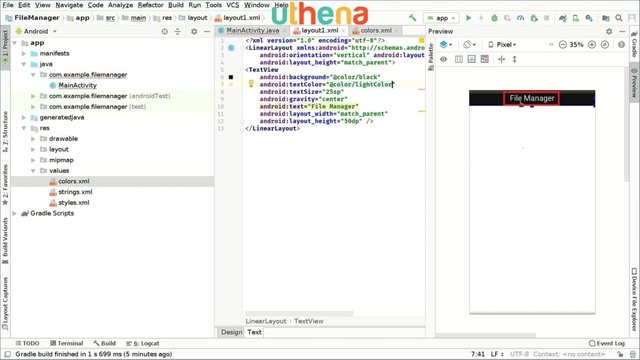
If you want to make this white kind of text light color a little bit brighter or more whiter we can change the D to an E, for example. So we will go and type six Es instead of six Ds. I think that’s good for now. We now have the title of our file manager.
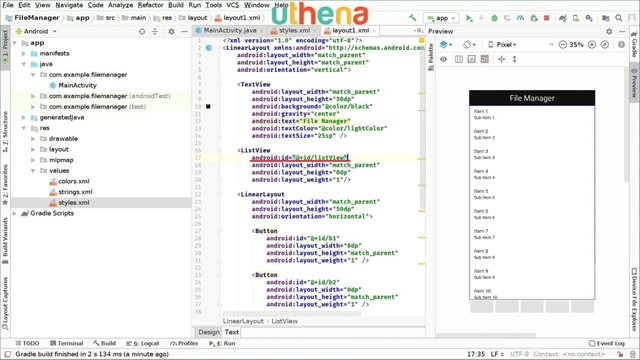
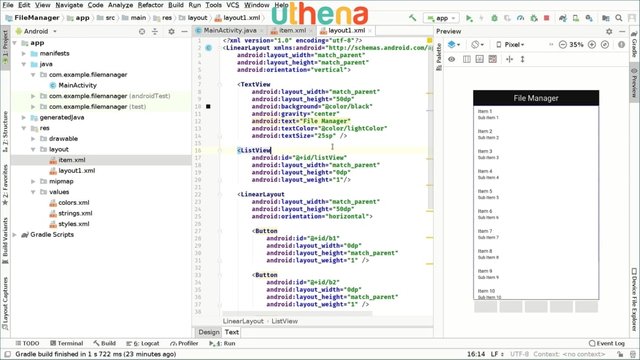
Next we will create a view that will simulate what our file manager will look like. We can go and say ListView, for example, which will be match_parent, the height will be 0 DP and the weight will be 1.
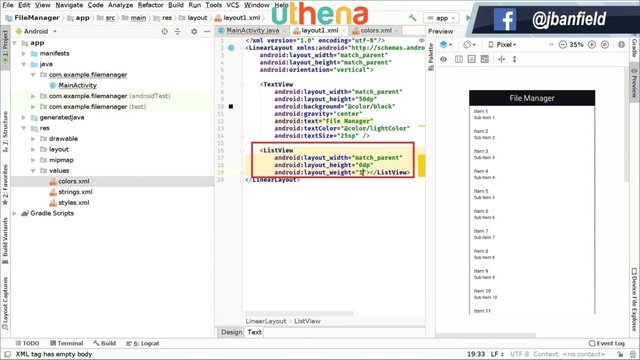
As you can see on the right side we have item one, sub item 1, item two sub item two and so on. This is the ListView that we have created right here. Here we will display the file names and so on.
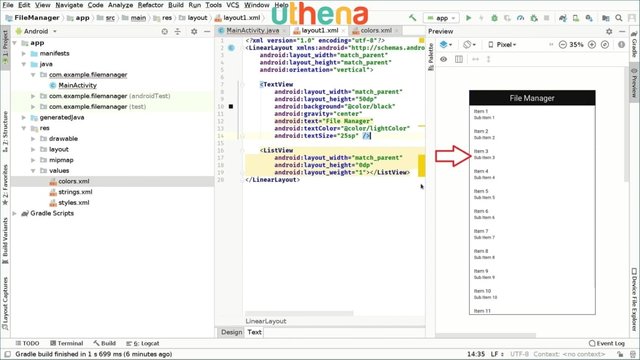
So we have our ListView ready and we have to create something else, maybe a bottom bar that will enable us to have some buttons and actions. For that we will create a linear layout right here and width will be match_parent the height will be 50 DB. We can change this later. The orientation of the layout will, of course, be horizontal because we want to create a horizontal bar at the bottom. As you can see here we have a horizontal bar, a ListView and on top of a TextView that says this is our File Manager.
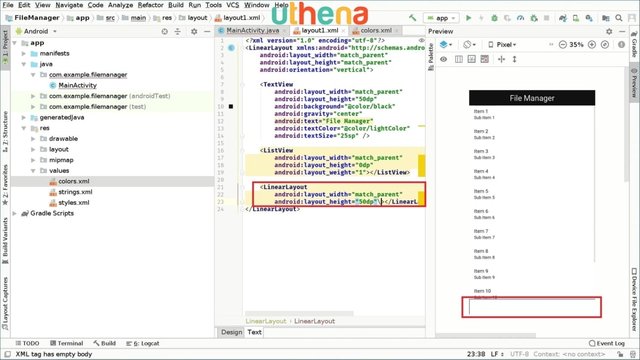
In the future we can add more features and even add buttons in the top where file manager title exists, but here, for example, we will create some buttons. We will open an element. We will type in a button. The width will be 0 DP. The height will be match_parent and the weight will be 1. We can and can change or copy this.
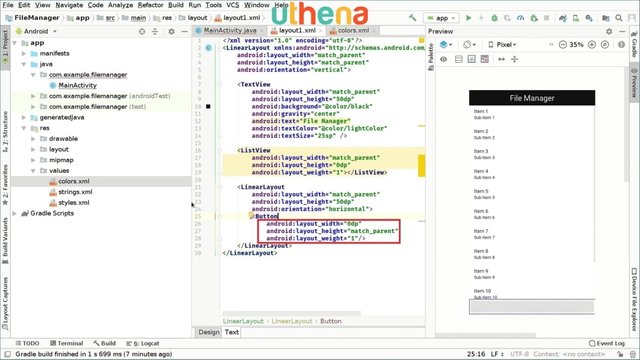
Now we have this button right here and we can enable an ID. For example, I will call it B1, but for me it means button one. We can add more buttons. For example, we will copy this and below it we will paste it maybe four times more, so we can have five buttons on our button bar, and we will change, of course, the ID of every one of them. B1 the next will be B2, the next B3, the next B4 and the next B5. We can press control+alt+L to order and reformat the code to make it look nicer.
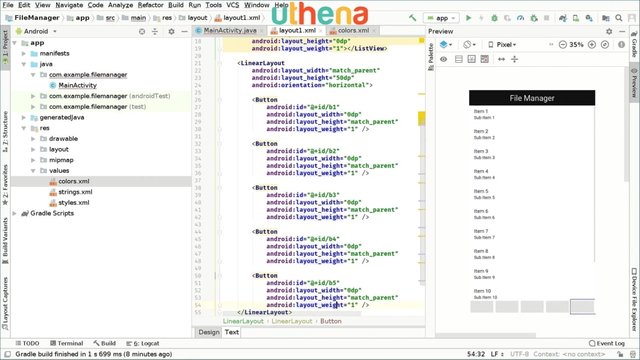
Here we have five buttons at the bottom of the screen. We have our list view and we have our title.
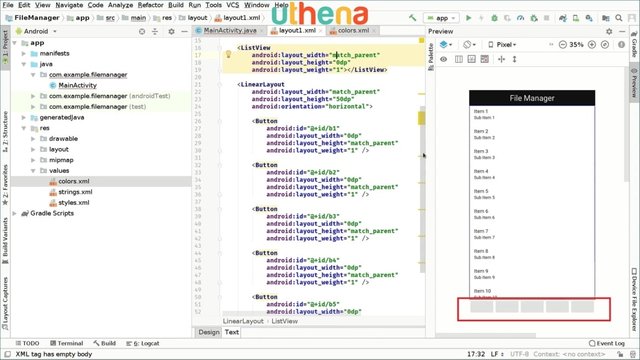
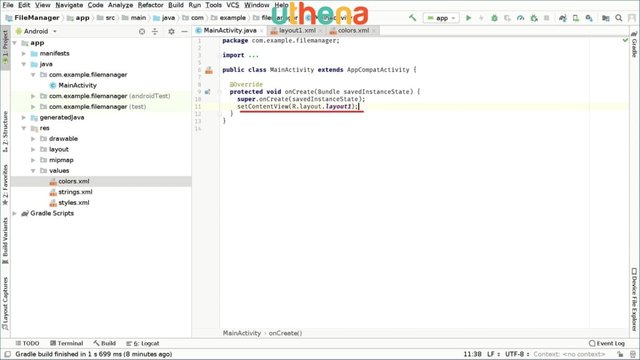
We have all of these buttons. What we will do now, we will open our main_activity.java file and we will fix this error that appears here, of course, because we changed the name of our layout file. So we will instead type R.layout.layout1, and that will fix the error we have.
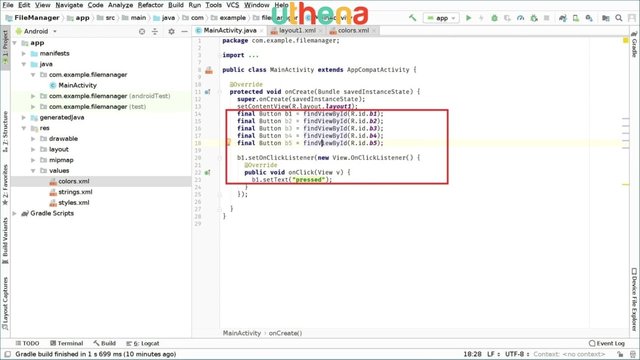
We will create the buttons. We will get access to the buttons we created. We can also do it with ListView but we will do it first with buttons. We will type the final Button and we will, of course, import the button library and we will call it B1 is find ViewById(R.Id.B1). We will do the same for the other five buttons. You can copy this and paste it five times. We have five buttons and here we have B1, this is B2, this is B3, B4 and B5. On the IDs we also have to change the IDs to be B2, B3, B4 and B5. We will set a click listener maybe to B1 just to test everything is working fine. We will say b1.setOnClickListener(view OnClickListener). We will say b1.setText("Pressed") just to make sure everything works fine.
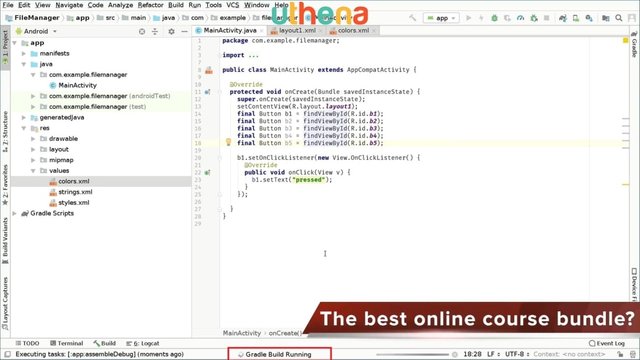
I will run the app on my emulator. You can do it on your emulator or your real device if you want. I’m compiling. As you can see, Gradle builds running and will be sent to the emulator if it doesn’t find errors in the code during the compilation time.
Right now, we will switch to the emulator to see if everything works as expected. Here you can see my emulator that it opened in the settings folder and settings app of the Android. I am running an Android PI on this emulator and as you can see we have our file manager. At the bottom we have five buttons.
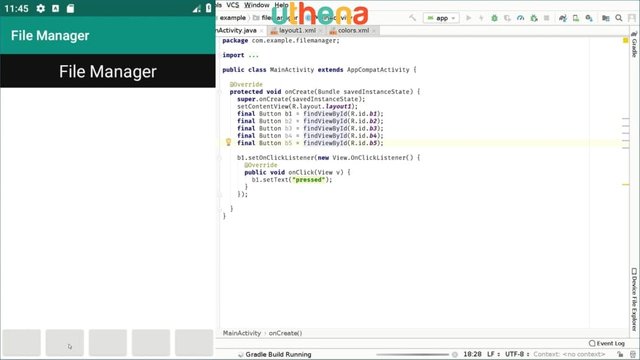
If we click on any but the first nothing happens but if we click on the first, the first says pressed.
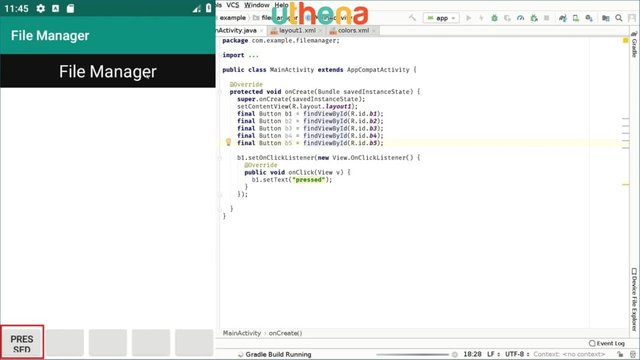
You can see right here that we have two titles. The one that we created is the one that is below the other because it is centered the way we created it. The other is kind of the default. We don’t want that title because we cannot really add a lot of customizations to it, so we want to keep only the one we created.
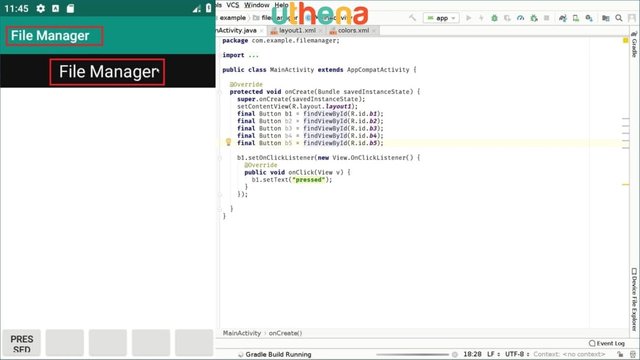
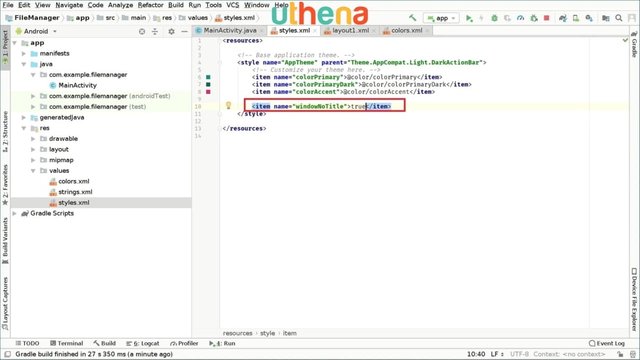
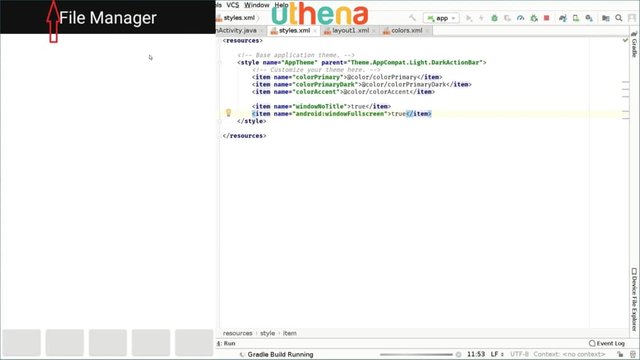
To hide the one that comes by default, we go to the values folder and open this styles.xml file. Here we can modify this style or the theme of our application. To do that we will create an item and we will set it to window no title, and we will set the value of that item to true.
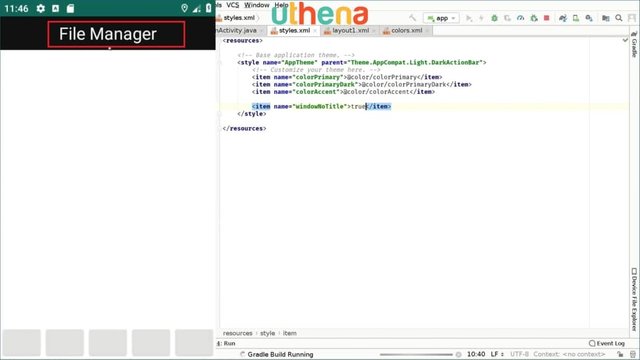
So if we run the app again, we can see that the title will be gone. It’s loading right now so wait a second and now we only have the title we wanted.
We might want the app to be full screen. We don’t want the top bar which contains the time and these icons. we want to hide that. To do that we will create another item right here that will say windowFullscreen. We will set that to true. We will run the app and see if it works. We’re running the app and as you can see the top bar is not shown anymore.
If it didn’t work for you don’t worry we will do something that we’ll fix on every phone, but it is probable that it worked.
We have our file manager title. We have our ListView right here and we have our five buttons at the bottom of our layout. We will go to our layout again and we will check something else right here. I told you that we didn’t access the ListView from java because the reason for that is the ListView doesn’t have an ID, so we’ll create an ID for the ListView, and we will call it ListView and here we can close this, so that it looks better.
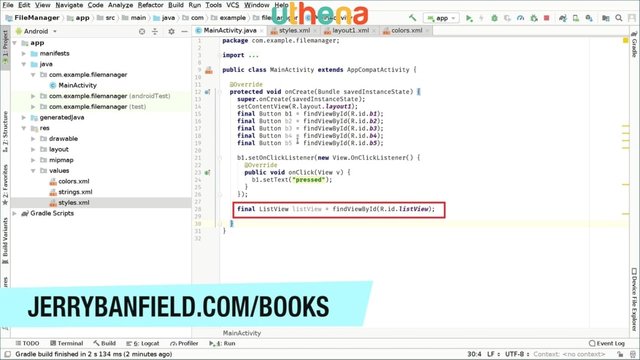
We are going now to main_activity.java and after this onClickListener right here we will create our ListView. We’ll access the ListView by saying the final ListView and we will name it ListView. We will say findViewById(R.id.ListView). Now we have the list view right here and we have accessed the rest of the buttons right here. Later, we can maybe rename these buttons. Maybe B1 can go back to the previous folder. B2 can be maybe something like rename the folder or something and so on and so forth.
Part Two of How to Create a File Monitor App for Android.
In the previous part we learned how to create the UI elements. We created the title, we created our ListView in xml, we created some buttons and we initialized some buttons and listener, and ListView.
In this tutorial, we will access our ListView and start changing the values in it to learn how a ListView works and all of that. The first thing we will do is we will go to our layout folder, right click new, and click on layout resource file.
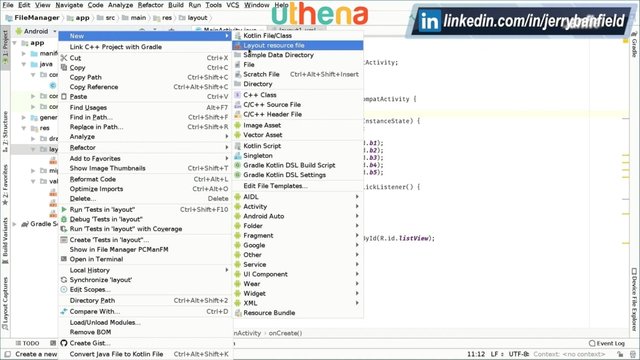
Here the name will be item because we are defining the item kind of the rectangle of the ListView, and the root element will be a Textview because we will display text on every item. We will click on OK.
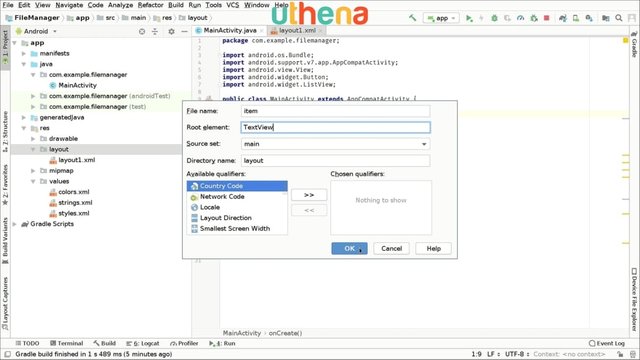
As you can see right now, I can let you see that here we have a Textview auto generated by the IDE which says width match_parent and height match_parent. We don’t need the last closing bracket so we’ll close it here, and we will delete this. I just typed this forward slash right here.
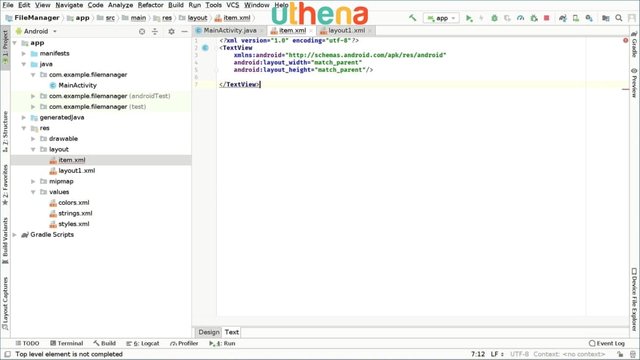
We have to give this item an ID. The ID of this item will be, for example, textItem. Maybe we can put the height we want right here for this item. For example, 50 DP, and we can also specify the color which will be black, and the padding which will be maybe 6 DP.
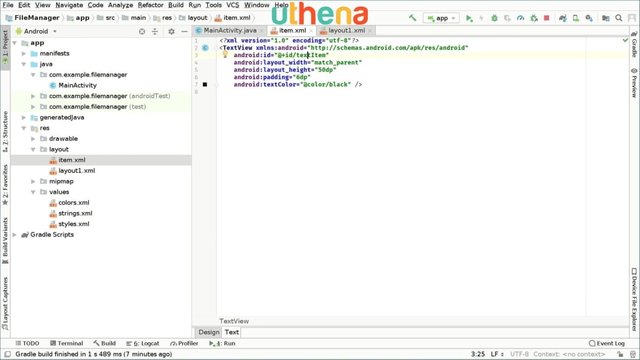
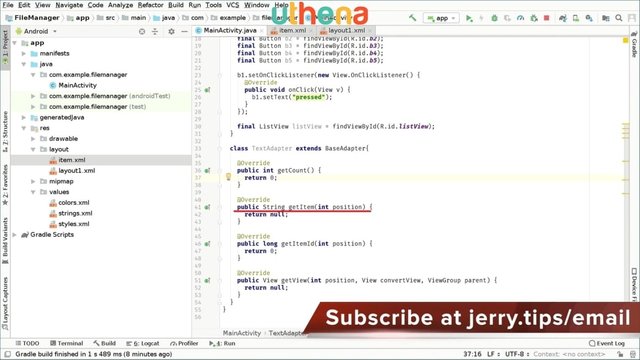
All of these are just cosmetic changes but the one thing you must have is the ID. Once we create this, we will create a text adapter. An adapter class that will enable us to set the information on the items on ListView. For that, we would say the class TextAdapter extends to BaseAdapter. As you can see here it tells us that we have to implement method, so we click on that red warning sign, and we click on implement method, and then okay.
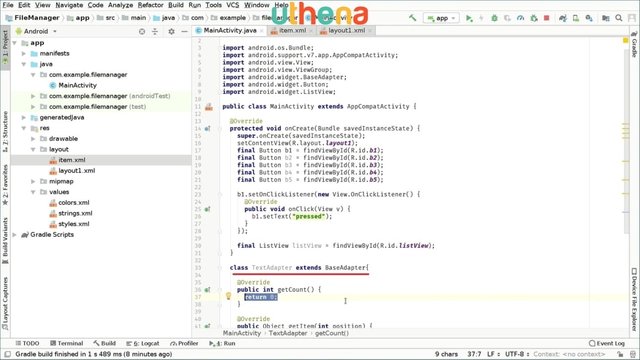
What just happened was the IDE auto-generated for us some method. The one thing we will change in this method right now, in the second method it’s overwrite public object getItem. We will change that from object to string because we will be using strings on our text fields.
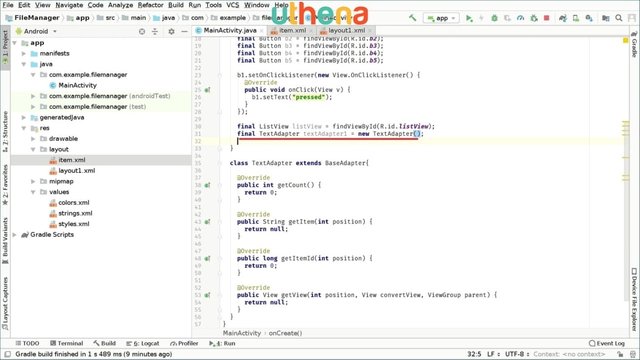
We have our text adapter right here so we can now connect the text adapter with our list view. To do that we say the final TextAdapter, we can say textAdapter1, and we will set this to the new TextAdapter().
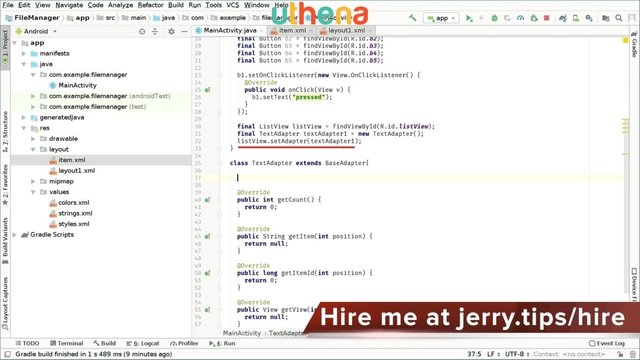
We have our new text adapter and we can set listView.setAdapter to textAdapter1.
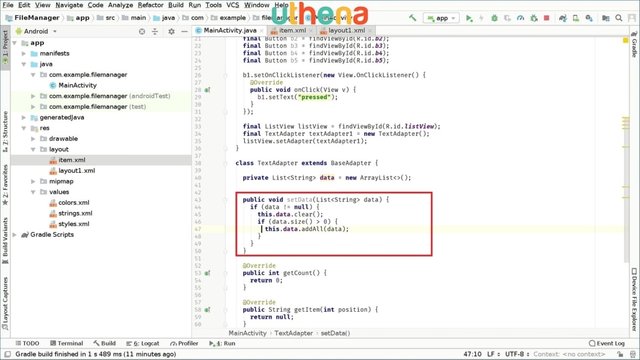
That’s okay. We have to modify our text adapter to fit our needs. To do that we will say private List<String>. We will call this data. We will set it to the new ArrayList<>. As simple as that. We will create a new element that will maybe be useful for us because we will have to set data so we can create a method. Public void setData(List<String> data). Inside this setData method, we will check first if the data is not null. If the data is different than the null then we will clear the data to the textAdapter. To access that we will say this.data.clear(). Now, we will say if data.size is greater than zero we’ll say this.data.addAll, and we’ll say data. As simple as that.
Always remember to end the line with a semicolon in Java. After this, we will tell the adapter that we have just updated the data. We want the adapter to reflect this change on the screen. For that we call the notifyDataSetChanged method.
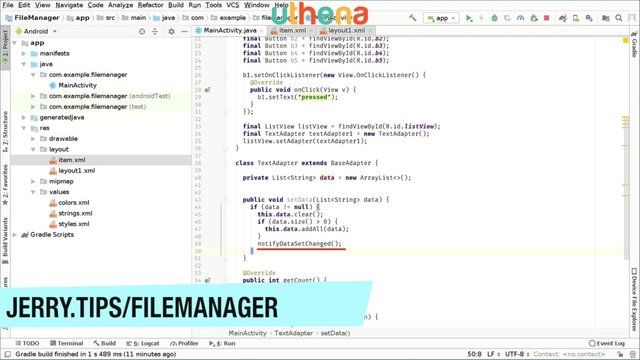
The next method is getCount so we will modify it to our needs which will be in our case, return data.size. As simple as that.
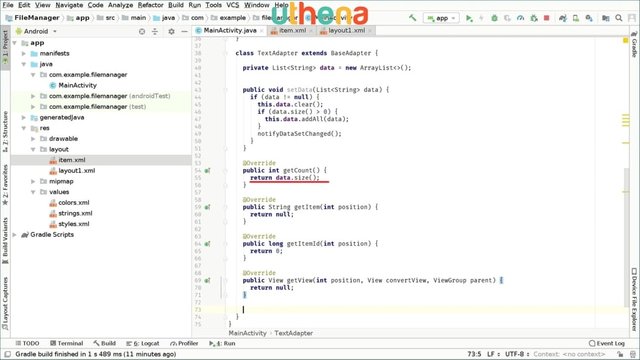
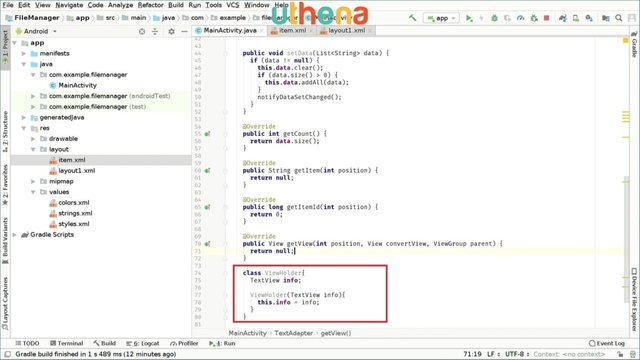
We won't be using this getItemId just yet. We will go to GetView and we will create a viewHolder class outside of these things. Outside the GetView, after the GetView method we will say class ViewHolder - which is the kind of object we used to refer to what it’s holding in the view - and it will be TextView info, for example. The constructor will be viewHolder(TextView), the parameter of TextView will be info. Inside this constructor we will say this.info assigned to info.
We can go to our GetView and instead of returning null, we will return to the view of course. In this case, the view will return to be called convertView as it is passed with the parameter. Inside this, we will first check if ConvertView is null. So say if convertView equals null then we have to kind of initialize convertView and set all this to be correct. We say convertView is equal to LayoutInflater.from. So we’re inflating this layout from the parent which also is a parameter, and, of course, want to get the context of the parent. Then we say outside this, we will type inflate and we will inflate the item layout which was the text item we created, so R.layout.Item. We also have to pass the parent to complete the passing parameters. I would say convertView.setTag which sets the information right here to the new ViewHolder which is the one we created recently. We will cast ViewHolder on TextView then we will cast it on convertView.findViewBy.Id. In this case, we type the ID of the text we created which is textItem.
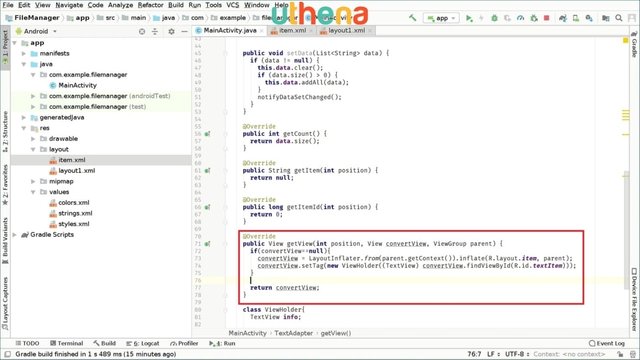
All of this is in case the convert view object is null, After the null where the if ends we will create a ViewHolder to define the view we are returning, right? Holder will cast this on ViewHolder and this is ConvertView. We’re getting the view from ConverseView, so say getTag just like that. Now, we say final string Item and we pass the position to get the item actually.
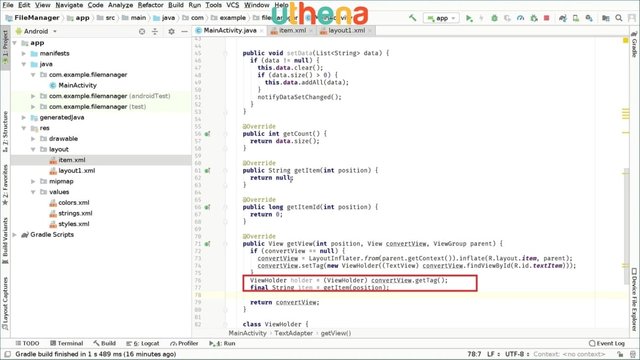
If we’re getting the item, we have to return the item. So in the get item method right here we are returning null, so that would cause an error, of course. You have to return data.get(position). This way the crash won’t occur.
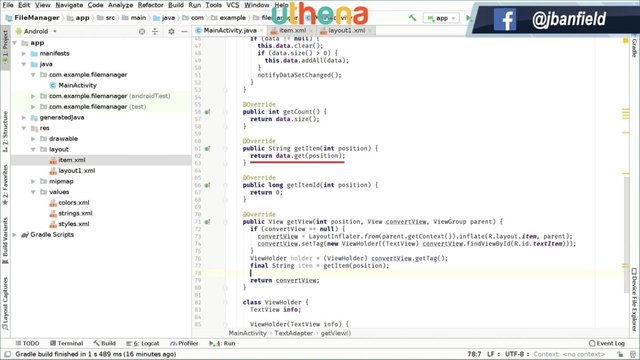
We're returning to the final string of items right here and we will tell holder.info.setText. Here we are updating the text of the item and this will be the item. This is all we really need for this adapter.
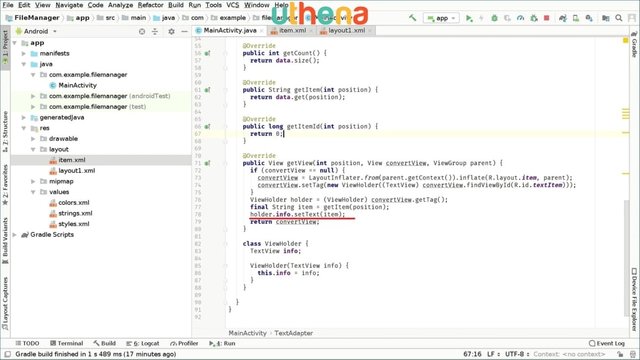
We don’t really need anything else. If we need something else we’ll do it later. We will create programmatically a ListView and update the information of the ArrayList.
To do this we will say List<Strings> and say example because I’ll just call it example right now and this will be new ArrayList(). We will now create a for loops in order for us to fill out the array list just for testing purposes. To test if everything is okay. So int i = 0: i <100; i++. We will add a string. We will add a string.value(i). As simple as this.
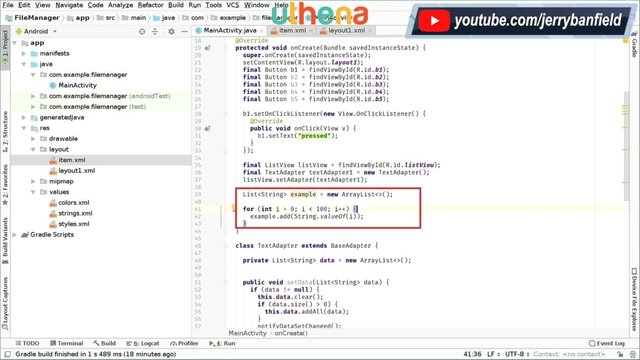
We will run the app and we will see if it’s working fine. It should show our list view with all the elements we just added. I’m opening the emulator and something is not working as we expected. Maybe something is wrong right here.
Oh, because we are not adding stuff to the parameters of the adapter. We filled out this string array list but we still didn’t send that to the text adapter. So we say textAdapter1.setData and we’ll set data for example.
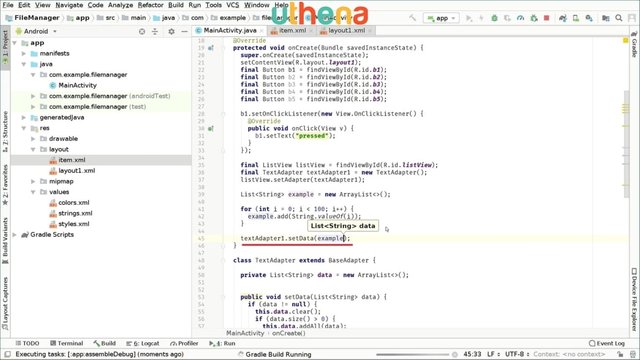
It should work. So we ran the app again. We are waiting for the compilation to end and we have an error. What’s going on? We will see. Maybe we typed something incorrectly right here. We forgot to add a false thing right here which is attached to the root. So after the parent we pass an extra parameter which is false.
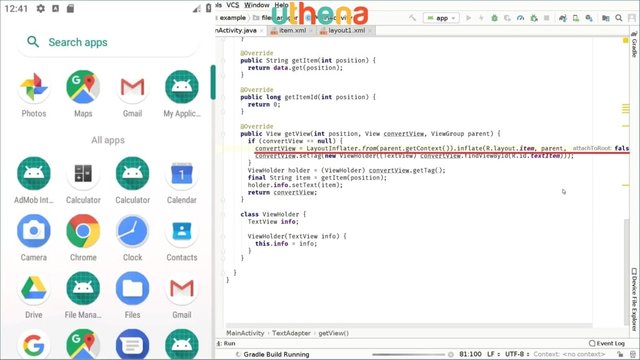
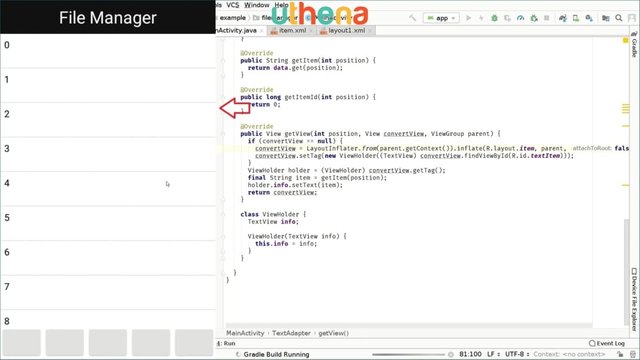
Now we will hopefully run again and this time it will work. We’re running it and yes, this time it works. As you can see right here we start from zero to 1,2,3,4,5,6,7,8,9, all the way down to 99 I think because we started the counter from 0. So 99. You can see that we have our ListView work really, really fine.
Part Three Of How To Create A File Monitor App For Android.
In the previous tutorials we learned how to create a layout as you can see right here, and we also set up the text adapter, the ListView adapter and we displayed a hundred elements on the screen.
In this tutorial, we will learn how to setup up the permissions to read and write to the storage of the device. We will also learn how to get a list of the files from a directory and start displaying them on our file manager application.
The first thing we need to do is to specify the permissions we need. We go to our manifest file under the manifests folder and we open an element and type user permission and type storage. READ_EXTERNAL_STORAGE will be the first permission that we will use, and the second one will be WRITE_EXTERNAL_STORAGE. Please check that you have these two lines exactly as I have right here. I am selecting them in order for you to see them.
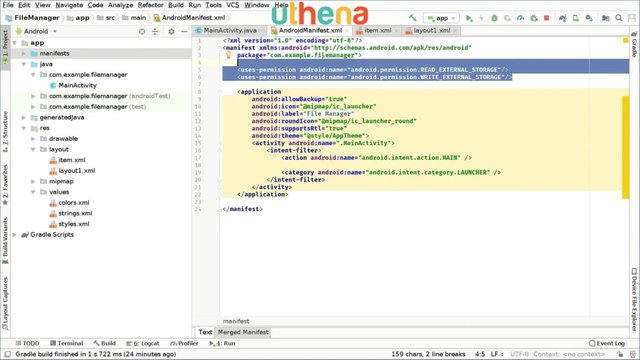
Android requires us to specify the permissions we need and after Android version 6 which is Marshmallow, we have to request permission usages at runtime. We will also learn how to do that. After the TextAdapter class, we will override the onResume method.
Protected void onResume. We open the method then we type super.onResume. So every time this method is called we will check if we have permissions. Because remember if you go to settings on your Android device you can disable the permission access from certain apps. That’s why we have to check every time the app is resumed if we still have those permissions.
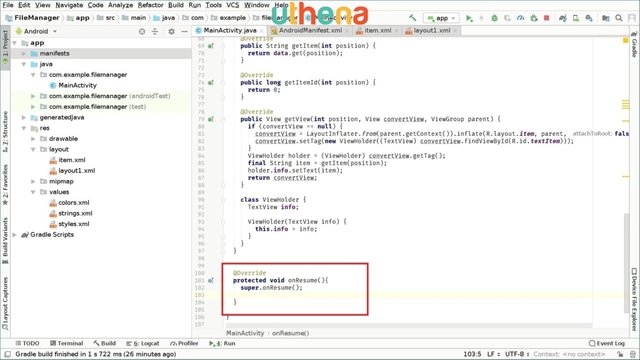
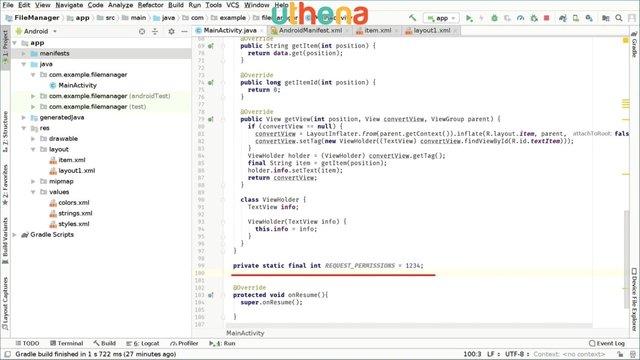
Of course, the first time we will request them and the later times we will check if we still have them. To do that, we will create a code kind of identifier for permission request. We type private static final int and then and we say REQUEST_PERMISSIONS and that we will set to a number. For example, it can be any kind of identifier. It doesn’t really matter. For example, 1234. It doesn’t really matter.
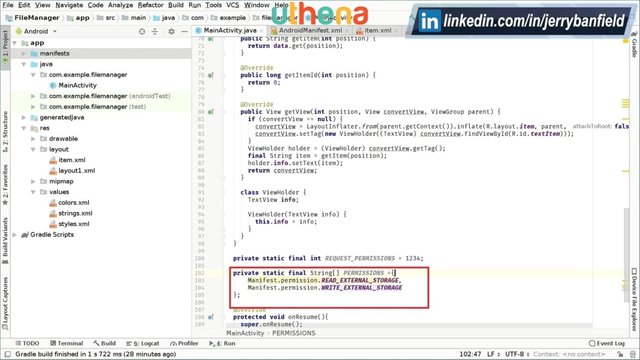
We currently define a string array with the actual permissions we want to request. We will say private static final String[] and in caps PERMISSIONS because we will be asking for two permissions. We then said Manifest.permission.READ_EXTERNAL STORAGE and created a comma right here, and Manifest.permission.WRITE_EXTERNAL STORAGE. If we use this way, I think this is a good way of defining permissions because we can add more permissions.Just type comma and then add more permissions.
As you can see here we have a warning right here which says the field that requires API level 16 current minimum is 14. To fix this we will go to an increase in our API level to 16.
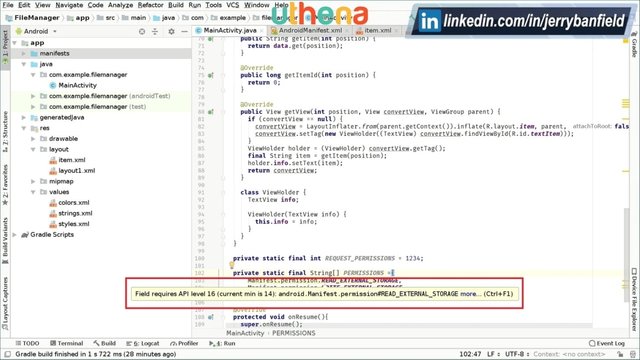
We go to the left, then open the Gradle script, and under the module app - which is the second build.gradle file we open this file and we search for minSdkVersion which is the minimum SDK version our app will target. I will change this from 14 to 16 because 14 is too old. So we’re going a bit up to 16.
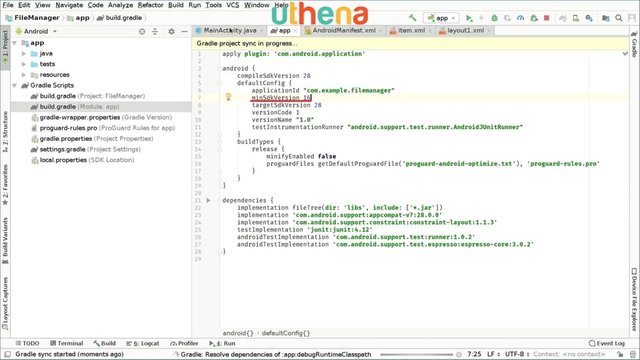
We are clicking on sync now and we are waiting for the app to be synced. If you don’t find the sync now button you can also click on this top bar for this elephant button and everything will work fine. Every time you modify this file you have to do just that.
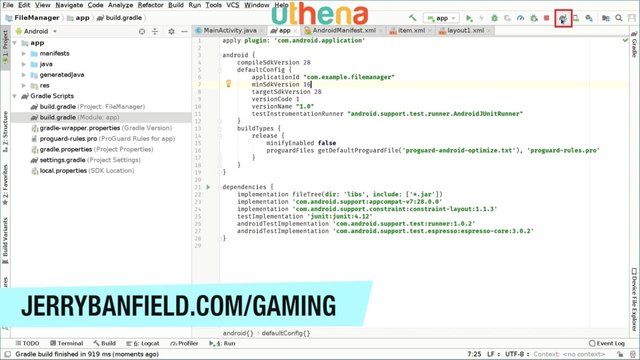
The warning has disappeared. We will also create another field, a private static final int that will be about the permissions count. PERMISSIONS_COUNT. In this case we are asking for two permissions, so we’ll set it to two.
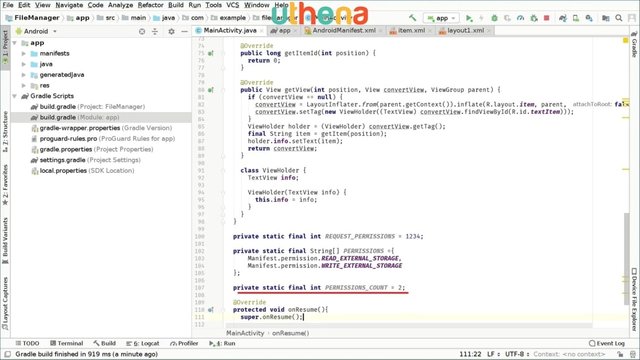
On the onResume method we will later check if we have permissions or not. We will create a boolean that will enable us to do this. The boolean method actually.
So the boolean method will be private boolean arePermissionsGranted, for example. In this way we will know if the permissions are granted or not. Here, as I told you, we only have to do this if we are on version 6 or Marshmallow or above. To do that we say if Build.VERSION.SDK_INT is greater or equal than Build.VERSION_CODES.M. M stands for Marshmallow. So this way we’re saying if the device is running Marshmallow or higher then we have to ask for permissions.
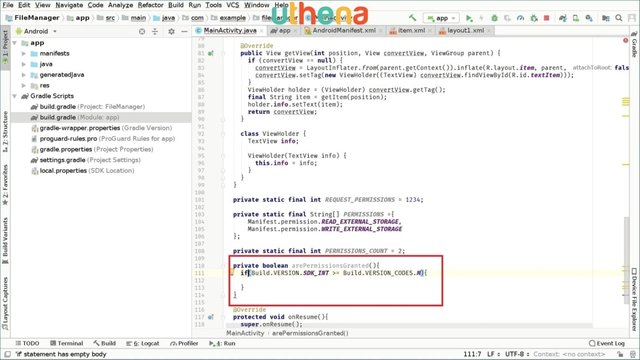
We created an int and we call it P, for example, and we will set it to 0. Here we say while P is less than PERMISSIONS_COUNT, we will ask for permission or we will check for permission. To do this we say checkSelfPermission and we will pass our PERMISSIONS P because this is the pointer actually. If this is different than PackageManager.PERMISSION_GRANTED, this means if the permission is not granted we will return false, of course. We return false.
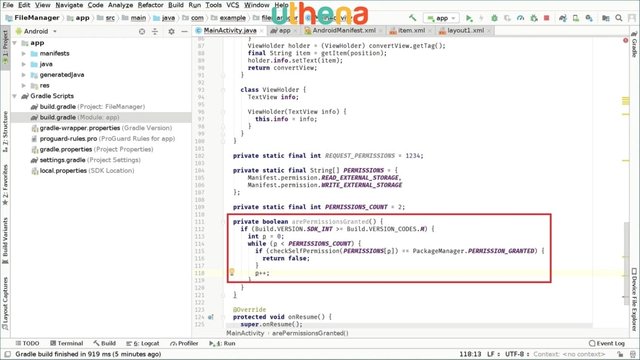
We don’t want this to happen, right? Because we’re returning True when one permission is granted. We will change this a bit and we will say arePermissionsDenied or something. That’s better looking, better logic. This means we are returning true.
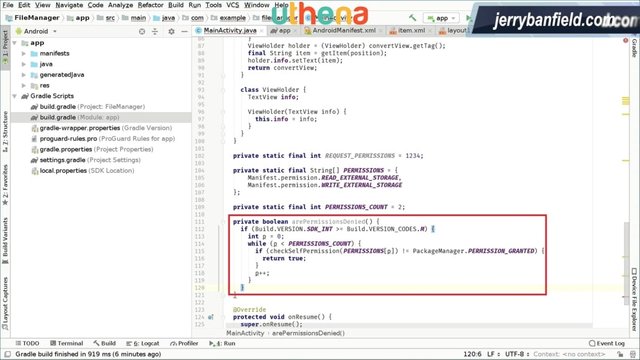
Otherwise, we return false because this also applies to versions that are below Marshmallow, and if this didn’t return true this means that permissions are not denied. Which means they are granted.
GET MORE OF THIS COURSE
Would you like to continue learning about the Code, an Android File Manager and Explorer App in Android Studio Today Course? If you are interested will you please buy the complete course, Code an Android File Manager and Explorer App in Android Studio Today Course, on the Uthena Education Platform..
You can also get the first two hours of the course completely for free on YouTube.
Thank you for reading the blog post or watching the course on YouTube.
You may want to read Build an Android Studio Gallery App Like QuickPic Google Photos FOTO Piktures A+ and Camera Roll and Code Your Own Video App Player in Android Studio!
I love you.
You’re awesome.
Thank you very much for checking out the Code an Android File Manager and Explorer App in Android Studio Today Course and I hope to see you again in the next blog post or video.
Love,
Jerry Banfield.
Posted from my blog with SteemPress : https://jerrybanfield.com/android-file-manager-app-creation/
This step by step has been well explained to you.
I hope you will soon do a tutorial about MARVEL
Downvoting a post can decrease pending rewards and make it less visible. Common reasons:
Submit