Hi Everybody !
(All the images are my own creation and so I own the rights of them)

Introduction: Realization
"your design sucks".
Pt1. Designing the Elements

Pt2. Designing the Base

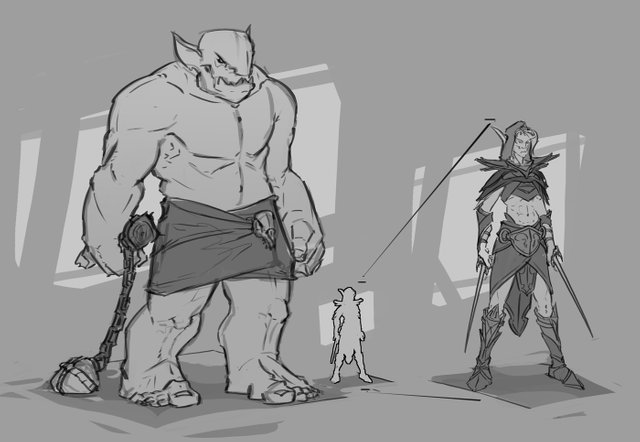
See, after a while of trying different alternatives I recalled that the main objective with this piece was to create contrast between the BIG trolls and the small elf. By the way this is the way you can create that feeling of "epicness" in an artwork, placing the small against the big.

Sometimes, it's better to sacrifice decision and gain a better artwork instead just doing the hell you want and have a non-outstanding piece of art.
Pt3. Everything set up. Let's Get the Base Ready

Which means that I will paint the areas I want to define as different layers of the artwork and then I lock the alpha lock for only working on the painted places or pixels.
What we got until this point should look like something like this:

Be clever. Be smarter than me: Start and stick to the fundamentals.
Thanks a lot for your support and I see you in the next one!
I always try to listen to the ideas of my fellow followers to improve my posts and to give something back to the community... therefor: What would you like the next posts to be about? What should I talk about? What kind of painting? Would you like some tutorials about arts, about cooking? Maybe some fresh gaming broadcast? I would love to know!

ı am happy to catch this article. Its importand to setup a scene correctly. EXAGGERATION, RATE-RATIO and POSING - ACTING are main rules in cartoon and animation. Its more importand for me to see students
learned. Well done its a good work, And using your own drawing for.
Downvoting a post can decrease pending rewards and make it less visible. Common reasons:
Submit
Thank you @animart! Life is a great teacher and drives us through places and processes of learning that we need to experience for learning. It is up to us to catch these lessons or not ;)
Downvoting a post can decrease pending rewards and make it less visible. Common reasons:
Submit
I have some vories abouth steemit. But when i ve found some articles like yours i get more interest. Thanks again for the article.
Downvoting a post can decrease pending rewards and make it less visible. Common reasons:
Submit
Thank you for the Post man! I really like the way you show your process Think I am going to learn a lot from you!
Downvoting a post can decrease pending rewards and make it less visible. Common reasons:
Submit
I d love if you do! Thanks!
Downvoting a post can decrease pending rewards and make it less visible. Common reasons:
Submit
Good post dear
Downvoting a post can decrease pending rewards and make it less visible. Common reasons:
Submit
The art post is very nice thanks to sharing the beautiful post
Downvoting a post can decrease pending rewards and make it less visible. Common reasons:
Submit
Thanks!
Downvoting a post can decrease pending rewards and make it less visible. Common reasons:
Submit
Nice post
Downvoting a post can decrease pending rewards and make it less visible. Common reasons:
Submit
Spamming comments is frowned upon by the community.
Comment spam is currently defined by @steemcleaners as:
10 or more generic comments per day that are not in response to a question posed by the post or comment. “Thanks”, “Great Post!”, “Great Photo!”, “Good”, “Like”, “Nice”, “Wow”, “Cute”, “Follow me”, etc.
Commenting on old posts to hide self up-votes or a voting trail.
Copy/Paste comments that serve no purpose or the purpose is self promotion (including copying and pasting similar comments in rotating way).
Comments that inform the contributor that they have been up upvoted, resteemed, or flagged when the curator does not actually upvote, resteem, or flag the post.
Unsolicited and off topic referral links.
Continued comment spamming may result in action from the cheetah bot.
More Info: Abuse Guide - 2017.
Downvoting a post can decrease pending rewards and make it less visible. Common reasons:
Submit
Great post sir. .
Downvoting a post can decrease pending rewards and make it less visible. Common reasons:
Submit
Thanks!
Downvoting a post can decrease pending rewards and make it less visible. Common reasons:
Submit
I've learned so much from this post. I love to draw but I always had some queries which are now cleared. Thank you for the amazing post, great work.
Make sure to give my post a read too!
https://steemit.com/life/@liaquatkhan/25th-december-birth-of-the-jesus-and-quad-e-azam-71c6f02d7d2c9
Downvoting a post can decrease pending rewards and make it less visible. Common reasons:
Submit
this is so informative ..thanks for the tips
Downvoting a post can decrease pending rewards and make it less visible. Common reasons:
Submit
You got a 1.40% upvote from @upme requested by: @anritco.
Send at least 1.5 SBD to @upme with a post link in the memo field to receive upvote next round.
To support our activity, please vote for my master @suggeelson, as a STEEM Witness
Downvoting a post can decrease pending rewards and make it less visible. Common reasons:
Submit
6.20% @pushup from @anritco
Downvoting a post can decrease pending rewards and make it less visible. Common reasons:
Submit