Hi, Guys! my name is Azka,
Hope everybody is fine and doing well in life.
Do you guys wants to spend time doing some interesting and fun stuff? I am going to give you a DIY (DO It Yourself) / origami to make boring time time interesting.
As world is changing day by day and also the way of living learning is also changing.
As paper art or origami make children as well as adults aesthetic, educational and is a way of therapy, as in this hectic life some change in life such as creating things, art, creativity and origami create positive effect in life and give a therapeutic time in free time and in interesting way.
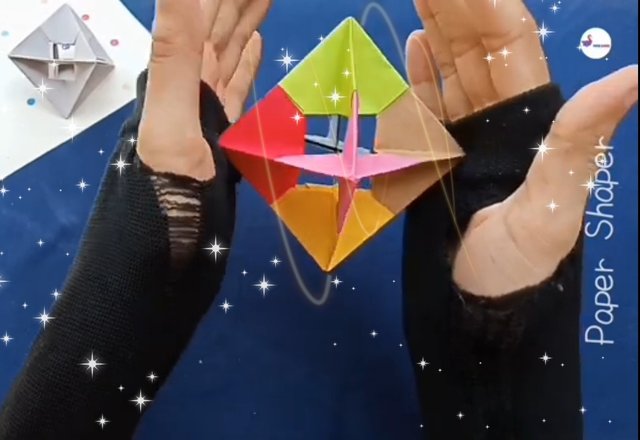
I made a paper spinner that spins by blowing air on it and and I enjoys whenever I make it and play with it.
video is also available at the end of this.

I will try to explain it step by step
THING REQUIRED:
12 (7X7cm) square Papers of any color
please follow these steps by looking at picture for better understanding;
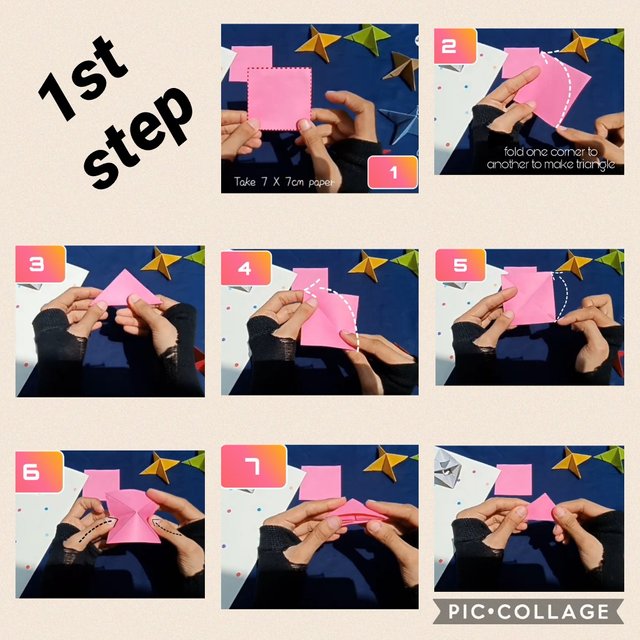
1st STEP;

- Take 7X7cm of paper
- Fold one corner to make a diagonal
- It will look like triangle
- Again fold one corner to another to make diagonal
5.Now fold it to half
6.And press the paper as it is shown in step 6 - It will make triangle.
Here a piece of step is complete. make 6 pieces with similar way (as 1st step)
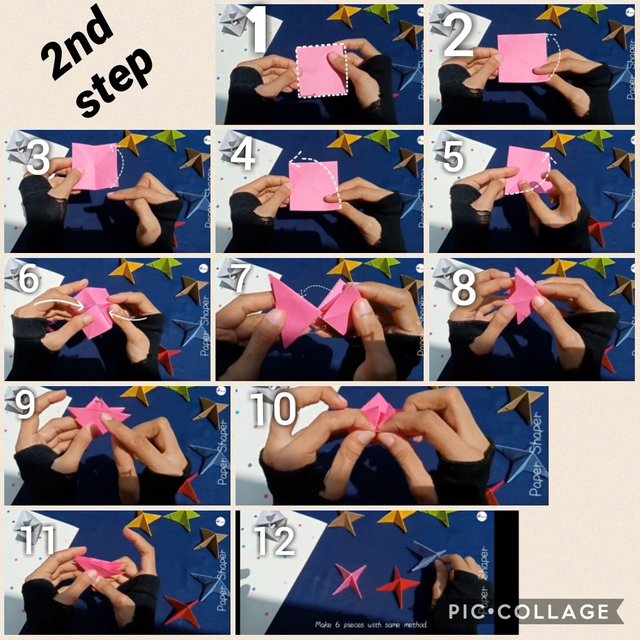
2nd STEP:

1.Take 7x7cm paper
- Fold it into half
- Than fold it again from other side or opposite to first side
- Now fold one corner to another and make a diagonal
- Do the same by folding one corner to another and make right diagonal
6.Now press the sides of paper to in-word
- From here you have to take 1 piece that is made in 1st step and of second step
- At this point the piece of paper that is made in step one and the piece that is made in step two will be put together by
8.Putting inner part of piece of into the other piece and it will fit into each other as shown in picture (step 7 and 8 ) - The piece that is shown in step 9
10.Fold it to its inside and to the similar with all the remaining 3 edges
11.It will look like triangle.
Make 6 pieces with similar step.
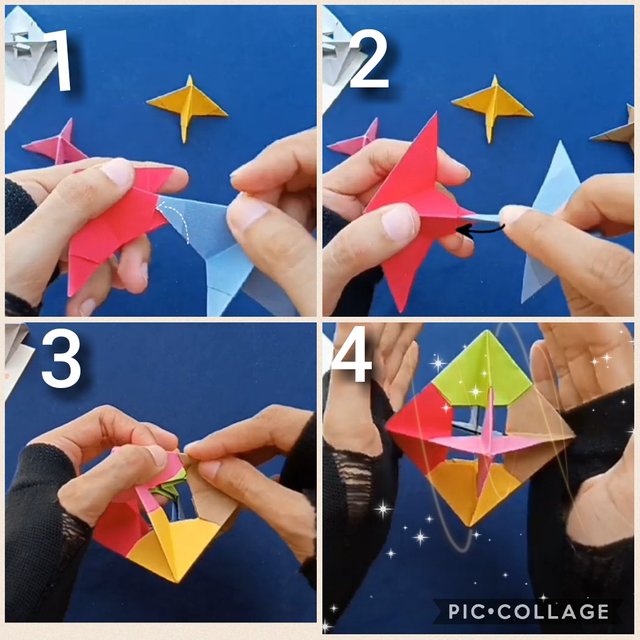
LAST STEP:

After making 6 pieces in these step we only have to insert them into each other as;
1.Take two piece and insert one edge to the other piece
- Join all the pieces together
- By inserting last its complete.
- Here you go... its complete
now you can enjoy it by putting the sides between hands as shown in picture blowing on it.
For more better understanding you can watch its video on my you tube channel:
Hope you guys will enjoy it.