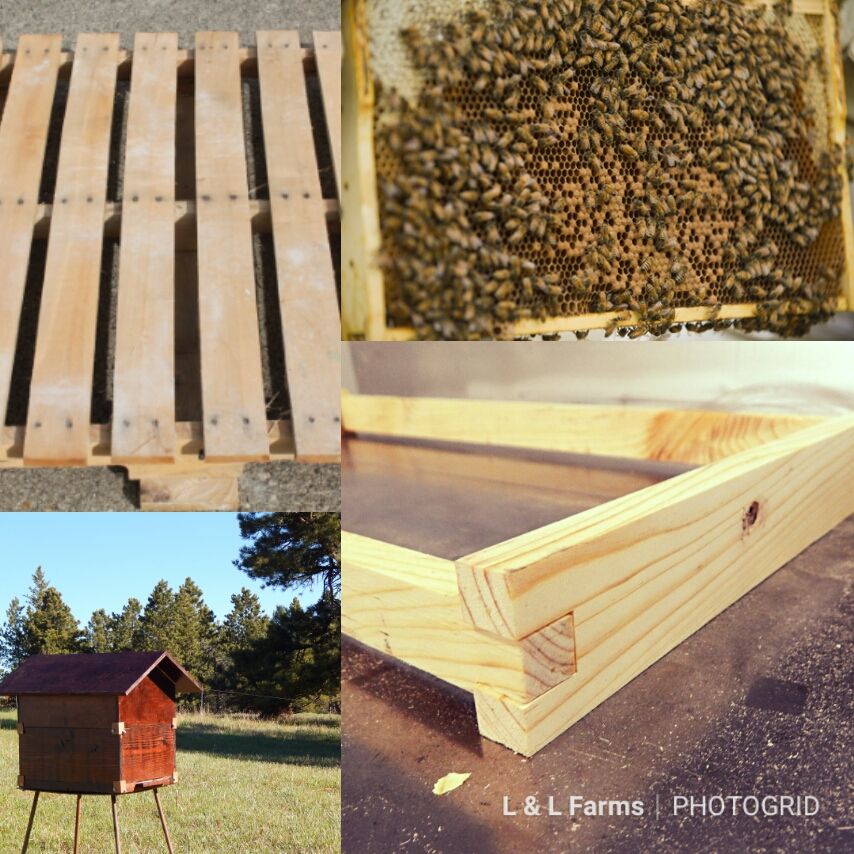

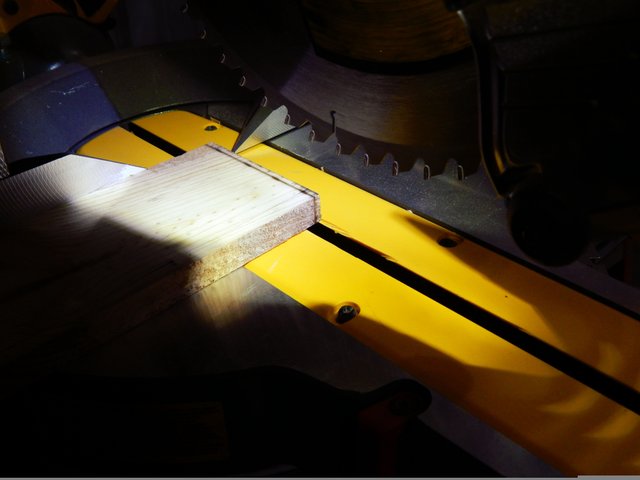
Step One
We need to ensure we have a straight edge, we will do that by cutting off the rough edge of the board, leaving a smooth surface to work with.
Then we need to measure the board to 19" and cut off excess using a miter saw or table saw.
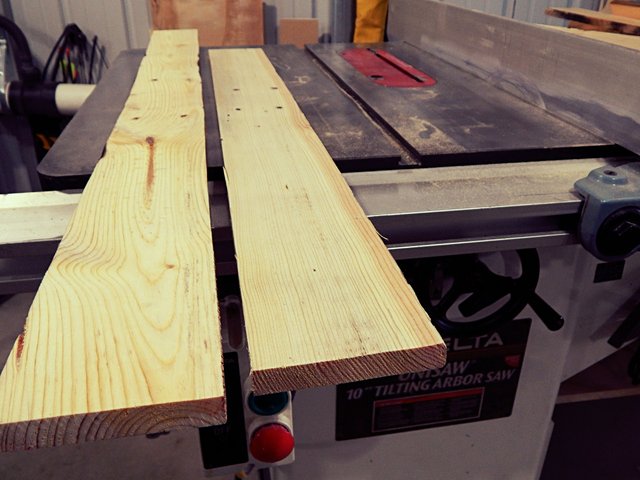
Step Two
Next, We are going to rip our board to 1" width...
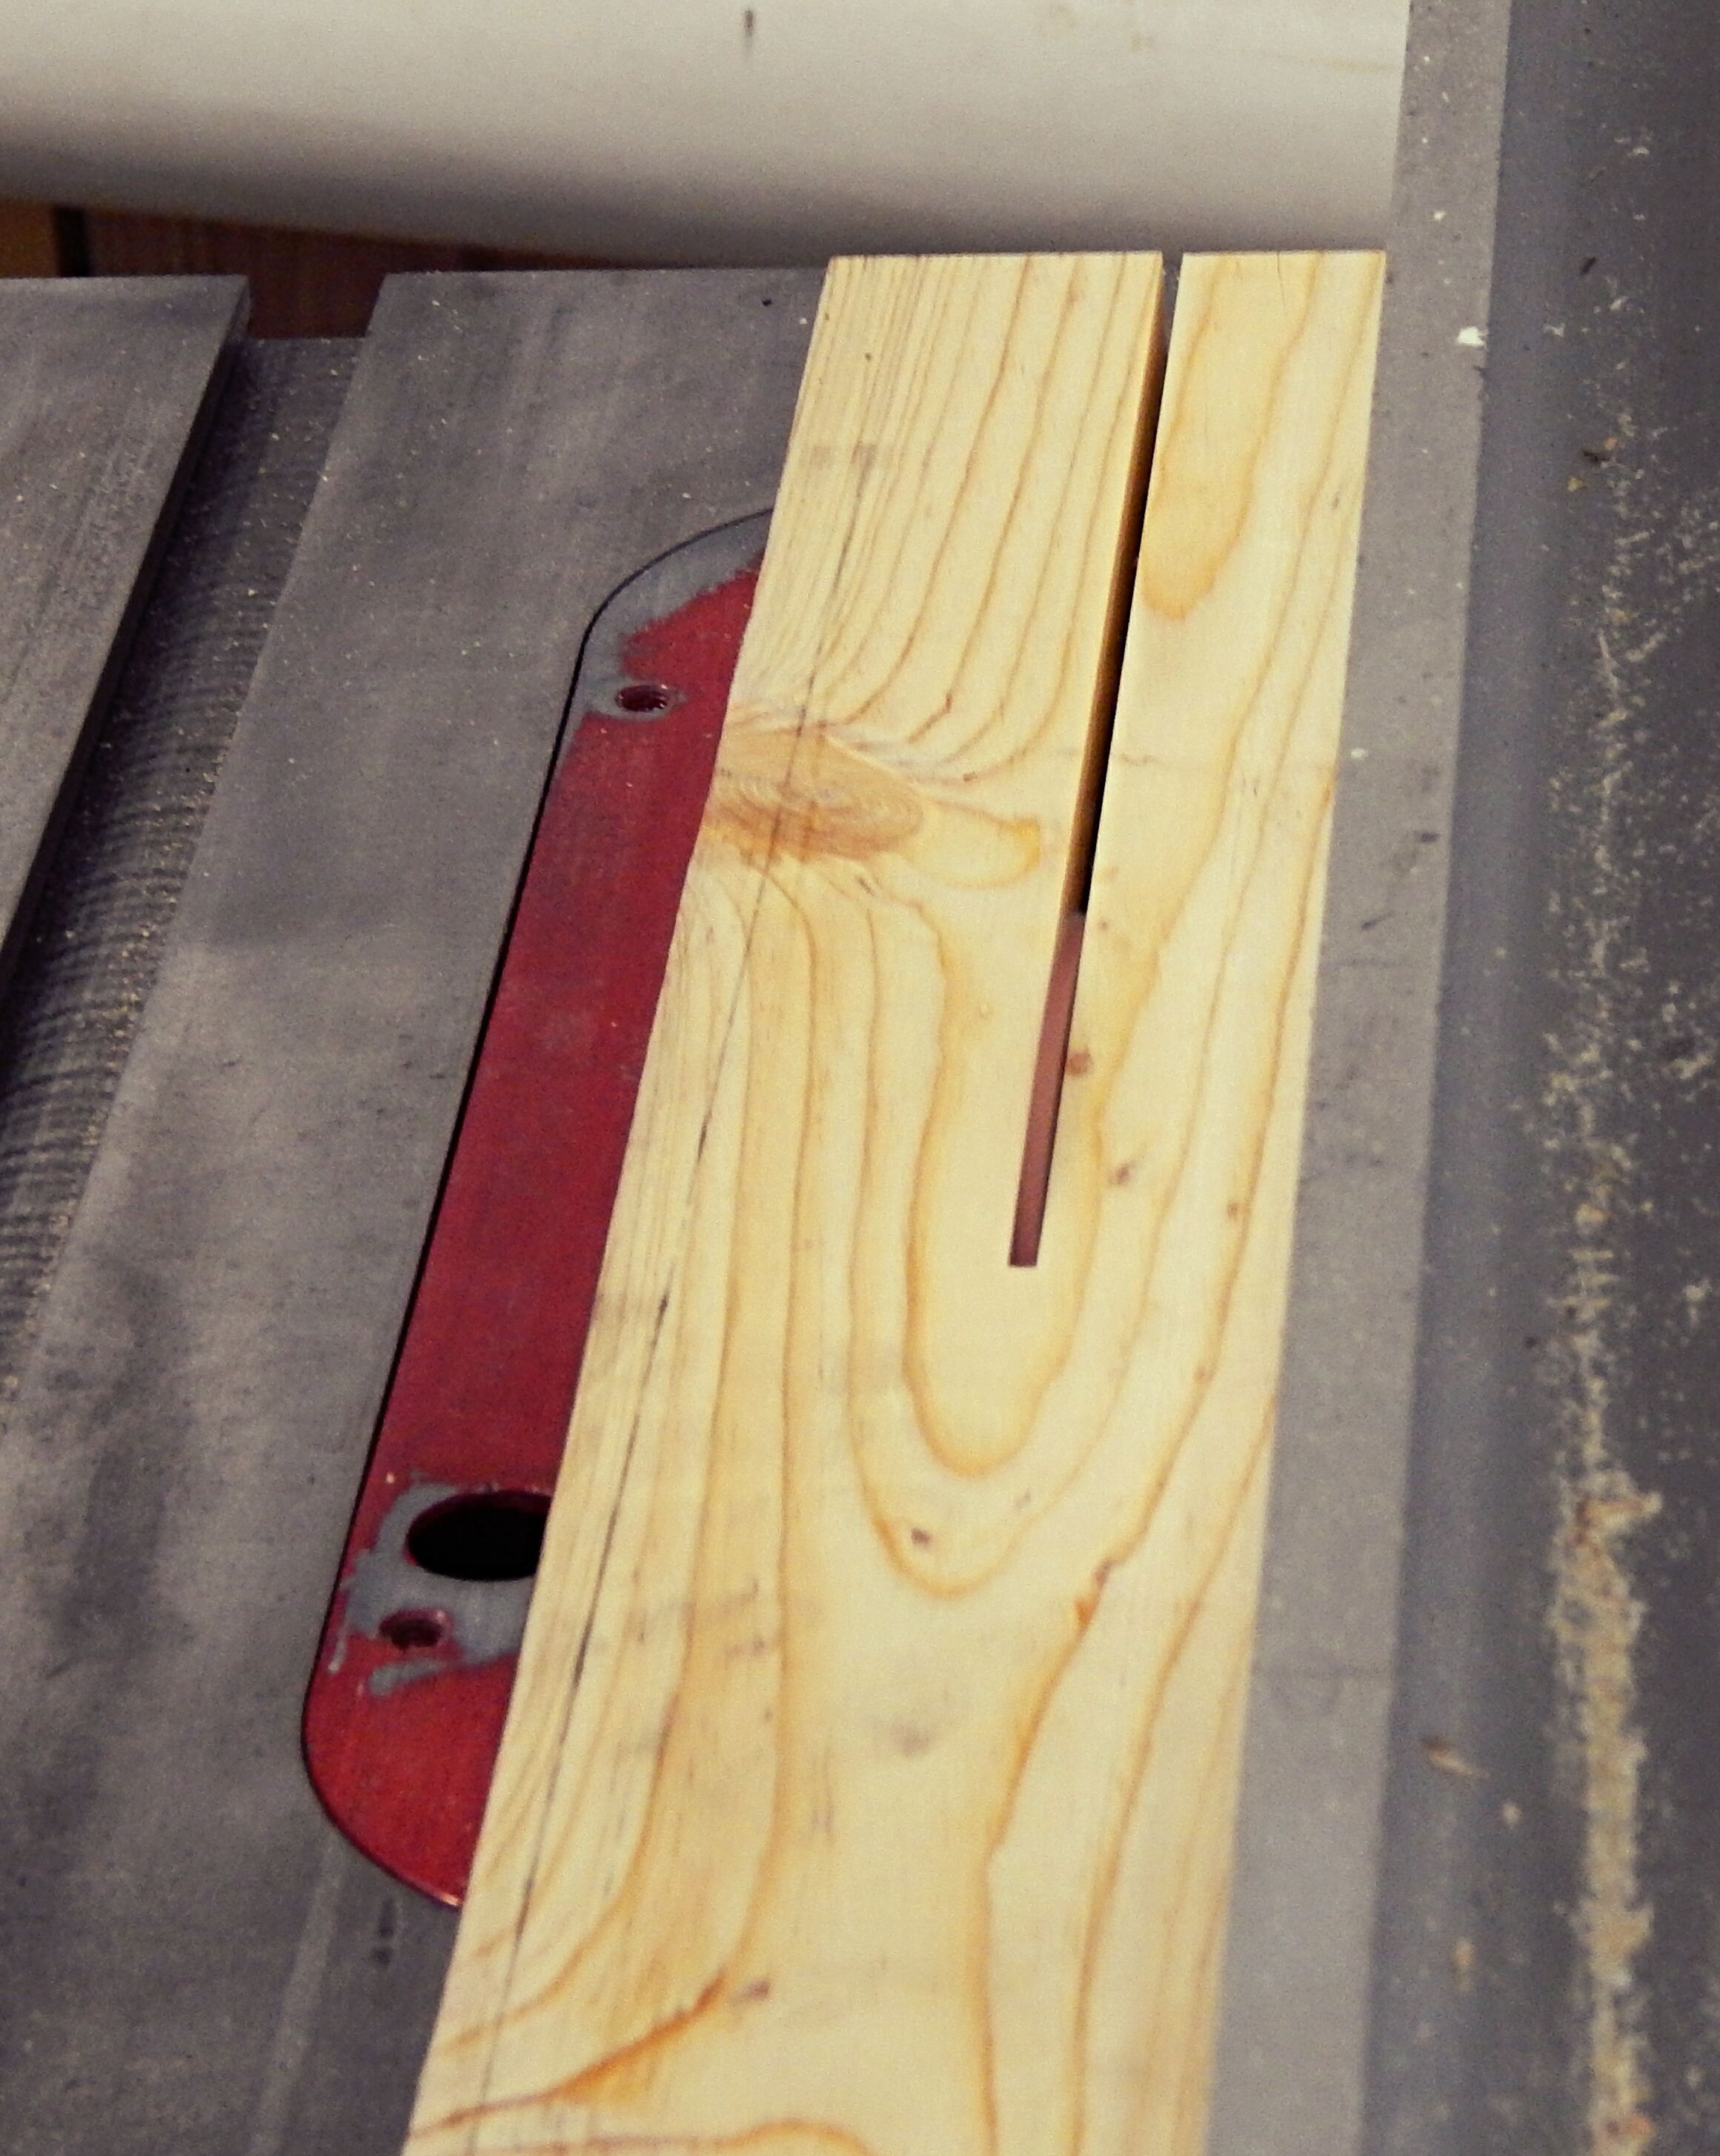
followed by additional cuts of
3/4" width
1 3/8" width
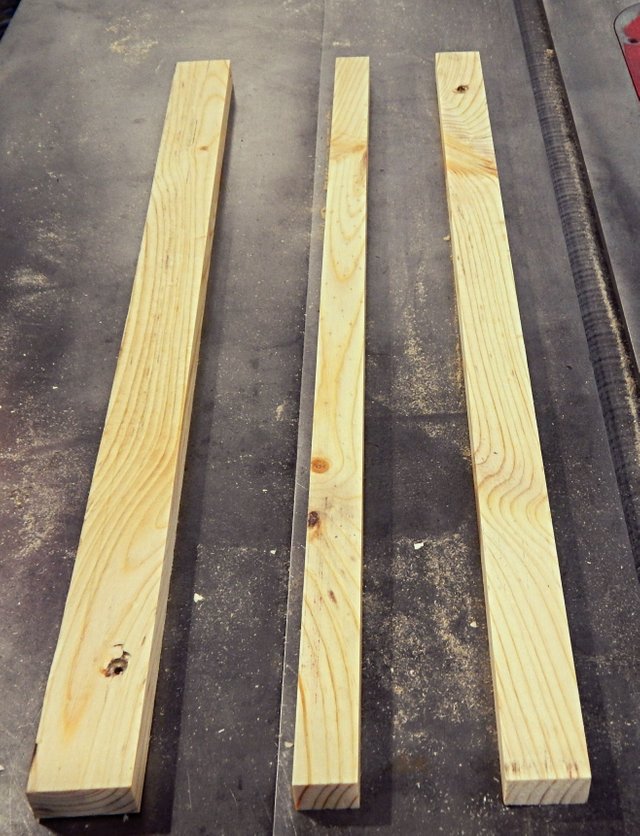
Leaving you with three pieces like so;
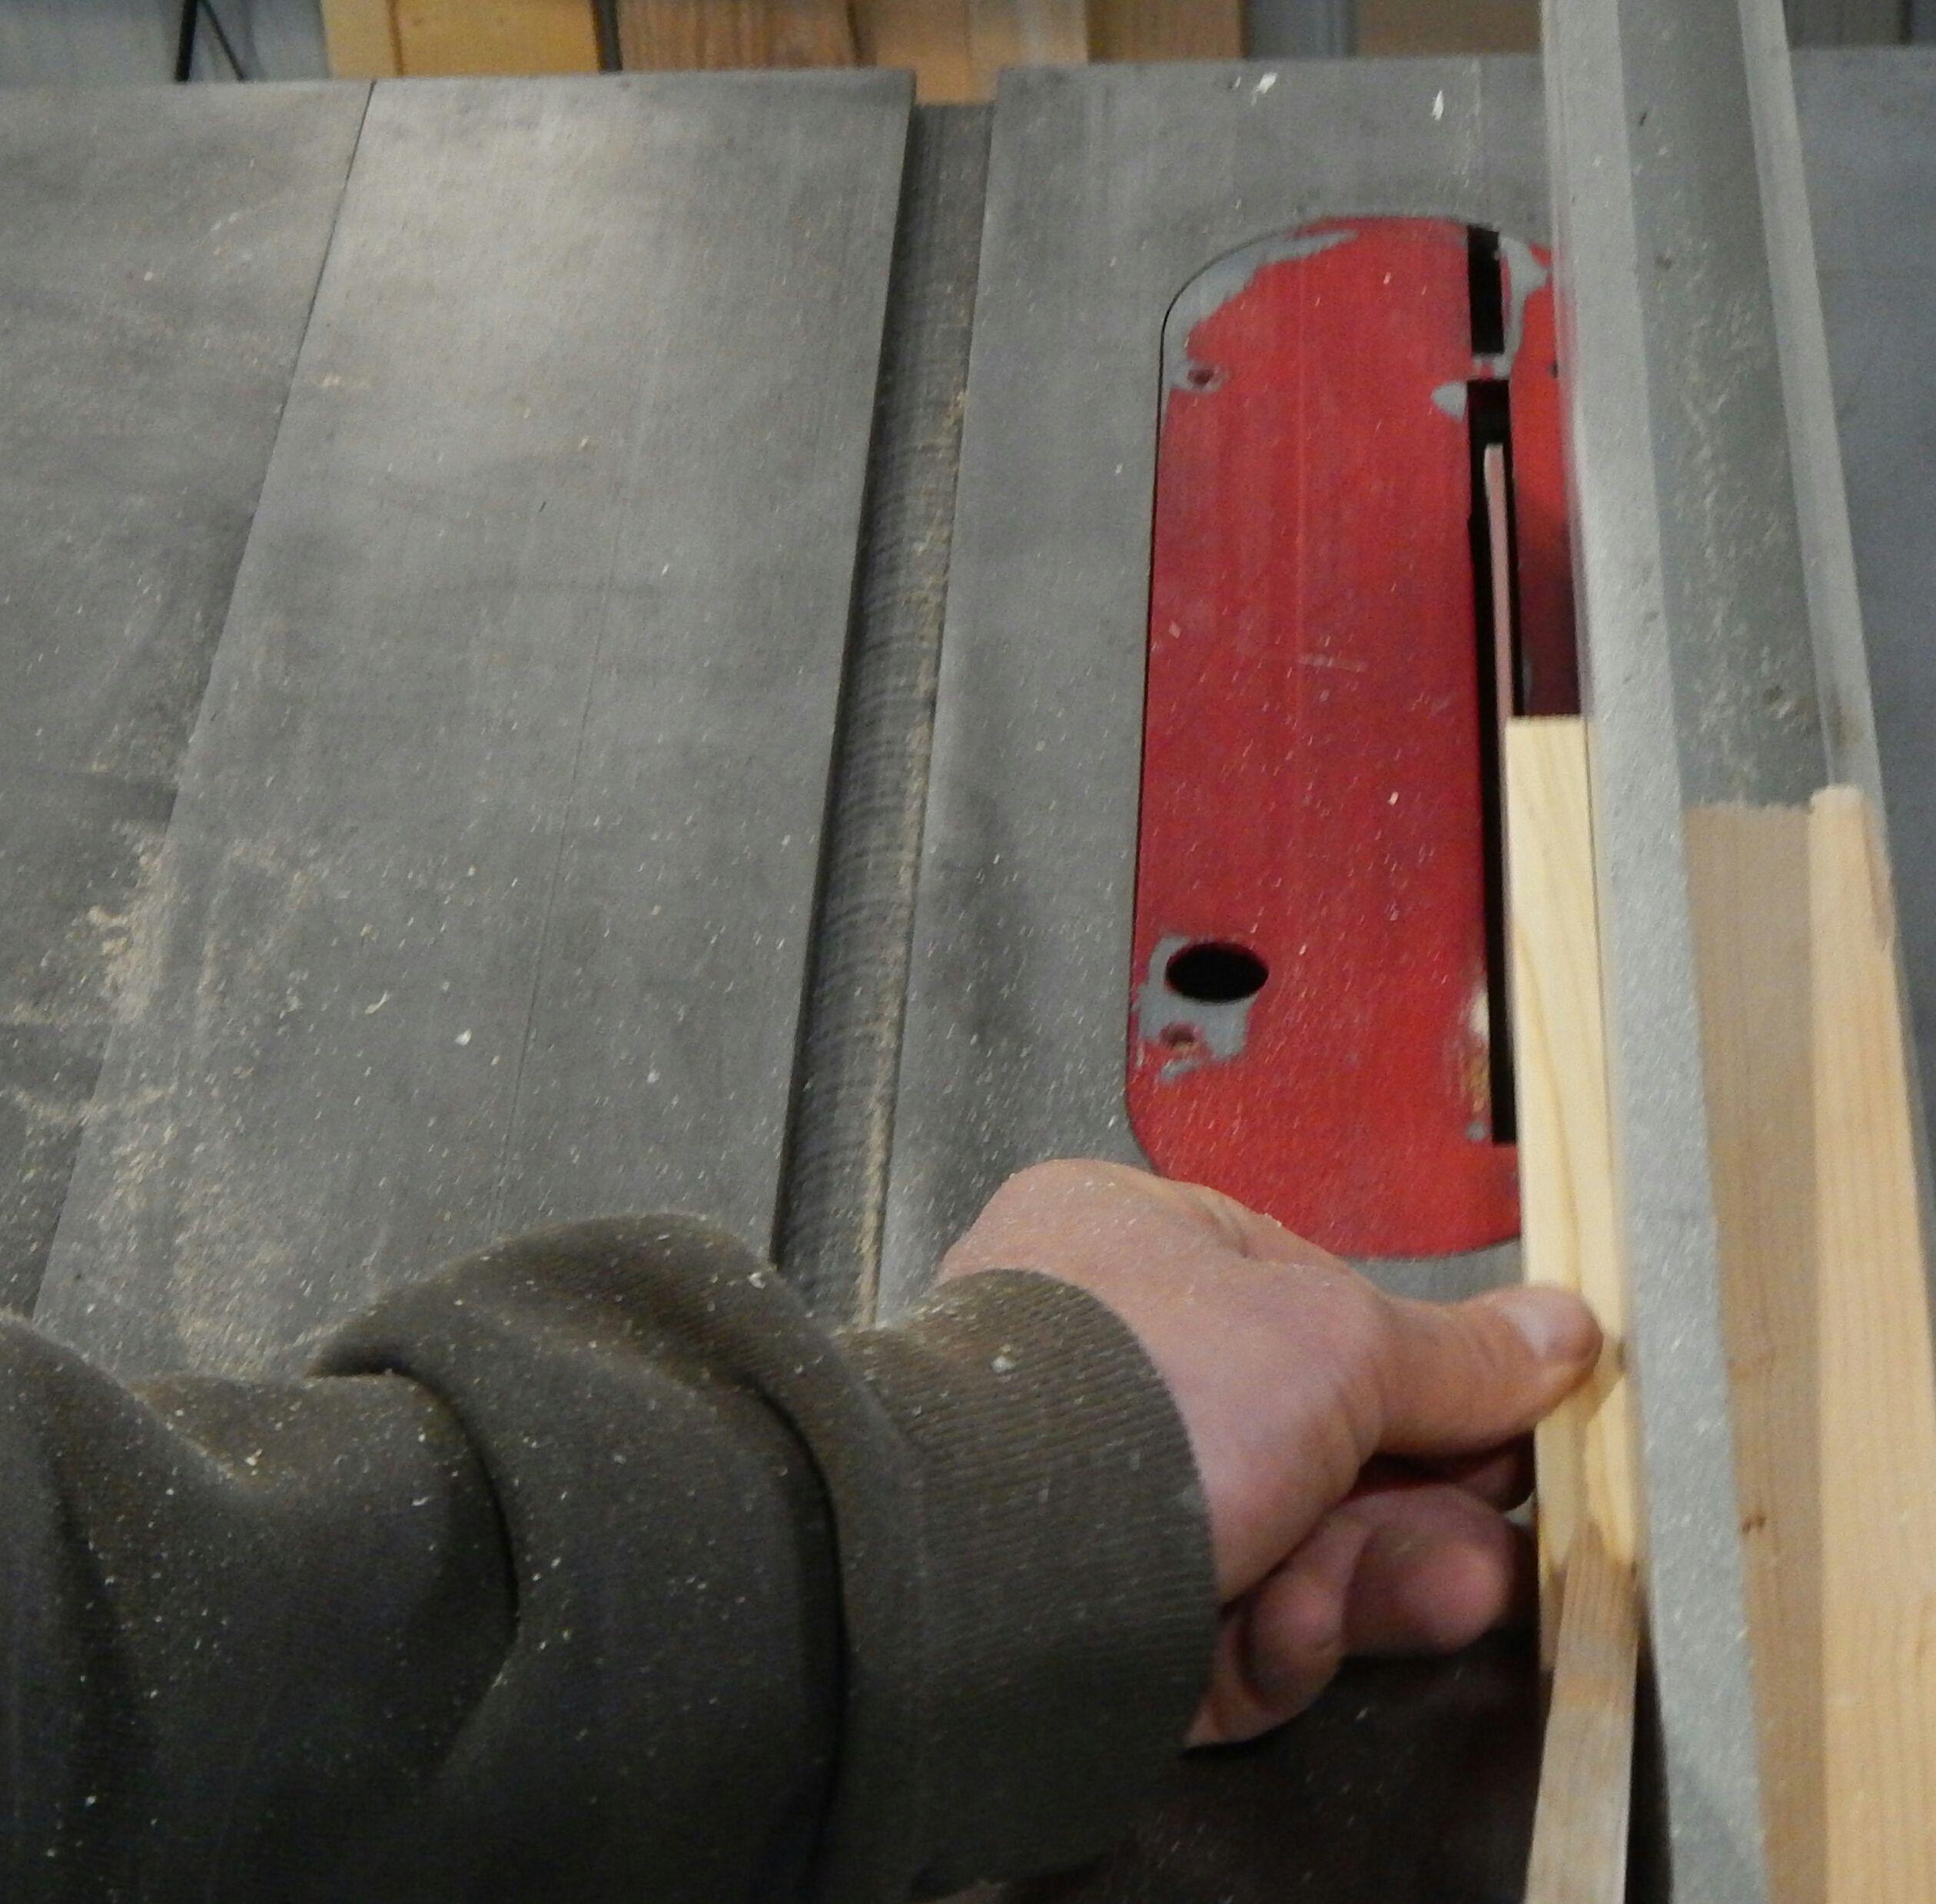
Step Three
We then need to rip each piece to 1/2" thickness. If you have access to a planer you can simply plane the pallet board to 1/2" thickness, skipping this step altogether. We do normally use a planer instead, but wanted to show how it could be done with just a table saw for those who don't have access to a planer. So, using a table saw set your fence to 1/2" rip and run each board through. If you have extra material rip both sides of the board to leave you with a smooth clean finish. If you do not have enough material, you can sand the board down till smooth.
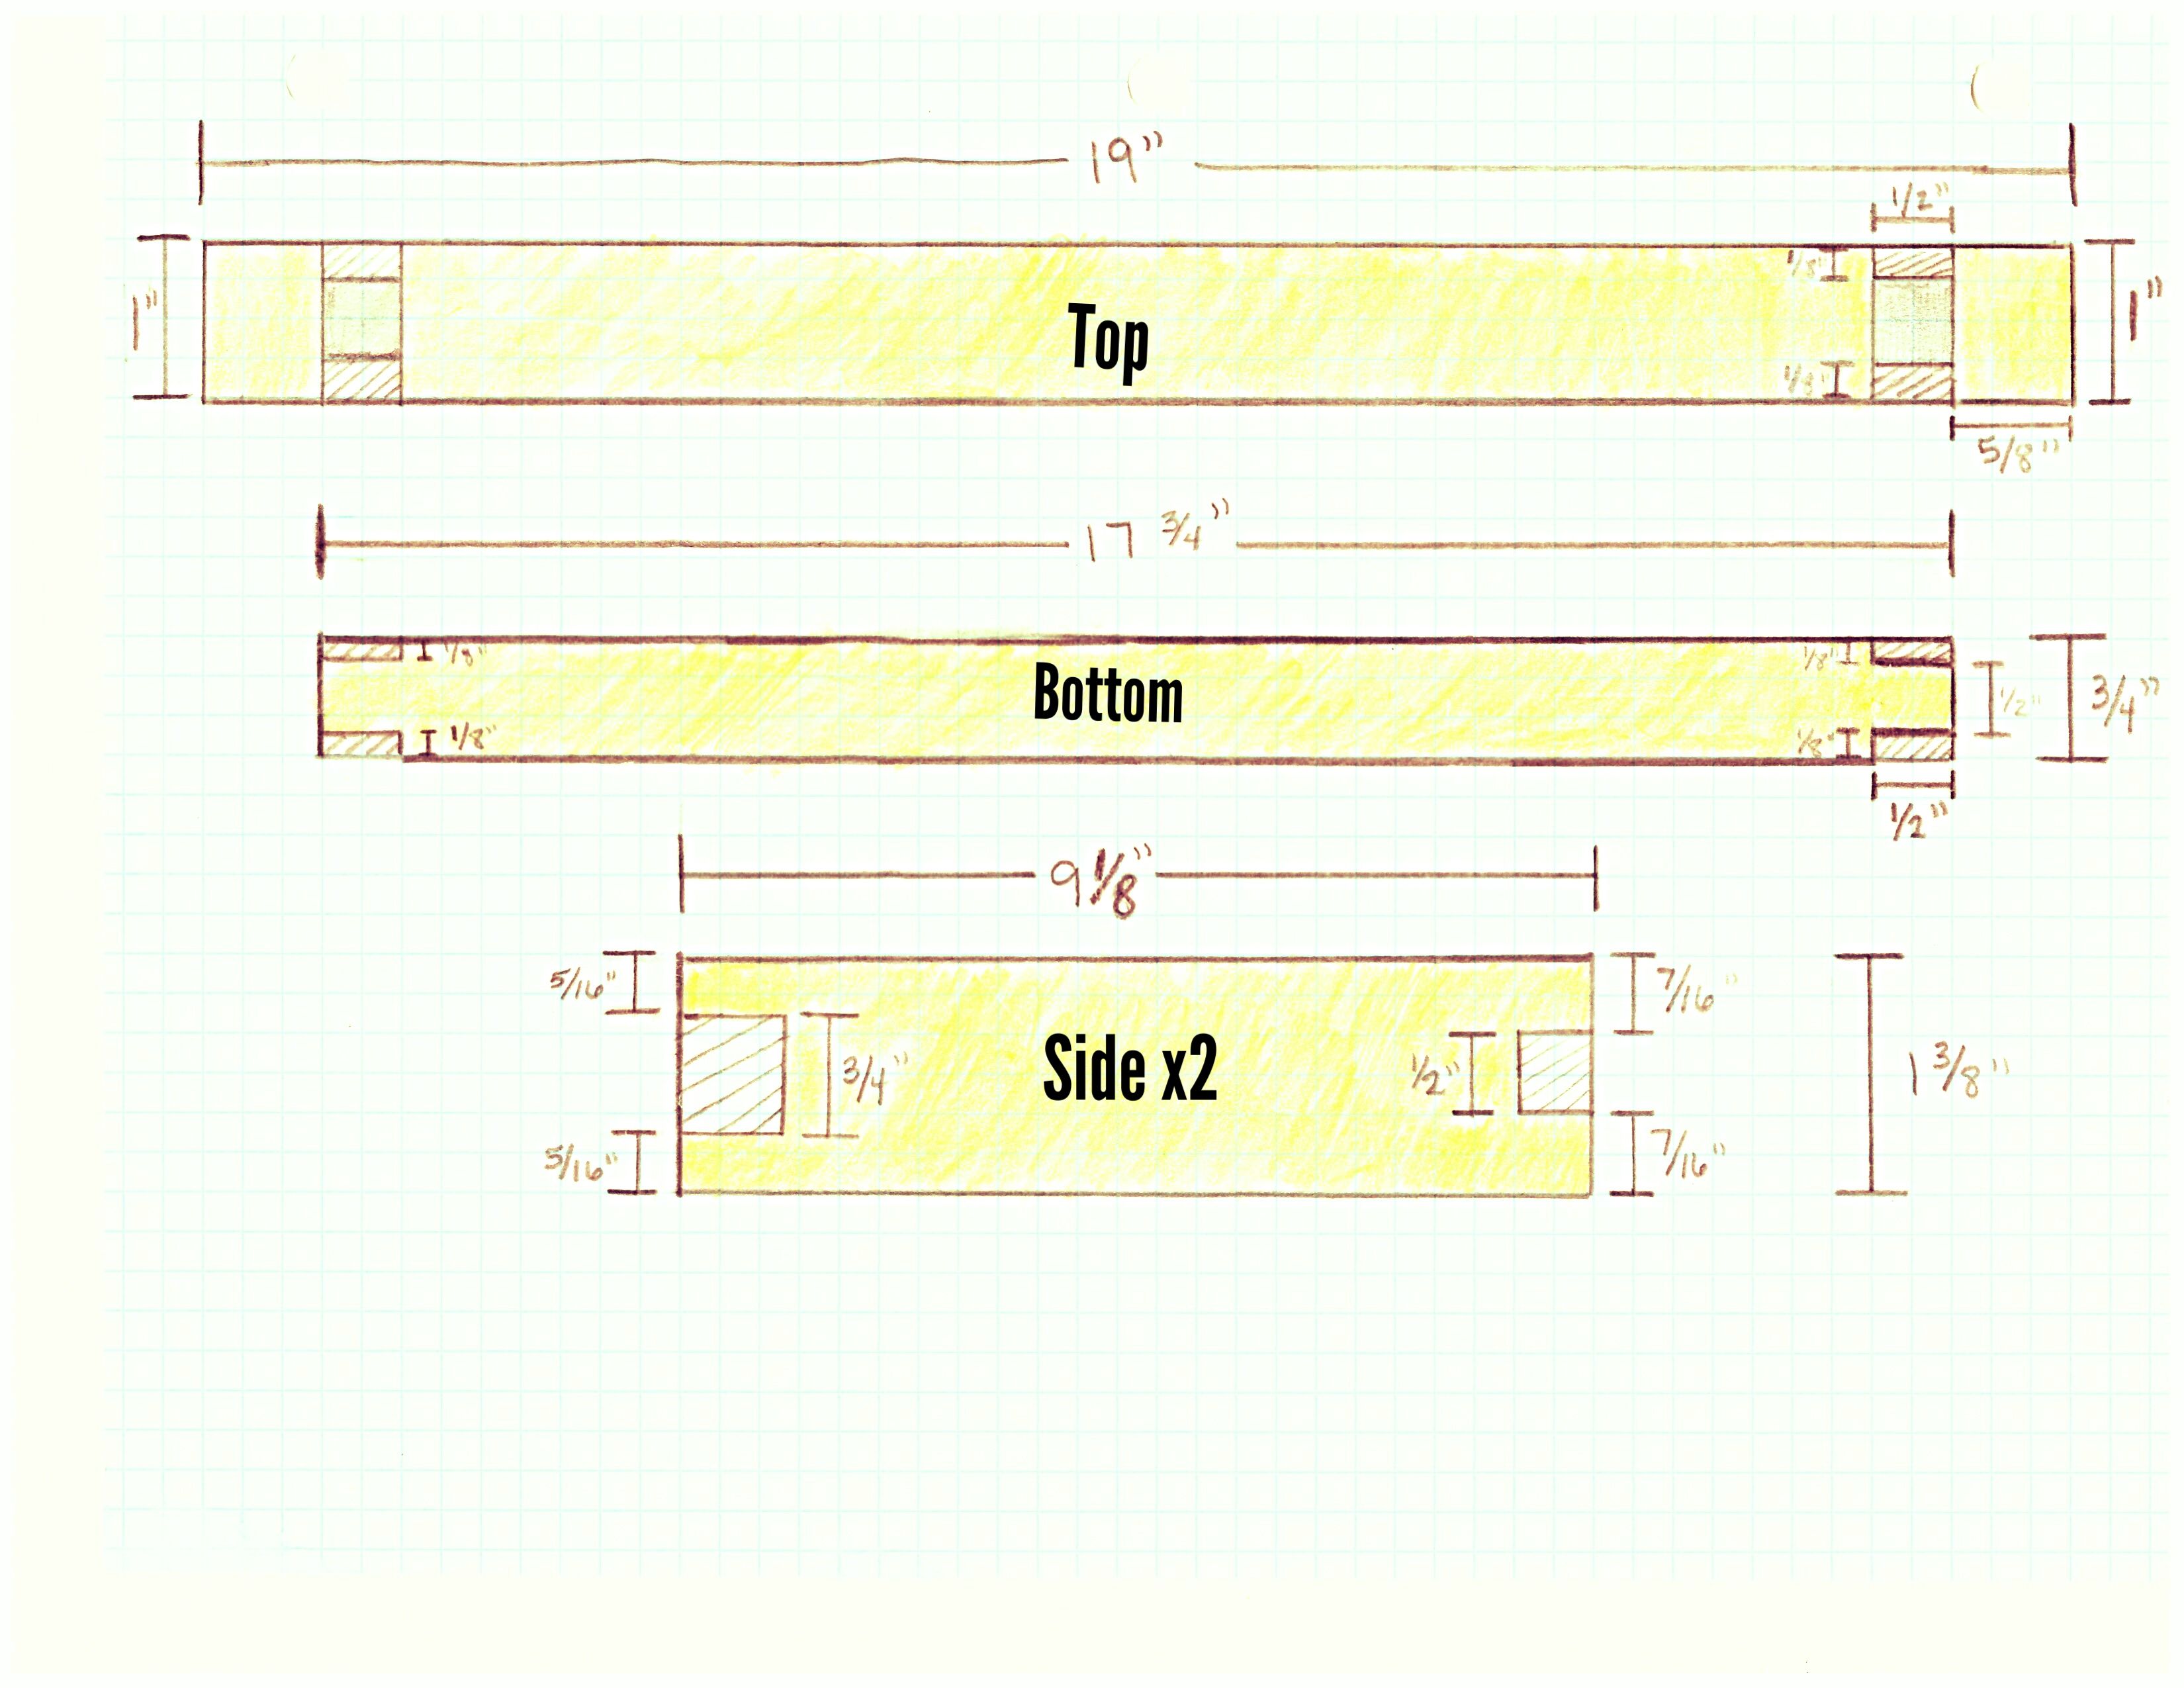
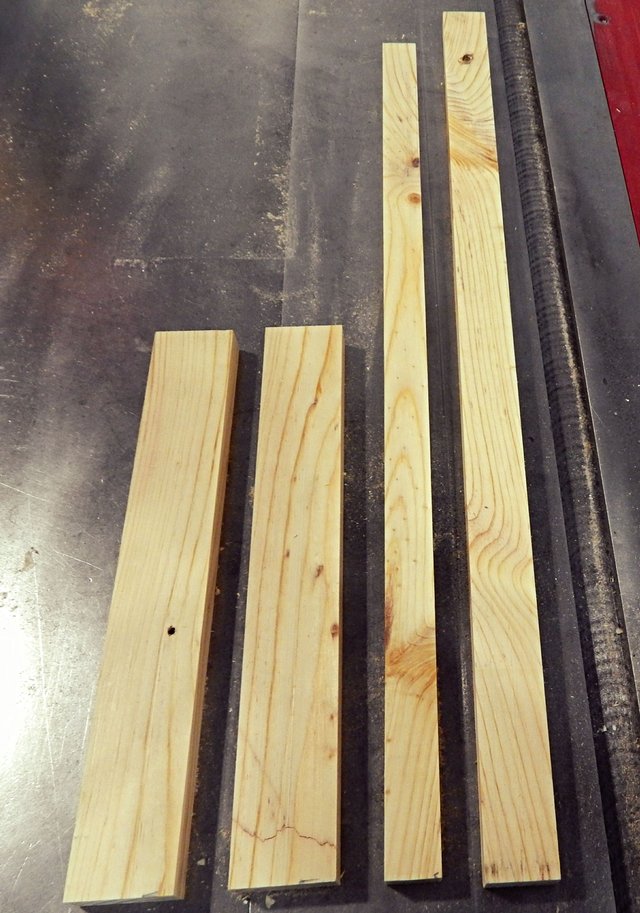
Step Four
We then need to cut our board with 1 3/8" width into (2) 9 1/8" Length pieces, making the sides. Then cut our board with 3/4" width to a 17 3/4" length, making the bottom piece.
Leaving you with the following (4) pieces...
(1) 19" x 1" x 1/2"
(1) 17 3/4" x 3/4" x 1/2"
(2) 9 1/8" x 1 3/8" x 1/2"
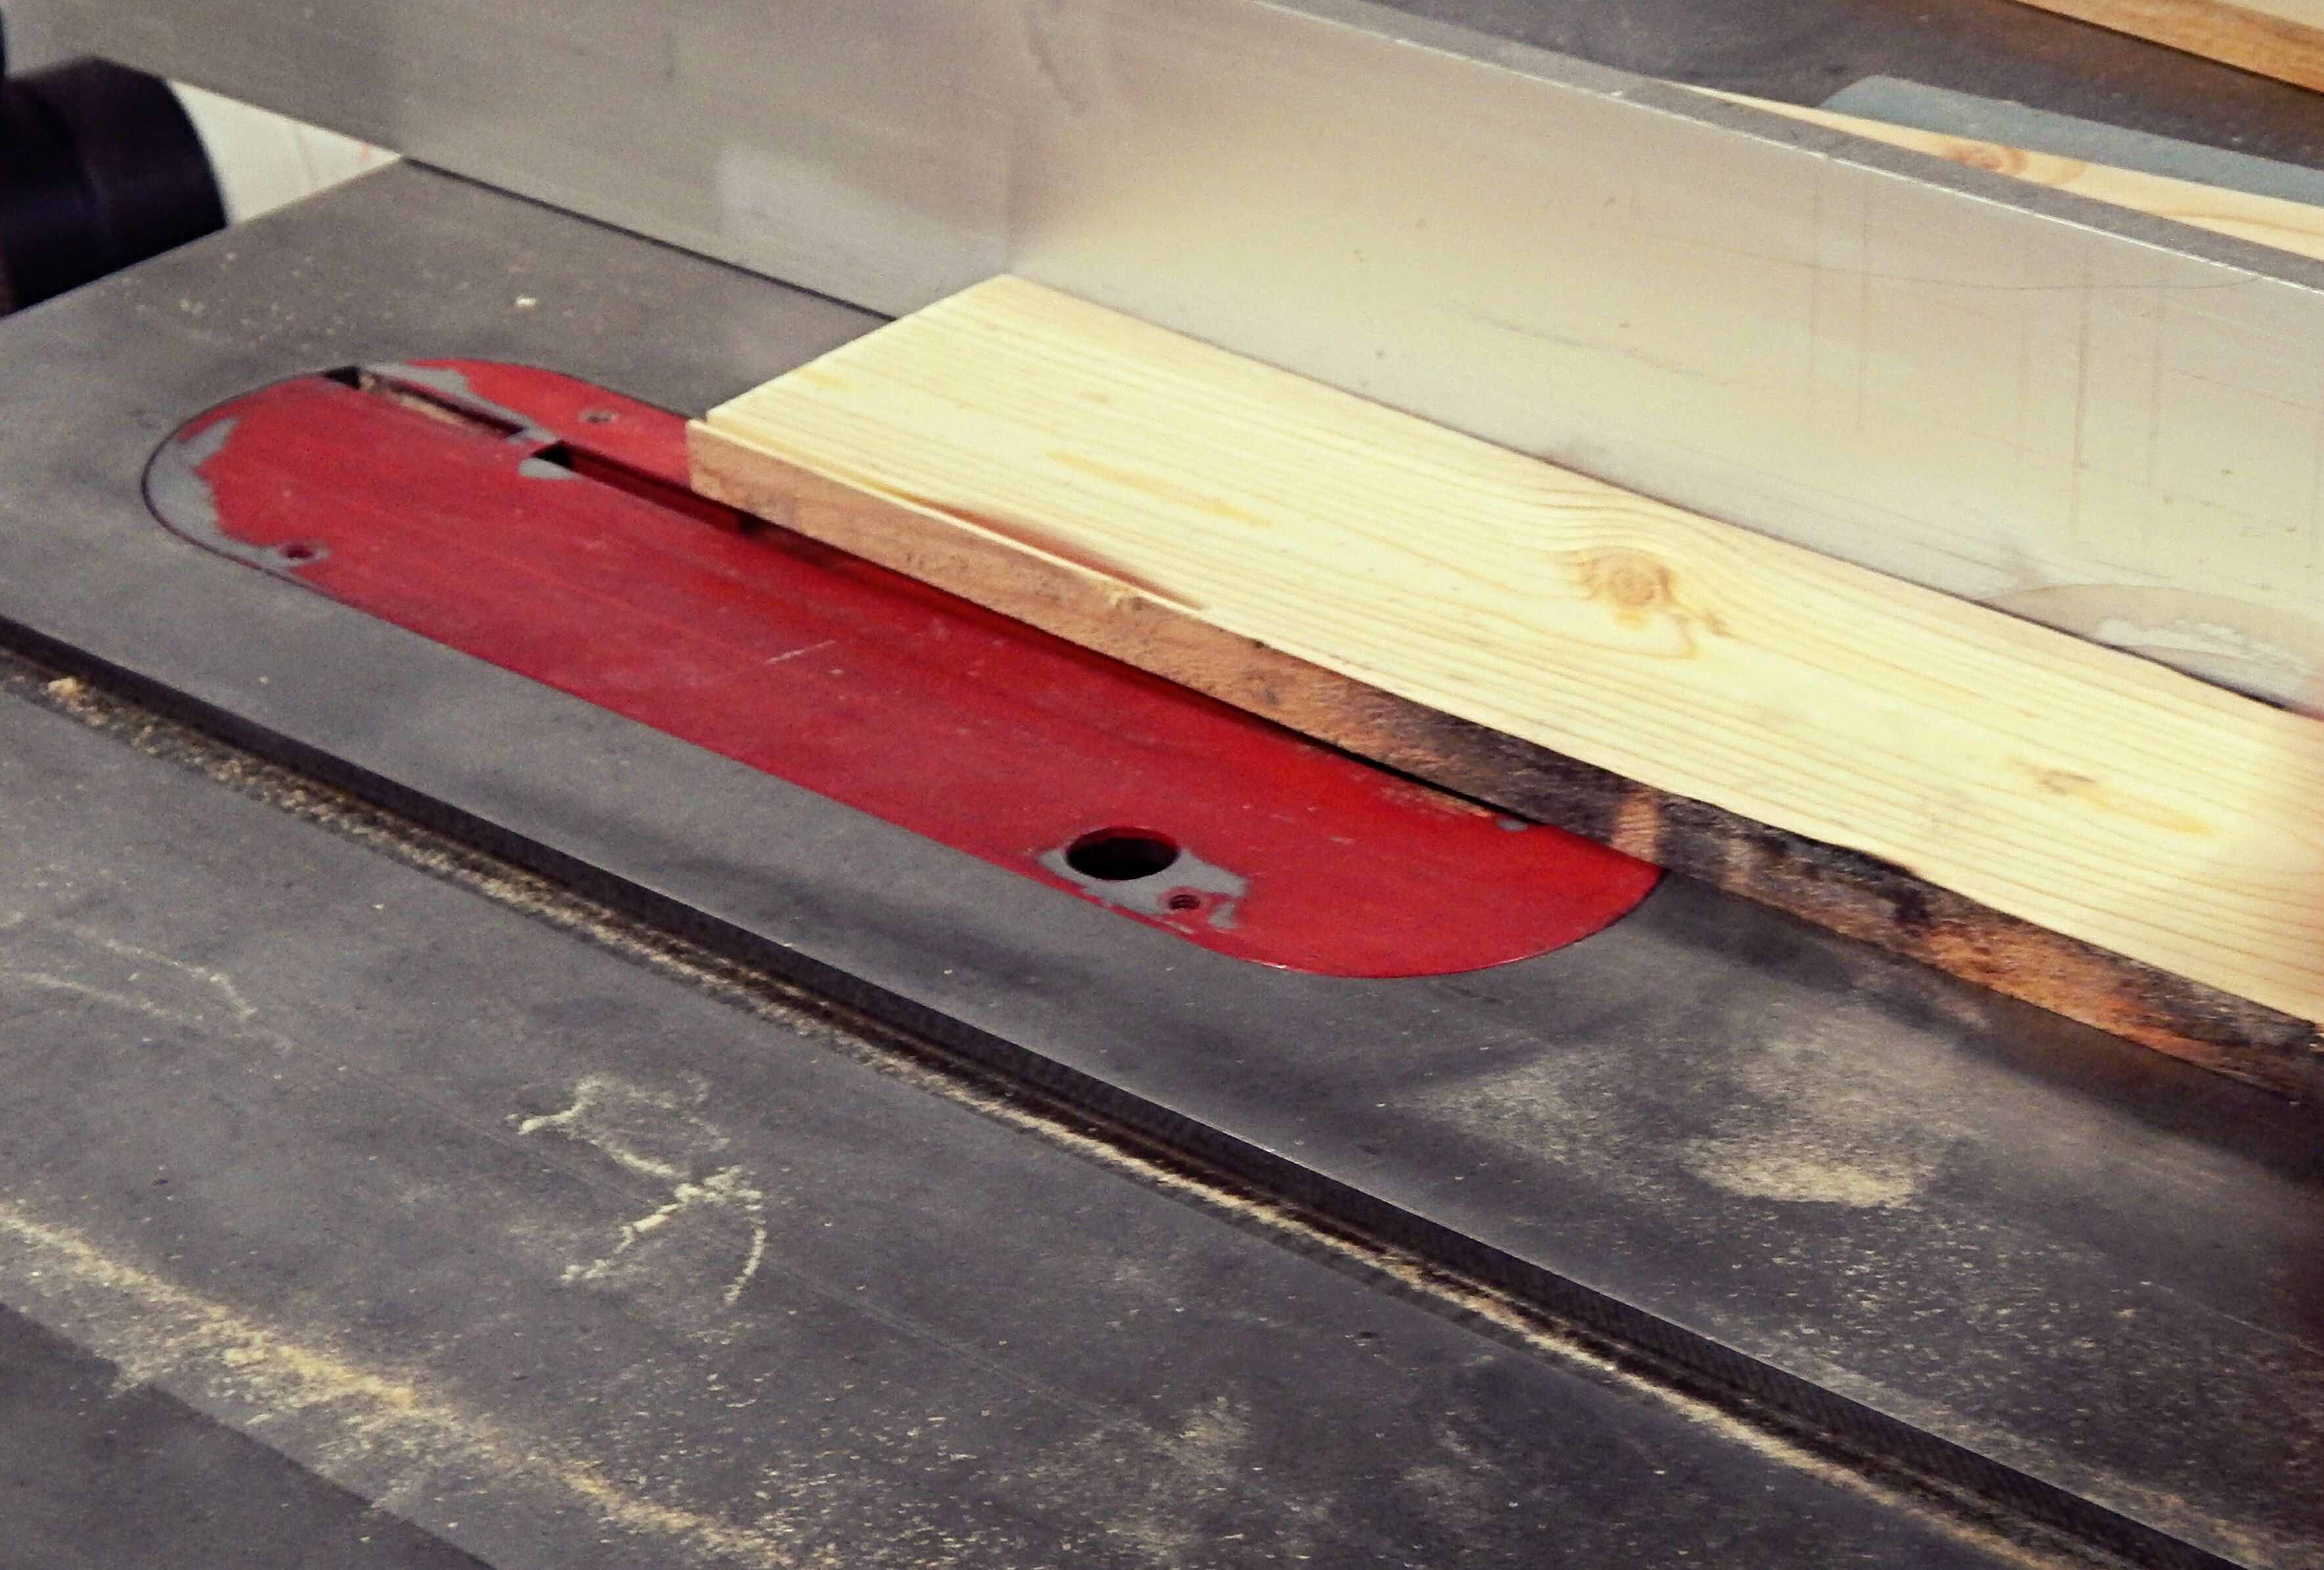
Step Five
Next we are going to switch out our table saw blade for a 1/2" Dado Blade. We originally did the following cuts on a table saw blade, making several cuts.. but recently purchased a Dado Blade to make the process easier, it can also be used for other projects down the road. Dado Blades can be found relatively inexpensive depending on what brand and model you get. If you do not have access to a Dado Blade you can make several cuts to get to the width specified below.
We have the 1/2" Dado Blade set to 1/2" up and 7/16" off the fence. Using a homemade jig we pass the two side pieces over the Dado Blade
leaving you with this...
We are going to set the side pieces aside and finish the rest of our 1/2" cuts, coming back to these at the end to finish the opposite side with the 3/4" cut.
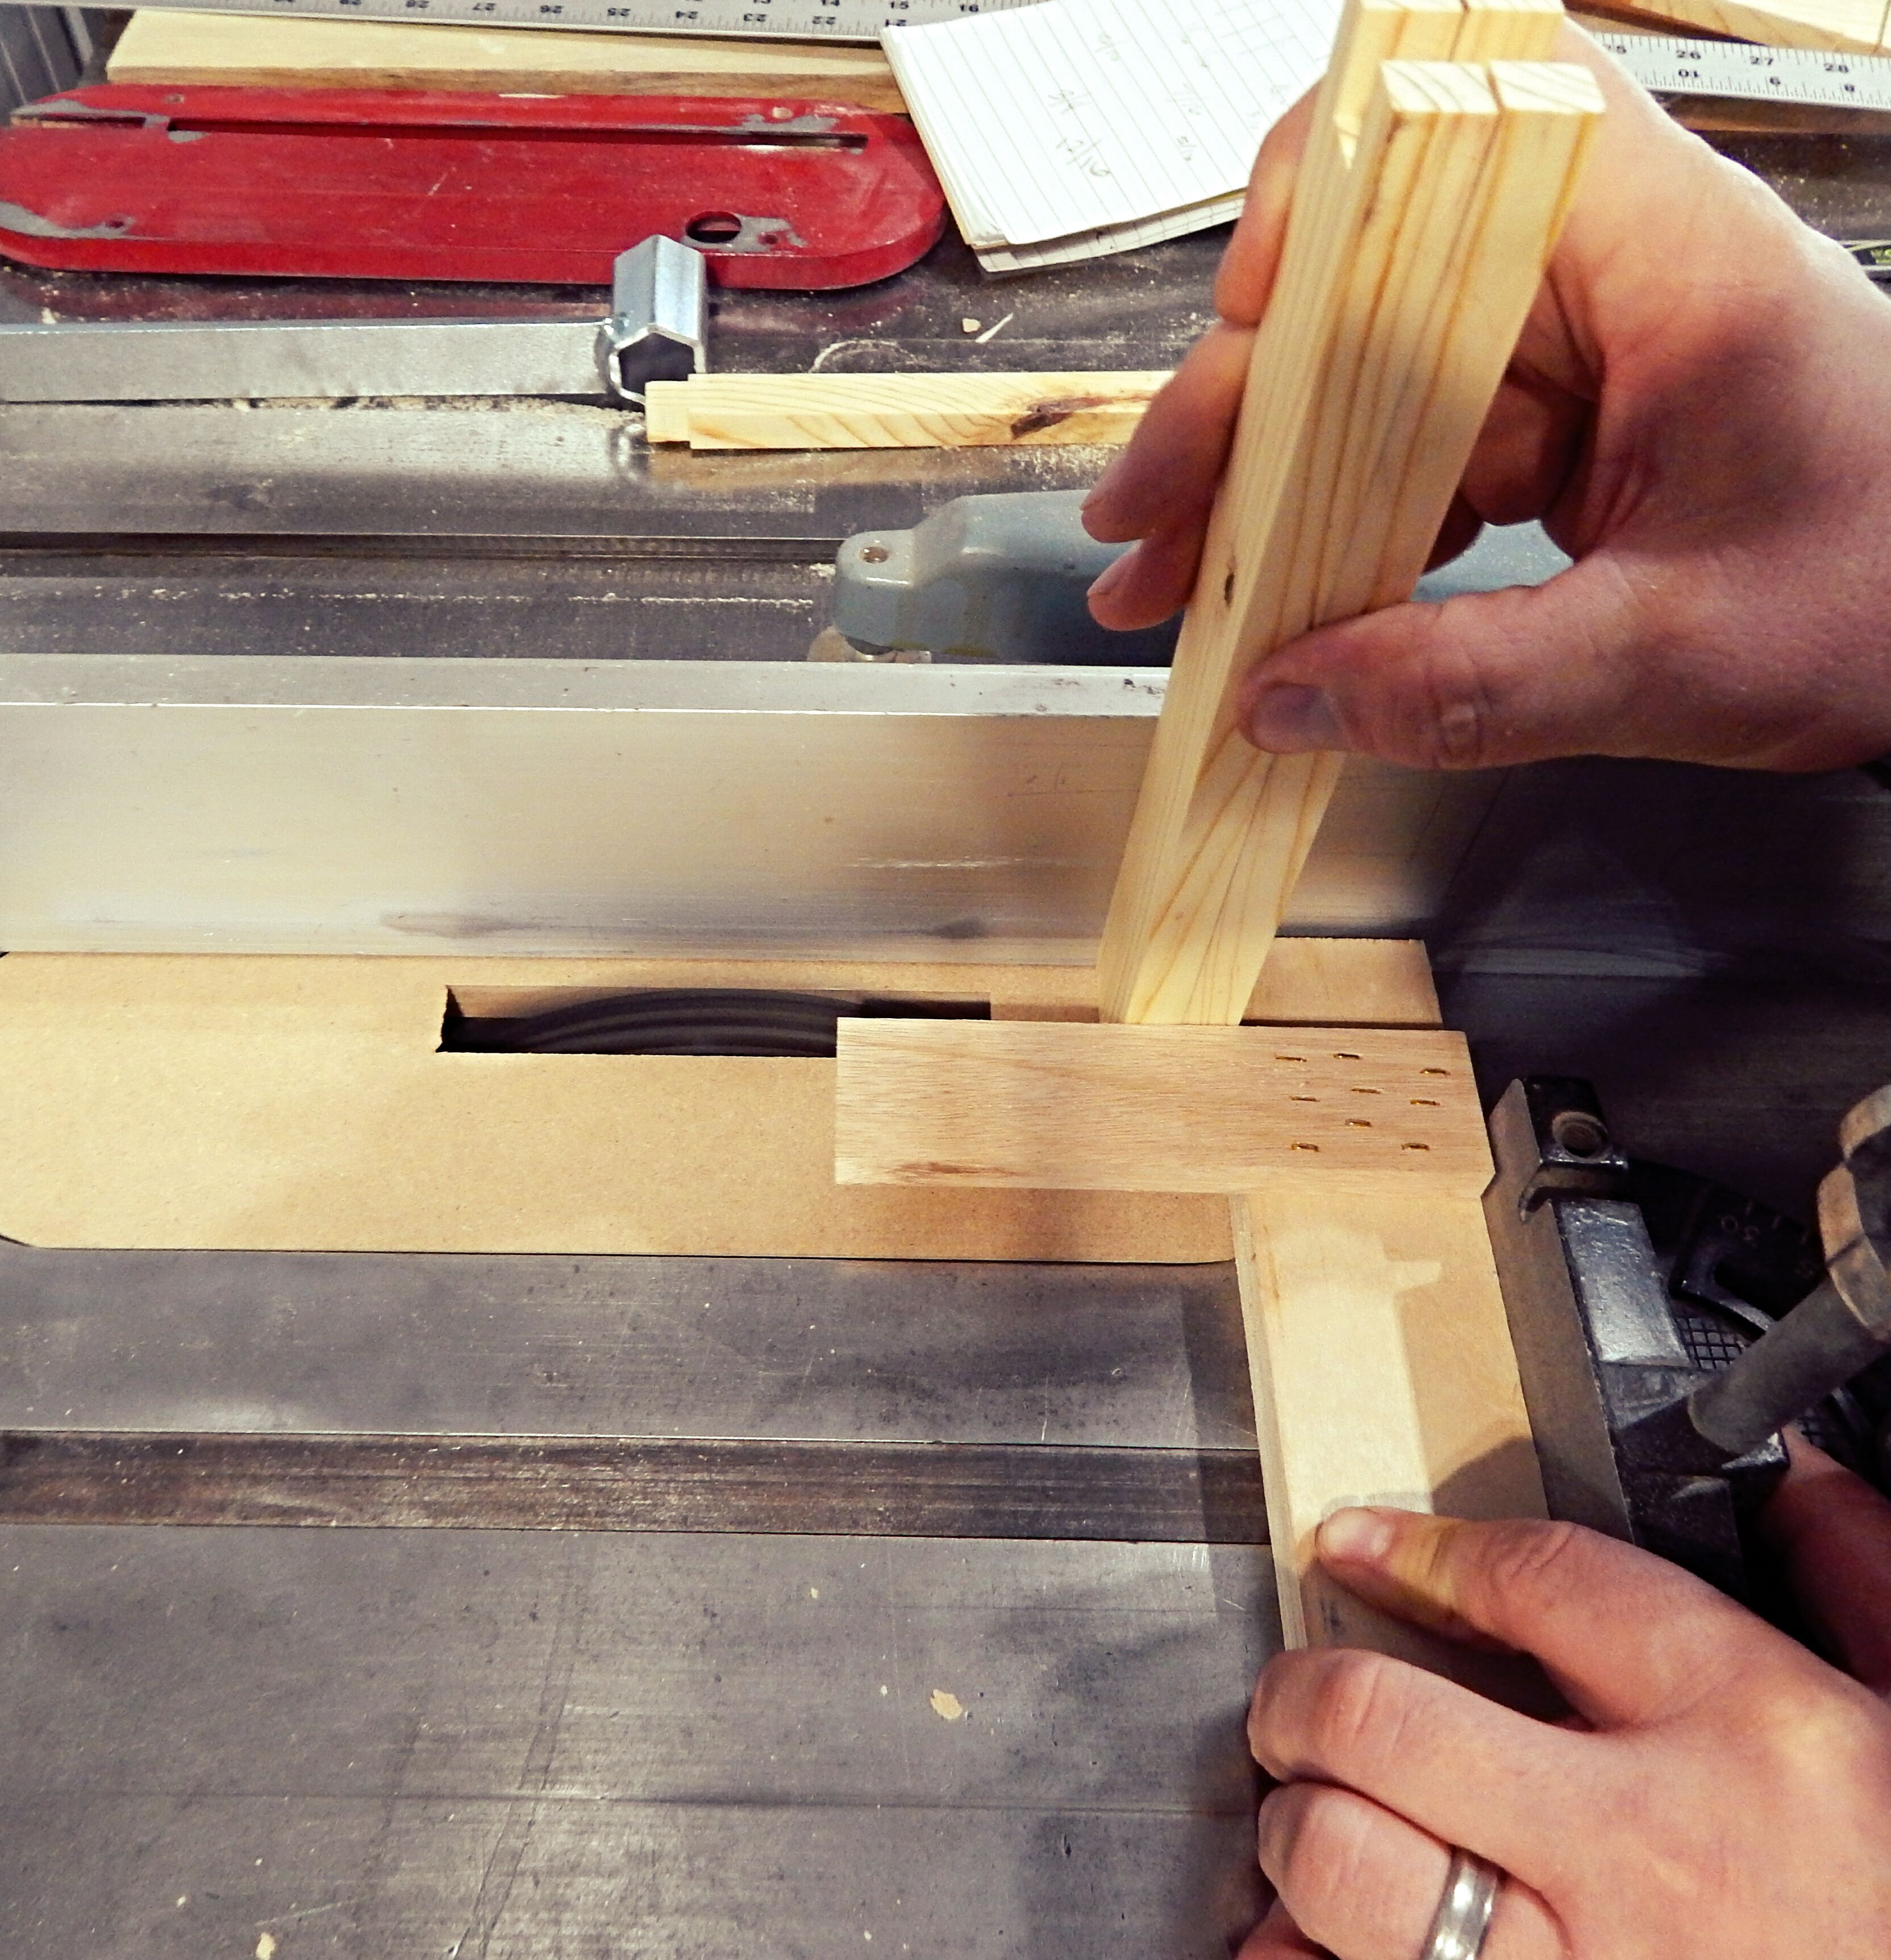
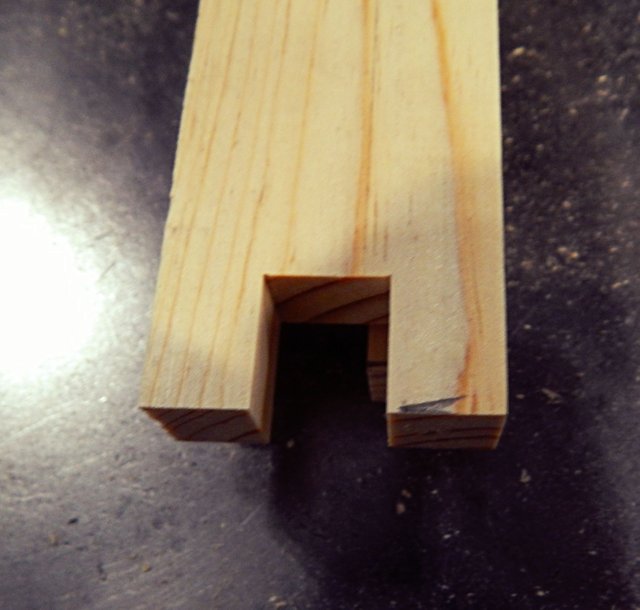
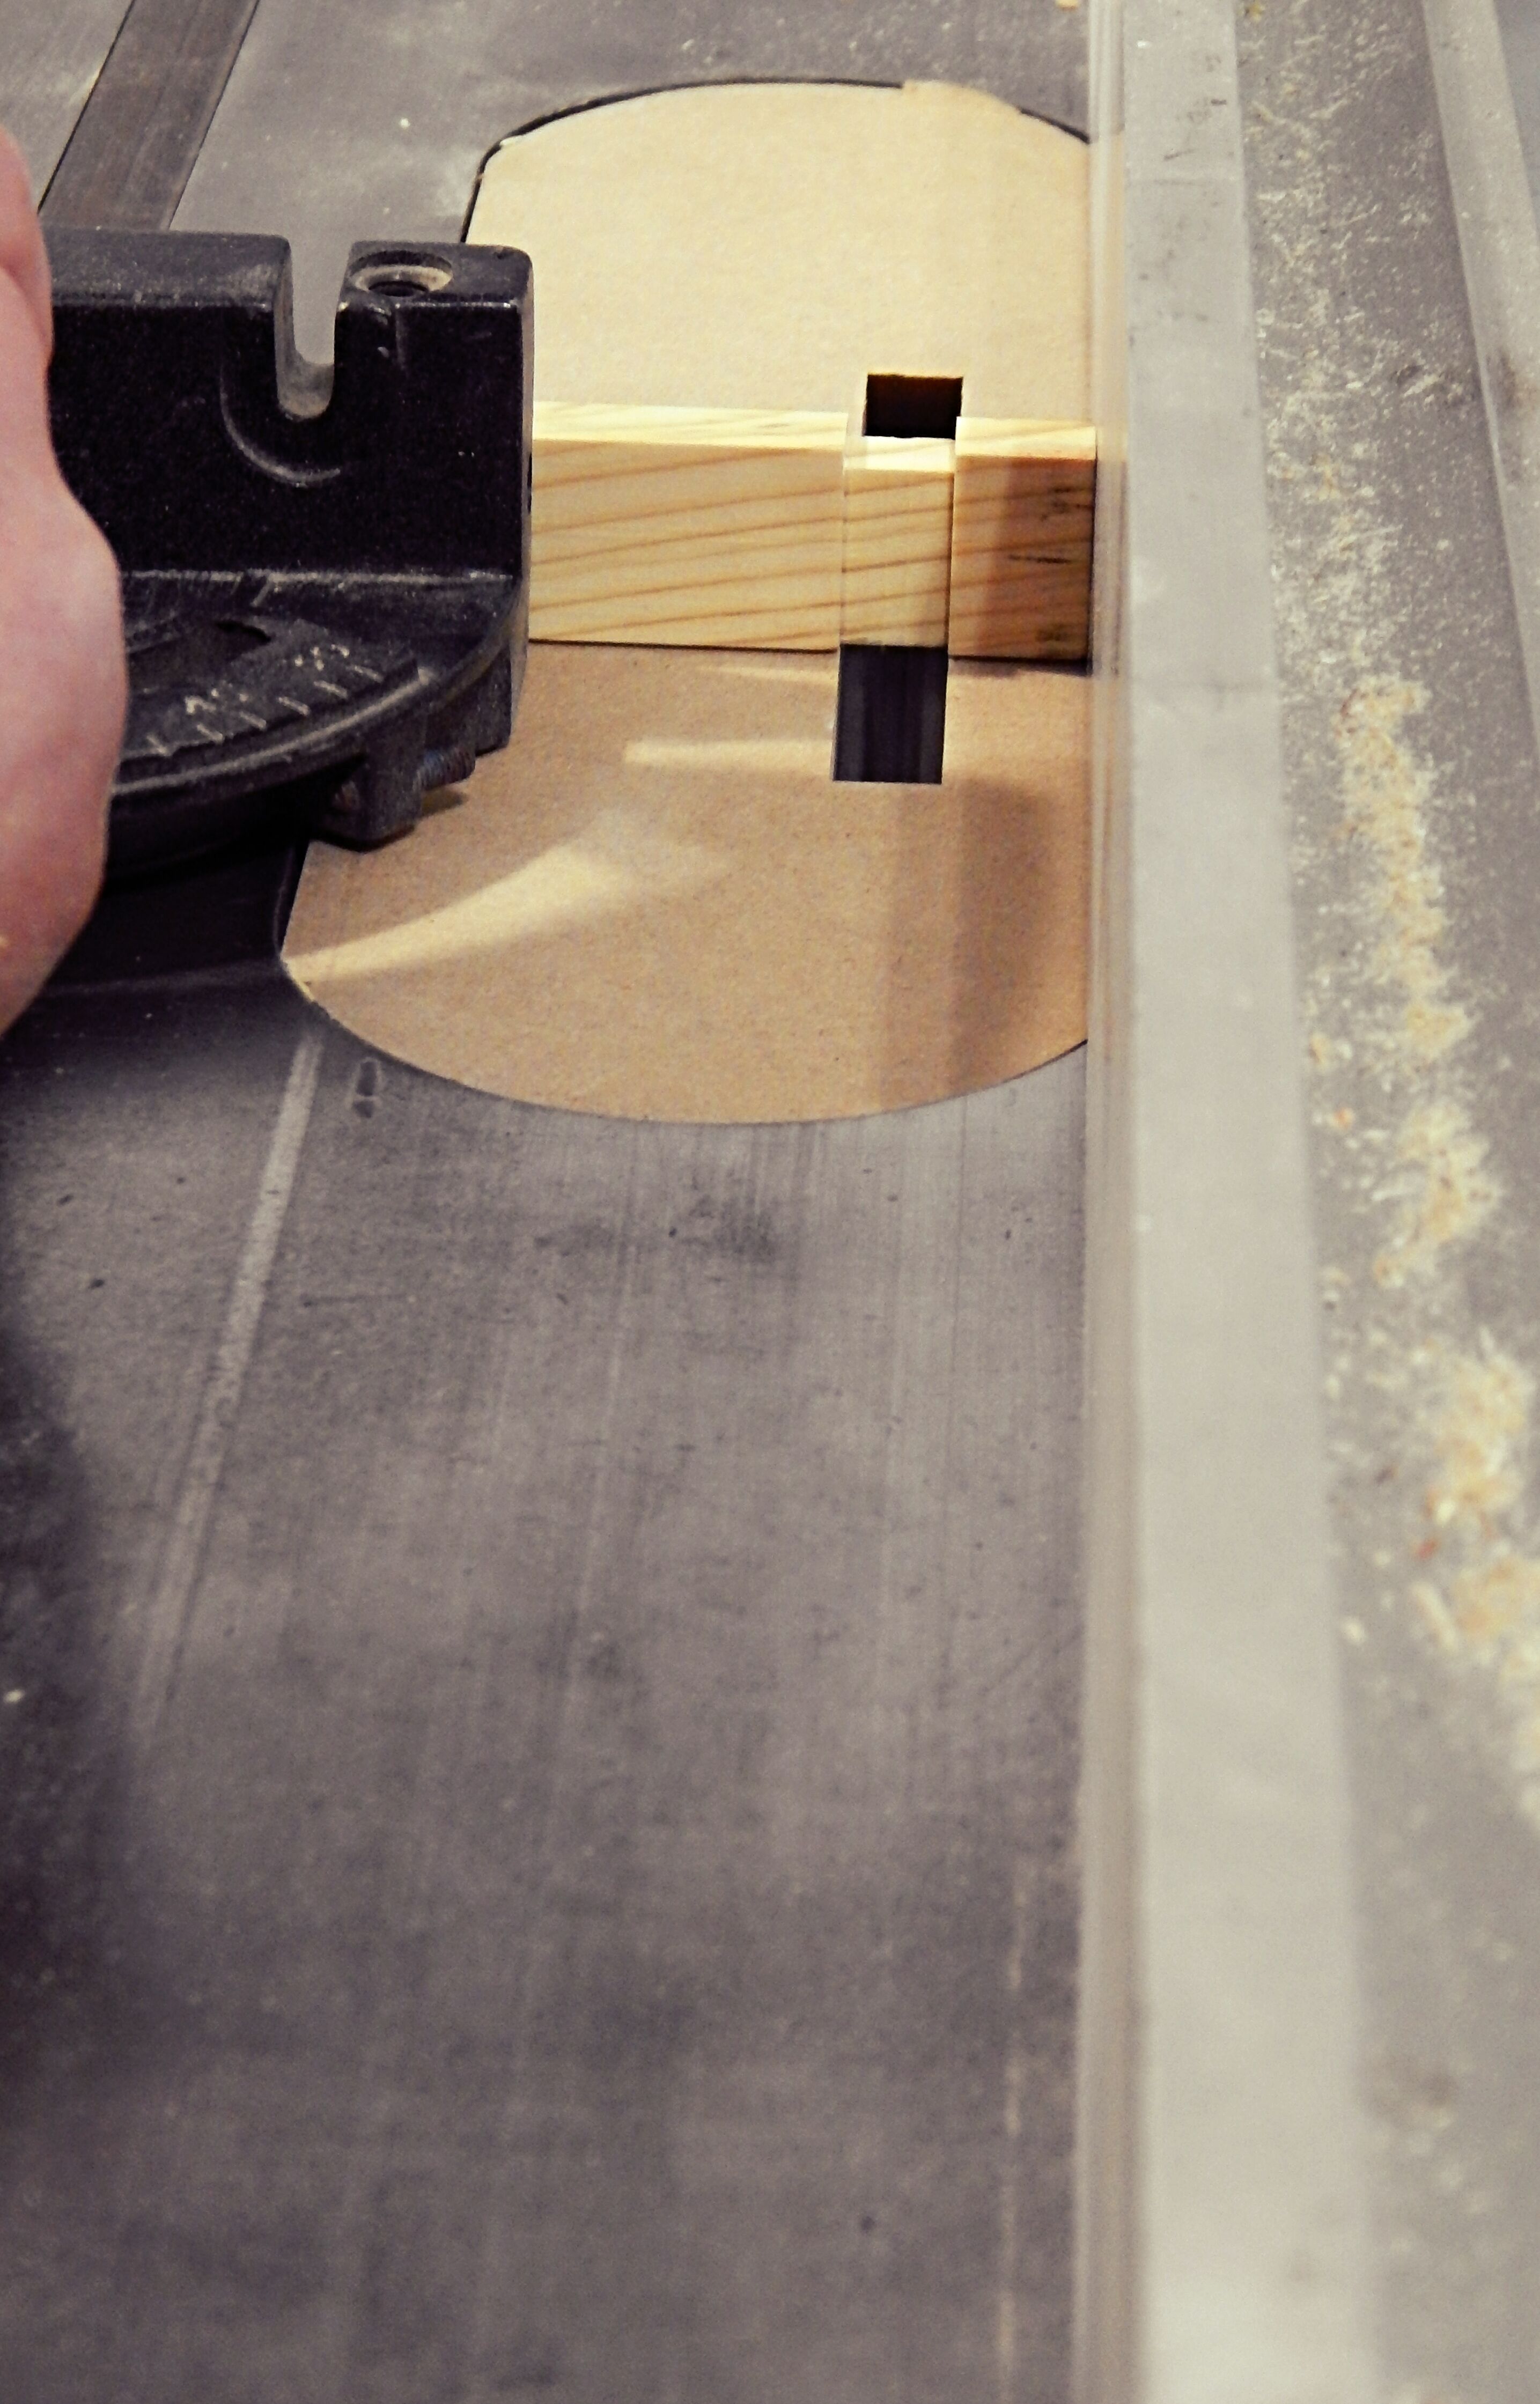
Step Six
We will now be cutting the notches into each end of your "Bottom" 17 3/4" length board. Setting the Dado Blade to 1/8" up and using a sacrificial fence, set the spacing between the Dado Blade and the fence to zero. We will then make two cuts on each 3/4" side on both ends, making a 1/2' x 1/2" square on the end (Refer to drawings for visual).

The two pieces you have just cut should fit together making the bottom and side joint. If it doesn't fit perfectly you can use a razor blade to cut off any excess material.
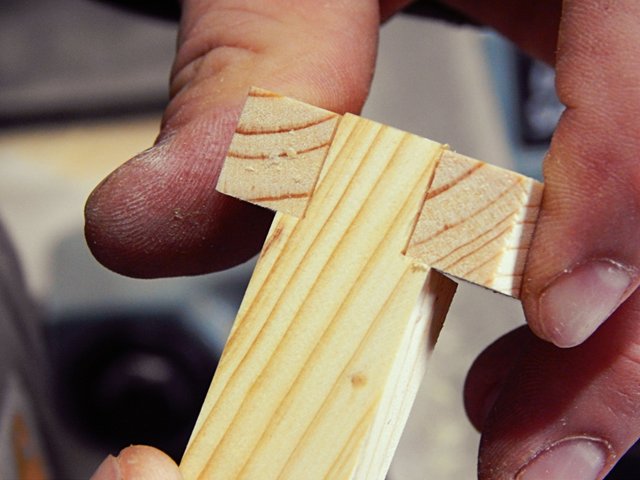
Step Seven
We are now going to work on our 19" length "Top" piece. With the Dado Blade still at 1/8" depth we measure 5/8" off the fence and cut the same three sides on both ends.
Step Eight
We are now going to do the additional cuts on the side pieces from above. First, need to change out our Dado Blade to the 3/4" size blade. Measuring 3/8" up and 5/16" off the fence we will make one cut on each of our 9 1/8" "Side" pieces.
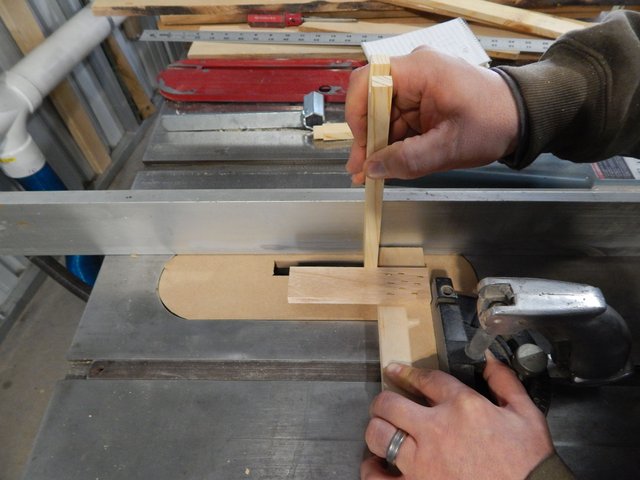
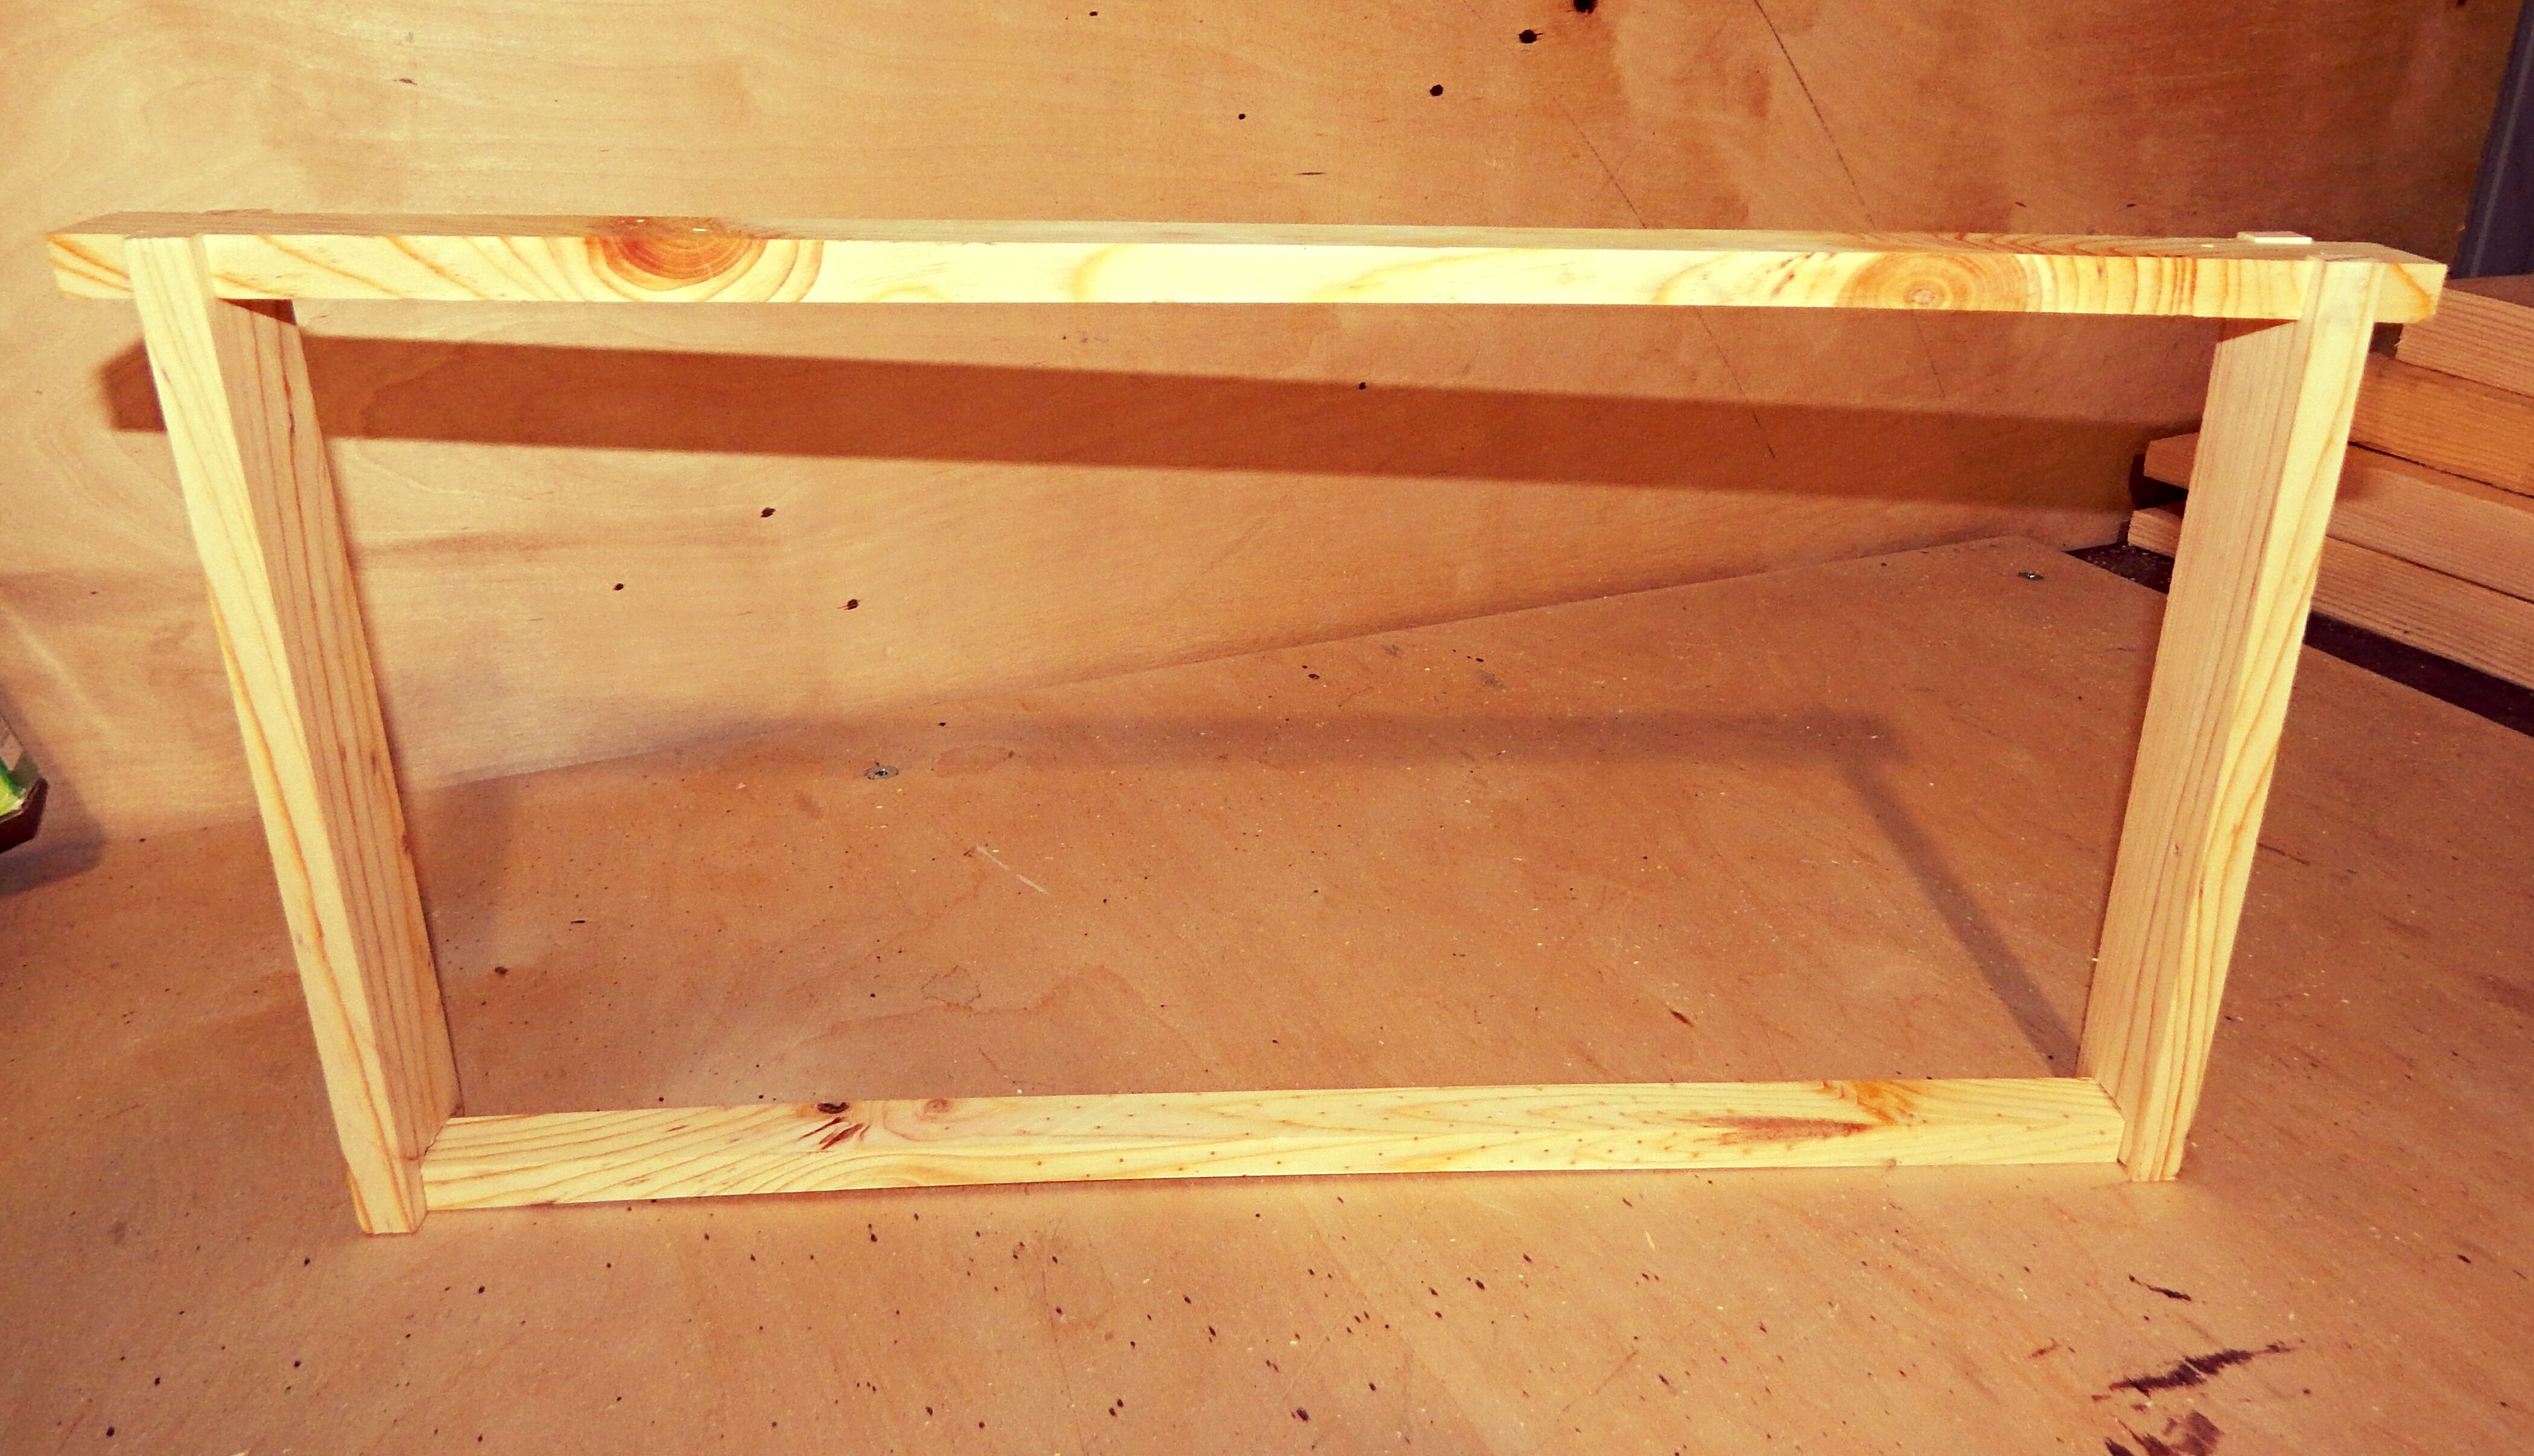
You now have your four complete pieces of the Hive Frame.

Glue each joint and use claps to secure while drying overnight. Using claps will make your frames 10x stronger than just glue alone, and we highly recommend using them.

You now have a finished Hive Frame made from scrap material... not bad huh?
Remember to save all of your hardwood scraps to make this cutting board
We hope you found this post helpful, feel free to contact us with any questions you may have along the way. We hope you will stay tuned to the rest of our Beehive building series.
Thank you for reading,
Happy Homesteading!
Excellent motivating post.
Downvoting a post can decrease pending rewards and make it less visible. Common reasons:
Submit
Thank you!
Downvoting a post can decrease pending rewards and make it less visible. Common reasons:
Submit
Resteeming, followed, and updooted. Oh wait! I'm already following you cuz your posts are amazing! You really should consider @qurator! You're perfect for them!
Downvoting a post can decrease pending rewards and make it less visible. Common reasons:
Submit
Thank you so much @phedizzle! You're too kind! We do need to check them out...
Downvoting a post can decrease pending rewards and make it less visible. Common reasons:
Submit
I'll definitely be trying this. Bees have always interested me. Apparently bees strip down to a kind of skeleton crew during the winter. They all huddle together and vibrate to maintain about 68 degrees inside their hive. Craziness.
Downvoting a post can decrease pending rewards and make it less visible. Common reasons:
Submit
Yes! It's so amazing...they end the summer with so many bees and they all just spend their short lives keeping the queen warm. On warmer days they then remove all of their dead and you can see them scattered all around the hive 😬...
I hope you do decide to keep bees, we really love ours and they are pretty easy the keep. Thank you for the support!!
Downvoting a post can decrease pending rewards and make it less visible. Common reasons:
Submit
There's a livesustainably hashtag you can use that will upvote you when you use things you already have. So much work and crafting. :) you should be proud!
Downvoting a post can decrease pending rewards and make it less visible. Common reasons:
Submit
Thank you so much for the tip! I never know what to tag these things, I appreciate the help. Thank you!
Downvoting a post can decrease pending rewards and make it less visible. Common reasons:
Submit
Very useful info. Thanks so much for sharing this!
Downvoting a post can decrease pending rewards and make it less visible. Common reasons:
Submit
Thank you so much!
Downvoting a post can decrease pending rewards and make it less visible. Common reasons:
Submit
Wow! This is pretty kewl. I could SO do this!
Downvoting a post can decrease pending rewards and make it less visible. Common reasons:
Submit
Thank you! Yeah it is a pretty simple process and the end result is a much higher quality than you normally find. Get on it and don't forget to let us know how it goes! 😉
Downvoting a post can decrease pending rewards and make it less visible. Common reasons:
Submit
I want to have bee hives someday, I'll have to remember to lookup this post when it's time. My wife's actually doing a barter today for some honey and bees wax, the bees make great stuff :D
Downvoting a post can decrease pending rewards and make it less visible. Common reasons:
Submit
Don't they??? We really love our bees, I promise you wont regret getting them!
Downvoting a post can decrease pending rewards and make it less visible. Common reasons:
Submit
I resteemed your post. I know a few people that can benefit from this, so thank you dearly for sharing your knowledge. And thank you on behalf of the bees!
Downvoting a post can decrease pending rewards and make it less visible. Common reasons:
Submit
Thank you so much! We really appreciate it!!! We love our bees and try to get more individuals to keep them. ❤
Downvoting a post can decrease pending rewards and make it less visible. Common reasons:
Submit
You can read about us here
Downvoting a post can decrease pending rewards and make it less visible. Common reasons:
Submit
Congratulations! This post has been upvoted from the communal account, @minnowsupport, by L & L Farms from the Minnow Support Project. It's a witness project run by aggroed, ausbitbank, teamsteem, theprophet0, someguy123, neoxian, followbtcnews, and netuoso. The goal is to help Steemit grow by supporting Minnows. Please find us at the Peace, Abundance, and Liberty Network (PALnet) Discord Channel. It's a completely public and open space to all members of the Steemit community who voluntarily choose to be there.
If you would like to delegate to the Minnow Support Project you can do so by clicking on the following links: 50SP, 100SP, 250SP, 500SP, 1000SP, 5000SP.
Be sure to leave at least 50SP undelegated on your account.
Downvoting a post can decrease pending rewards and make it less visible. Common reasons:
Submit
Is this you LL :P
Downvoting a post can decrease pending rewards and make it less visible. Common reasons:
Submit
Great start to what looks like it's going to be an amazing series. Unfortunately I won't be able to use your plans (I don't have the tools, plus, where I am in the mountains of Japan, western bees are rapidly killed off by hornets so that only Japanese "nihon-bachi" bees can survive, and they generally prefer a different style of hive...), but I'll be following nonetheless, if only to admire your workmanship!
Downvoting a post can decrease pending rewards and make it less visible. Common reasons:
Submit
Thank you so much!! Well if you ever find yourself with the tools, I'm told for Japanese bees you would just skip the frames all together and go right to building the hive box, because they do not use frame structures within their hives. Thank you so much for the follow and kind words!!❤
Downvoting a post can decrease pending rewards and make it less visible. Common reasons:
Submit
Yes, you're right: hives for Japanese bees have no more than two "cross-beams" inside each level. I actually inherited two hives which I a m very keen to use just as soon as I have got my land cleared and vegetable production under way.
Downvoting a post can decrease pending rewards and make it less visible. Common reasons:
Submit
great job, easy to understand !
deserves more upvotes
Downvoting a post can decrease pending rewards and make it less visible. Common reasons:
Submit
So when can we buy some honey from you with our STEEM?
Downvoting a post can decrease pending rewards and make it less visible. Common reasons:
Submit
Anytime! Haha... We have plenty!
Downvoting a post can decrease pending rewards and make it less visible. Common reasons:
Submit
Once I get a nice income from Steemit I'll be spending a paycheque on that hooney ;)
Downvoting a post can decrease pending rewards and make it less visible. Common reasons:
Submit
I live in city region, so not sure if I can attract bees. But this is definitely a good project to try some day :)
Rydhi
xox
Downvoting a post can decrease pending rewards and make it less visible. Common reasons:
Submit
Thank you! I actually know a person with 4 hives on their small city lot, so don't rule it out! Thanks so much for reading!
Downvoting a post can decrease pending rewards and make it less visible. Common reasons:
Submit
Wow, great post. I have made boxes before but I have never tried frames, we use mostly national hives here in the uk but I can adjust the measurements from langsgroth. I also have access to free pallets, I am very much looking forward for your next posts in this series😀
Downvoting a post can decrease pending rewards and make it less visible. Common reasons:
Submit
Yay! Thank you so much! We are really excited about this series too. We should have the next part up in a few days. Pallets are such a great resource.
Downvoting a post can decrease pending rewards and make it less visible. Common reasons:
Submit
You have received an upvote from @livesustainably. I promote and curate content that encourages and educates others in living sustainably. You can support the live sustainably cause on Steemit by upvoting, resteeming and creating content under the tag #livesustainably.
Downvoting a post can decrease pending rewards and make it less visible. Common reasons:
Submit
Great work! With the time it takes to make them, do you think it’s a financial advantage? Just wondering. I think it’s teally cool you’re finding ways to make hives from scrap material! I may have scanned the article and missed it but do you worry much about how the pallet wood was treated? (Heat treated, etc?). I’ve ordered my first nuc and will be starting bees this year! Im excited to follow along with this series! When your series is complete, you should submit it all at once to the Knowledge Base! Very cool, really!!
Downvoting a post can decrease pending rewards and make it less visible. Common reasons:
Submit
Thank you! Well, as far as the financial aspects go... a good, well built bee frame is somewhere around the $5-$6 dollar mark. You can get them for less, but those break very easily due to being made with such poor material...you can barely get a year out of them. So with the set up we have (as described above), we can make them assembly line style and knock them out very quickly. A really good producing hive can use somewhere around 60 frames, so at $5 thats around $300 for each hive (We are adding 5 hives this year so thats around $1500 for us) in frames alone. So, if you already have the equipment...I think it is a great financial savings.
As far as the lumber we do try to be picky about the wood we choose to use. In the process we describe you are removing all of the surface material, therefore removing a large majority (if not all) of any chemicals that may have been used. Most hives individuals purchase are being made in china and are a very low quality plus, they are most likely treated very heavily after the fact.
We really want to be able to produce things ourselves using the materials available...we think its an extremely important part of self sufficiency. Using pallets that would normally be thrown away to make our hives is something we think is a great step in that direction.
Good luck with your bees! You are gonna love them.
Downvoting a post can decrease pending rewards and make it less visible. Common reasons:
Submit
Very cool! I have a good source for nice pallets, it's definitely something I can consider in the future once we have all the necessary wood-shop equipment needed! Beehives definitely aren't cheap!! Thanks for the detailed reply!
Downvoting a post can decrease pending rewards and make it less visible. Common reasons:
Submit
An awesome post with easy to follow directions on making hive frames. You make it look so simple. Bees are on our wish list. Not this year but perhaps next. I need to plant more fruit trees and flowering plants for food for the bees.
Downvoting a post can decrease pending rewards and make it less visible. Common reasons:
Submit
Thank you! We love our bees so much, I hope you do give them a try...you won't regret it!
Downvoting a post can decrease pending rewards and make it less visible. Common reasons:
Submit
This is some excellent craftsmanship! We plan on doing bees this year. I will definitely consider this build tech.
Downvoting a post can decrease pending rewards and make it less visible. Common reasons:
Submit
Great project.. Although i have only hand-tools i would do it by hand.. Will be interesting to see the development of the hive.
Downvoting a post can decrease pending rewards and make it less visible. Common reasons:
Submit
Thank you! We might do a hand tool tutorial down the road as well!
Downvoting a post can decrease pending rewards and make it less visible. Common reasons:
Submit
very nice. I use to make stuff from pallets, but then somebody said that there might be some cemicals on / in the wood. And for me it made sence becouse I dont know where those pallets have been and what kind off stuff has been caried on them. You ever thought about this aspect?
Downvoting a post can decrease pending rewards and make it less visible. Common reasons:
Submit
Hey silini! Thanks so much for your comment. It's true some pallets have been pressure treated and you should be picky about the wood you use (I go into this a few comments up as well) but considering you are taking all of the surface wood off, it's not really a problem. The same could be said for any lumber really...we don't know where it been and so forth. With proper prep work pallet can be used safely for any project. Thanks for reading 😀
Downvoting a post can decrease pending rewards and make it less visible. Common reasons:
Submit
I've seen so many uses for pallets. Loved how you used yours and the process you shared. I appreciate the wooden joints involved, it takes skill to get them right. Curious to know how the final result turns out. Great post, thanks for sharing!
Downvoting a post can decrease pending rewards and make it less visible. Common reasons:
Submit
This is amazing and super detailed! Also i love the quality of your photos!
Downvoting a post can decrease pending rewards and make it less visible. Common reasons:
Submit
Thank you so much ❤
Downvoting a post can decrease pending rewards and make it less visible. Common reasons:
Submit