How to create and manage Cloud wallet and/or Local wallet Accounts
This document purpose: To explain BitShares UI wallet Client and wallet types and answer some of frequently asked questions about Wallet and Account. And also, show how to create a Cloud wallet and a Local wallet.
Source: How to create and manage Cloud wallet and/or Local wallet Accounts - GittHub
Contents:
- BitShares Client
- Lite Client
- Web Client
- BitShares Wallet Types and Login
- Cloud Wallet
- Local Wallet
- Frequently asked Questions
- Light wallet or Web wallet?
- How to Create an Wallet (Cloud wallet)
- How to Create an Wallet - Advanced (Local wallet)
BitShares Client
- BitShres wallet has two client types.
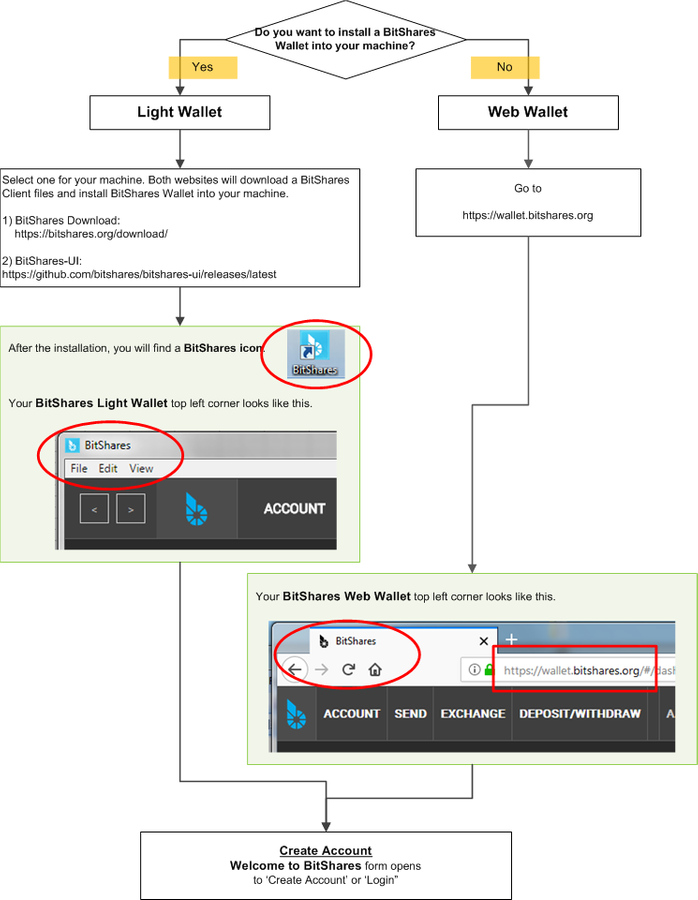
- Light Client : Download and install BitShares wallet to your computer. This does not mean that you will have a Local wallet.
- Web Client : Access the network and open the wallet in the browsers.
- wallet.bitshares.org https://wallet.bitshares.org
BitShares Wallet Types and Login
Cloud Wallet
- BitShare UI wallet will create a Cloud wallet as a default wallet. (i.e., [CREATE ACCOUNT])
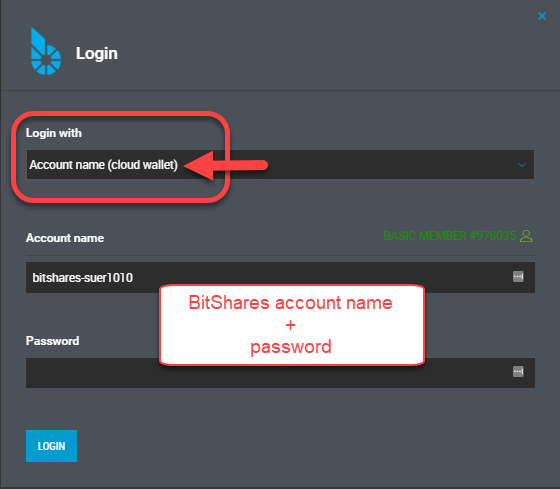
- The Cloud wallet allows you to login from any web browser at any time to gain access to your account by using your credentials (username and password).
- The Cloud wallet only allows for a single account to be accessed at a time.
- If you have a Cloud wallet, you don't need to worry about a backup. (You don't have the functionality in the Cloud wallet).
- You can switch the interface by using the [Settings] - [General] - Login Mode, however your account won't switch, only the interface switches.
- Even you import Private keys (was in the Cloud wallet) to the Local wallet, you do not have a brain key to associate with the Private keys you imported. Therefor, a brainkey restore won't find those Private keys. (No meaning to do a brainkey backup and restore.)
- The Cloud wallet has no brainkey. The password is basically the equivalent of the brainkey, but it's only used for that one account.
Local Wallet
- If you know you want to have a Local wallet, use an [advanced form] link on the Welcome to BitShares form and create a backup file.
- The Local wallet creates a correct pair of keys (a brainkey and private keys) and save the information to your browser.
- The Local wallet creates a database with in your browser. This means that you can only access your funds from the same computer and web browser that you have used to register and create your account. If you attempt to access your local wallet from any other computer, or any other browser, it will fail unless you actively import your backup file from the original browser backup file.
- You have to create a backup files to manage the Cloud wallet account.
- The Cloud wallet has Backup options. Go to [Settings] - [Backup] to find.
- Create local wallet backup : create a Binary File (.bin) backup.
- Create brainkey backup : give you long random phrases. You need to write down and keep it in a safe place.
- The backup files can be used to move your local wallet to different computers or different browsers. In order to restore your local wallet you will need the backup file and your password! Therefor, it’s extremely important you create a backup and keep a safe place.
Frequently asked Questions
- Q1. Can I switch (by changing the Wallet Mode or importing private keys) my Cloud wallet to a Local wallet?
- No. Your account won't switch, only the interface switches.
- Q2. I have a Cloud wallet. Can I have a Local wallet?
- Yes. But you will have to create new account for the Local wallet.
- Q3. How can I move my funds from a Cloud wallet to a Local wallet?
- We mentioned before. You have to create new account for the Local wallet. You can create the Local wallet by using an [advanced form] link on Welcome to BitShares form. After you created new Local wallet, send your funds from your old account (Cloud wallet) to new account (Local wallet). And create a backup!!
- Q4. I have a Cloud wallet. Do I have to save my private keys information somewhere?
- Not necessary. Because the Could wallet always do it for extra security. Also lets you login without exposing your owner key, you can login using only the active key.
- Q5. Can I change a Cloud wallet password?
- Yes.
- Go to How to change a password if using a Cloud Wallet : from BitShares UI wiki
- Q6 .Can I change a Local wallet password?
- Yes
- Go to [Settings] - [Password] - Change your password. Use this page.
- Q7. There is [Create Account] in a Side navigation menu. Can I create and add new account in the same wallet I logged in?
- Yes. However, the account you logged in must have a LifeTime Membership (LTM) stats.
Light wallet or Web wallet?
Before we create a wallet, let’s check which wallet you want to have as your BitShares wallet. Quick check the below chart.
How to Create an Wallet
This example will Create a Cloud wallet.
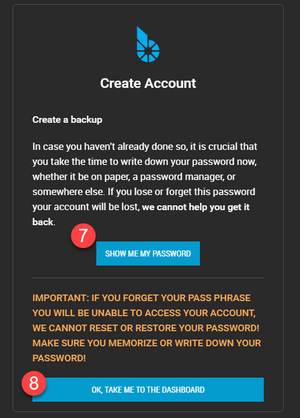
This is very important. Please create a strong password and write down or save it to a safe place!! Do not lose it. ONLY you can open your wallet again. No one can help.
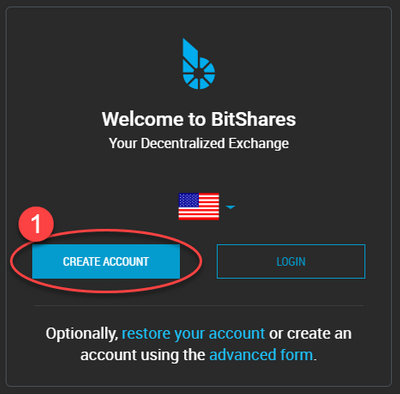
- 1.Click [CREATE ACCOUNT]
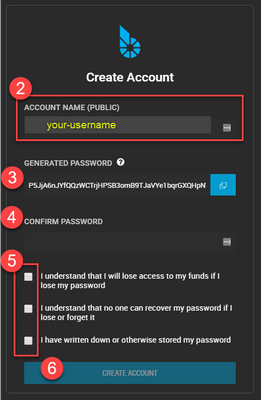
- 2.Type in [ACCOUNT NAME]. You can create your unique BitShares account name.
- 3.Set a password. You can use a GENERATED PASSWORD or create own strong password.
- 4.Type or paste your password to confirm.
- 5.Check the check boxes. Make sure you read before you check!
- 6.Click [CREATE ACCOUNT]
Before you submit, check your password one last time. It's very important!!
- 7.Click [SHOW ME MY PASSWORD] and double check if you have a correct password.
- 8.Click [OK,TAKE ME TO THE DASHBOARD]
Login Form for Cloud wallet
How to Create an Wallet - Advanced
This example will create a Local wallet.
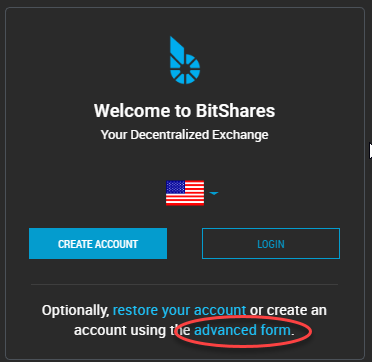
- 1.Click [advanced form]
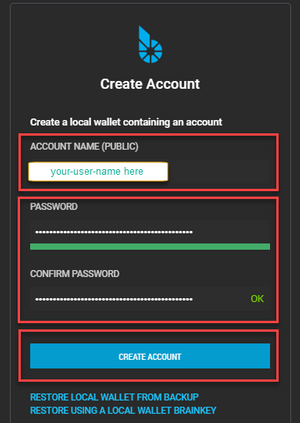
- 2.Type in [ACCOUNT NAME]. You can create your unique BitShares account name.
- 3.Set a password. Create own strong password.
- 4.Type or paste your password to confirm.
- 5.Click [CREATE ACCOUNT]
If this is yore first account, a faucet will pay the registration fee for you!
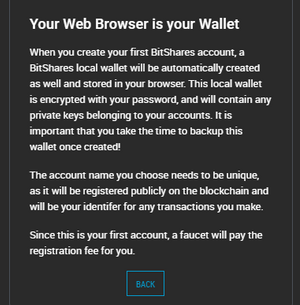
Your Web Browser is your Wallet: Please read the information below on the form.
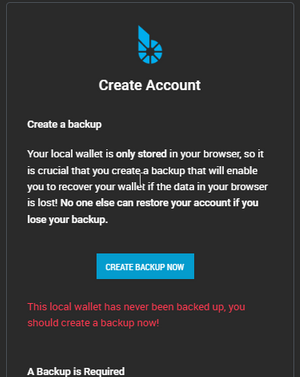
- Click [CREATE BACKUP NOW]
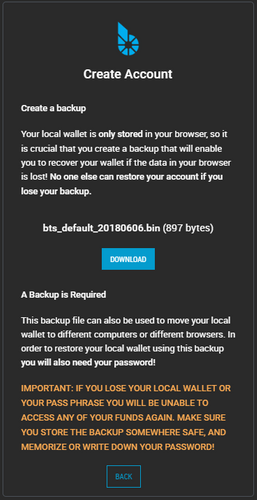
- Click [DOWNLOAD] to save a backup (.bin) file
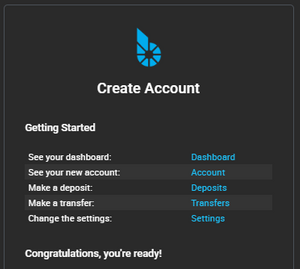
Congratulation, you’re ready!
Login Form for Local wallet
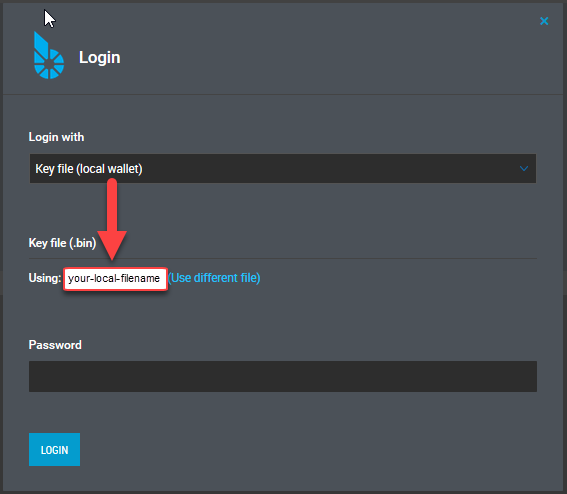
Source: How to create and manage Cloud wallet and/or Local wallet Accounts - GittHub
Thank you for @svk!
If you like, please share this information. No need to vote.
Thank you
You need to update the screen caps to stay current.
Downvoting a post can decrease pending rewards and make it less visible. Common reasons:
Submit
Hi @funkit, Thank you for letting me know. I took most screenshots a few days ago. May I ask which one you saw wrong?
p.s.
I found if I try the steps in different order, I get a different look form.
Downvoting a post can decrease pending rewards and make it less visible. Common reasons:
Submit
I have a suspicion you have a old version. This is how my local login looks like:
Latest reference client for Mac.
Downvoting a post can decrease pending rewards and make it less visible. Common reasons:
Submit
Congratulations @tsugimoto! You received a personal award!
You can view your badges on your Steem Board and compare to others on the Steem Ranking
Vote for @Steemitboard as a witness to get one more award and increased upvotes!
Downvoting a post can decrease pending rewards and make it less visible. Common reasons:
Submit