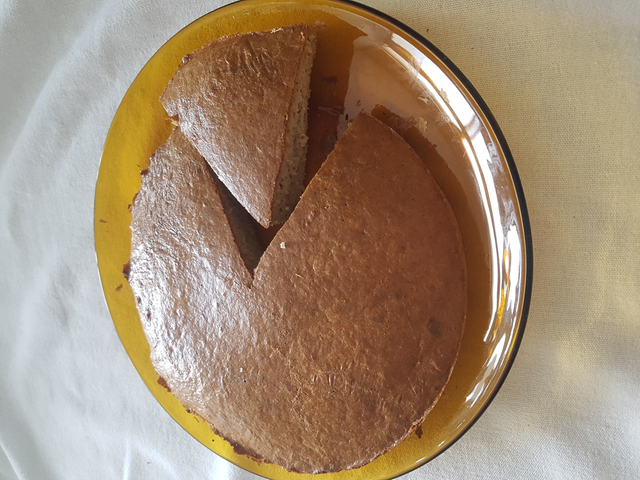
I've been hearing about how silicone molds are convenient because food doesn't stick to them. I had been wanting one for a while, to use with my air fryer and my electric pressure cooker (similar to Instant Pot), but I was having a hard time finding molds of the right size, which is 19cm (around 7.5 inches). Most molds I found were too big, and the few smaller ones were too small. After more than two months searching, I finally found one!
February 8th, 2020 was my second "Steemiversary" (yay, two years on Steemit already!). I had meant to make a cake to celebrate my first "Steemiversary" in 2019, but. right at that time of the year, I was going through a difficult moment in my personal life and wasn't in the mood to celebrate anything. Come 2020, thankfully those issues from last year are mostly resolved. And I happened to get my new silicone molds just in time for February 8th. So, I decided to test it with a gluten-free and low carb cake.
I got inspiration and ideas from some recipes, but ended up not following any recipe in particular. I just used ingredients that I had at home. I'm not sure if the result is good enough to become a recipe, but below is what I used:
- 3 eggs at room temperature (whites and yolks separated).
- For the fats, I used 1/2 tablespoon of butter + 3 tablespoons of homemade peanut butter that I had been wanting to use up.
- For sweetening, I used 2 tablespoons of erythritol + 2 sachets of a stevia-based powdered sweetener that we had lying around (my idea was to have the stevia cancel or at least reduce the erythritol's cooling effect. From the end result, it apparently reduced the effect).
- For the gluten-free (and also low carb) "flours," I used 2 tablespoons coconut flour, 2 tablespoons peanut meal, 3 tablespoons grated coconut, and added 1 tablespoon oat flour (that isn't low carb, but it's a small quantity) to help with texture and to help glue the other ingredients.
- 1 teaspoon baking powder (perhaps I should've added more).
I beat the egg whites with a whisk in a bowl (I don't have a stand mixer), the other ingredients (except baking powder) in another bowl with a hand mixer, then mixed everything, added the baking powder, poured the batter into the silicone mold inside the air fryer preheated to 180°c (around 360°f), and baked for 30 minutes at the same temperature.
Honestly, as I poured the batter into the air fryer, I even doubted it would actually turn into a cake. In the end, it did. Not exactly the way I had imagined it, but it did. I just wished it'd have risen more. The end result was a round and rather flat cake looking like an UFO.

Image source: own picture, taken with my cellphone.
The silicone mold really worked as it should, and the cake came off easily. The cake's outer part was a bit harder than I had expected, and at first, I worried that the cake may have gotten hard and "rubbery." But as I sliced it, the knife went in easily and the cake proved to be quite soft inside, much to my surprise. It also proved to be held together quite well, unlike the previous low carb cake that I had made which became crumbly and hard to remove from a normal mold.
The taste was quite nice too, though I couldn't feel the peanut butter or the normal butter. The cake yielded around 8 slices. To those worried about counting carbohydrates, the whole recipe has around 12.6g net carbs (the carbs minus the fibers), meaning each slice has around 1.5g net carbs.
My biggest disappointment was how flat the cake came out. The batter only doubled in size and didn't rise much, and barely reached half of the mold's height. Though from what I've read, this seems to be normal for cakes with no gluten, and even more so for low carb cakes because also no starches and no sugar, which are important to help traditional cakes rise. From what I've noticed in recipes, the way to make low carb cakes rise more is to add lots of egg whites (from 4 and up), but I wanted to see what three eggs could do. I still haven't gotten the hang of separating the whites from the yolks and beating the whites into peaks, so maybe they could actually have done a bit better... and some more baking powder may have also helped.
All in all, the cake came out okay. Not really fit for a very special event celebration, but good enough to enjoy with some afternoon coffee or tea. At least there was a cake for this "Steemiversary. (better than last year when there was nothing). It was a nice little experiment, though!
Congratulations @aiyumi! You have completed the following achievement on the Steem blockchain and have been rewarded with new badge(s) :
You can view your badges on your Steem Board and compare to others on the Steem Ranking
If you no longer want to receive notifications, reply to this comment with the word
STOPDownvoting a post can decrease pending rewards and make it less visible. Common reasons:
Submit