Windows 10 is the latest operating system release under Microsoft’s banner! As per the reports, Windows 10 has managed to garner a lot of popularity within a few years of its launch. Thanks to the outstanding interface and security features! The initiatives are being taken each day to protect saved data and prevent malicious attacks. Creating a complete backup of Windows 10 System data is one such measure to prevent data loss. The entire process of creating a backup of Windows 10 System on your computer involves copying the complete operating system, related files, and system-specific data. You can create a complete backup of Windows 10 System in 2 simple ways mentioned below.

Way 1: Create System Image Using Windows Backup and Restore Feature
Windows 10 comes with a default built-in feature that’ll help you to create complete system backup on any external media storage device like a flash drive, an external hard disk, DVDs or any other network location. Besides, it is also possible to create a backup of Windows 10 system data by using the system image.
So, our first method of creating a complete backup of Windows 10 System data is by creating a system image using Windows Backup and Restore feature. The steps are as follows:
Step 1: The first step involves navigating to the Control Panel and selecting the Backup and Restore option. This feature works similarly in Windows 10 as it works for Windows 7.
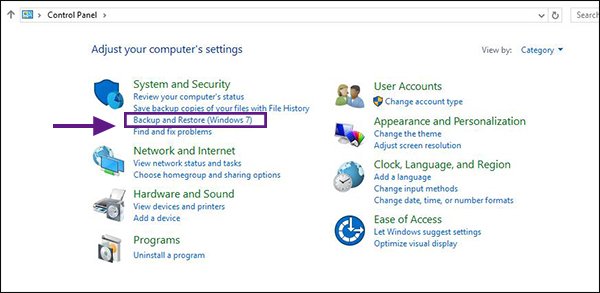
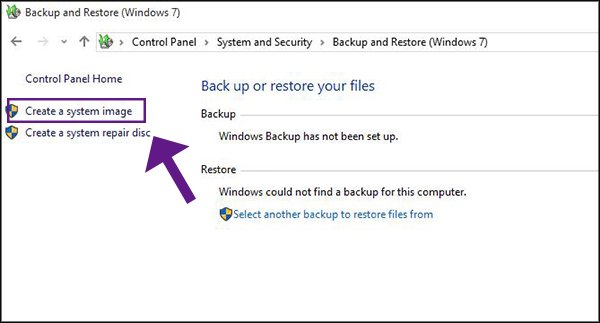
Step 2: Once you’ve selected the Backup and Restore option, you’ll come across Create a system image option listed in the left menu. Click on it to move ahead.
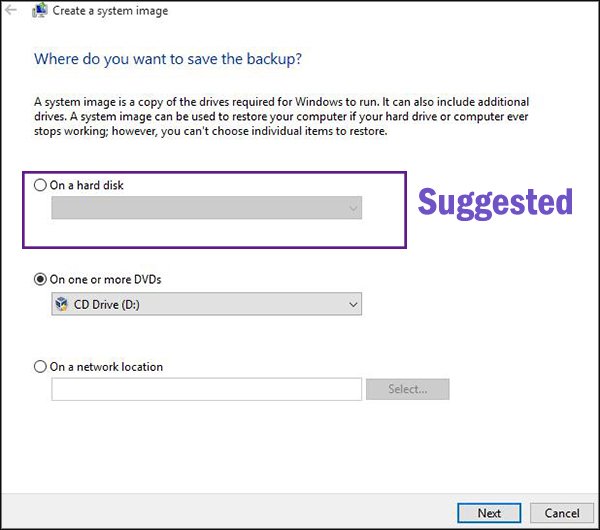
Step 3: The next step is to choose a destination where you want to save the system backup file. Once you have selected the destination, click on Next. We’ll suggest you save the backup file on an external device as this provides you with additional data security if the system gets corrupted.
Step 4: Now the next step is to go through the backup settings and confirming them. After checking the backup settings, all you have to do is click on Start Backup. Once it is done, Windows will automatically start to create the required system image file.
Way 2: Using CloneGo to Make an Entire Backup of Windows 10 System Partition
The second method of creating a complete backup of Windows 10 System data is by using CloneGo software. iSunshare CloneGo is your “go-to escape” for this method. CloneGo is professional software that helps to create Windows 10 system backup. Besides, this software is also used to do partition as well as volume backups. This software is easy to use so that it is worth trying. Thus, you can easily make a complete backup of Windows 10 system with few clicks.
All you have to do is sit patiently, grab a cup of coffee and follow the steps listed below:
Step 1: Open CloneGo and opt for the Backup option.
Step 2: The next window displays the occupied volume information and the number of hard drives in the computer. All you have to do is to look for the system partition that is accompanied by the Windows logo to backup.
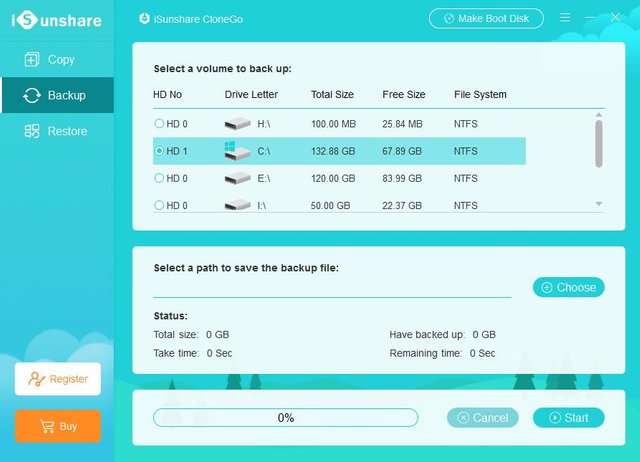
Step 3: Now, the third step is to choose a path for saving the backup file. I’ll suggest you save the entire backup file in another external hard drive. Therefore, it becomes necessary for the user to attach an external hard drive to the computer for creating a backup.
c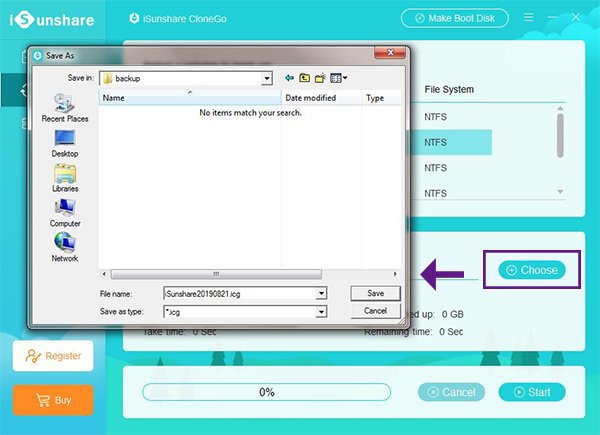
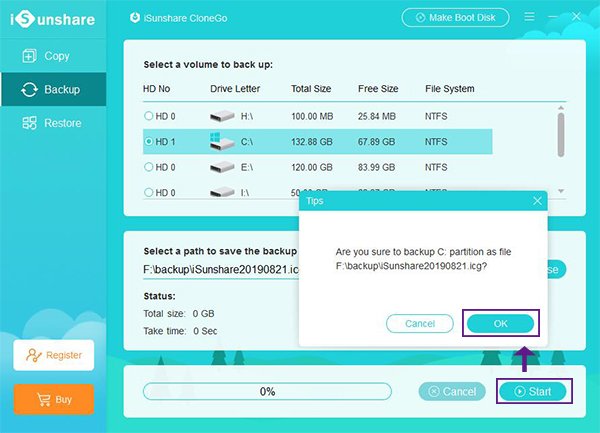
Step 4: The final step is to click on the Start button and select agree for the current process by clicking on the OK option. Now, all you have to do is to wait for the entire backup process to complete.
When it comes to restoring the saved system backup file on any Windows computer, follow the simple steps listed below:
- Attach the external hard disk.
- Open the CloneGo software.
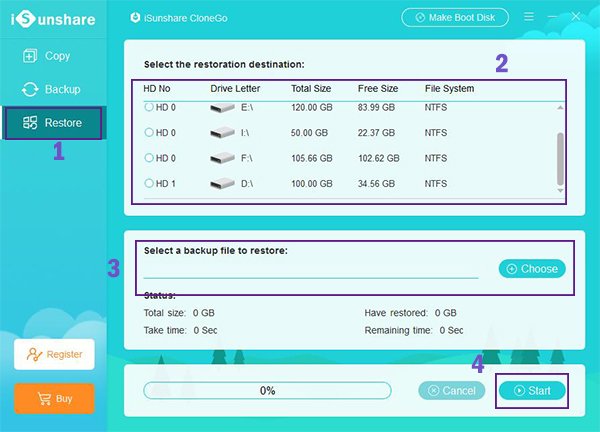
- Choose the destination point for restoring the data.
- Select the backup file you wish to restore by clicking the choose option.
- The final step is to click on the Start button>OK option. The restoration of the opted backup file will begin. To witness the changes made, all you have to do is to restart your system after the restoration process is completed.
So in the above discussed two ways, you can create a complete backup of Windows 10 System data. By this time you must have realized that it is very simple. Hope you can make it done easily as I did!