Introduction
In 'Part 1' we covered changing the root password, changing the default SSH port and enabling key-based SSH authentication.
If you haven't already done these things, you should go back and work through 'Part 1' first before moving on to this section.
Step 4 - Turn Off Password-based SSH Logins - 'Brick Up The Old Front Door'
There's no point in having enabled key-based SSH logins if an attacker can still attempt password-based logins. At this point in this guide, both systems are currently enabled on your VPS. So, let's turn off password-based SSH logins.
SSH into your VPS (if you haven't already) and use nano to open the SSH configuration file (just like we did when changing the default port above):
nano /etc/ssh/sshd_configFind the line:
#PasswordAuthentication yes
(it should be on the third page). Change it to read:
PasswordAuthentication no
Note the removal of the '#' character at the beginning of the line (a '#' means a line is a comment and should be ignored) as well as the change from 'yes' to 'no'.
Hit Ctrl-O to save the file and Ctrl-X to exit nano.
Now, restart SSH on the VPS:
service ssh restartFinally, check you can still log in via SSH (with a new SSH session - leave the existing login open in case you need to revert the changes above).
If you can, all is well. Now would be a good time to take a snapshot of your VPS if your provider makes that capability available to you.
The steps in the rest of the guide can, if carried out incorrectly, deny you the ability to access your VPS - being able to restore a snapshot to regain access without losing all of the work above might be convenient.
Don't forget that your provider probably has a shell available on their web-based control panel that you can use instead of SSH in an emergency (such as locking yourself out with a badly configured firewall).
Step 5 - Install A Firewall - 'Brick Up The Windows And Add CCTV Cameras'
Unless your VPS provider supplied you with a firewall (most don't) your VPS is sat out naked on the Internet, ports exposed to the world.
An (automated) attacker can drive by your VPS and check to see which ports are open, and what services you're running, with a view to exploiting any known vulnerabilities in those services. Like a burglar peering in through your windows and giving them a little tug to see if they're locked.
Let's get a firewall installed and brick up those windows - our aim here is to achieve as close to 'silent running' as we can manage.
That is, want to a) reduce the probability of the VPS being detected b) reduce the available attack surface to the absolute minimum when/if it is detected.
We're going to use 'ConfigServer Security & Firewall' (csf). It not only provides an easy interface to the 'iptables' system in Linux (which has a pretty steep learning curve but is very capable) it also comes with a Login Failure Daemon (lfd) to watch out for, and block, the originators of multiple failed login attempts.
Make sure you check the software licensing terms on their site above before continuing to installing the software below (it's free) and that you agree with those terms.
SSH into your VPS as root and make sure you're back in your home directory:
cd ~or
cd /root/and then type the following to download csf:
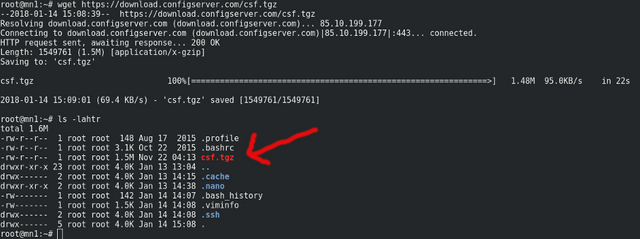
wget https://download.configserver.com/csf.tgzYou can do:
ls -lahtrafterwards to make sure the file is there as per:

Now, decompress the file (it's a gzip'd tar archive) with:
tar xzf csf.tgzIf you do another:
ls -lahtrYou'll see a new directory called 'csf'.
Let's get into that directory:
cd csfNow do:
lsand you'll see lots and lots of files. Of note are 'readme.txt' which describes in detail how 'csf' and 'lfd' work and 'install.txt' which describes how to install it.
Firstly, let's get some standard perl libraries installed which csf may make use of. On Ubuntu, use:
apt-get install libwww-perlOr on CentOS, it's:
yum install libwww-perlAnd also some other prerequisites:
apt-get install e2fsprogsor
yum install e2fsprogsNow, using 'install.txt' for guidance, let's go ahead and get csf installed by typing:
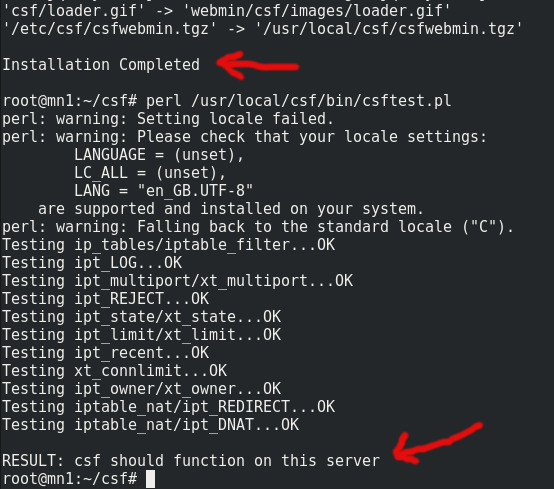
sh install.shA lot of information will scroll past really quickly, and should end with 'Installation Completed'.
Now we check if all the required iptables modules are installed:
perl /usr/local/csf/bin/csftest.plWe're looking for 'RESULT: csf should function on this server' as per:

If you don't get those results, consult the csf documentation for guidance.
Having completed these steps, csf is now running, but in 'TESTING' mode only. That is, it's not actually doing anything (or rather, it'll stop doing being useful after 5 minutes in case you lock yourself out).
Before we turn it on for real, let's tweak the configuration file. You can open this in nano with:
nano /etc/csf/csf.confHead on down to the lines that read:
# Allow incoming TCP ports
TCP_IN = "20,21,22,25,53,80,110,143,443,465,587,993,995,9707"
It should be about 138 lines down (you can use 'Pg Dn' on your keyboard to move more quickly through the config file).
This line controls which ports are open to incoming connections from the outside world.
Note that csf has been smart enough to append your new, non-standard, SSH port number to the end of this line already - 9707 - set in 'Step 2' above. At least, it should have. If it hasn't, add this now to the end of the list taking care to separate the values with commas and to end the line with a double-quote.
Most of the open port numbers above have no business being open on a masternode and are for services we're either not running, or don't want to be running.
Really, the only open ports we want are the one you're going to be SSH-ing in on, and the one your masternode uses for whichever cryptocurrency you're working with. So, for example, PIVX uses port 51470, meaning you'd be looking to change that line to:
TCP_IN = "9707,51470"
Slightly further down, we can also edit the line:
TCP_OUT = "20,21,22,25,53,80,110,113,443,587,993,995"
to:
TCP_OUT = "25,53,587,80,443,51470"
(meaning the VPS can now only make outgoing connections for four things - sending e-mail, doing DNS lookups, HTTP connections for downloading software updates, and outgoing masternode connections).
Change the line:
UDP_IN = "20,21,53"
to:
UDP_IN = ""
as there's likely nothing we need incoming UDP connections for.
Now, if your VPS comes with IPv6 support (which is increasingly likely) we also have to make sure csf is operational for that too.
If you don't know if IPv6 is enabled on your VPS, back on the commandline type:
ifconfigIf you can see any line beginning:
'inet6 addr:'
(note the '6') then IPv6 is probably enabled on your VPS and you need to adjust csf accordingly. If not, you can likely skip this next section.
Enabling csf for IPv6
Back in nano in /etc/csf/csf.conf find the line:
IPV6 = "0"
Change it to:
IPV6 = "1"
to enable IPv6 firewall support.
Now, find the line:
TCP6_IN = "20,21,22,25,53,80,110,143,443,465,587,993,995,9707"
and change it to match your equivalent 'TCP_IN' line above, for example:
TCP6_IN = "9707,51470"
Similarly, change:
TCP6_OUT = "20,21,22,25,53,80,110,113,443,587,993,995"
to:
TCP6_OUT = "25,53,587,80,443,51470"
And then find:
UDP6_IN = "20,21,53"
and change it to:
UDP6_IN = ""
All of this essentially duplicates the firewall configuration so that it's also active for IPv6 connections (as well as IPv4).
Enabling The Firewall
Finally, it's time to enable the firewall for real, so go back up to the top of the configuration file in nano and find the line that reads:
TESTING = "1"
Change it to:
TESTING = "0"
Hit Ctrl-O to save, and Ctrl-X to exit nano.
Now, back on the commandline let's reload the firewall with:
csf -rYou'll see many, many, lines scrolling past. It'll probably end with:

(you can ignore the warning unless you've got maliciously-minded third parties SSH-ing into your VPS on a regular basis - which you hopefully don't if you've been following this guide).
Lastly, without closing your existing SSH window, check that you can still SSH in by opening a new SSH connection to the VPS.
If you can, all is well and the firewall should be doing its job - on to Step 6! If you happen to speak iptables, you can verify the firewall is in place with:
iptables -L --verbose(which will list all active firewall rules).
Oops - Now You Can't SSH In!
If you can't log in, you've likely made a mistake somewhere in /etc/csf/csf.conf. Back on the SSH connection you left open (or using the emergency commandline on your VPS provider's control panel) open the csf configuration file with nano:
nano /etc/csf/csf.confand set:
TESTING = "1"
back to:
TESTING = "0"
Save the file (Ctrl-O) exit nano (Ctrl-X) and do:
csf -rto reload the firewall in 'testing' mode.
Now check if you can log in via SSH - it may take up to 5 minutes for the firewall to drop automatically, so be patient and keep retrying.
If eventually you can, that likely proves something is wrong with your csf config file and you need to fix it as per the instructions in this section (Tip: check 'TCP_IN' has your special SSH port listed).
Now that password based authentication is deactivated and there's a firewall running on your VPS, it's time for the next steps.
In Part 3 of this guide I'll cover installing software to detect rootkits and ensuring that your VPS can talk to you to tell you that something may need checking out.
Buy Me A Beer
If you find this guide at all useful, feel free to buy me a beer. Or part of a beer. Or a keg. Or two:-
LTC: LcorMkmmMpbVn2vBy5dUCGNDytnmHSW5vy
DOGE: D8PUDKoF7ZkHN43ELdRZZGNUv6iZ9xLScL
BCH: bitcoincash:qq2u2tcmwefpwh5lz5x9pndz30jathm93539m42dkj / 12z7QcbwYXirNj8EhzXHsuDMz6BjY9An6e