In this guide we'll use the Coinbase mobile app and the Gatehub desktop website to buy your Ripple XRP coins. We use the terms "Ripple" and "XRP" interchangeably.
At the time of writing, Ripple is on a pretty massive pullback from $3.64 to $2.50 2.45. If you believe like I do that Ripple will someday hit $10 per token, now is a great time to buy Ripple. This cryptocurrency tutorial will show you how.
Four weeks ago I bought 1300 Ripple for my girlfriend's Dad at a price of just under $0.77 per coin.
I dumped $1000 into the Ripple, resulting in 1300 coins, and then held onto it for him.
When I transferred the Ripple to him the night before Christmas, it was worth about $1.00 per coin.
Now aside from [insert your epic example of BF winning over GF dad here] I can think of no better way to win over your future father in law that delivering him tokens with profit. I even bought some physical Ripple coins on Amazon for added effect, but that's not what we're doing here.
If you'd like to replicate this process yourself, and buy Ripple tokens at affordable exchange rates, then follow the process I used in this article.
Note the "optimizing your ripple tips" below each Step to get the most possible Ripple for your dollars.
Step 1: Buy Bitcoin
The first step to owning Ripple is to simply buy some Bitcoin. We need to have Bitcoin because all the exchanges where Ripple is available are either crypto only exchanges or have large delays on bank account approvals.
Fortunately, there's Coinbase.
You can also buy Bitcoin on GDAX, which as Emily's Coins points out has lower transaction fees. I personally didn't know about GDAX when I first bought Bitcoin / Ripple, and it's slightly more confusing without the sleek app feel, so I don't mind paying 1.49% fees at Coinbase.
I know what you're thinking. Bitcoin is too expensive. Take comfort in the fact that this single sentiment (it's too expensive) keeps many people from buying any Crypto, and creates an early entry scenario for you so that you can take advantage of lower prices. And, at least buying Bitcoin is now instant on Coinbase if you've completed the basic verification.
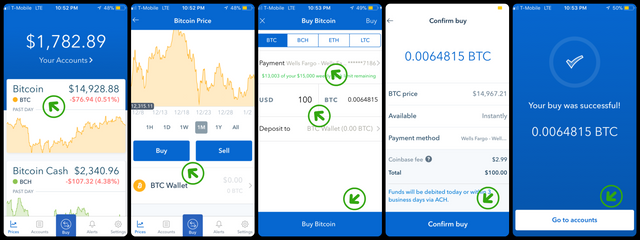
How to buy Bitcoin on Coinbase:
Before you buy, you'll need to download Coinbase on the App Store or Google Play store and link a bank or savings account (don't do credit card, fees are too high).
In this scenario we will actually buy $100 worth of Bitcoin then convert it to Ripple.
- On your mobile app homescreen, click on the word Bitcoin.
- Click Buy.
- For Payment choose your Bank Account. Enter a USD amount. Click Buy Bitcoin.
- Click Confirm buy.
- Congratulations! Your buy was successful! You can click Go to accounts to see your purchase details.
Also, if you buy Bitcoin low and the price of Bitcoin increases, you'll get more Ripple for your initial dollar investment than you would have if you just simply went to buy Ripple for USD or another fiat currency, which far as I know, we cannot do currently.
So to complete Step 1, simply signup for a free Coinbase account, then link your bank account (not credit card), and purchase any desired amount of Bitcoin ideally at a low price.
That part is easy. The next parts aren't bad either.
Optimizing Your Ripple Tips: Follow Emily's coins advice in this article. Her process is to fund Coinbase with your bank account, then visit GDAX to move these funds from Coinbase to GDAX, then buy Bitcoin on GDAX and send it from GDAX. Using our $100 example, doing it this way instead can save you up to at least a few $$, which means more money to buy Ripple with. I don't use this method because I'd rather not wait the unknown amount of days for funds to arrive in my Coinbase account. Coinbase is about convenience, as Emily's coin's points out.
Step 2: Open a Gatehub.net account
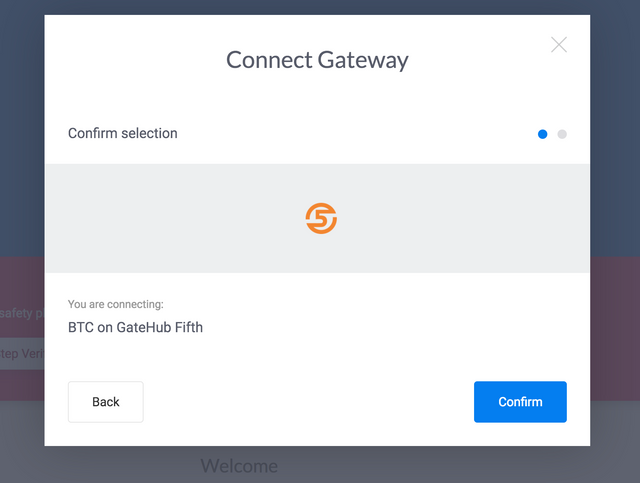
It's easy to setup Gatehub if you'd rather just visit Gatehub and do it on your own. But if you need help, there are complete screenshot instructions here. We'll get rid of the green arrows for now.
Gatehub.net is the third most recommended Ripple market exchange and one of the easiest for a beginner (like myself not long ago) to figure out. It also helps that they are still allowing new sign ups.
I've used sites like Binance too, which just closed their doors to new users sadly, but started buying Ripple on Gatehub.
Setting up a free account at Gatehub is easy. Here's how to do it:
Visit Gatehub.net and click Sign Up.
The next steps are shown here. Recovery key step not shown (but do make sure to Download yours). Just keep in mind that after you enter your email and password, you'll have to activate your account and confirm your device from your inbox. You have to visit your inbox twice, but it's for your own security.

Go ahead and complete all the super basic steps above.
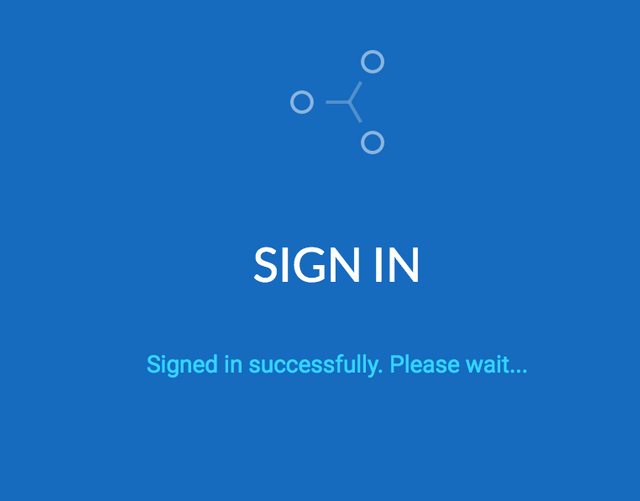
Now you can sign in successfully...feels good.
And you'll see this Gatehub welcome screen. Click Individual or choose another option.
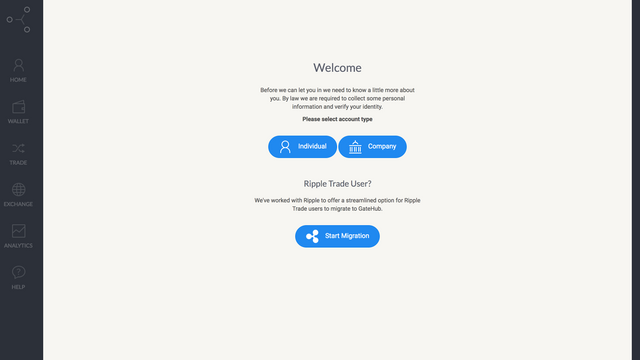
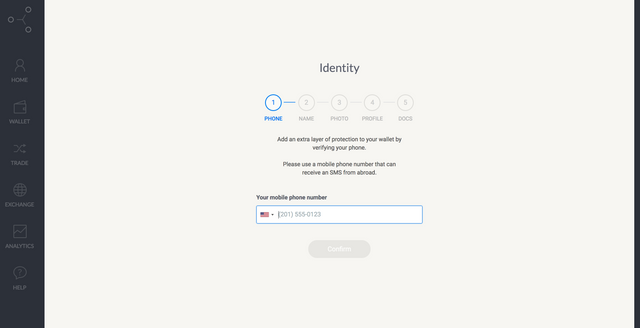
Once you click Individual you'll be taken to the Identity screen. You'll need to at least verify your phone number here. However, some people report the Mobile Phone Number verification doesn't send to their phones. If so, call your phone provider and make sure you can accept international texts (Gatehub is located in London) then try to verify again. You will most likely have to verify your phone number, and it helps with security, so get this step done.
Just enter your phone number and click Confirm.
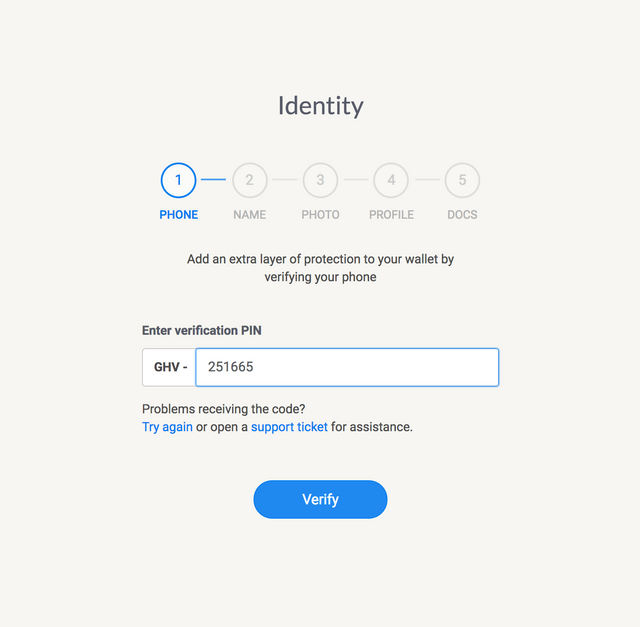
Next enter in the code Gatehub will send you via text message, and click Verify.
You can skip the nickname part, and head to your Wallet. Click Wallet on the left.
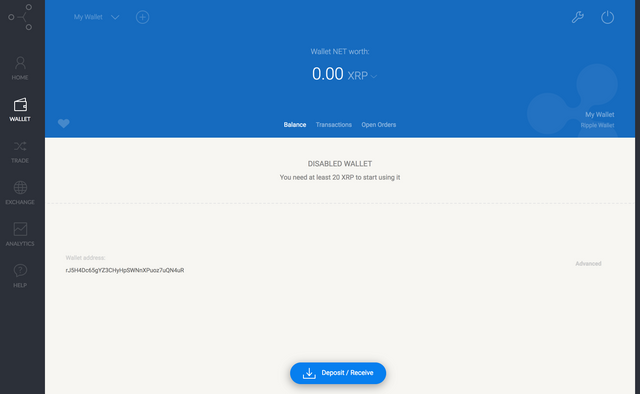
You'll see this:
Wonderful.
You now have a Gatehub wallet. You'll see that Wallet address front and center, which you can now send Ripple to! Woohoo!
However, you probably don't have any Ripple yet to send...
Good thing we have Bitcoin to send! Once we do that, you can buy Ripple with Bitcoin - aka exchange Bitcoin for Ripple - at Gatehub.
Please note that the Disabled Wallet notice confuses everyone. What is means is that you need to make a deposit to start using your wallet. Once you deposit Bitcoin to Gatehub they will activate your wallet. It's unclear if Gatehub gives you the 20 necessary Ripple or takes that Ripple from your initial BTC deposit. Not a huge deal. You'll also need to watch your email inbox in case they need to you add a BTC trustline, which we'll cover below.
Optimizing Your Ripple Tips: The sooner you open a Gatehub account the better. If they follow the path of Bittrex they may close shop to new users.
Step 3: Send Bitcoin to Gatehub
Almost ready to buy Ripple now!
First, we need to send the Bitcoin we bought on Coinbase to Gatehub.
(You can't buy Bitcoin on Gatehub straight away, because you likely won't be able to link a bank account at Gatehub to get USD).
Sending Bitcoin to Gatehub can be a bit nerve racking because you don't want to send your precious BTC off into cyberspace.
But don't worry, I've sent more BTC than I can remember to all sorts of wallets, and as long as you get your address correct it always arrives.
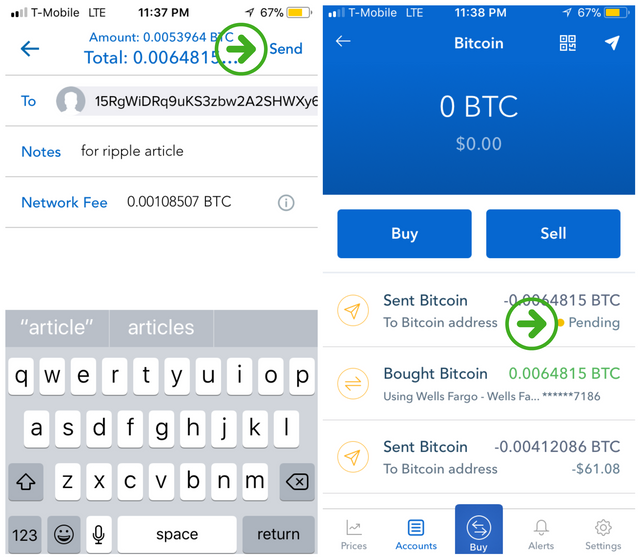
We'll go back to using green arrows to be sure we get this right :)
How to send Bitcoin to Gatehub:
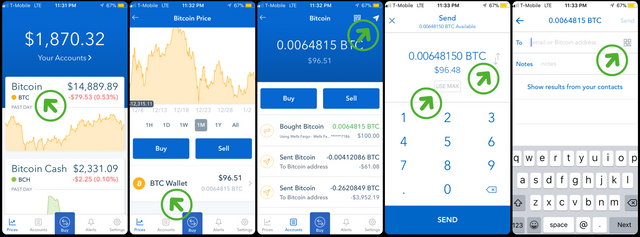
- Open up your Coinbase app (or desktop either way), and click Bitcoin.
- Then scroll down and click BTC Wallet.
- You'll see your BTC balance, and in the upper right, a little paper airplane arrow. Click that.
- Now select how much BTC or USD you want to send. Use the up/down arrow to change currency. Click USE MAX to send it all. Next, click SEND.
- Now it's time to enter in your address, or if you're lazy like me, you can just scan the QR code. I don't know why but I love these QR codes. Click on the QR code icon in your Coinbase wallet and it will open up your camera. You can close the camera for a second.
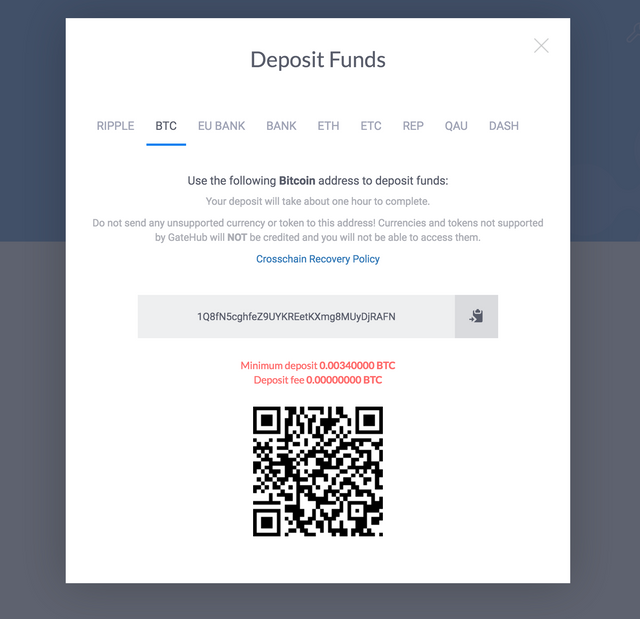
Now it's time to locate your BTC address at Gatehub.
Log back into Gatehub if you need to, then click on Deposit / Receive, then click BTC.
Now enter your password to get to this screen. Click Confirm.
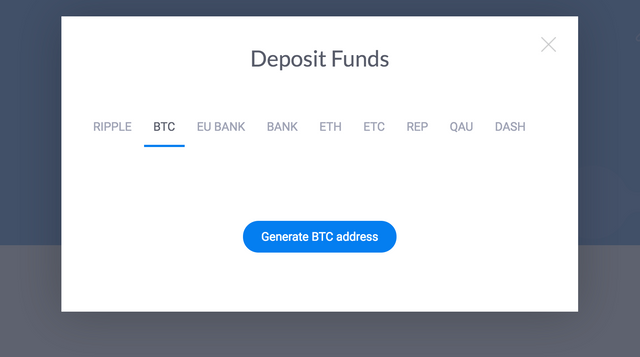
Next, click Generate BTC address.
And voila! Your Gatehub BTC address is ready to send to.
Okay, now we need to enter this BTC address in at Coinbase in your mobile (or desktop if you'd rather) app.
Using this image explanation from above, far right screen, and click on the QR-code button:
Once you click on the QR code button (again, far right screen in the image above) it will open your phone's camera.
Simply point your camera at the Gatehub BTC address, and your phone will gather and enter your BTC address properly.
Alternatively, you could manually enter your BTC address into your phone.
With your address entered, I like double checking the starting and ending numerals to make sure everything looks correct.
Now, enter a Notes if you'd like, then click Send.
In Coinbase, you can view the status of your Sent Bitcoin.
You'll need to wait 3-24 hours for that bitcoin to arrive at Gatehub. In my personal experience, it arrives in about 8 hours.
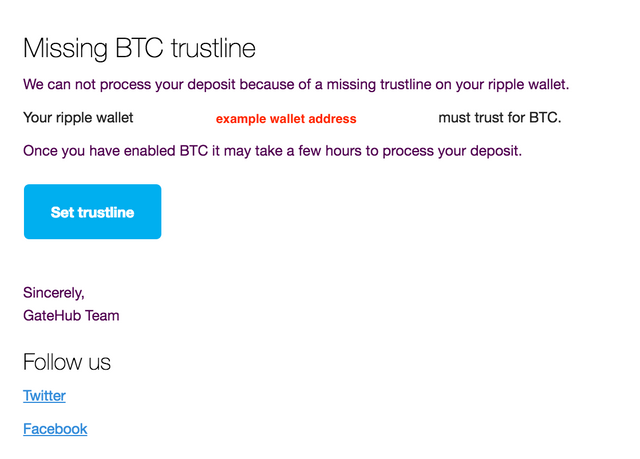
In that time, check your inbox for a message from Gatehub subject: missing deposit currency trustline.
Just click Set trustline in the email, follow any additional directions which should be clear, and Gatehub will proceed to deposit your BTC.
Optimizing Your Ripple Tips: If your BTC goes up in value as/while/after you send it, you'll get more Ripple for it. This beats hypothetically buying Ripple for USD, as the value of USD is much less likely to increase like BTC's value does.
Step 4: Buy Ripple on Gatehub
Okay almost done now.
Once your BTC arrives at Gatehub you'll see it on the Home screen.
(Slightly annoying how Coinbase took out .001 BTC for sending it).
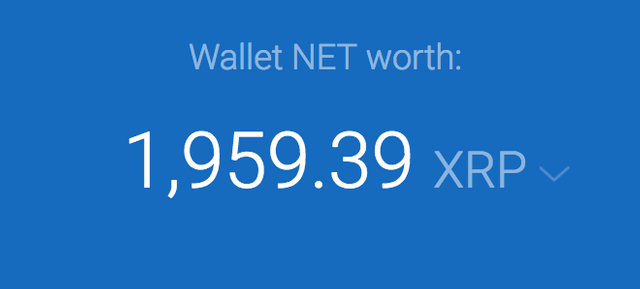
Your Gatehub account will also show a Ripple balance at the top in Wallet net worth - this is the value of your BTC in XRP.
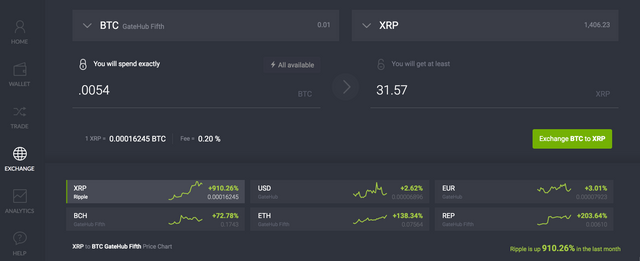
You can now (finally) click Exchange.
From the left drop down menu select BTC. From the right drop down menu select XRP.
Type in the exact amount of BTC you'd like to use, and it will output how much XRP you'll get.
Now, just enter your password to Unlock the wallet, and click Exchange BTC to XRP.
Gatehub will think for a minute, then Confirm your purchase.
And, low and behold, you now finally have some Ripple to your name. Great job.
After a few times...
What I've done is repeated this process, sending over BTC and converting to XRP to stockpile a decent amount of XRP at the lowest prices I can get. Please do consider sending the BTC from GDAX in the future too if the fees are getting on your nerves.
For now, you should probably be in HODL mode (hold on for your damn life mode), because the value of Ripple is skyrocketing expected to increase.
With the above knowledge down, you can buy more Ripple, or exchange Ripple for other tokens or coins, and hopefully watch your Enjoy your new crpyto!
Optimizing Your Ripple Tips: You want to trade Ripple for Bitcoin at a price ratio which is advantageous to you. To determine the best price ratio, click on the Trade tab and get familiar with observing the exchanges rates of XRP to BTC as well as trade volumes happening at the moment.
Thanks so much for reading. Have you had any experience buying Ripple? Do you have a better / faster / more convenient way to get Ripple using different crypto or fiat than the steps above? Drop us a comment or piece of advice to help improve everyone's experience in this ever changing Bitcoin wild wild west!
Further reading on the subject:
Another user's take on the best places to get Ripple:
http://www.thetruthaboutdigitalmoney.com/open-a-gatehub-account-and-receive-20-ripple-xrp.html
How to buy Ripple using Eur (Euros):
https://ripple.com/xrp/how-to-buy-xrp-on-gatehub/
Gatehub's (seriously lacking, hence me writing all this) article on how to make your first deposit:
https://support.gatehub.net/hc/en-us/articles/115004442854-First-deposit-and-wallet-activation
More stories and adventures on buying, selling and hodling Ripple:
http://rippleblogger.com


Congratulations @leeroyjenkins! You have received a personal award!
Click on the badge to view your Board of Honor.
Do not miss the last post from @steemitboard:
Downvoting a post can decrease pending rewards and make it less visible. Common reasons:
Submit
Congratulations @leeroyjenkins! You received a personal award!
You can view your badges on your Steem Board and compare to others on the Steem Ranking
Do not miss the last post from @steemitboard:
Vote for @Steemitboard as a witness to get one more award and increased upvotes!
Downvoting a post can decrease pending rewards and make it less visible. Common reasons:
Submit