I decided to put this guide together after noticing quite a few people having trouble getting the job sorted.
This guide will be very beneficial to persons setting up multiple Cryptocurrency Masternodes on a single instance.
More on which Cryptocurrences support Masternodes, or Proof of Stake (POS) can be found here:
In this guide I will cover how to add a secondary IP, but may go over adding more IP addresses in the future.
This guide assumes that you have an AWS instance up and running.
Disclaimer: You must take care when setting the IP addresses on your instance, since incorrect settings may render your instance unreachable. Take your time and triple check.
Amazon Console
1 > Open the Amazon EC2 console at https://console.aws.amazon.com/ec2/.
2 > In the navigation pane, choose Network Interfaces, and then select the network interface attached to the instance.
3 > Choose Actions, Manage IP Addresses.
4 > Under IPv4 Addresses, choose Assign new IP.
5 > Choose Yes, Update.
6 > Take note of your newly added IP, you will need this for step 99
Windows Instance
7 > Connect to your Amazon instance.
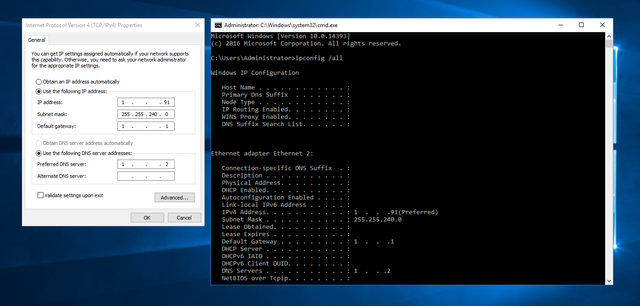
8 > At a Command Prompt window, run the following command:
ipconfig /all
From this Command Prompt window you will need the following information:
- IPv4 Address
- Subnet Mask
- Default Gateway
- DNS Servers
9 > Leave this window open and click the Start button (or what used to be the Start button) paste the following and hit Enter.
%SystemRoot%\system32\control.exe ncpa.cpl
10 > Right click on your network interface and click Properties.
11 > Click Internet Protocol Version 4 (TCP/IPv4) (the text, not the checkbox) and click Properties .
12 > Choose Use the following IP address, and CAREFULLY enter the values you obtained from step 7, and then choose OK twice. Do not worry if you only had one DNS Server listed, your instance will work fine with just one.
You will lose connectivity to your instance for a few seconds but it will reconnect shortly after.

13 > Once again, right click on your network interface and click Properties.
14 > Click Internet Protocol Version 4 (TCP/IPv4) and click Properties .
15 > Click Advanced…
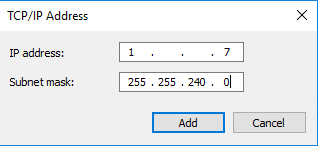
16 > Choose Add.
17 > In the TCP/IP Address dialog box, type the secondary private IP address for IP address. For Subnet mask, type the same subnet mask that you entered for the primary private IP address in 12.

18 > Click OK, OK and Close.
AWS Console
19 > In the navigation pane, choose Elastic IPs.
20 > Click Allocate new Address.
21 > Click Allocate.
22 > You should be provided with a new Elastic IP. Click Close.
23 > Right click your new IP and chose Associate Address.
24 > Leave Resource type as Instance.
25 > Select your instance from the Instance drop down menu.
26 > Select your secondary IP from the Private IP drop down menu.
27 > Click Associate and Close.
Testing the new IP from your PC
28 > Copy your new public IP to clipboard, click Start type Remote Desktop and hit Enter.
29 > Paste you elastic IP and hit enter.
30 > You should be prompted with a Windows Security screen.

If so, congratulations, you successfully just set up your secondary public IP address.
Thanks for this useful guide.
Downvoting a post can decrease pending rewards and make it less visible. Common reasons:
Submit
You're welcome!
Downvoting a post can decrease pending rewards and make it less visible. Common reasons:
Submit
Thanks for putting the time in to do this. Really good tutorial thanks.
Downvoting a post can decrease pending rewards and make it less visible. Common reasons:
Submit
Thanks for the comments and you're welcome!
Downvoting a post can decrease pending rewards and make it less visible. Common reasons:
Submit