Github : https://github.com/omegacoinnetwork/omegacoin/
This guide has been built thanks to Omega developpers and mn-user
1st step : Requirements
In order to setup an Omega masternode , you’ll have to get :
- 1000 OMEGA coins (https://www.southxchange.com/Market/Book/OMEGA/BTC https://wallet.crypto-bridge.org/market/BRIDGE.OMEGA_BRIDGE.BTC https://crex24.com/exchange/OMEGA-BTC)
- An Ubuntu 16.04 VPS ( OVH , VULTR … (https://www.vultr.com/?ref=7343218)
- A fully-synced wallet installed on your computer (https://github.com/omegacoinnetwork/omegacoin/releases)
2nd step : Coins transfer
- Once you get all the requirement , send EXACTLY 1000 OMEGA to an adress of your wallet ( Some exchange such as crypto-bridge are not very accurate so send all your coins to an another adress on your wallet and then you’ll transfer exactly 1000 from this adress to another ) I suggest to label this adress with a clear name such as MN1.
- Now we are going to gather informations about your masternode. Open tools -> Debug console and type “masternode outputs” , it should generate something like this “XXXXXXXXXXXXXXXXXXXX”:”1" the adress is the TxID of the transaction of the 1000 OMEGA , write it down somewhere
- Now type in this console “masternode genkey” , it will generate the private key of your masternode , write if down somewehere safe
3rd step : VPS setup ( thanks to mn-user)
Now , you’ll have to connect to your VPS through Putty ( for example).
Copy and paste each of these line one by one , it is the tricky part cause it involves linux manipulations , please be carefull and don’t hesitate to ask to the community on Discord if you encounters issues ! Each quote is one line to past. Don’t forget that on linux , Paste = Right click ! It’s not Ctrl+V.
Omega
wget https://raw.githubusercontent.com/XeZZoR/scripts/master/Omega/omega_setup.sh
chmod 755 omega_setup.sh
./omega_setup.sh
During this step , you’ll have to paste your VPS IP and our masternode privkey when asked
Sentinel
sudo apt-get -y install python-virtualenv virtualenv
git clone https://github.com/omegacoinnetwork/sentinel.git && cd sentinel
virtualenv ./venv
./venv/bin/pip install -r requirements.txt
crontab -e
This line will open a Linux editor , pick Nano , and add this at the last line (below the # ) , you can navigate in Nano with the arrows of your keyboard :
* * * * * cd /root/sentinel && ./venv/bin/python bin/sentinel.py >/dev/null 2>&1
Then hit Ctrl+x , Y and Enter to save
nano ~/sentinel/sentinel.conf
change /home/username/ to /root/ and save, Ctrl+x, Y and enter.
If you did the setup of your VPS with a different username from “root” adapt the path !
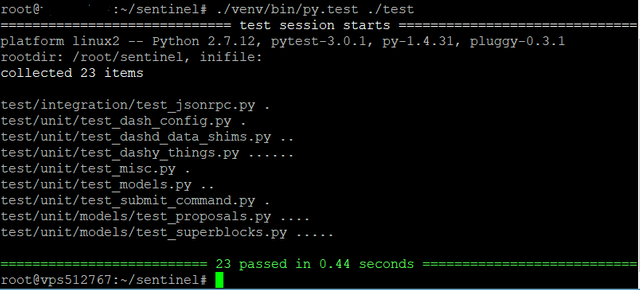
./venv/bin/py.test ./test
If error appears, we’ll have to change IP , if not , you’re done for VPS :)
DO THIS IF ERROR APPEAR :
nano test/unit/test_dash_config.py
Change 19998 to 17778 and save, Ctrl+x, Y and enter. Run again ./venv/bin/py.test ./test and if no error appears , you’re done !
It should look like this :
( )
)
4th Step : Wallet configuration
- Open tools -> open wallet configuration file and then a .txt file should appear
- Paste this :
rpcuser=<EXAMPLE>
rpcpassword=<EXAMPLE>
rpcport=7778
rpcallowip=127.0.0.1
daemon=1
server=1
listenonion=0
addnode=142.208.127.121
addnode=154.208.127.121
addnode=142.208.122.127
listen=1
staking=0
port=7777
externalip=<VPS_IP>
masternode=1
masternodeaddr=<VPS_IP>:7777
masternodeprivkey=<privatekey>
Change rpcuser , rpcpassword , externalip , masternodeadrr and masternodeprivatekey by your own values
NOTE : externalip is for eventual problem with VULTR
- Now go to tool-> open masternode config file. Erase everything and write this : <label> <VPS:IP>:7777 <MNprivatekey> <TxID> 1
( )
)
label=The name you gave to the adress which sotre the 1K coins
vps IP=the ipv4 of your VPS
Mnprivatekey=itself
TxId=The transaction id of your 1k coins
Save and close your file !
- Open settings->options->wallet->and enable “display masternode tab”
- Now you can restart your wallet , then go to the masternode tab and you should see your MN with status “DIABLED”. Click on it and then hit “Start-Alias”
- The masternode should now be in “PRE-ENABLED” or “WATCHDOG-EXPIRED”. In each case , It should go ENABLED shortly :)
- If your MN is Enabled on Masternode.online , DO NOT restart it , it’s working properly and the rewards are coming !
- If the WATCHDOG_EXPIRED last for more than 2 hours , try to start your MN again by clicking on “Start alias”
- The first reward should be here in 36h , all the other should be each 8h.
- When you turn your computer off , your Masternode may turn on NEW_START_REQUIRED ; DO NOT restart it ! You’ll be last in queue , it should go back to ENABLED after 1 hour.
Setup several Masternodes
If you want to setup another MN on your wallet , I advice you to take another VPS. Create a new adress , send 1000 coins on it , and then follow the same steps for the VPS configuration , the wallet.conf doesn’t have to change ( it’s weird I know but it works.) You’ll only have to add another line on masternode.conf with the new settings of your MN.
Last advices :
- Don’t forget to encrypt your local wallet to secure your coins ! (Settings->Encrypt the wallet)
- Always keep a backup of your wallet.dat ( this file can be found in your omegacore folder )
- If you don’t know how to access to your omegacore folder , try this on windows : Execute -> %appdata% and then you’ll be able to browse to your folder
Congratulations ! Your Masternode is ready ! Now just confortably wait for the profit to income :)
Make sure you followed all the steps and double check all informations , and if you still have problems contact woznial (from omega team) on discord : https://discord.gg/njJruDc.
Donations appreciated :)
OMEGA : oM1zVKccqng9d3h8dZdf6B38rUQ6sTeX1J
Hi! I am a robot. I just upvoted you! I found similar content that readers might be interested in:
https://medium.com/@lucaslareginie/how-to-setup-an-omega-masternode-with-linux-vps-75f64f0aa969
Downvoting a post can decrease pending rewards and make it less visible. Common reasons:
Submit