In this article, you will learn how to integrate your root domain into systeme.io.
You will need:
a domain registered outside of systeme.io
a systeme.io account
Note 1: A domain name can only be used for one website. If the root domain name you intend to integrate to systeme.io is already assigned to an external website, this one will no longer be available once it is added to systeme.io.
Note 2: These guides are intended to connect your root domain (example: www.domain.com) with systeme.io. If you want to use a subdomain instead, please click here.
Step 1: Add your Domain into systeme.io
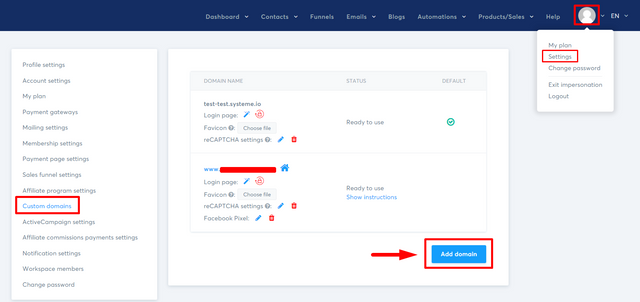
1.1. Click on your "profile picture" >> "Settings" >> once in the settings area, click on "Custom Domains >> then click on "Add Domain"

1.2. Once the first popup appears, put in your domain name with www in front of the domain name. Example: www.domain.com

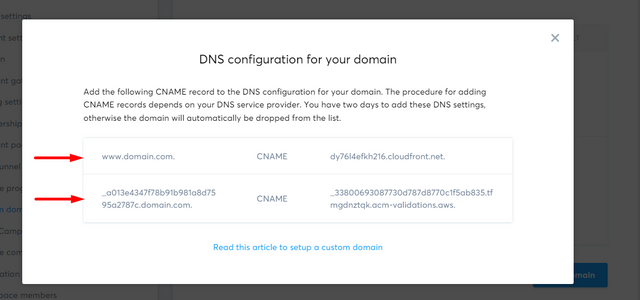
1.3. Once the domain name is added, a second pop-up appears. You will see two DNS records that we call CNAMEs. These CNAMEs are the DNS that you will add to the DNS zone of your provider to connect your domain name

Step 2: Add your CNAME Records
Sign in to your account that is hosting your domain and create two DNS records, then type the CNAME mentioned in the previous pop-up.
Using the list below, click on your registrar and follow the instructions given on how to create your CNAME record:
GoDaddy or OVH
Note 3: Regarding other hosts, it is necessary to contact their support to know the exact location of the settings you need if you can't find them.
Now, once on your host, you must follow the general instructions below:
2.1. Go to your DNS zone to create new CNAMEs.
2.2. You have two CNAMEs displayed on your systeme.io account, so you will need to create two CNAMEs on your host and add them as follows:
First CNAME :
Host: www
Value: dy76l4efkh216.cloudfront.net.
Second CNAME :
Host: _a013e4347f78b91b981a8d7595a2787c
Value: _33800693087730d787d8770c1f5ab835.tfmgdnztqk.acm-validations.aws.
(The CNAME records above are examples; you must add your own values).
Here is an image of the elements you need to add to your DNS zone:

2.3 Once the two CNAMEs are added to your host, you can check your DNS RECORDS to confirm changes using this website:
https://dnschecker.org
They should all be verified like the example below. If not, the records were not entered correctly. You need to edit your DNS.

Note 4: It can be up to 24-48 hours before the DNS records are fully propagated.
Note 5: Sometimes your provider may not be able to register your CNAMEs due to a conflict with another DNS. This usually happens when the first CNAME is added.
At this time, you need to contact your host to find out the importance of these DNS and to give you permission to remove them.
Once you have completed this second step, you need to move on to the redirection of your domain name.
Step 3: Redirection
This step depends on the hosting service provider you use.
If you use Namecheap or Cloudflare, then follow step 3.1
If you use any other DNS hosting provider, follow step 3.2
Step 3.1 Create a CNAME with root (Namecheap or Cloudflare)

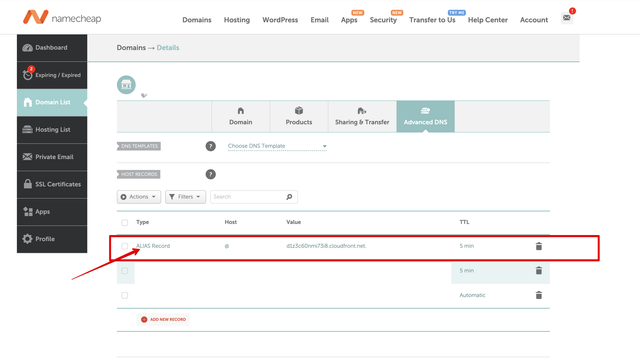
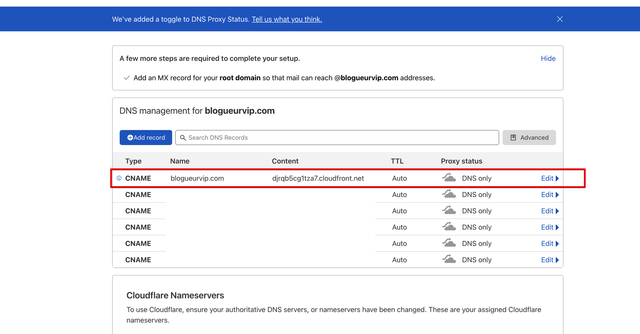
If you make use of Namecheap or CloudFlare hosting service providers, then you need to create a CNAME record from root to the same destination you used with the www CNAME record:

Examples with Namecheap hosting service provider:

Examples with Cloudflare hosting service provider:
Step 3.2 Create a redirection (other DNS hosting providers)
From within your domain host:
Click on "redirection/forwarding"
Click "add redirection"
Create a redirection from domain.com to www.domain.com
Important notes:
It can take a few hours for the subdomain to be approved.
It can take up to 24-48 hours for DNS Records to fully propagate.
The redirection usually only works with HTTP, or if you do not mention protocol in the URL.
It does, however, work with an explicitly specified https:// in URL. This is due to the limitations of DNS hosting providers.
If this is important for you, please migrate your domain to Cloudflare or Namecheap, or other hosting providers that allow you to create a CNAME with a domain root