At this moment in time, my husband and I have half done our hallway stairs and landing. There’s more to be done, but some other jobs need to be finished first, and it’s much better than it was before.
After we finished the master bedroom and bathroom last year, we know we’d take a bit of time to plan the next move, and save up more money. In January I said to my husband that I had two rooms I’d like to tackle this year – getting the attic boarded to use as storage space, and having the spare bedroom ceiling plastered so I could redecorate it and use it as my dressing room/ office/ work room, which in turn would free up the box room for him to use as his own office/ home brew experimental lab.
To my utter delight and surprise, he said “Why don’t we just get all the rest of the upstairs and hallway ceilings plastered?” Yes. Yes, please. Yes, let’s do that. What a good idea. YES. To say goodbye to those Artex ceilings is beyond wonderful to me. I’m sure some people love Artex, but I am not one of them. I don’t see the point of striping wallpaper and repainting and decorating if there’s still hateful Artex on the ceiling.
Our hallway and landing had some truly hideous wallpaper. Painted in dark grey. Not stylish dark grey that’s a bold colour choice in a fabulously appointed room. A muddy dark grey that made a space with very little natural light look like a dank cave. With dirty green carpet. And Artex ceilings. And a dado rail.
The spare bedroom seemed like it would be a simpler job than the master bedroom to redecorate because there was no fitted wardrobe to remove and to light fitting needing altering. Ha! This house doesn’t like to do easy. There was polystyrene coving and a ceiling rose that needed to be removed. There was a large old unused water tank in the closet that needed removing. There were large wooden beams that supported said tank that needed removing. There was a false floor in the closet that needed removing.
Just a taste of what was.

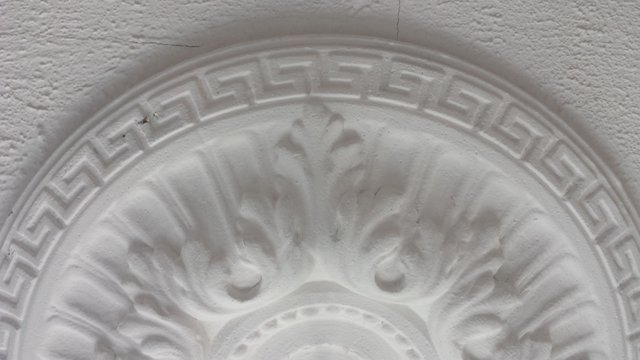
A close up.

Yes, that's a Greek Key pattern surrounding a Rococo flourish. Who wouldn't want this in their house?!
With that decision made, we worked out a chronological list of jobs.
• Remove closet doors and frame.
• Remove the old water tank.
• Remove the false floor.
• Increase the size of the loft hatch and install loft ladder.
• Board the loft.
• Put all the non-essential items from the spare room and box room up in the loft and out of the way.
• Strip the plaster coving and wallpaper from the hallway, stairs and landing.
• Move everything left in the spare room into the box room and strip the wallpaper and polystyrene coving and ceiling rose from the spare room.
• Move everything from the box room into the spare room and strip the wallpaper and polystyrene coving and ceiling rose from the box room.
• Have the plasterers in to skim the ceilings in the spare room, box room, hallway, stairs and landing.
• Paint the hallway, stairs and landing white.
• Put back the hallway furniture.
• Paint the box room.
• Move everything from in the spare room back into the box room.
• Paint the spare room white.
• Remove carpet from spare room and see what lies beneath.
• Hopefully paint the floorboards, if they’re good enough.
• Install new skirting in spare bedroom.
• Make a new frame and doors for the closet.
• Install new closet rails and storage.
• Paint all the woodwork in the spare bedroom.
• Move all my stuff into the spare room.
• Paint the woodwork in the box room.
• Create an office for my husband in the box room.
• Strip the carpet in the hallway, stairs and landing.
• Paint stairs.
• Hallway floor?
• New radiator in hallway.
• New banisters, hand rail and under-the-stairs cupboard door.
Long list. So far we’ve got up to painting the spare room walls and ceiling. Painting the floorboards is the next job.
Before that there was a lot of dirty jobs. A lot of sweat. A lot of rubbish bags full of old wallpaper. Three 5 litre tubs of Pure Brilliant White emulsion.
It took about a week in total to strip all the rooms ready for the plasterer. Hard work but very rewarding.
That seem like a good place to leave it, so I’ll show some progress pictures in a future post. Thanks for reading!