(Originally posted on my blog at: https://obsolete.audio/veggie-oil-powered-truck-project/)
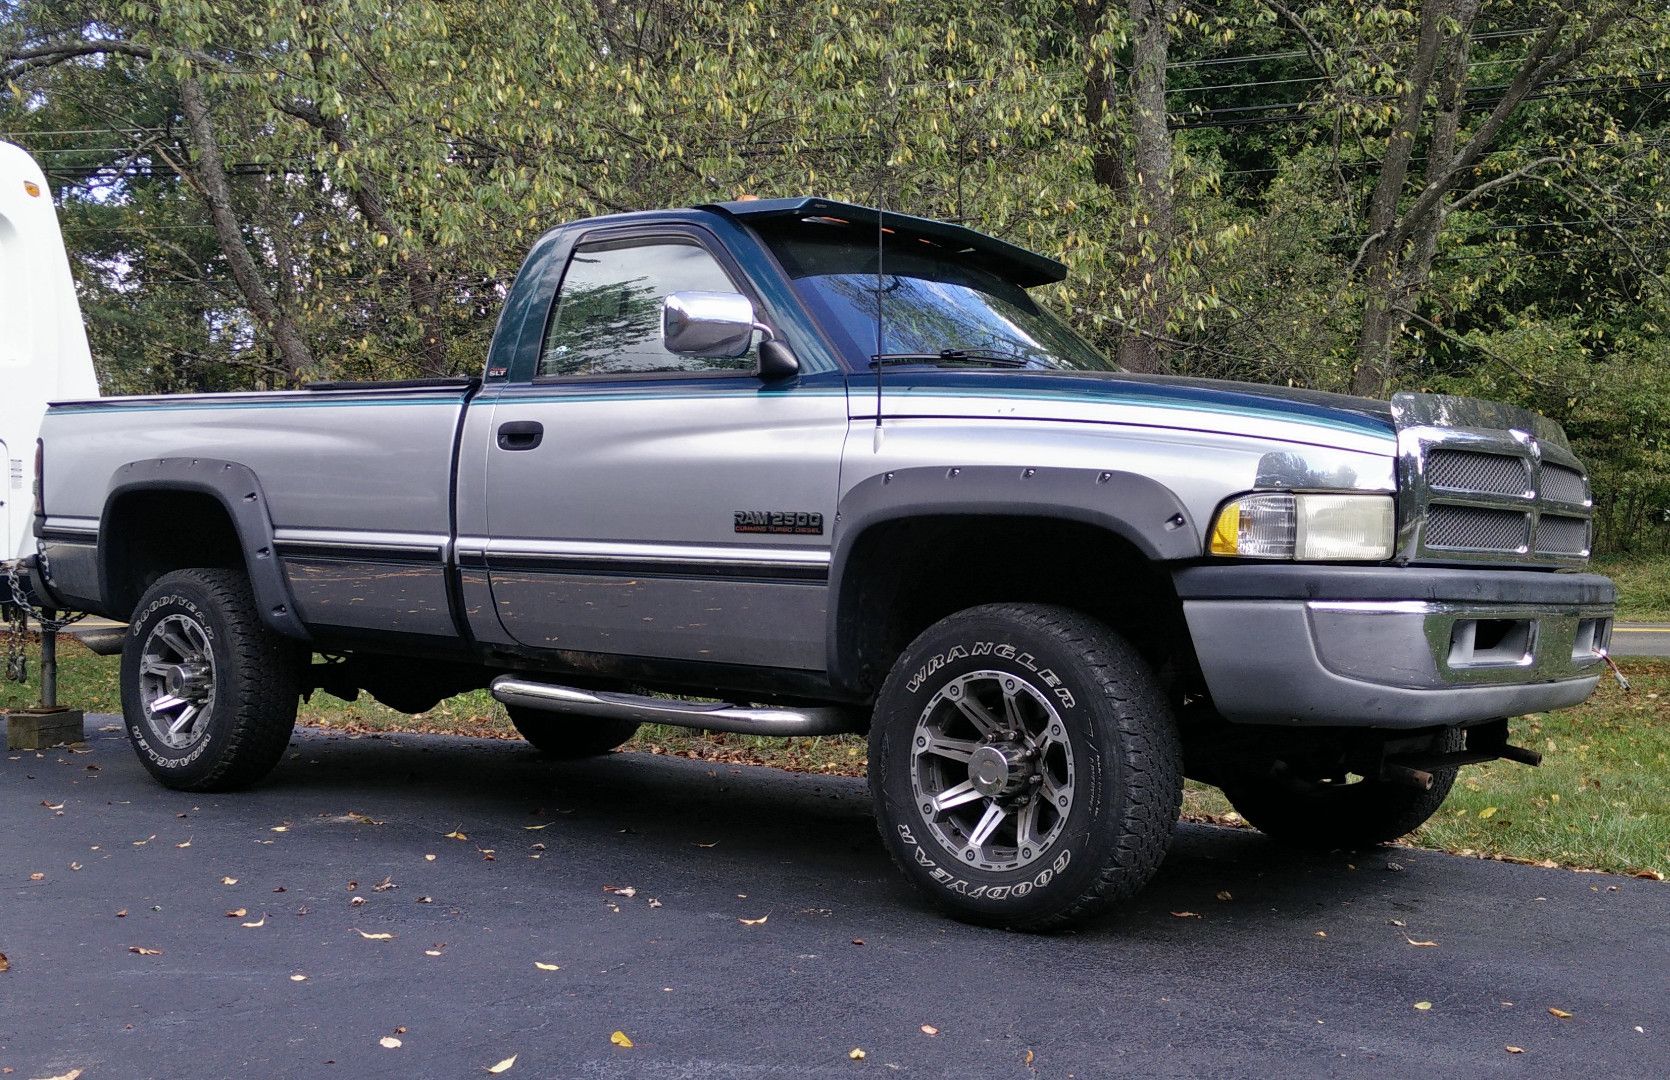
This is my old Dodge truck— a 1995 Ram 2500 with the 5.9L Cummins diesel engine. What’s so special about it? Well aside from the fact that this truck made me fall in love with the elegant simplicity of diesel engines — especially the older, noisier, all-mechanical ones — it also happens to be capable of running on vegetable oil that was once used in the fryers at a nearby restaurant. That’s right, it will run on straight waste vegetable oil… soybean oil to be specific. Now there are a couple of caveats to that: Firstly, the engine has to be hot before it can burn the oil. This is because at room temperature, the oil is very thick and definitely wouldn’t properly mix with air when fired through a fuel injector. So the oil must be heated to 150 degrees Fahrenheit at the very least, because at this temperature the oils viscosity approaches that of diesel fuel. As a result, most of the modifications that are made to the truck’s fuel system are centered around getting the oil up to temperature before it goes into the engine. The second caveat, which is a direct result of the first, is that the oil can’t be left in the engine when it cools, or else it won’t start. That means to turn the engine off, I first have to purge the oil from the system by back-flushing the fuel lines with diesel fuel. I’ll explain how that’s done after detailing the individual components of the system.
I bought most of the parts of my particular setup from Greasecar. They offer conversion kits for all sorts of diesel vehicles (disclaimer: I’m not affiliated with them and they didn’t sponsor this post). However I mainly have to thank my friend Ted, who has been running veggie oil burners for many years… mostly old Mercedes Benzes. He suggested some modifications to the Greasecar kit that have made it operate more efficiently and reliably.
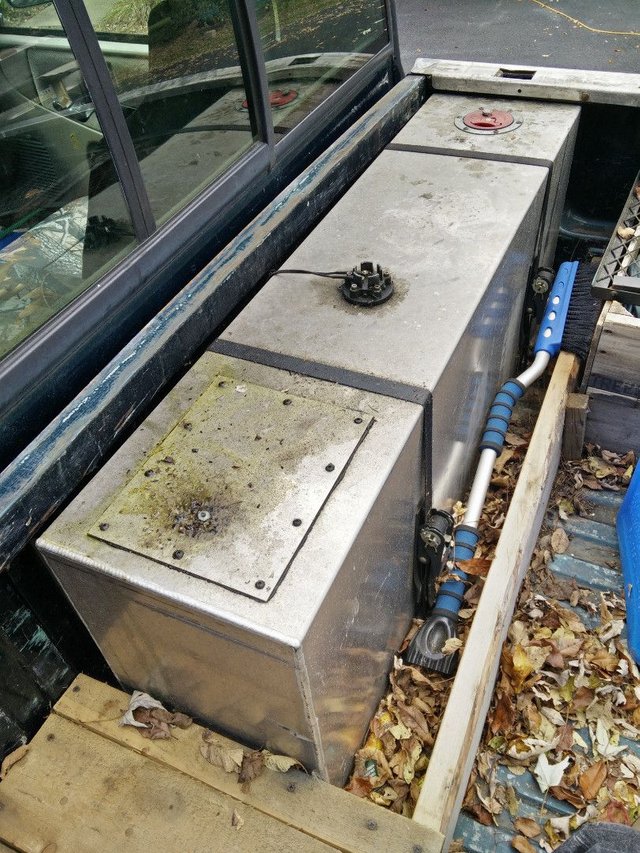
First up, this is the fuel tank itself. This was by far the most expensive piece of the kit, and if you know how to make one yourself or know someone who does, I’d definitely recommend that. Just keep in mind that doing any sort of welding on used fuel tanks can be dangerous because they’re full of fumes and require special care. This particular tank holds 40 gallons of oil, and it has a fuel level sender inside a tube in the center which sends a signal to a gauge in the dash. It also has two holes cut into it for lines: one returns coolant to the engine, and the other is a dual purpose tube that sends hot coolant into a heat exchanging tube inside the truck and also houses the fuel line that carries veggie oil to the engine. The fuel line is threaded through the coolant line and separated out using a custom hose-in-hose connector Greasecar makes. Both lines (or all three, rather) feed up to the engine underneath the truck’s chassis. As these old diesels vibrate a lot, the lines had to be carefully secured in a way that keeps them from rubbing against the chassis and springing leaks. This is more important than I initially thought, and applies to all of the rubber lines included in the conversion: after a couple thousand miles I ended up stranded because a diesel line had been rubbing agains the block and started leaking fuel everywhere. If I had to do it over again, I would have taken the time to bend some brass fuel lines rather than using the included rubber ones.
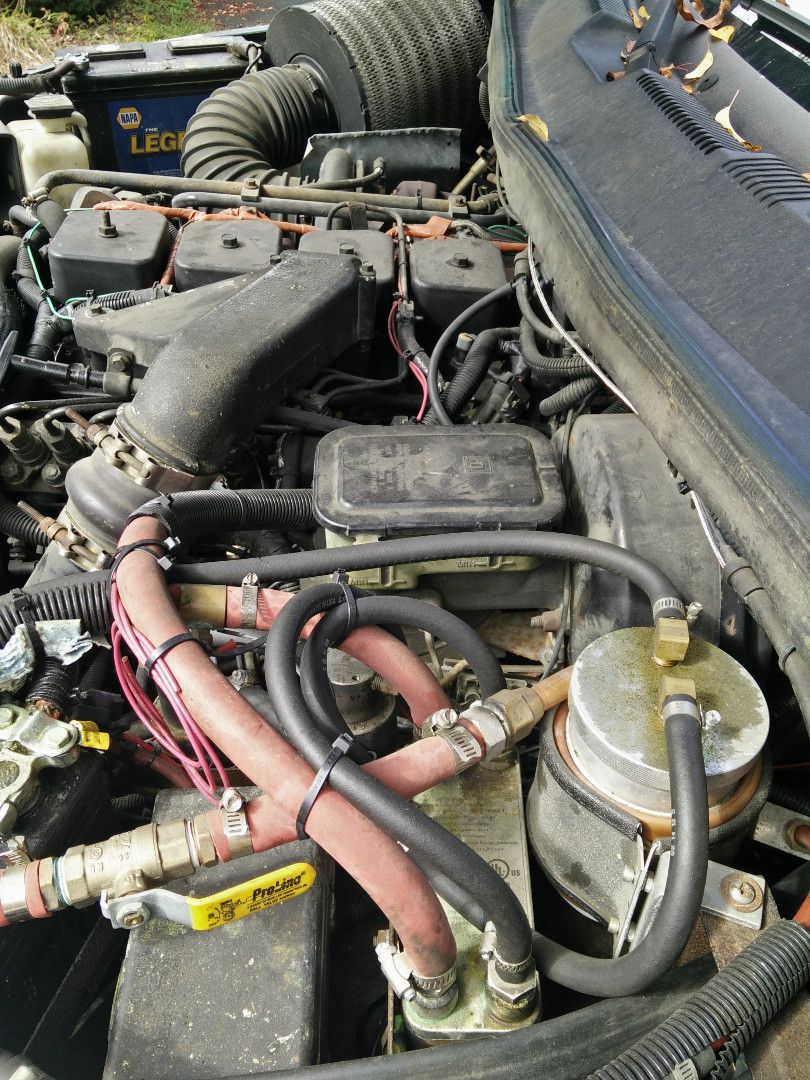
From there, the lines meet up with another one of those custom hose-in-hose connectors, and the coolant return line goes its separate way back to the main coolant loop which goes into the heater in the cab. There’s also a ball valve which allows me to shut off the coolant from circulating back into the tank when I’m not planning to burn oil. This helps the truck warm up faster on really cold days… old diesel engines are very cold blooded, as it turns out! The other coolant line, which brings hot coolant over into the veg system, makes two stops before feeding back to the tank: first, a flat-plate heat exchanger, and second, a heated fuel filter assembly. The heat exchanger has two chambers that are interweaved with each other, and the fluids flowing through each side approach the same temperature before exiting. So since the hottest coolant hits the heat exchanger first, the veggie oil hits it last, before going to the lift pump and injection pump. The coolant then goes to the heated filter assembly, where the oil is both heated and filtered. From the oil’s perspective, this is the previous step compared to the heat exchanger… whereas from the coolant’s perspective, it’s the next step. In the same way, the heated oil tank in the bed is the last step for the hot coolant, but obviously it’s the first step for the oil itself. The heat exchanger, by the way, was not included with the kit and was an add-on recommended by Ted. Good guy Ted.
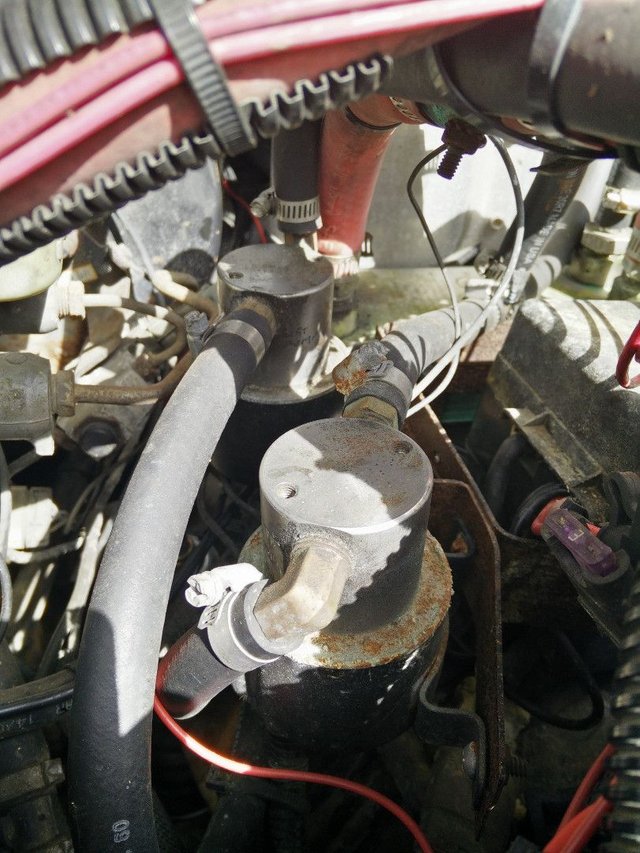
In order to switch to oil-burning mode while driving, there are two electronically-controlled solenoid valves that are inline with both the fuel line feeding the lift pump and the return line coming back from the injectors. Valve “A” (send) selects between the stock fuel filter (which is of course fed from the diesel tank) and the heated veg lines. Valve “B” (return) sends whatever fuel didn’t get pushed into the injectors either back to the stock diesel tank or a “return feed” which sends the oil back into the fuel lines to be re-heated and re-injected. The veggie oil tank only has a single oil pickup line, not pair of pickup/return lines like the stock tank does.
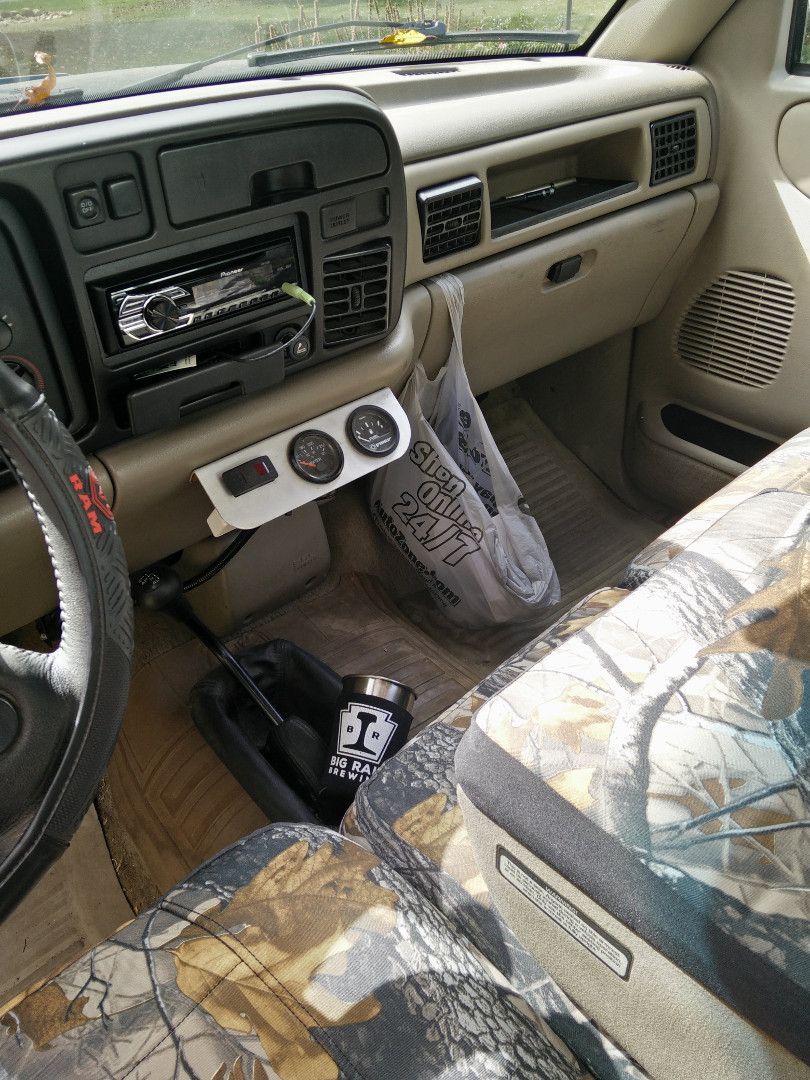
In the cab, I made this little panel (out of an old piece of aluminum) to house the main system switch and the two gauges — one for coolant temperature (as measured immediately after coolant exits the heat exchanger) and the other for oil tank level. The coolant temp gauge is important because the stock gauge isn’t super accurate in this truck, and it tells me more precisely when I can safely start making the neighborhood smell like french fries. The rocker switch is a DPDT (double pole, double throw)… meaning it has three positions. In center position, the system is “off” and I’m running diesel. Once the coolant temperature reaches somewhere close to 180 degrees, I move the switch to the left position, and both solenoids engage, meaning both the fuel pickup and return lines are in “veg” mode. Then, when I’m about to turn the truck off, I move the switch to the far right, into “purge” mode. In this position, only valve “B” (return) is in veg mode, and valve “A” changes back to diesel mode. This means I’m sucking up diesel fuel and returning to the veg lines… meaning diesel fuel is pushing the veggie oil out of the fuel lines and back into the veg tank. I do this for somewhere between 30 and 40 seconds, and then return the switch to the center. Importantly, I then run the engine on straight diesel for another couple of minutes (preferably while driving, rather than just idling) to flush out any remaining oil from the injectors and injection pump.
And that’s how it all works! I hope this was informative or at least entertaining… it obviously isn’t meant to be a complete how-to, just a rough outline of how it works so that if you’re interested you can start researching it yourself. In theory, any diesel engine can burn quality veggie oil (read: well-filtered and de-watered and free of hydrogenated oils), but I definitely recommend understanding your vehicle’s engine very well before attempting anything like this. Importantly, one of the reasons I picked a mid-90s Dodge for this project is the all mechanical injection pump: the post-1998.5 electrically controlled pumps and high pressure common rail systems don’t deal as well with heated fuel. Greasecar has kits for later engine models, but you’ll notice they’re quite a bit more expensive because they require more modifications to the engine.
Welcome to Steemit!
We have all been waiting for you, we are glad you could make it.
I have given you a upvote to help you out!
Hope you love Steemit as much as we do.
Give these a read:
Chat with us:
If this post was helpful, please leave an upvote. It helps me to keep helping new users.
I'm sunnybooster, a booster for accounts not posts. Send me 0.5 STEEM or SBD to get a week of upvotes! If you don't yet know what this is its fine.
I am a bot and this was automated. I exist to help out new members and attempt to get them hooked
Downvoting a post can decrease pending rewards and make it less visible. Common reasons:
Submit