BLACK BUNNY
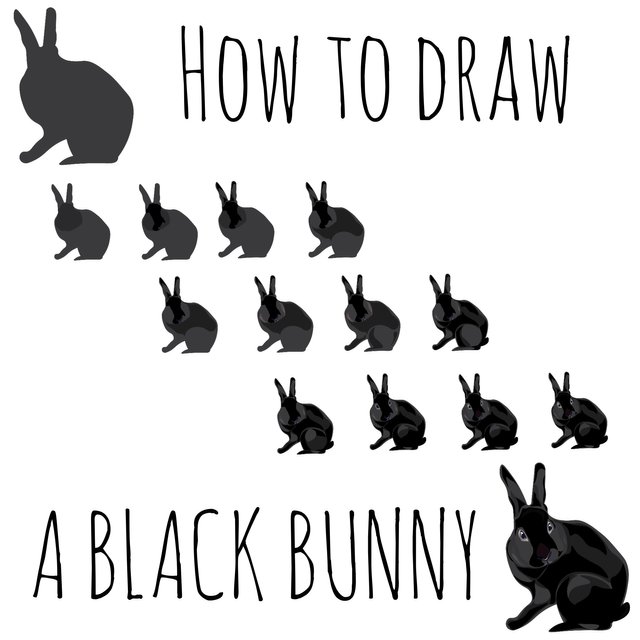

☘️ One of my insta followers asked me how would I draw her black bunny Mocha? She said she makes drawings but she can't seem to draw a pure black bunny and make it look less flat. I told her I could make a step by step for her just so she can see how it's done or at least how I do it.
My method may not be the best but she said she wanted to know it in my style
Here we go!
1
I make a flat dark or neutral color outline.

I actually made it a bit darker than middle tone.
2
Add dark shades on a few parts to emphasize shape, just follow your reference as I did

Not all areas are supposed to be Pitch black.
No surface touched by light is actually a pure color, it is composed of many colors with a certain color scheme. In this case even monochromatic surfaces have a variance of tints and shades. Meaning there is a gradation of dark to light shades and light to dark. In short there's always a shadow and a highlight. So when you are drawing you need to establish a "light source" and apply the appropriate shading and highlighting.
3
You can add shades and tints and adjust transparency (if your App has it) to make it blend and create an extra sharp shadows or colors. But if you don't, you can manually just create a layer of solid colors to achieve the same effect.
So here, if you zoom in a bit, you'll see how there's opaque pink and peach tones to emphasize the rabbits cheeks and nose. And the nose itself has a bit of blue and dark red tones, from afar it'll be visible compared to just using a gray color and it will still blend in and seem black.

One trick I've learned in art school is you can opt to use little black pigments and replace it with a combinations of brown + blue, violet + black, green + red. A purely black color on your canvas will create an appearance of a hole, using lighter than black dark tones can easily make your painting look more natural and even make the dark hues more saturated and distinguished that way.
Some lighter shades I used are pink, peach, creamy yellow (plus transparency so they don't outshine the white in the eyes, which we will see next!)
For some dark areas I use dark violet and dark blue and some dark brown. I did use black but not in all parts and I even used a lot of gray. But it all worked out good.
4
You can now out in details, which means the eyes! Only thing left to do.

I used shades of blue, black and peach and light yellow and white. Hope zooming in helps the step by step.

Adding warm hues always helps add more life to anything. So I try to minimally apply it.
5
Save a PNG transparent file. Add your backgrounds if you like.
A PNG file is used for transparent background. Very handy when using it for editing. You can always reedit the picture with a collage app and even add various backgrounds.


Done!
That's all I can share for now!
Hope it helps. I myself have been just practicing so hopefully I will find a better process to make it even more improved.
Thank you for stopping by.

That's all thank you so much!
