Turning up the beam on a Philip's CM10 Transmission Electron Microscope and getting it centered with the electron optics and apertures.
▶️ DTube
▶️ IPFS
So, I have been so busy with work and projects that I have been unable to work on the EM420 . To make up for it I recorded a short video of me turning up the filament, centering the Condenser 2 aperture and filament and some Condenser Stigmation. and If you are new to my blog you can follow this link to the first post on the subject.
Reviving a Vintage Transmission Electron Microscope
As you watch the video, you can refer to my explanation in another window.
First off, I have already turned on the High Tension, it is only at 60kV because this scope has been down for a while, and I like to turn it up to maximum, which in this case is 100kV, gradually. Times are approximate.
0:00 to 0:10 Turning up the filament, every thing is dark the first few seconds because the filament needs enough current for it to get hot enough for the electrons "evaporate" out. They then travel down through the column and hit the Phosphor Screen transducer that I am videoing from through a lead glass viewing window on the side.
0:11 to 0:30 Saturating the filament. Carefully getting it as bright as possible. I prefer to do this at around 8,000 to 10,000X depending on the TEM.
0:31 to 1:44 Here I am centering the C2 aperture, mechanically. This is done by turning the intensity up and down across an inflection point and adjust two Axis on the mechanism until the spot is equal over the crossover point. Basically overlaps equally. This usually takes the longest.
1:45 to 3:29 It is hard to see here but I am centering the gun coils, they guide the beam down the top half of the column through C1 and C2 onto the Specimen. At 2:06 you can see the "Cats Eye" or called "Gods Eye", I basically want that eye centered, within the beam and the screen. The default photo for this post is an alright screen shot if it. There are several coils in the gun section that I can adjust to center it. I want to note that the Cats Eye is only visible when the filament is below saturation, which is the point the filament is its brightest. On this scope it appears a few clicks of the filament knob down. This whole process is something you really need someone to walk you through in person first time, but this video may come in handy for someone who is rusty or learning.
At 2:50 ish there is some more nice moments where you can see the eye clearly.
3:30 to 4:00 You will notice here that the spot is being stretched and squished. I want to get the spot nice and round. The Condenser stigmator coils enable me to do this. I am also adjusting the intensity, and therefore the size of the beam. Adjusting the size helps me see the distortion. Unfortunately from the perspective of the camera, which is viewing off the side of the screen it will appear oval even when it is round.
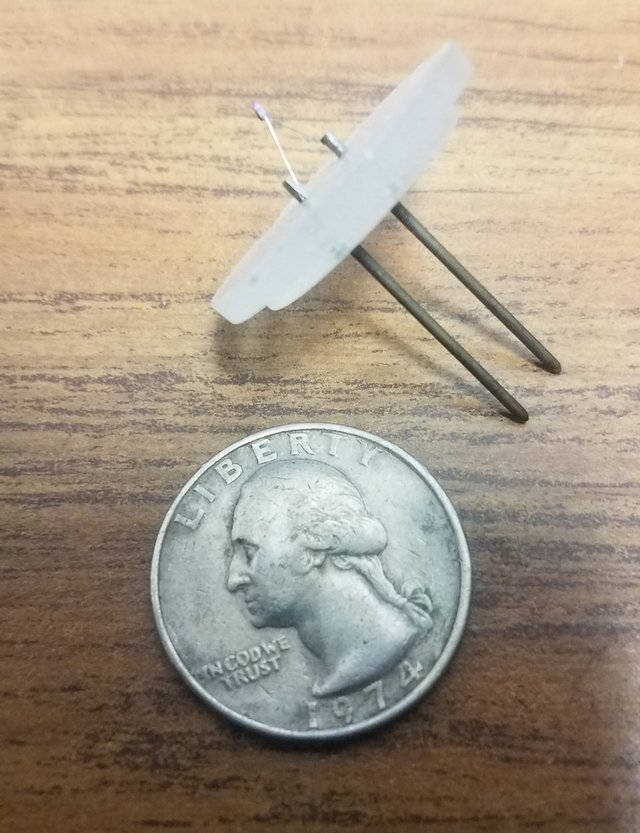
4:01 to the End. I run through the whole process all over again (with exception of turning up filament). Basically fine tune everything. Lastly, I saturate the filament and the Cats Eye disappears. The Cats Eye is a phenomenon of the filament structure, which in this case is Tungsten. I have attached a picture of a Lanthanum Hexaboride filament which looks similar. This one in particular is useless because it cracked, so it just hangs out on my desk. The electrons are emitted right from the tip, where the two fine wires meet at the purple crystal. Tungsten looks the same, except its just a wire loop.

Takes a few seconds to see light because the filament emits electrons due to heating. I have to turn the heat up enough for them to emit, so the initial darkness is because its just not hot enough.
Downvoting a post can decrease pending rewards and make it less visible. Common reasons:
Submit
Do or do not. There is no try.
Downvoting a post can decrease pending rewards and make it less visible. Common reasons:
Submit
Wow, that was glitchy. When I first posted it kept kicking out "Picture did not save correctly messages". I could not figure out which one, so just went ahead and posted. Then, none of my text appeared. So, I went back and pasted it in from the original. Odd. Wuteva...
Downvoting a post can decrease pending rewards and make it less visible. Common reasons:
Submit
Congratulations @roguescientist84! You have completed the following achievement on the Steem blockchain and have been rewarded with new badge(s) :
Click here to view your Board
If you no longer want to receive notifications, reply to this comment with the word
STOPTo support your work, I also upvoted your post!
Downvoting a post can decrease pending rewards and make it less visible. Common reasons:
Submit
This post has been voted on by the SteemSTEM curation team and voting trail in collaboration with @utopian-io and @curie.
If you appreciate the work we are doing then consider voting all three projects for witness by selecting stem.witness, utopian-io and curie!
For additional information please join us on the SteemSTEM discord and to get to know the rest of the community!
Downvoting a post can decrease pending rewards and make it less visible. Common reasons:
Submit