Hello everyone! I hope you will be good. Today I am here to participate in the contest of @kouba01 about Java Graphical Programming with Swing. It is really an interesting and knowledgeable contest. There is a lot to explore. If you want to join then:
.png)
Exercise 1: Example of JFrame
Write a class SimpleFrame that displays a window. Assign it a title and a minimum size.
Here is the program which has the class SimpleFrame and it displays a window and it assigns it a title and the minimum size. This will cover all the requirements of the question.

This code makes a simple graphical user interface by using Swing library. It displays a window with the following elements:
- A title for the frame.
- A label at the center with centered text
- An "OK" button at the bottom.

These are the required elements for the complete execution of the program. Without these required elements the program will not work as per the required functionality. Here is the further detail of these imports:
java.awt.BorderLayoutis a layout manager that is capable of aligning components in five regions such as NORTH, SOUTH, EAST, WEST, and CENTER.java.awt.Containeris actually a container that is capable of holding and organizing graphical components.javax.swing.*contains all the classes that are required for the development of GUI such asJFrame,JLabelandJButton.

Here is a public class named SimpleFrame and it the main class of the program. In this main class there is the main method which is the entry point of the program. The main method is executed when the program runs.
The code
JFrame frame = new JFramein the program creates a newJFramewhich is a window with the title of "Simple Frame Example".JFrameis the highest level container and serves as the main window for the graphical user interface.frame.setSize(400, 200)is used to set the size of the frame to minimum size.The frame size becomes 400 pixels wide and 200 pixels tall. In this way the minimum size of the window is defined.
frame.setDefaultCloseOperation(JFrame.EXIT_ON_CLOSE)is used to defined the functionality to close the application. Now when the user will click the close button then the window will be closed.Container contentPane = frame.getContentPane()gets the content pane which is a container to which GUI elements are added. By default it uses aBorderLayoutfor organizing the components in the container.This program creates a
JLabelwith the text "Hello, I am Muhammad Faisal!".The text of the label is centred by using
setHorizontalAlignment(SwingConstants.CENTER).Moreover
contentPane.add(label, BorderLayout.CENTER)adds the label to the CENTER region of the content pane. TheBorderLayoutensures the label occupies the central space.At the end there is a button by using
JButtonwith the name OK. We can use this button to perform the functionality but in this case it is not performing any functionality.contentPane.add(okButton, BorderLayout.SOUTH)adds the "OK" button to the SOUTH region of the content pane at the bottom of the frame.At the end of the program I have used
frame.setVisible(true)which makes the frame visible by setting its visibility to true. Without this the window will not appear to the user on the screen.

Here you can see the output of the program which has created the required GUI.
- This GUI displays "Simple Frame Example" in the title bar of the window.
- A centered label with the text "Hello, I am Muhammad Faisal!"
- An "OK" button at the bottom.
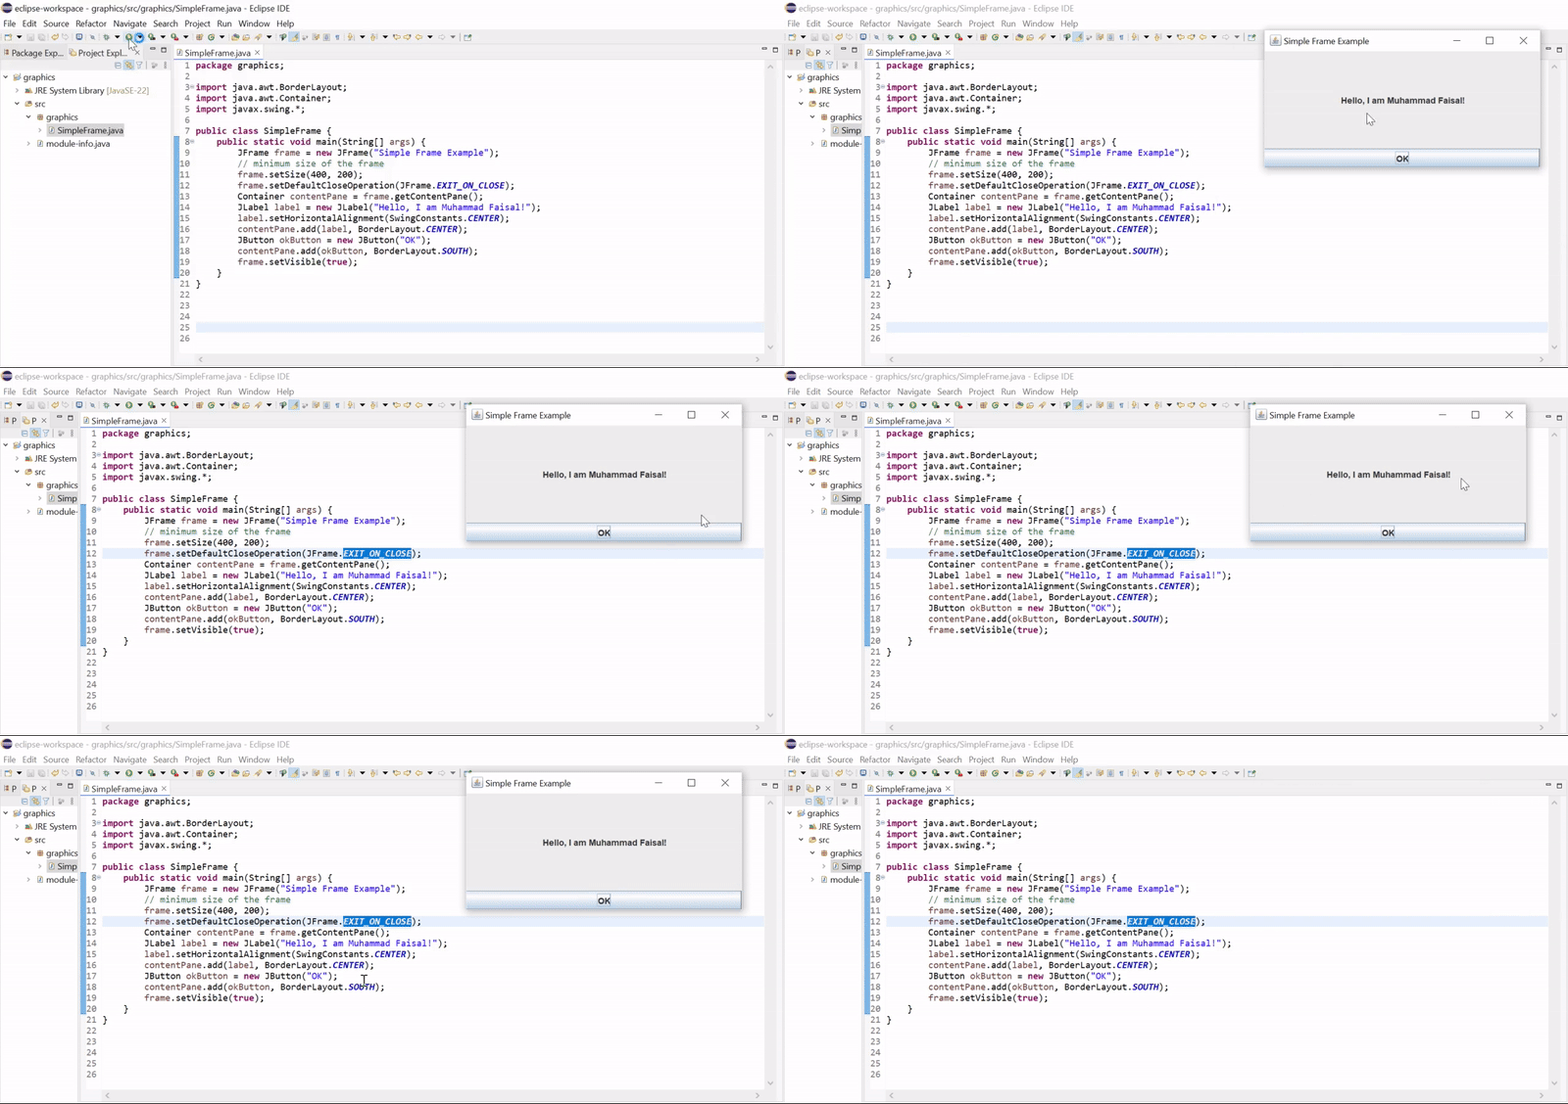
Here you can see the result in the form of the Gif where the working of the whole frame is visible. When I click on the cross button then the application is closed.
Exercise 2: Discovering New Components
Create a new JFrame named "Discovery"
Here is the program which creates a new JFrame with the name Discovery and has the following components:
- A button
- A text field
- A text area

Here is the explanation of the program code how it creates a new JFrame and adds different components in it:

- A new JFrame named "Discovery" is created with a size of 500 x 300 pixels.
- The default close operation ensures the program exits when the window is closed.
- The layout manager BorderLayout is used to arrange the components in different regions (NORTH, CENTER, SOUTH, etc.).

- A button is created with the text "Click Me!".
- Its background color is set to cyan, and the text color is set to red.
- A tooltip is added using
setToolTipText(), which displays "This is a button!" when the user hovers over the button.

- A text field is created with the default text "This is a text field.".
- The text field is made non-editable by using
setEditable(false).

- A border is created around the text field using
BorderFactory.createLineBorder(Color.BLUE, 2), which draws a blue border with a thickness of 2 pixels.

- A text area is created with the initial text "This is a text area.
You can add multiple lines here.". setLineWrap(true)forces text to wrap at the edge of the component.setWrapStyleWord(true)forces wrapping to occur at a word boundary.

- The text area is wrapped in a
JScrollPane, which automatically adds scrollbars if its content exceeds the visible area. - The scroll pane is placed in the SOUTH region of the frame.
- The button is placed at the top (NORTH).
- The text field is placed in the center (CENTER).
- The text area with scrollbars is placed at the bottom (SOUTH).
- The frame becomes visible hence accessible to the user.

Here you can see that the button appears at the top, with a tooltip, cyan background, and red text. The text field is centred, non-editabla with a blue border. The text area appears below with word wrapping enabled to make it scrollable.
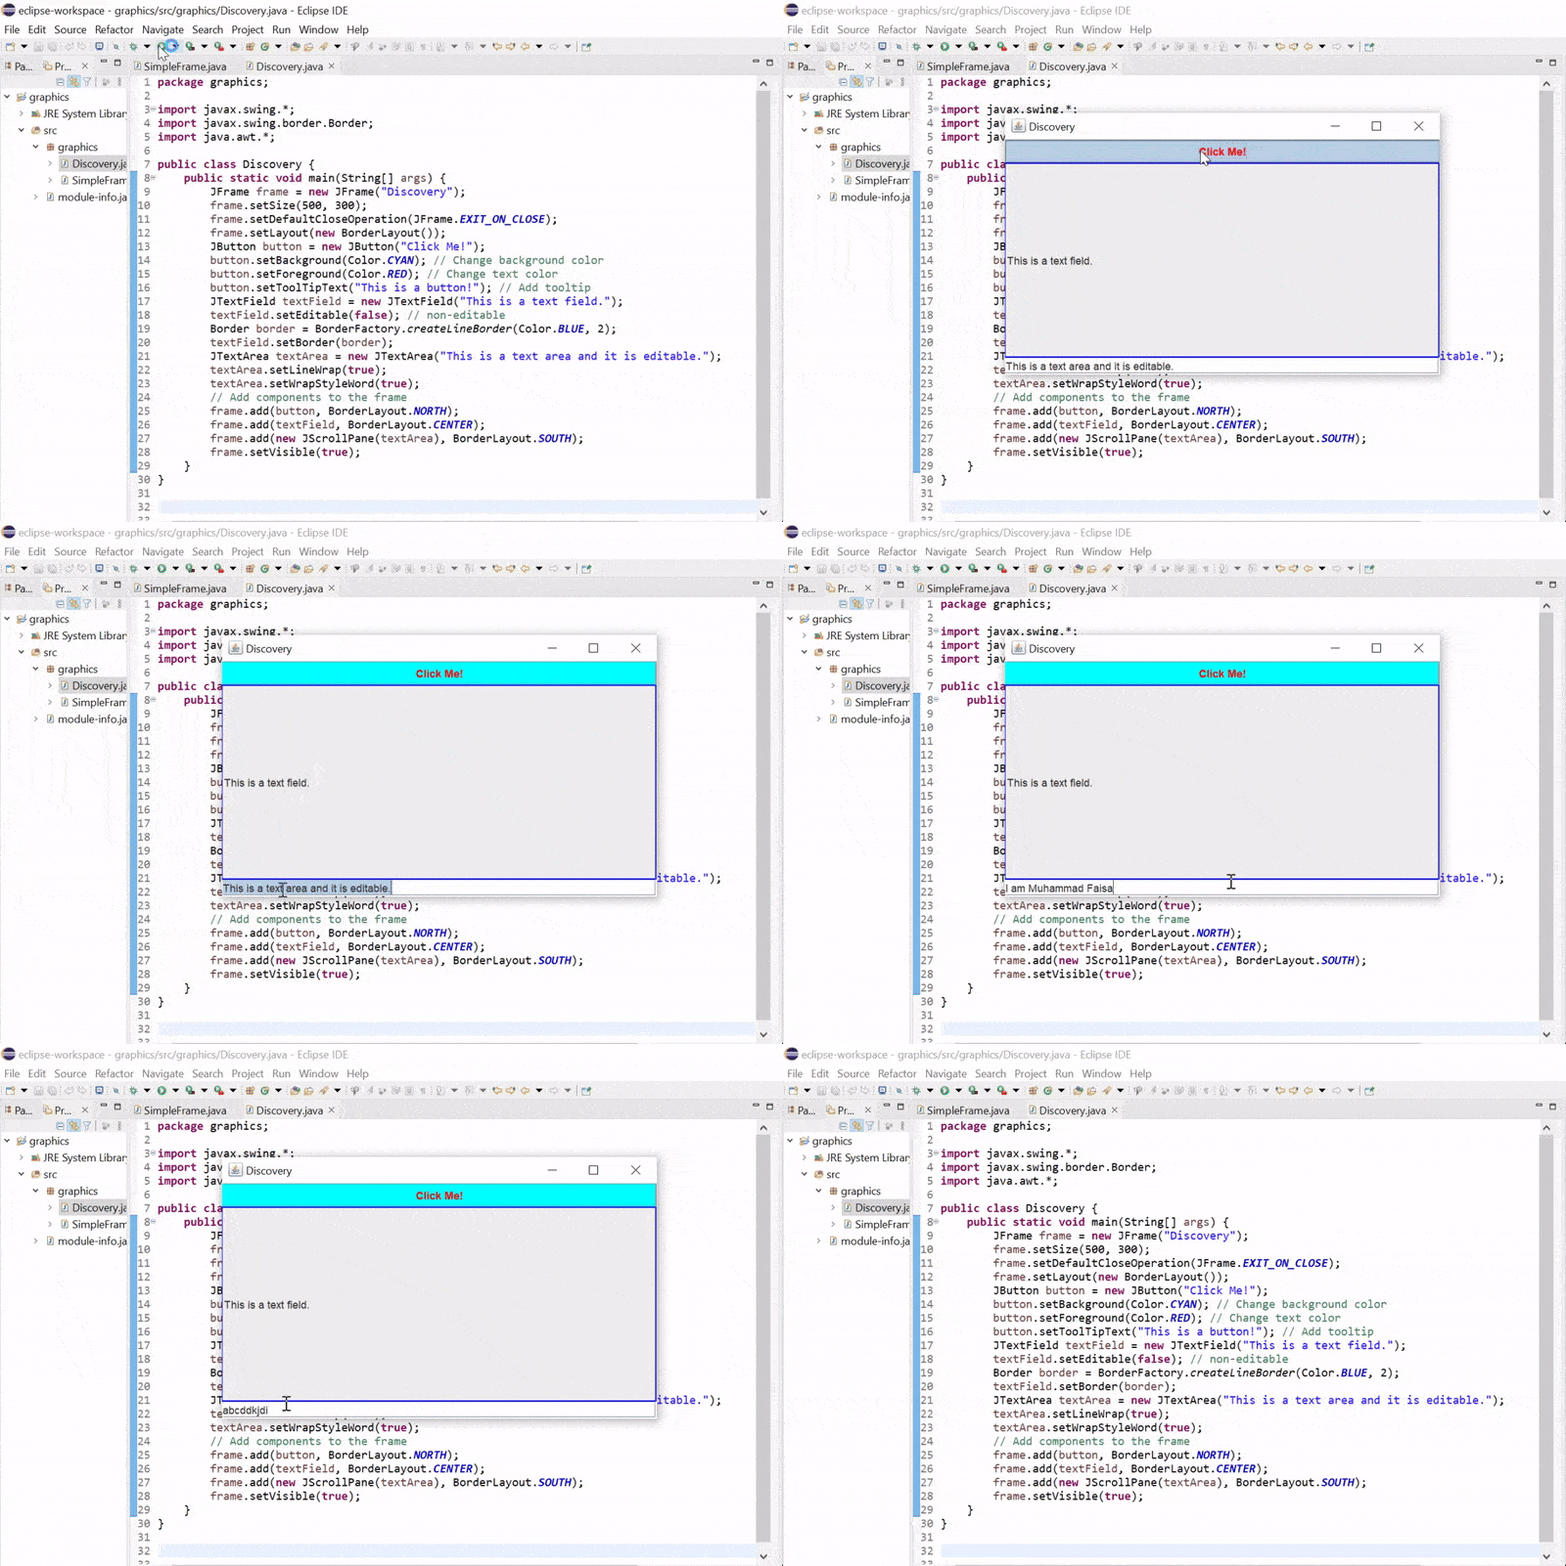
The button is clickable but we have not defined any functionality under the click of the button so it is not doing any action. It is at the top but the text field is in the centre but this text field is not editable because it is static. Moreover at the end there is a text area and this is editable and we can add and remove the text from this text area and it is present at the bottom of the frame.
Exercise 3: Associating Actions with Buttons
The goal is to create a window with a button labeled "Test" that, when clicked, displays "Test click" on the standard output.
Here is the program which creates a window with a button labeled "Test" that, when clicked, displays "Test click" on the standard output. And the remaining three buttons with name One, Two, Three which when pressed change the name of the window frame.

Here is the explanation of the program code how it creates a new window and adds different buttons in it with functionality:

- A JFrame is created with an initial title "Main Window".
- The size is set to 400 x 300 pixels.
setDefaultCloseOperation(JFrame.EXIT_ON_CLOSE)ensures the application exits when the window is closed.BorderLayoutis used to arrange components.

- A JPanel is created to hold the buttons. This panel uses the default FlowLayout, which places components in a row.
- A button labeled "Test" is created.
- An anonymous class implementing the
ActionListenerinterface is used to handle the button click event. - When the button is clicked, "Test click" is printed to the console.

- An array of button names
"One","Two","Three"is used to create buttons dynamically. - For each button an anonymous class is used to implement an
ActionListener. - The
ActionListenerchanges the title of the JFrame to the name of the button when clicked.

- The
buttonPanelcontaining all buttons is added to the center of the JFrame. - The
setVisible(true)method is called to display the frame.
This program is scalable so in order to create more buttons we just need to add their names to the buttonNames array. For example:
String[] buttonNames = {"One", "Two", "Three", "Four", "Five"};
The code will generate buttons and bind the proper action to each automatically.

This is the complete interface of the frame where the window opens with the title "Main Window". There is a test button and by clicking the "Test" button it will print "Test click" to the console. There are three more buttons. When we click any of the "One", "Two", or "Three" buttons, and the window title will be changed to the corresponding button label.
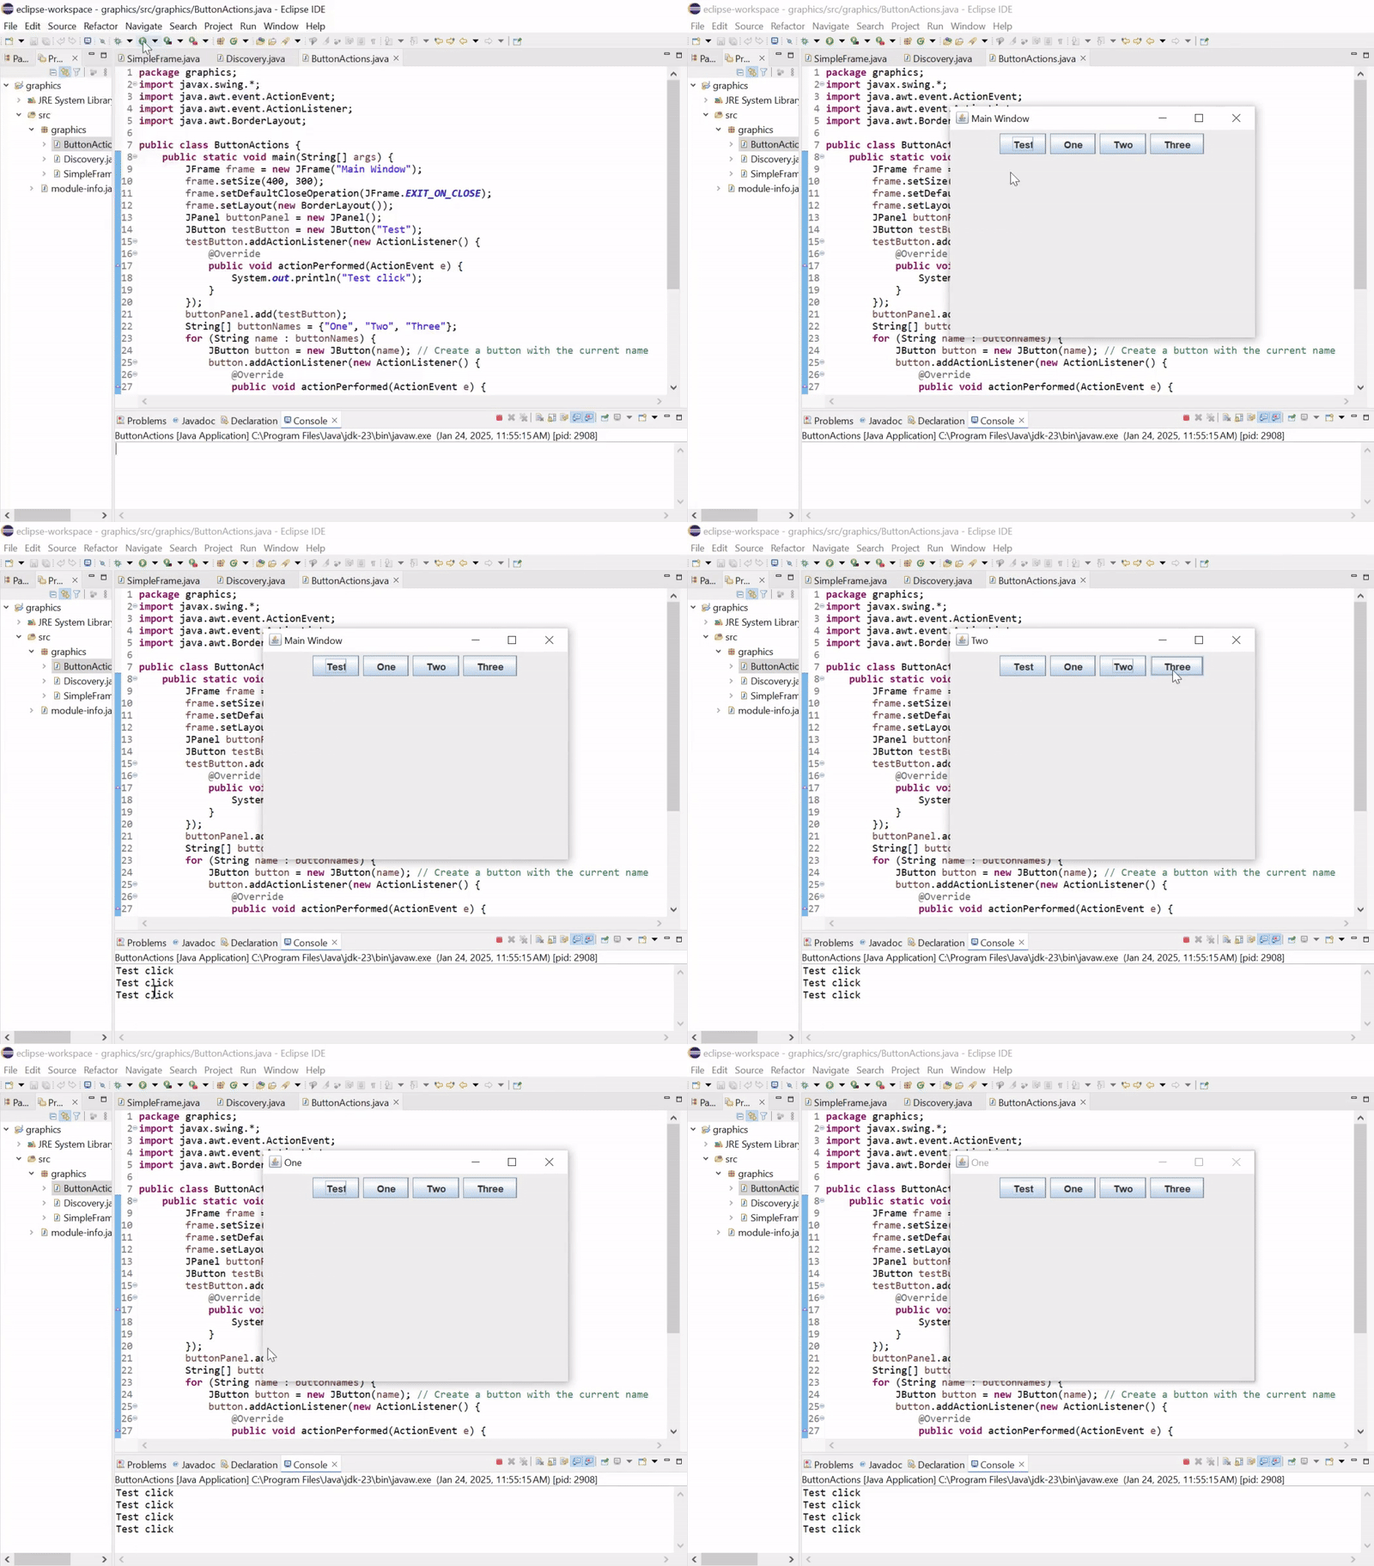
Here is the output of the program where when I am clicking the Test button it is printing the text in the console and while clicking on the other buttons the title of the window is changing according to the label of the button.
Exercise 3bis: Associating Actions with Buttons
Redo Exercise 3, but use the AbstractAction class instead of the ActionListener interface.
Here is the solution for Exercise 3 using the AbstractAction class instead of the ActionListener interface. The AbstractAction class provides a convenient way to encapsulate an action and allows reusability.

- Each button is linked with an object of
AbstractAction, overriding itsactionPerformed()method to describe the behavior of that particular button. - The
Testbutton uses an inlineAbstractActionthat, on click, printsTest click. - The buttons "One", "Two", and "Three" apply a repetitive pattern wherein the window title is automatically updated.
- A new
AbstractActionis created for each button, thus making sure that every button has its own behaviour but without duplication of code. - The
JButtonconstructor takes anActionobject (in this case, anAbstractAction), so the action is directly associated with the button.
Here are some benefits of using AbstractAction:
- Reuse Functionality: Actions may be reused between different components.
- Centralized Logic: It encapsulates all the related code and hence more manageable, easier to maintain and extend.
- Scalability: It makes it easy to add or remove buttons if needed.
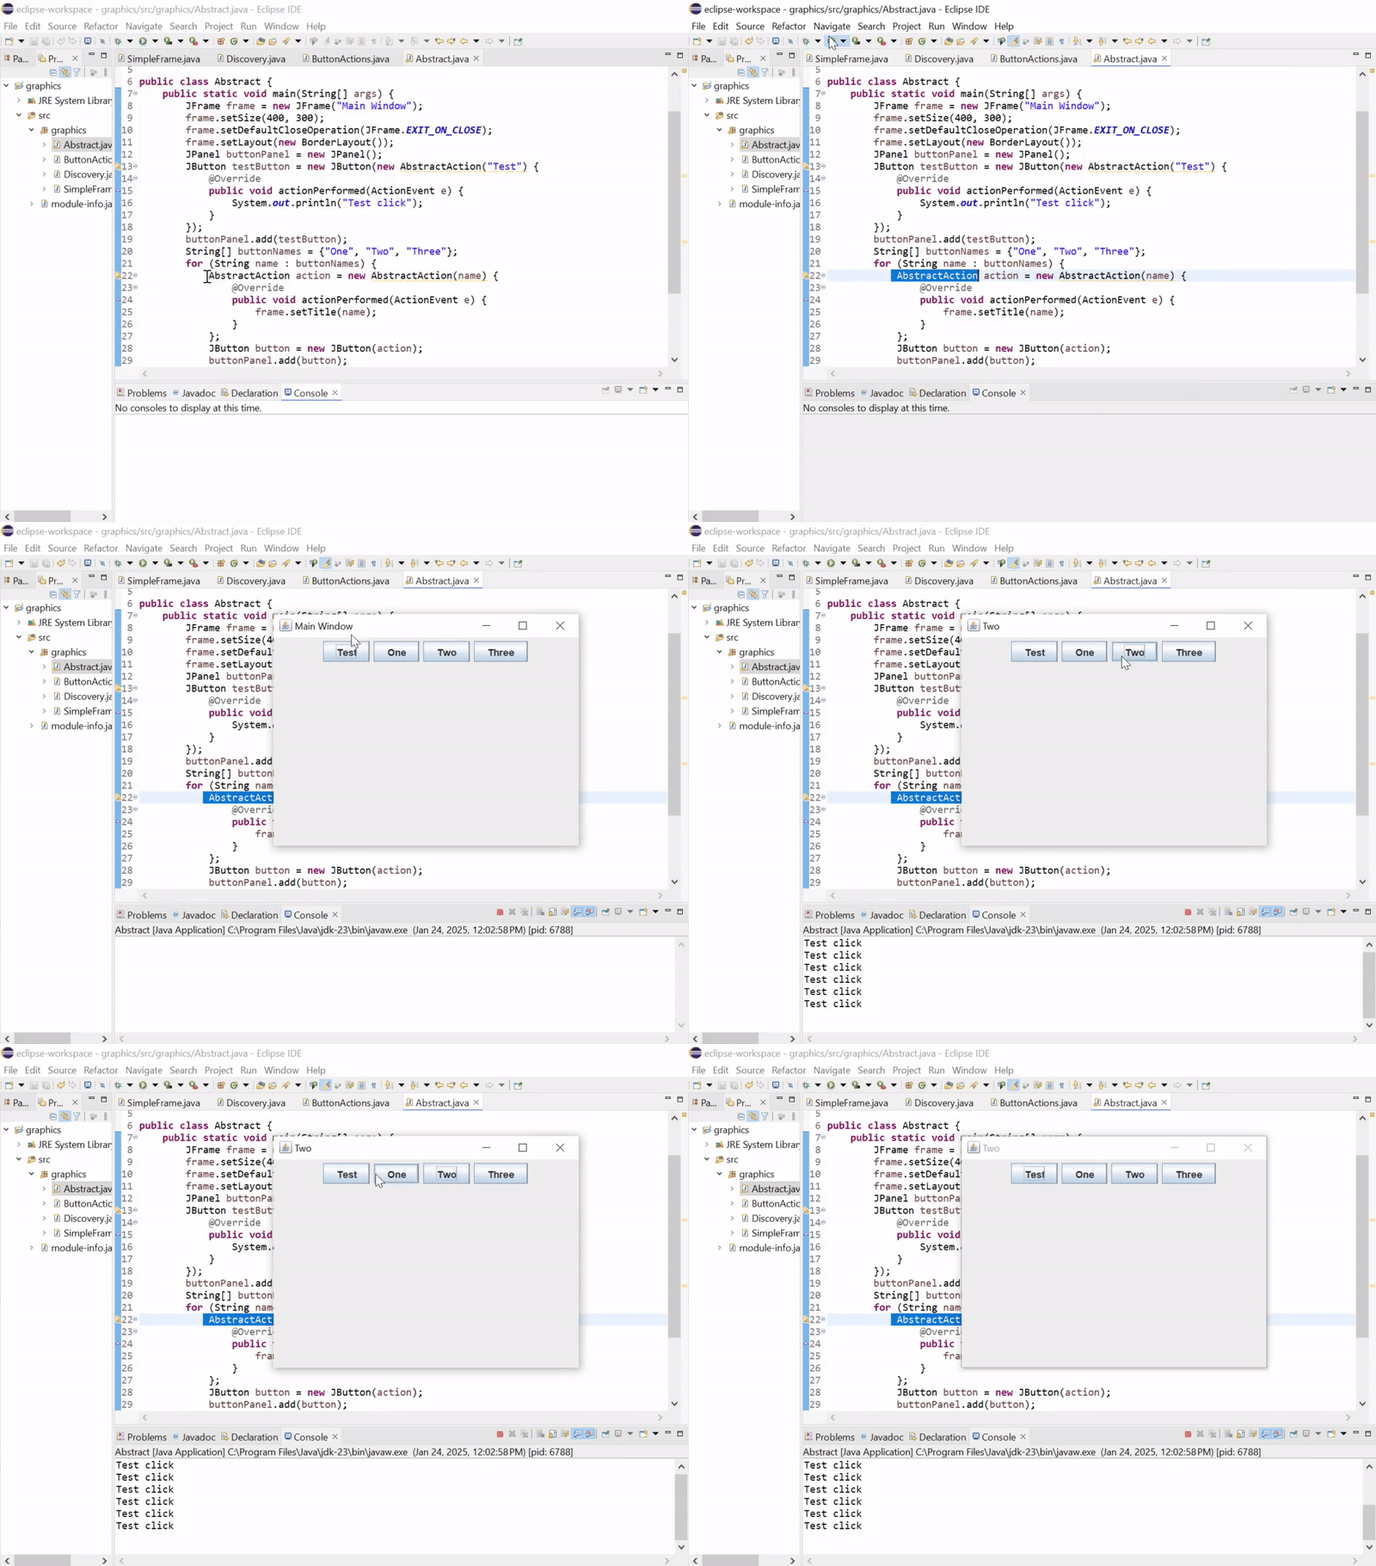
The output is completely same as with the previous method.
Exercise 4: Event Listeners
Create a window containing a button titled "Add." Each click on this button should add a numbered button to the window. When any of the added buttons is clicked, it disappears.
Here is the program which creates a window containing a button titled "Add." Each click on this button adds a numbered button to the window. When any of the added buttons is clicked it disappears. There is a "Reset" button (next to "Add") that removes all added buttons.


Here is the explanation of the program:

- The main window is arranged with
BorderLayout. - The control panel on top has "Add" and "Reset" buttons.
- The button panel at the center contains added buttons.

- For every click of "Add", a new button labeled
"Button X"whereXis the current count is generated. - This new button is appended to the
buttonPaneland kept track of in theArrayList(addedButtons). - An action listener is assigned to the button such that its click event will cause it to be removed from the panel and from the tracking list as well.

- When "Reset" is clicked, it clears all
buttonPanelbuttons by invokingremoveAll(). - The
addedButtonslist is cleaned up to ensure all references to the buttons are cleaned up. - Refreshing the panel via
revalidate()andrepaint().
The UI updates dynamically each time by revalidating and repainting the buttonPanel after change.

Here is the interface of this program where there is a frame with the name Event Listeners Example and there are two buttons Add and Reset.
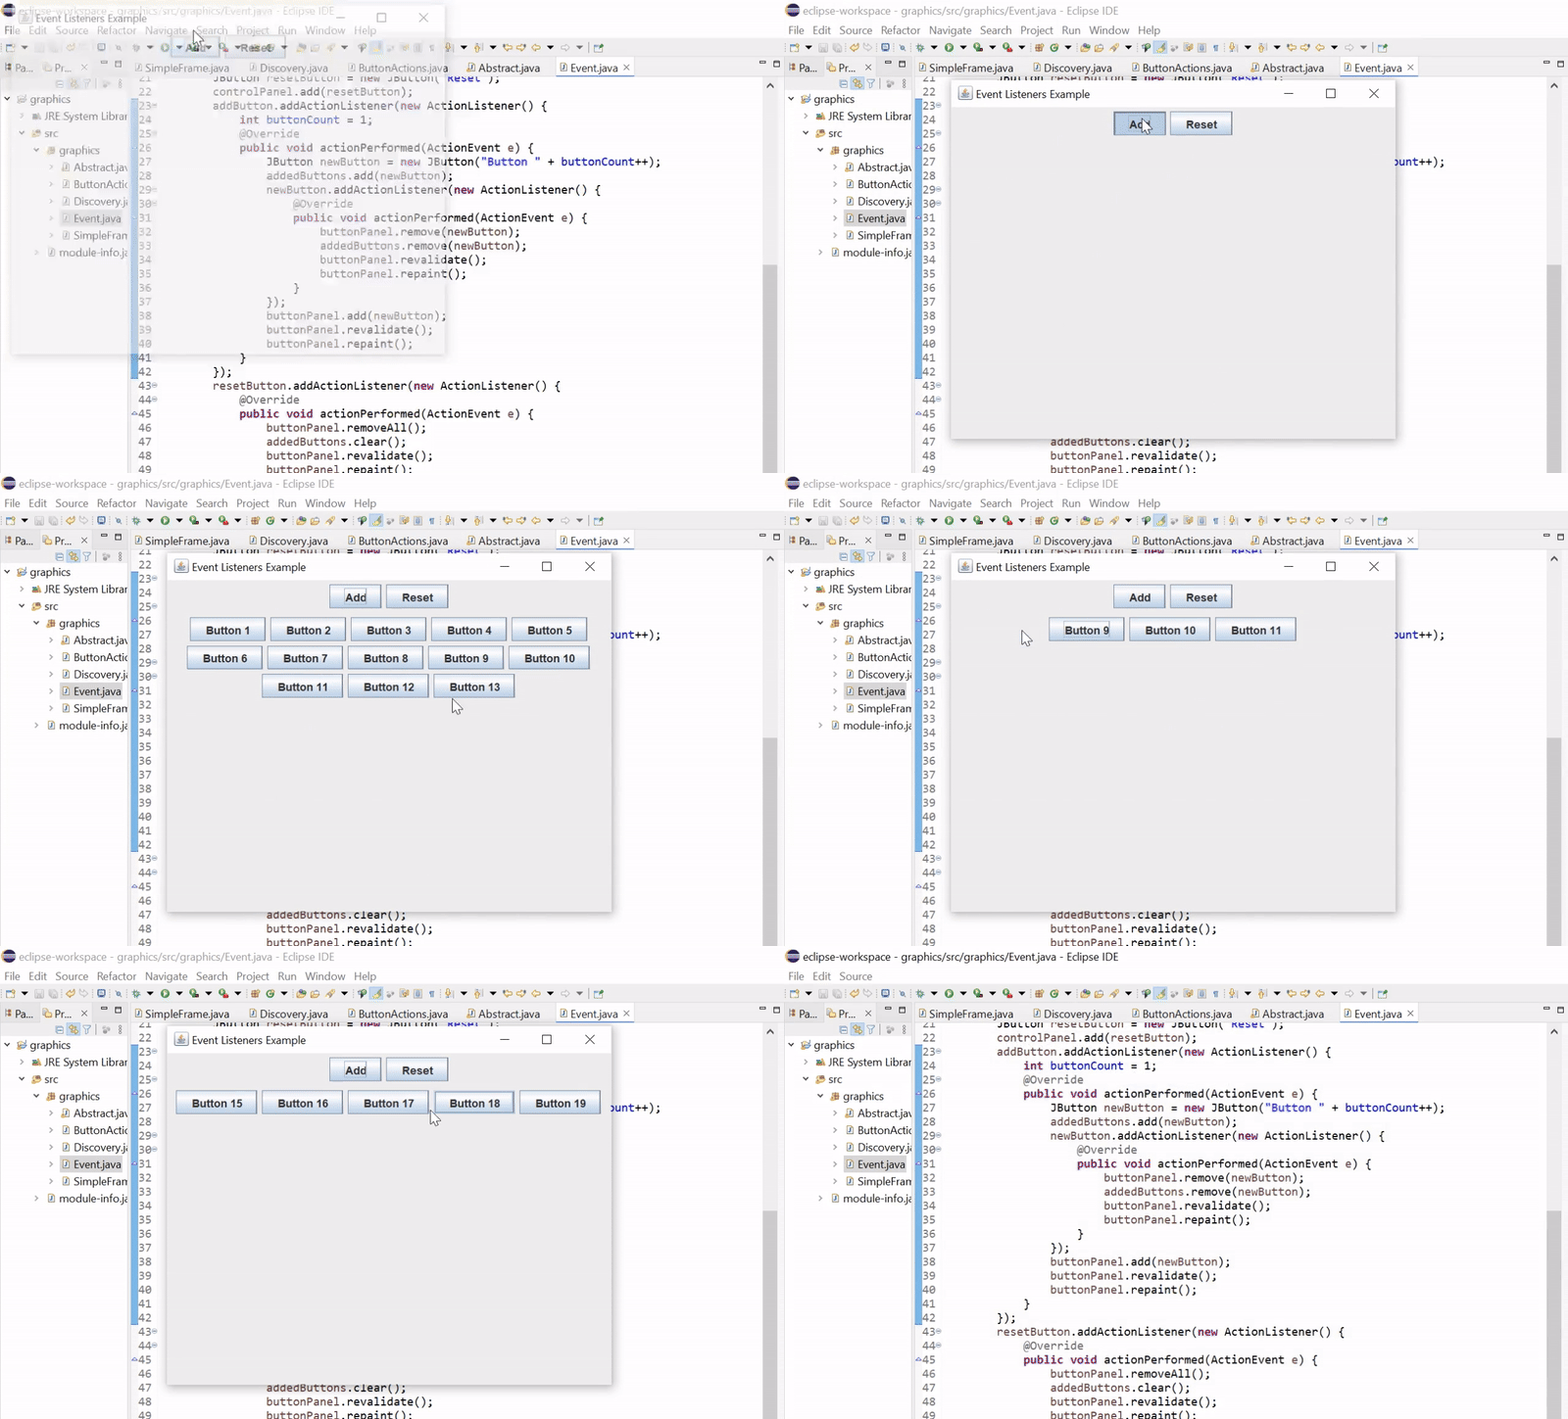
Here you can see the output of the program where there is a frame and in the frame there are two buttons. When I am pressing the Add Button then the new button is being added in the screen with the counting number starting from 1. And when I am clicking on the button then the button is disappearing. And by clicking on the Reset Button all buttons are cleared from the interface. And if we want to add new buttons again then we need to click on the Add Button and it will add new button starting counting from the last ended button.
Exercise 5: Factorial
Write a program to compute the factorial of an integer entered in a text field. If the integer is 17 or greater, prompt the user to re-enter the value with an appropriate dialog message. Display the result in a label after clicking a button whose label updates to "5!" if 5 is entered.
Here is the program to compute the factorial of an integer entered in a text field. If the integer is 17 or greater it prompt the user to re-enter the value with an appropriate dialog message. It displays the result in a label after clicking a button whose label updates to "5!" if 5 is entered.


Here is the explanation of the program:

- The program first creates a main application window (
JFrame) with the title"Factorial Calculator". - The window size is set to 400x200 pixels for a compact and user-friendly layout.
- The
BorderLayoutmanager is used, dividing the window into regions: North, Center, and South. This ensures a clean layout for the input field, button, and result label.

- Create an input panel using a
JPanelwithFlowLayout, which horizontally aligns components (a label and a text field). - The program uses a
JLabelto give the user a prompt for input, e.g., enter an integer:, making it intuitive. - A
JTextFieldis added that would take input from the users, given a width of 10 columns that would make it convenient for users entering numbers.

- Another
JPanelis created to hold the result label, which will display the factorial result dynamically. - The
JLabelis initialized with default text:"Result will be displayed here.". This is just a placeholder that will be updated when the button is clicked. - This label is placed in a separate panel to keep the layout clean and organized, where the result is visually separated from the input controls.

- A
JButtonwith label"Calculate"is defined and assigned a preferred size of 150x30 pixels for being more eye-catching and friendly. - This button will activate the calculation logic. Its label will be later set dynamically to reflect the factorial as
N!.

- The
ActionListenerhandles button clicks by performing the following steps: - Retrieves the user input from the text field and parses it into an integer.
- Validates the input to ensure it is a positive integer and less than 17.
- If the input is invalid, the program will use
JOptionPanedialogs to display appropriate error messages to the user.

- Once the input is validated, the program calculates the factorial using a
forloop. - A
longvariable is used to store the factorial because the values can grow large as the number increases. - The loop runs from
1toN(inclusive) multiplying the result in each iteration to calculate the factorial.

- Once the factorial is calculated:
- Dynamically update the label on the button to print the format of the factorial to be calculated (in case the user input was
5, say, the button will print"5!") - Update the result label (
JLabel) to print the calculated factorial.

- If the user input is something other than numeric (letters or special characters), it catches a
NumberFormatExceptionand displays an error message through aJOptionPanedialog.

- The input panel, which is the panel that contains the label and text field, is added to the North region of the frame.
- The button is added to the Center region.
- The output panel, which contains the result label, is added to the South region.
- This layout is clean and structured.
- Finally, the frame is made visible by calling
setVisible(true).

Here is the interface of the program where there is an input field which accepts the number for which we want to calculate the factorial. Then there is a big button which is used to trigger the calculation for the factorial. At the end there is a label which is used to display the result of the factorial.
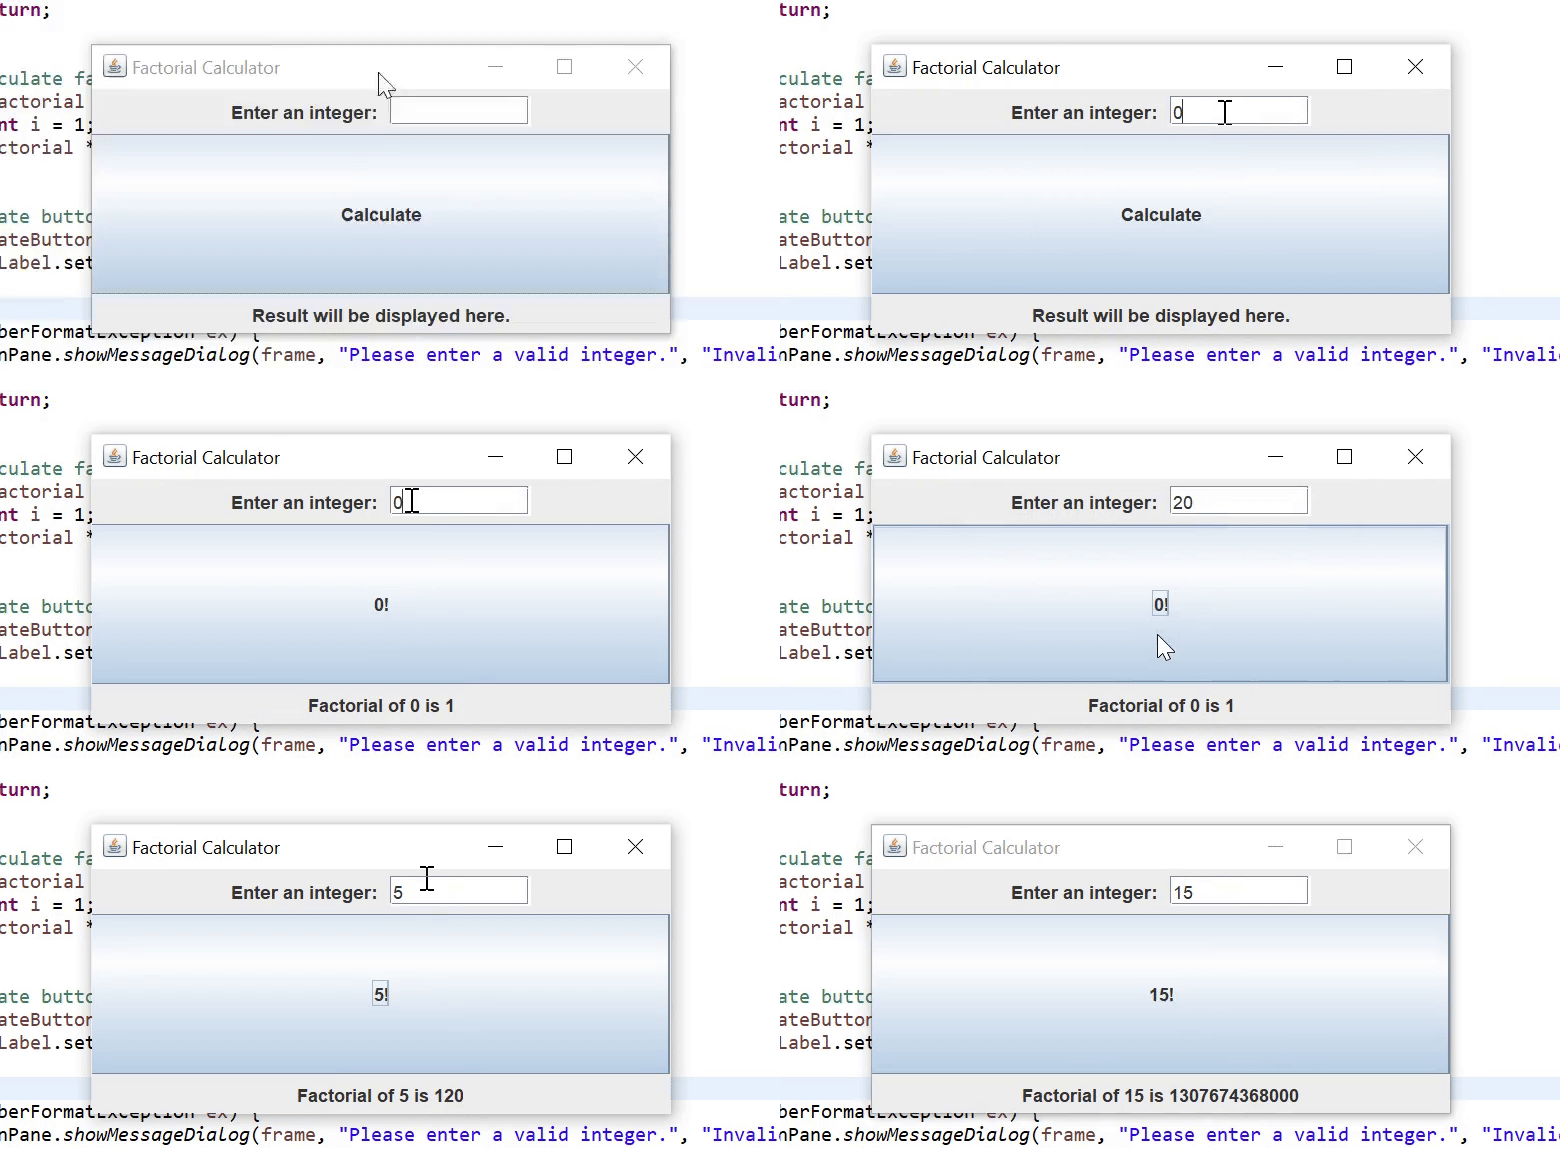
Here you can see that the application handling the inputs finely because when I am entering a number 17 or greater than this then the program is displaying a warning message to use a lower number.
Exercise 6: What is Your Age?
Design the following layout by considering the panels and layout managers required. The three white text fields should be editable, while the blue one should not. Your source files should be in a package named ageIHM.
This program has two parts as defined by the professor one part is for the user interface and the other part is for the event handling. Here is the program for the first part which is used to build the graphical user interface for the age calculator application:


In this code all the user interface has been defined. There is a main frame which has the size of 400 pixels wide and 200 pixels tall.
There is grid layout for the aliment and consistency.
Then there are the text fields and the labels for the text fields for the easy navigation. Each label is specific to display information for the input field.
Then there is the code to add components to the input panel. Each input component is specific to the input field and label.
Then there is the creation of the button panel which adds two buttons in the user interface. One is the ageButton
and the other is thereverseButton`.Then there is the setting for the location of the panels. The input panel is in the centre and the button panel is in the bottom.
The frame is set as visible so that it can display on the screen.
At the end I am passing the components to the file of the event handlers so that all the inputs gotten from the user interface can be passed successfully to the event handler and then the event handler will use those information for the calculation of the age.

Here you can see the graphical user interface made by the code. There are three input fields of white colour and these are editable and they can accept data from the user. Then there a is a blue field which is used to display the result and it is not editable. At the end there are two buttons Age? and Reverse.

This is the code for the event handling. It gets the components from the graphical user interface and then performs the functions of the calculation of the age.
There is the usage of the
try-catchmethod. The functionactionPerformedis using thetrymethod to calculate the age.This function first gets the current year and then it converts the string value into the integer.
Then there is the formula to calculate the age of the user. It calculates the age by subtracting the
birthYearfrom thecurrentYear.If the user do not enter the year of birth in the correct format then the
catchdisplays the error to put a valid birth year.At the end there is the functionality for the reverse button. This takes the Birth Year text from the text field reverses the string and displays the reversed result in the blue text field.
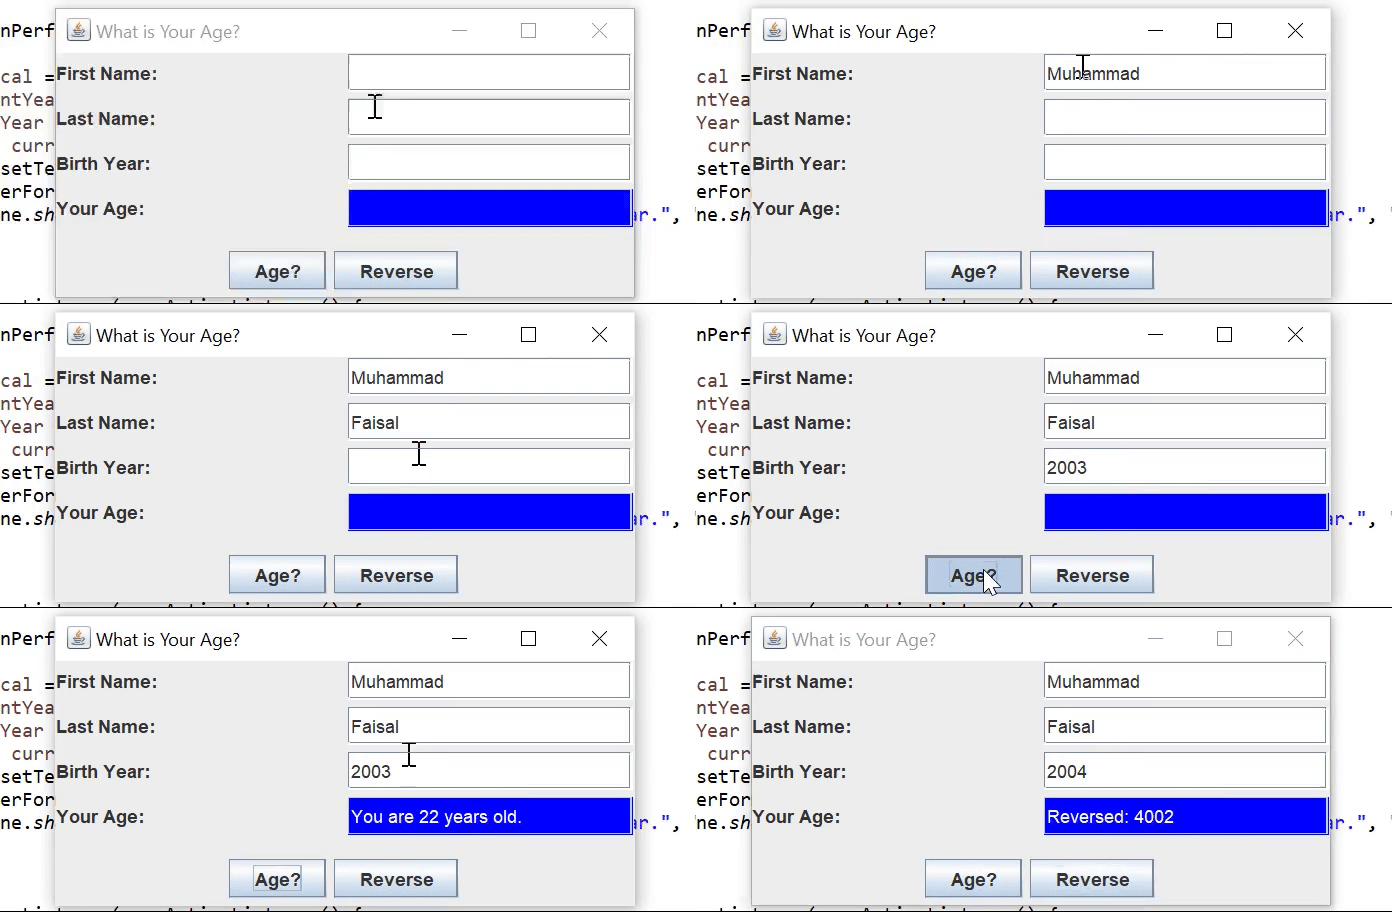
This is the complete working of the application. The input fields are accepting the first name and the last name and the birth year. After adding all the data when the age button is pressed it validates the inputs and then it calculate the age of the user. And when the reverse button is clicked then it reverses the birth year entered in the field.
Exercise 7: JTable Component
Write a Student class with name and firstName as string attributes.
This program or the task is divided into 5 major parts where one part is for the creation of the Student class, StudentLanguage class, LanguageService class, LanguageModel class and GUI.
1. Student Class

This is the
Studentclass which has two attributesnameandfirstName.There is a constructor which initializes the
nameandfirstName.There are two getters for the attributes.
2. StudentLanguage class

This is the
StudentLanguageclass which has two attributesstudentandfavoriteLanguage.There is a constructor which initializes the
studentandfavoriteLanguage. There are two getters for the attributes.This class will associate the
Studentobject with their favourite programming language.
3. LanguageService class

This is the
LanguageServiceclass which has a private constructor for the Singleton.This class has the hardcoded data of the students with their name, first name and favourite programming languages according to the requirements.
Then there is a method which is used to get the instance for the Singleton. for their favourite programming languages.
At the end there is a meth to get the list of the students.
4. LanguageModel class


This is the
LanguageModelclass which extendsAbstractTableModelto provide data to theJTable.There is an array with the name
headerand it has different values such as"Name", "First Name", "Favorite Language".Then there is a constructor for the
LanguageModeland it initializes thelanguageServiceandstudentLanguages.Then there is the implementation of the
getColumnCount,getColumnName,getRowCount,getValueAtandgetColumnClass,The method
getValueAtaccepts therowIndexandcolumnIndexin the integer form. This method get the data and then set into the respective columns with the help of the switch case.At the end there is a method which sorts the student data alphabetically according to their favourite language.
5. GUI

This is the graphical user interface code which builds the user interface of the application.
This displays the data in the
JTableand it allows the sorting of the data alphabetically according to the favourite programming language.It sets the colour to red for the Java language.
This code creates instance for the
LanguageServiceand then it creates a table model andJTable.It has a custom cell renderer for the favourite language column. It checks that if the favourite language is the Java then it sets red colour and for other languages it sets blue colour for the other languages.
Finally it creates a fame and then it adds table to the frame and at the end there is a code to show the frame on the desktop.

Here you can see the output of the complete JTable component. There are three columns in the application. The first column shows the name, the next shows the first name and then the last column is used to display the favourite programming language of the students. We can notice the students are aligned alphabetically with respect to their favourite programming languages. And all the columns where the favourite programming language is Java the colour of the language is red and the colour of the other languages is blue. We can see that most of the students have Java as their favourite programming language.
@tipu curate
Downvoting a post can decrease pending rewards and make it less visible. Common reasons:
Submit