Computer Repair - The Motherboard
Week 2 of the Steemit Learning Challenge Season 23 is unfolding with an exciting learning adventure into the computer. This week, we are working on the motherboard.
I had to read through this lesson twice to get ready for the week's homework task.
Task 1:
First Experience with a Motherboard
Question: Remember your first experience with a motherboard. Did you intend to repair it, or were you just curious to see the inside of a central unit? What was your reaction to this technical complexity? If you have never had this experience, take the time this week to open a central unit and explore its motherboard. Share your observations and impressions, including a photo of your exploration.
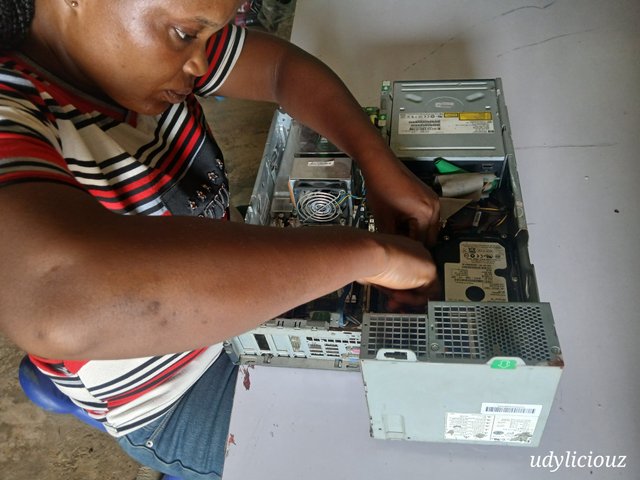
The first time I looked into the interior of a system unit, I was not trying to fix it, our tech support staff was on the phone with my boss, explaining why the system needed more RAM. My boss asked me to look at what the tech support staff was saying. I did not know much about computer hardware, so I took a quick pick. It was dusty and full of wires.
On that day, I lost some of the esteem I had for computers. It was simply an empty dusty box with wires crossing each other. I was expecting to see something thick and full of parts. The thought that came into my mind was, is this how empty this thing has been?
It really fell short of my expectations. The inside of my father's old Television was more complex and clean compared to what I saw that day.
Task 2:
Identifying Motherboard Components
Question: Take a photo of a motherboard, either your PC's or another PC's. Identify and name its main components, specifying their role. Describe the processor socket, RAM slots, chipset, PCIe ports, SATA and M.2 connectors, power connectors, CMOS battery, and any other visible elements. Also indicate the model of the motherboard studied.
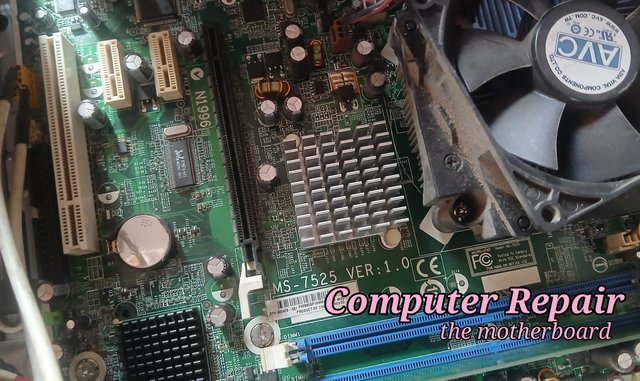
The motherboard I am exploring is an MSI MS-7525 (HP OEM) motherboard installed on an HP mini tower system. Here is a picture of the motherboard.

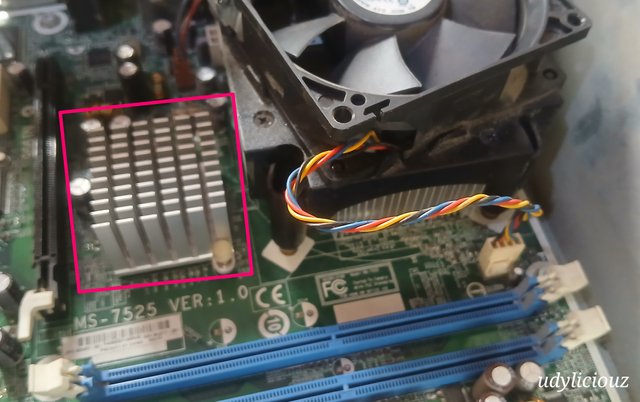
The CPU and fan
One of the key components on this board is the microprocessor and its cooling fan. The CPU is an Intel dual-core processor running at 3GHz with an L2 cache of 2Mb. Its temperature is regulated by a powerful fan mounted on a heat sink to help extract and dissipate heat.
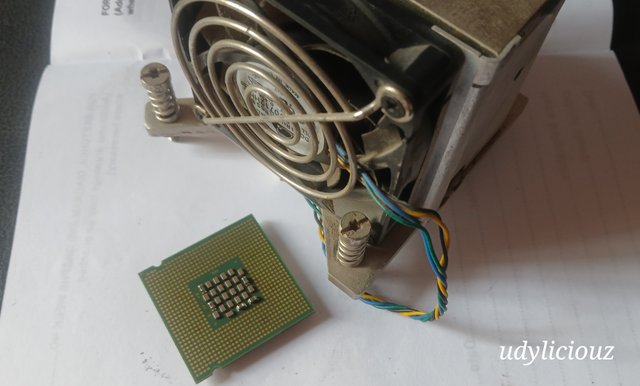
CPU Socket
The CPU is mounted on an LGA 775 socket that supports a pinless processor with connectors arranged in a land grid array format
System Bus
This motherboard is designed to support a clock speed of 1333MHz as FSB when the processor is communicating with the RAM and basic peripherals.
RAM slots
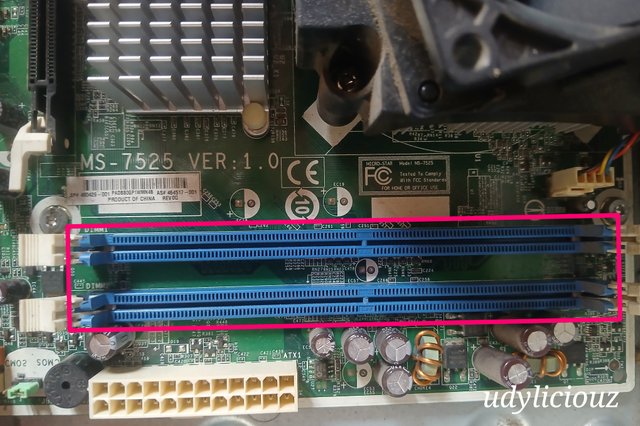
The motherboard in this system unit is equipped with two DDR-2 RAM slots colour-coded with blue. The slot can carry a combined capacity of 4Gb of memory, a feature largely responsible for the overall speed of the computer. An orientation notch on the RAM slot prevents connecting the RAM module wrongly and also screens off the wrong RAM type.
Chipset
Outstanding among the chipsets is the Southbridge chipset, which is responsible for adjusting the clock speed so that slower components can communicate with the CPU. Some chipsets care for sound, video, network connectivity, and input and output devices.
PCIe ports
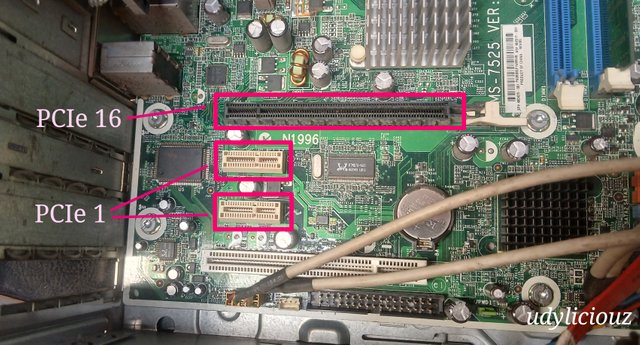
The peripheral component interconnector express slot is an expansion slot that allows us to connect different cards like graphic cards, sound cards, network, storage and others. It comes in different sizes from x1, x4, x8 and x16 and can support speeds from 0.1, 0.2 to 0.5.
SATA
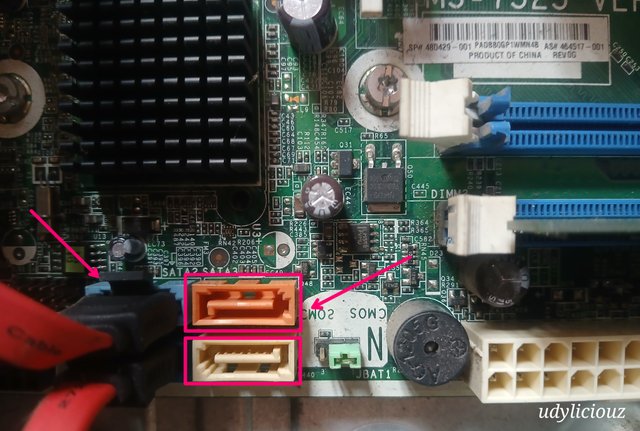
The Serial Advanced Technology Attachment has replaced the IDE technology for connecting drives to a computer motherboard. The serial data transmission is faster than the parallel transmission that was previously used, and it also supports hot swapping. The SATA interface has a 7-pin data transfer connector and a 15-pin power connector interface.
M.2 connectors
The system unit I was exploring did not have any M.2 connectors. M2 connectors are found on newer models of motherboards, but you will easily see them on the underside of laptops. At a 45° angle, you insert a network module, a LAN or a WAN module into an M.2 connector, press it down and clip or screw it down.
Power connectors
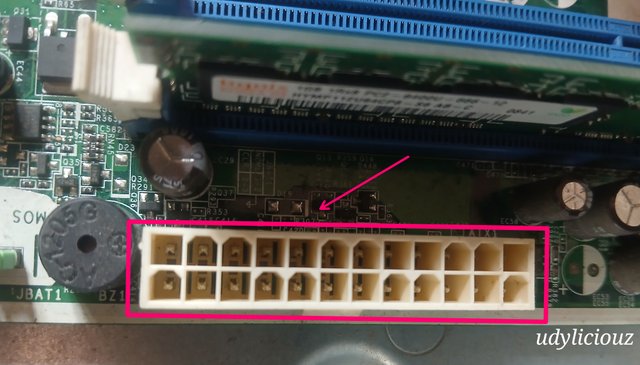
This motherboard requires a 24-pin connector power supply from an ATX power unit. Each colour-coated cable supplies a specific voltage or signal to the motherboard. The ATX power supply is more advanced compared to the AT power system. The ATX power is so smart that it can be controlled using computer software.
CMOS battery
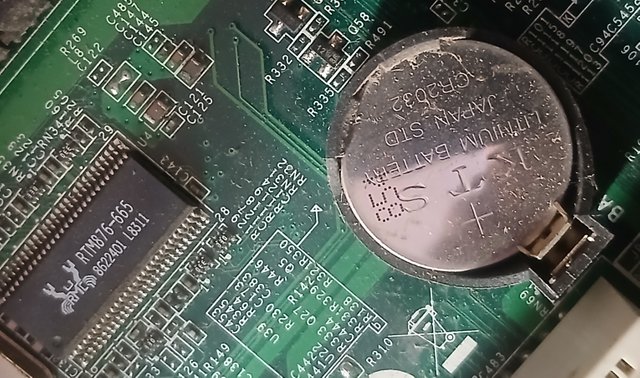
The CMOS battery is a Lithium-coin cell battery mounted on the motherboard to keep time, configuration settings and other information about the state of the computer. It is responsible for keeping some parts of the computer alive even when it is not in use for years when sitting on a shelf in the shop or at home.
Task 3:
External Ports Identification
Question: Take pictures of the back of the PC to capture the external ports. Identify the different ports and explain their functions. Compare USB, HDMI, DisplayPort, VGA, Ethernet, audio jack, PS/2, and any other available ports. Detail their uses and differences.
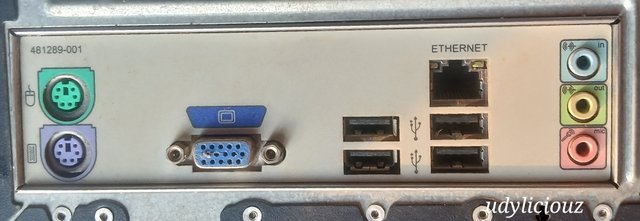
These are all the input and output ports available at the back of the computer motherboard I was exploring
USB
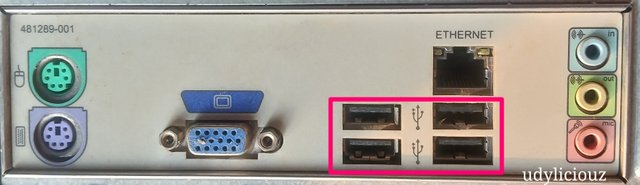
The universal serial bus has become the standard for connecting devices to computers. It is a type of serial connector that replaced the old 9-pin serial port and parallel ports. USB ports are used to connect flash drives, keyboards, mice, printers, game controllers and smartphones.
HDMI
HDMI is a digital high-definition multimedia interface for transferring compressed video and audio data to a display device. Some HDMI are more powerful than others ranging from HDMI 1.0, 1.3, 1.4, 2.0 and 2.1.
The HDMI interface has a type-A, type-C and a type-D. HDMI are often used to connect Televisions, computer monitors, projectors and gaming consoles.
DisplayPort
This system has no display port; they are found on newer models of computers, carrying digital video and audio signals and can support multiple monitors at once. It is easy to use because the connector is reversible. They are better than VGA connectors.
VGA

A VGA is an old analogue connector interface for video. Unlike the HDMI and Display port, It carries no audio and only transmits analogue signals at low resolutions to an analogue display monitor.
Ethernet
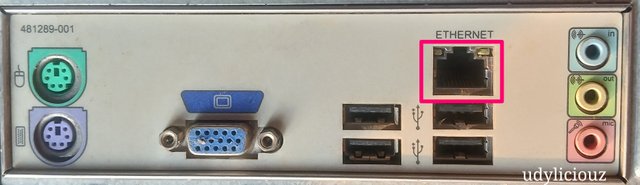
This is the port into which you plug an Rj-45 connector from a wired local area network. The port usually has two LEDs that blink when there is a data transmission. It is used when creating a computer network.
audio jack
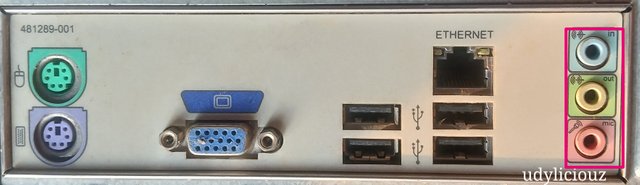
The three audio jack for sound input, output and an auxiliary. On this port, you can connect a system speaker, headphones
PS/2
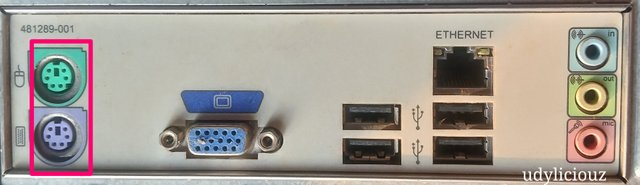
The PS/2 was the old standard for connecting a computer mouse and keyboard. The ports have colour coding: green for the mouse and purple for the keyboard. Interchanging the ports will not work; the keyboard must be connected to the correct port.
Task 4:
Motherboard Failures and Solutions
Question: Have you ever encountered a failure affecting your PC’s motherboard? If yes, explain the failure and how you fixed it. If not, mention some common failures such as power supply problems, BIOS problems, overheating components, swollen capacitors, or faulty RAM. Describe possible solutions for each problem.
Problem
The problem I had with my system was a situation where each time I power the computer, it will boot and prompt me to go to setup. Complaining of date and time not being set.
I will have to go into setup and adjust a few settings before the system will boot to the desktop.
Solution:
At a point, I got tired of passing through the setup. I went to a computer shop and got a CMOS battery. Called a friend who helped me fix the battery. If I knew it was that simple, I would not have called.
After that incident, I can now change the battery, run the setup, detect drives and set the boot sequence.
Task 5:
Preventive Measures
Question: How can you prevent dust accumulation, overheating, and power surges? Why is it important to check component compatibility and connections? What are the risks associated with BIOS updates and humidity?
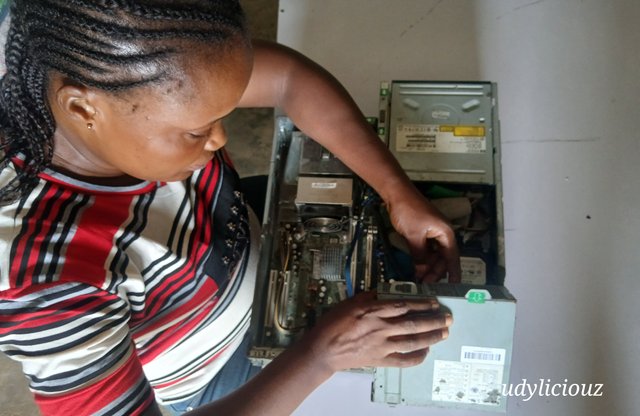
To prevent dust accumulation, keep the system in a dust-free room. Schedule a periodic cleaning using compressed air. Clean with a soft brush. You will have to open into the system unit as demonstrated in the picture above.

To prevent a power surge from affecting your computer, connect your computer using a good surge protector. Use good brands of UPS that have built-in surge protection capability.
When acquiring new components for replacement or upgrade. It is important to confirm that they are compatible so that they will physically connect to each other. Getting a DDR RAM when you need a DDR-2 will not work. You will not be able to fit it in and if you force it in, you will damage the RAM or the motherboard.
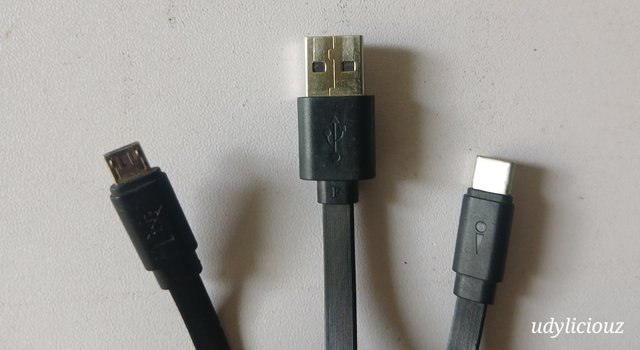
The picture above shows 3 types of USB which is a good reason you should pay attention to the type of connection. You can not use one USB in place of the other. The same will happen if you get the wrong HDMI type.
Things can go bad during a BIOS update. If power is lost during the process, you will lose the motherboard. A virus-infected device can spoil the whole process, and the worst problem is updating with software that ends up not being compatible with most of the motherboard chipsets.
Humidity can lead to corrosion of components parts and can create buildups that could lead to short circuit,
Thanks to my instructor for the training and evaluation questions and to Steemit for organising this learning opportunity. I am inviting @josepha, @dequeen, @okere-blessing and @bela90 to participate in this very informative contest.