Steemian Friends,
Today, I will write the Steemit Learning Challenge 22 week 02 lesson. Today, I will discuss Electrical Earthing and Motor Control Circuits for students. We know that electrical accidents are very serious. Proper grounding is very important to prevent electrical accidents. Besides learning about earthing, we will learn about motor control circuits in the industrial electrical sector. We learned about motor power circuits in Learning Challenge 21. So without delay, let's start the lesson.
Design By Canva
Earthing is the process of returning unwanted electricity deep into the ground through a system. It protects electrical home appliances from damage caused by excess current caused by electrical faults or lightning. Earthing is very important in a power system. There are different types of earthing based on power usage and load.
Normally, electrical lines consist of three cables: Phase, Neutral, and Earthing. We use red wire for phase, black wire for neutral, and green wire for earthing. In electrical standard lines, cables are identified by color.
Today, we start with neutral and earthing. Neutral is the means of completing an electrical circuit. It is used to return power from load to source. An electrical circuit is completed with a phase and a neutral wire.
On the other hand, earthing protects electrical equipment by sending unwanted current to the ground in case of an electrical accident. We use the green wire to send unwanted electricity to the ground, following certain rules. Earthing protects electrical home appliances from accidents.
There are three types of earthing in a house.
- Earthing for use at neutral
- Body earthing
- Lightning arrester earthing
Neutral Safety Earthing:
In an electrical accident, the earthing that sends the excess current to the ground through the neutral wire is called neutral safety earthing. During house wiring, we use phase, neutral, and earthing wires. House wiring is completed with red, black, and green wires. Check neutral earthing in your home. If neutral earthing is not done, make sure to do neutral earthing.
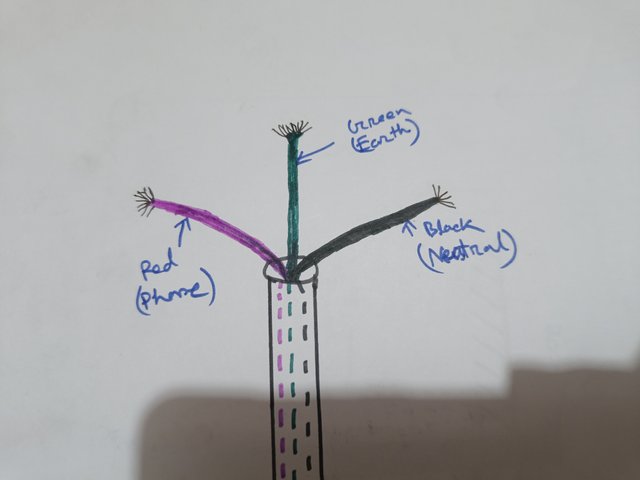
Neutral Safety Earthing
Body Earthing:
Body earthing is done separately for electrical home appliances like fridges, TVs, and air conditioners. Sometimes, you will notice in your home that when you touch the CPU or refrigerator, it feels like an electric shock. There will be no electric shock if you body earth your CPU or fridge. Body earthing is required for electrical home appliances that draw a lot of current. Earthing can be done at any end of the body of electrical home appliances.
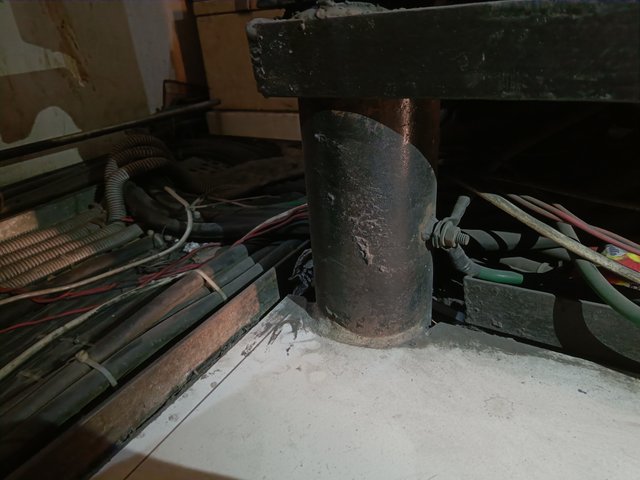
This is body Earthing(Green Wire)
Lightning arrester:
Earthing that is done to protect the electrical home appliances of our house in case of sudden lightning is called lightning arrester earthing. Our next lesson will discuss lightning arresters.
Four types of earthing:
- Rod earthing
- Plate earthing
- Pipe earthing
- Boarding earthing
We do most of the rod earthing in our house. Rod earthing costs less. We do rod earthing for neutral and body earthing. Rod earthing is used especially in house wiring of low loads such as houses. I have shown the rod earthing technique in the diagram below.
Materials required for rod earthing:
- GI wire(8 mm)
- A metal rod (16 mm)
- Necessary coal and salt.
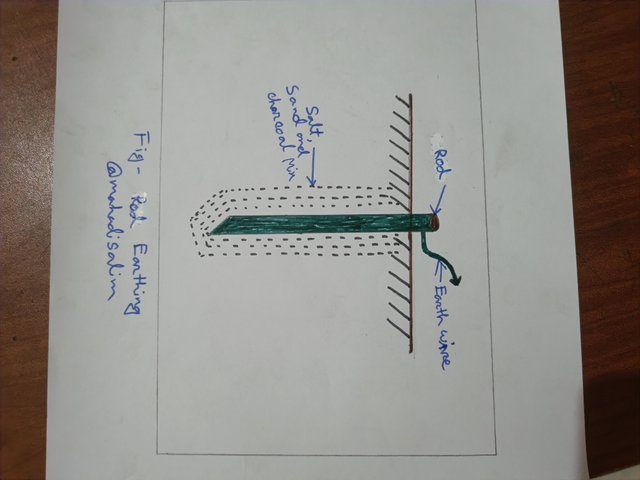
We will first determine the location for rod earthing. I will do earthing around the house where moisture or the soil is wet with water. Then, we will dig the soil till we get the soil moist. Only three to four feet of damp soil are found in some places. In this case, we will not specify the depth. However, rod earthing is of good quality when it is approximately eight to ten feet deep.
Then, we will dig the soil in a one-foot circle. I will connect the GI wire well to the head of the earthing rod. Then, I will put the rod in the dug hole and sprinkle the necessary salt and coal all around. Then, we will cover the surface of the soil with concrete so that after a few days, we can lift the cover and add water. The wetter the ground, the better the quality of the earthing.
Plate earthing removes excess current by placing a copper or steel plate deep in the ground and connecting it to an electrical line with a wire. I have shown the method of earthing a plate in the picture below. Plate earthing is useful for homes and low electrical loads.
Materials required for rod earthing:
- GI wire(8 mm)
- Metal or copper Plate (2/2) fit, Thickness 5 mm.
- Necessary coal and salt.
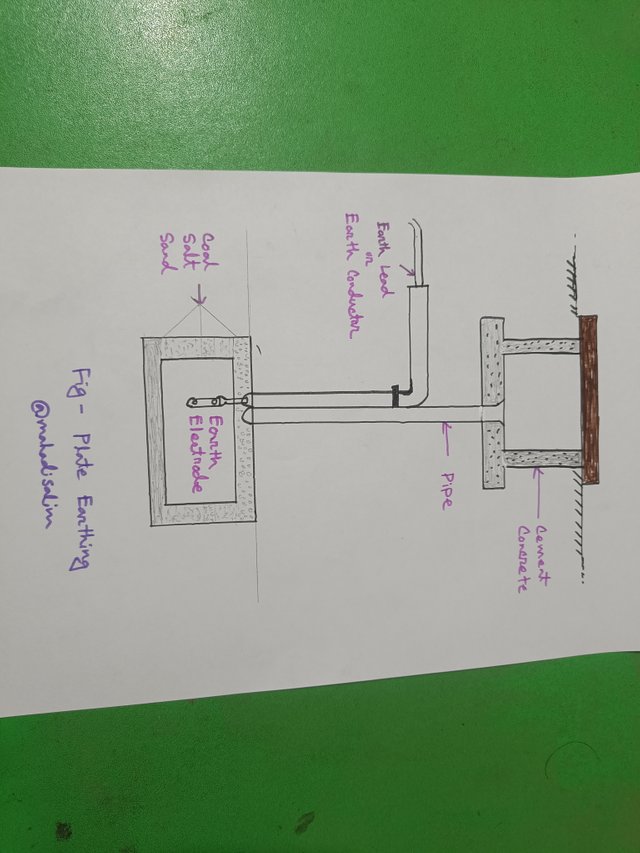
First, we take a (2/2) ft copper or steel plate of dia 5 mm. Then, we find the wet ground. We dig the soil three or four feet deep. After we dig the soil, if we find a layer of wet soil or water, we will place the piece of copper or steel. I will bring out an 8 mm cable connection from the copper plate.
Then, we will put charcoal and salt around the hole in the soil. Then, we place a GI pipe on the plate. After a few days, watering the pipe can keep the area wet. The wetter the earthing site is, the better the earthing will work. Then, concrete cover is put on the surface of the soil.
Pipe earthing is a very simple earthing method. It involves transmitting unwanted electricity to the ground by placing a steel pipe deep into the ground. I have shown the method of pipe earthing in the picture below.
Materials required for rod earthing:
- GI wire(8 mm)
- A metal Pipe (2-inch Dia)
- Necessary coal and salt.
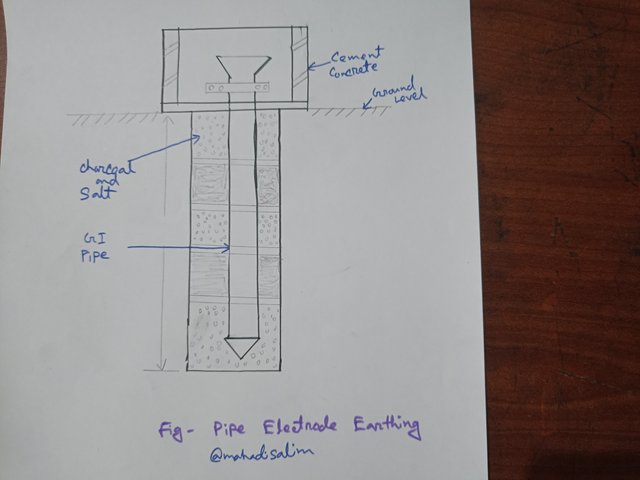
Take a steel pipe 2 or 3 inches in diameter. Then, dig the wet soil three or four feet deep. The diameter of the hole shall be one foot. Then put the steel pipe in the hole and give coal and salt all around. Then, I use a concrete cover on the soil's surface to keep the area wet with water through a pipe every few days.
Boarding earthing is very expensive earthing. Boarding earthing is required for power stations, industrial sectors, and high-load applications. 150 feet of 8 mm diameter copper wire is required for boarding earthing. Then, the copper wire has to be placed deep by a bore about 150 feet underground. Then, add coal and salt. I have done about thirty boarding earthings for our company. Boarding earthing done for electrical substations and large transformers.
There are earth meters to measure earthing. Like other electrical meters, there are earth meters or earth testers. I have an earth meter in my office. I sometimes do earthing tests. Below, I have given a picture of an earth meter test.
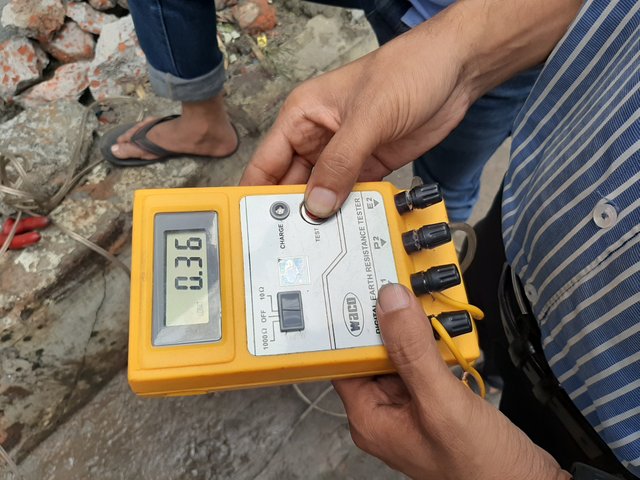
The earth meter has three connectors. A P1 connector is fitted to the earthing rod. Then, P2 is connected by placing a steel rod two feet down at a distance of three meters. Then, connect the P3 connector three meters from the P2 steel rod and another two feet below the ground. Then I push in a test knob on the earth meter. Then, see a value on the meter display.
The value of earthing is written in ohms. We calculate up to 5 ohms for homes. The earthing quality is not good if it is more than 5 ohms.
Earthing values in power stations and industrial sectors are calculated up to 1 ohm. Earthing value above 1 ohm is not accepted. I hope you have learned about Earthing.
If the earthing value is high, then if we put the earthing electrode deeper into the soil or wet the soil with water for earthing, the earthing value will decrease.
The motor control circuit is the electrical panel we make to start and stop small and large motors. We control the motor in three ways, according to its size and rating.
- DOL Starter
- Star Delta Starter
- Forward Reverse Starter
We will discuss control circuits today since we discussed power circuits in the previous learning lesson. Control circuits are more complex than power circuits. Below, I have diagrammed each control circuit.
Below are the names of some electrical symbols of control circuits.
- Start Push Button(SPB)
- Stop Push Button(SPB)
- Timer Coil
- Star contact Coil A1, A2
- Delta contact Coil A1, A2
- Star Auxilary Contact KM1
- Delta Auxilary Contact KM2
- Main Auxilary Contact KM3
- Over Load Relay (o/l)
- NO = Normally Open
- NC = Normally Close
DOL Starter Control Connection:
First, we make a control connection from 6A MCB to the phase and neutral wire. Then, we connect the overload with the phase wire. Finally, we make a phase connection with an off-push. Now, we can turn off the motor by off-push.
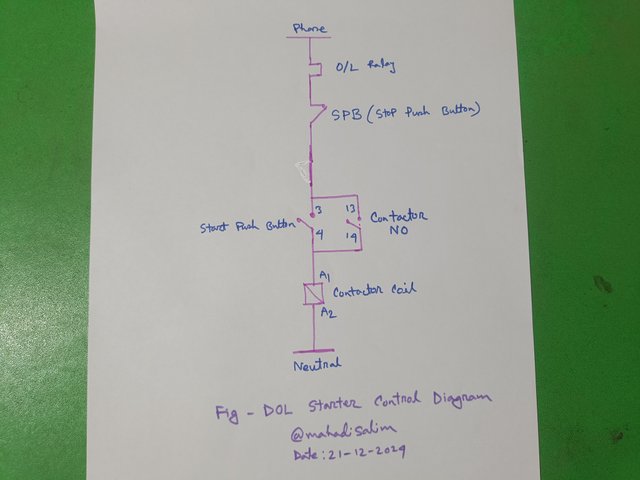
Then, we make the phase connection with an ON push. Connect the magnetic contact to the coil (A1) of the ON push button. Connect the other end to NO. The entire connection diagram is shown.
Forward Reverse Starter Control Circuit:
If you look at the control circuit, you will see that the circuit is arranged in two parts. One for forward and the other for reverse. A magnetic contact is turned on in the forward part of the circuit. The reverse contact turns on when the motor needs to rotate in reverse.
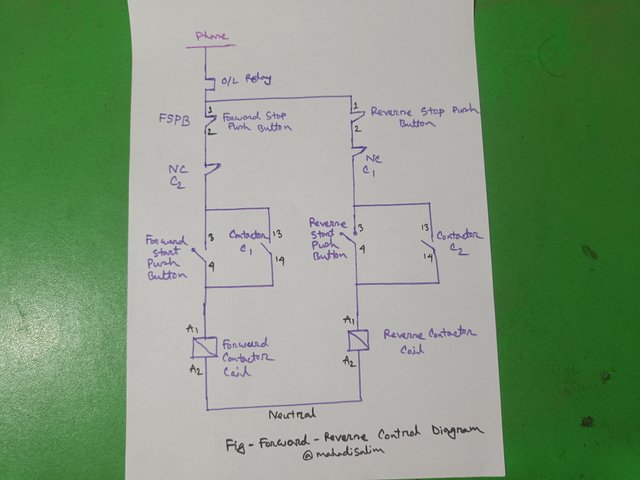
An MCB does not have phase and neutral wires. Then, connect the phase to overload first. Then, make a phase connection at the off-push. Then, make a push phase connection. Connect coil (A1) of magnetic contact to the other end of ON push and NO connection of magnetic contact.
Similarly, for reverse, connect one wire from phase to ON push. The other end of the ON push is connected to the coil (A1) of the reverse magnetic contact. Then, connect the reverse magnetic contact to NO. It is shown in the picture.
Star Delta Starter Control Circuit:
In the figure, first, provide the phase and neutral lines from an MCB. Connect the phase to an o/l relay and a stop push button. We will use this to turn off the motor.
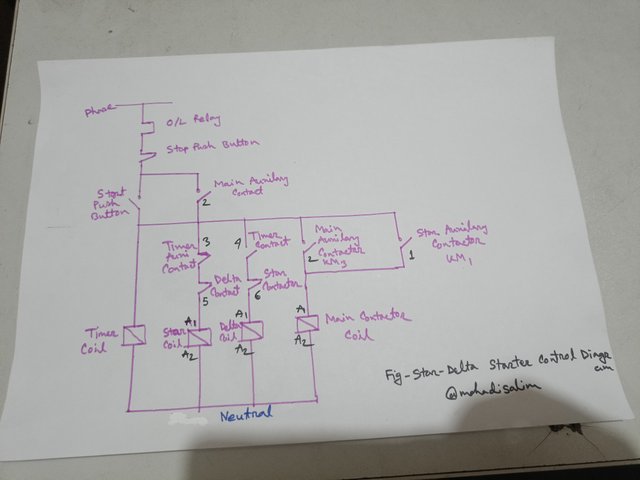
Then, we connect the start push button and a timer relay. Time will be set in the timer relay. After that, the motor will start by going from star to delta.
Then, we will make the auxiliary connection to the main contact. When the start push button is pressed, the star contact will turn on according to the time of the timer (3), and the motor will start.
Then, according to the timer's setup, the timer (4) contact will turn on, and the delta contact will turn on. Then, the star contact will be off, and the motor will start in the delta.
We start motors above 5 kW with star delta starters. A star delta starter increases the motor's life by taking too much current at the start and starting the motor in the star. We learned to draw a star delta power circuit in Learning Challenge 21, so today, we will learn control circuit drawing.
A. Write about the importance and use of earthing in your country.
B. Write the differences between earthing and neutral.
C. When you touch the body of an electrical home appliance in your home or office, what kind of earthing do you use and why?
D. Draw any one type of motor starter control circuit and describe the diagram.
[Note: Must be different from my drawing.]
E. Practical:
Make a rod or pipe earthing for your home and share the process in pictures or videos.
[Note: This earthing will be useful in my next lesson for making lightning arresters in your home.]
F. 1 mark will be allotted based on circuit design and post quality.
Note: Please do not copy homework drawings.
Marks Distribution:
| Sl. No | Marks |
|---|---|
| A | 0.5 Marks |
| B | 0.5 Marks |
| C | 1 Marks |
| D | 2 Marks |
| E | 5 Marks |
| F | 1 Mark |
- Your title should be "Electrical Earthing and Motor Control Circuits."
- The content must be #steemexclusive.
- The article must contain the tag #electricity-s22w2.
- Plagiarism is not allowed.
- The link of your task must be added in the comments of this publication.
- Use the burnsteem25 tag only if you have set the 25% payout to @null.
- You can publish homework in any community and in any language. But don't forget to use the original tag.
- Invite three of your active Steemian friends.
- The participation schedule is between Monday, December 23, 2024, at 00:00 UTC to Sunday, - December 29, 2024, at 23:59 UTC.
SC01/SC02 would check on the entire 15 participating Teaching Teams and Challengers and upvote outstanding content. Upvotes are not guaranteed for all articles.
At the end of the week, we would nominate the top 4 users who had performed well in the contest and would be eligible for votes from SC01/SC02.

Best Regards,
Industrial Electrical Instructor
@mahadisalim


@mahadisalim
It would be better to include some sort of practical problem or calculations in your homework tasks to make them more difficult.
Downvoting a post can decrease pending rewards and make it less visible. Common reasons:
Submit
Dear Sir,
Thank you very much for the suggestion. I did not give practical considering the cost to users. I am motivated to give practicals after receiving your advice. I have added a practical homework below. This will be needed by the students in the next lesson and will be used to make lightning arresters at home.
Downvoting a post can decrease pending rewards and make it less visible. Common reasons:
Submit
This is my Twitter share link :
https://twitter.com/mahadih83660186/status/1870784939907850586?t=SNoWFONXWoe5911M9fuZNA&s=19
Downvoting a post can decrease pending rewards and make it less visible. Common reasons:
Submit
This is My entry link:-
https://steemit.com/hive-153970/@mdpolasmia/electrical-earthing-and-motor-control-circuits
Downvoting a post can decrease pending rewards and make it less visible. Common reasons:
Submit
My entry :
https://steemit.com/hive-193637/@shadow04/electrical-earthing-and-motor-control-circuits
Downvoting a post can decrease pending rewards and make it less visible. Common reasons:
Submit
My entry link
https://steemit.com/electricity-s22w2/@drcrypto1/slc-s22w2-electrical-earthing-and-motor-control-circuits
Downvoting a post can decrease pending rewards and make it less visible. Common reasons:
Submit
My entry
https://steemit.com/hive-167213/@dwings/electrical-earthing-and-motor-control-circuits
Downvoting a post can decrease pending rewards and make it less visible. Common reasons:
Submit