BUIDL :: How to deploy SmartContracts without a full node.
When people get started with Smart Contract development, there is a tendency to gloss over how to get the sample code they are playing with to actually deploy to a public blockchain. That’s a critical part of software development, and important to understand. After all, what good is a smart contract that never gets an audience? We ought to make sure the seats and venue exist before we start advertising its existence! Time to deploy.
We’ll be referencing the same GreatestShow contract from the ComeOneComeAll project we started in the prior article in the #HowToBUIDL series, entitled ‘Your First Smart Contract’ so if you haven’t built it yourself, go ahead and grab a copy of the example project before proceeding.

So far we have built our GreatestShow smart contract, but we have not even run it locally. Let’s do that for a second. Open up a console window in the base of your project and run the simulator for a blockchain, called testrpc.
testrpc is a Node.js based Ethereum client for testing and development. It uses ethereumjs to simulate full client behavior and make developing Ethereum applications much faster. It also includes all popular RPC functions and features (like events) and can be run deterministically to make development a breeze.
Be sure that you have installed testrpc on the command line.
npm install -g ethereumjs-testrpc
Then, fire up an instance of testrpc, which is a great way of running a test blockchain that adheres to the Ethereum protocol while simulated mining, so making function calls and submitting transactions is fast and efficient. Accounts can be re-used and reset. Not to be used for production, but definitely used in the development & test stages.
testrpc -m “warrior minimum breeze raven garden express solar flavor obvious twenty alpha actress”
Starting testrpc with the -m flag allows you to specify a 12 word mnemonic, for which all of the accounts generated by the program will use as its seed for creating private keys and account addresses. This is a detail we’ll skip over for now, but just no that using the same mnemonic each time we start allows us to deterministically know what accounts will be created. Once the process is running, we’ll know because we will have output that looks similar to this list of 10 available accounts, and their private keys.
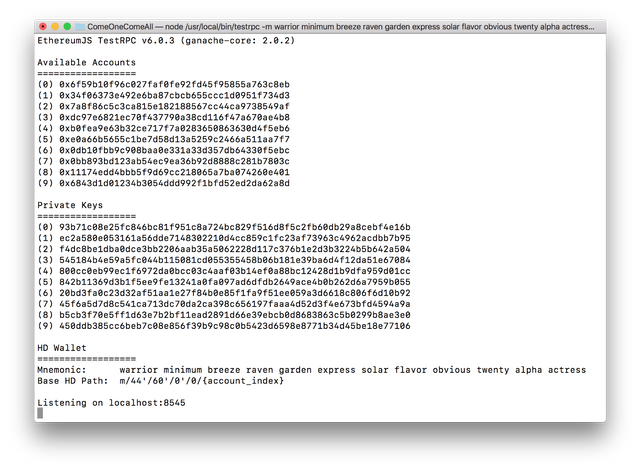
Now that we have a simulated blockchain running on our localhost on port 8545, clients can connect to it. Our first client will be the truffle console that is included as a part of the truffle framework. Go ahead and open a new tab and start the console.
truffle console
You’ll be prompted with a scary looking error. Don’t worry.
No network available. Use `truffle develop` or add network to truffle.js config.
Don’t bother using truffle develop as the message suggests, because we need to complete this step in order to proceed with connecting other networks in the future. This is a necessary step to understand how to connect to other networks.
Open up your editor (I’m using sublime, so I can type subl . at the prompt.
Open a file called truffle.js at the root of your configuration. Let’s define three different networks: development, ropsten, and mainnet. We’ll fill in the details for ropsten and mainnet later. Let’s just get this rolling with development for now. I like to keep thegas limit as close to the ropsten test network as possible, but that’s just a personal preference that has some practical purposes as well. I can guarantee my contracts never require the limits of the test network, which at this time are lower than mainnet. Stay under this limit and you’re golden for production as well.
let ropstenProvider, mainNetProvider;
module.exports = {
  networks: {
    development: { host: "localhost", port: 8545,
                   network_id: "*", gas: 4465030 },
    ropsten: { provider: ropstenProvider,
                   network_id: "3", gas: 4465030 },
    mainnet: { provider: mainNetProvider,
                   network_id: "1", gas: 7500000 }
  }
};
Be sure to save your file, then let’s head back to the console. This time typing truffle console will connect to your local testrpc and a couple lines will appear in the output, where the version and accounts are read in.


Functions and properties from web3.js library are available in the console. In the testrpc window, all interactions that are made with the localhost:8545 development network are logged. We can see that It is correctly configured.
Let’s have some fun. Time to deploy the GreatestShow contract to the development network. This is just our local machine, but it’s time to get some experience playing around with the contract anyway. In the truffle console:

The first time we’re deploying our GreatestShow contract is to a very tiny audience: ourselves.
GreatestShow.new("PT Barnum")
You will see a boatload of output in the screen, which is basically just a JSON text representation of the object that was created in your development environment. Notice that a Transaction actually took place, deploying your code to the local blockchain. Now there is an instance of your GreatestShow smart contract created at the address shown in the log. Notice that the same address and transactionHash appear in your JSON object.

On the left, you’ll see a series of RPC logs that transpired as a result of creating the new GreatestShow contract, including a Transaction hash.
We can gain a reference to the contract that was just created, using that address. Once we have a reference, we can start playing with it, calling functions and seeing its interaction with the blockchain:
show = GreatestShow.at('0xf2ddaa2b461af9955fbe220aa229806611f6ac02')
show.setAvailableSeats( 125 );
show.getAvailableSeats();
Pretty self-explanatory. We set 125 available seats, and check the data.
The act of changing data in our contract generated a new transaction!
This is important to understand. Any change to the state will require a valid transaction to move to a new state. In a real blockchain, nodes would achieve consensus through execution and validation of the code before storing the new state on the blockchain.
The Ethereum state transition function:
APPLY(S,TX) -> S'

Example of an Ethereum state transition. Calling a function that changes state requires a valid Transaction to be mined.
We’re not going into the calling of every function of our GreatestShow smart contract for this tutorial, but you can explore on your own by hitting the <tab> key after your variable name followed by a dot. Since we named our reference show it would be show.<tab> and the console will help hint at the properties and functions that are available on your contract. Notice that show.ringMaster refers to a public view function that does not change state, so calling it with show.ringMaster.call() does not require a Transaction.

Now, let’s kill the truffle console process by hitting ctrl-c. Start it back up again. Notice, since the state of a contract was stored in our one and only node, and that node died, starting it up without any context of the old blockchain will mean that we lose reference to our local contract. This is why development and testrpc are useful for small purposes like quick one-off tests and unit-testing (which we will cover in a future post). Notice that when we try to re-obtain a reference to the contract we created before killing testrpc, it is no longer available. We would have to re-create and redeploy it.
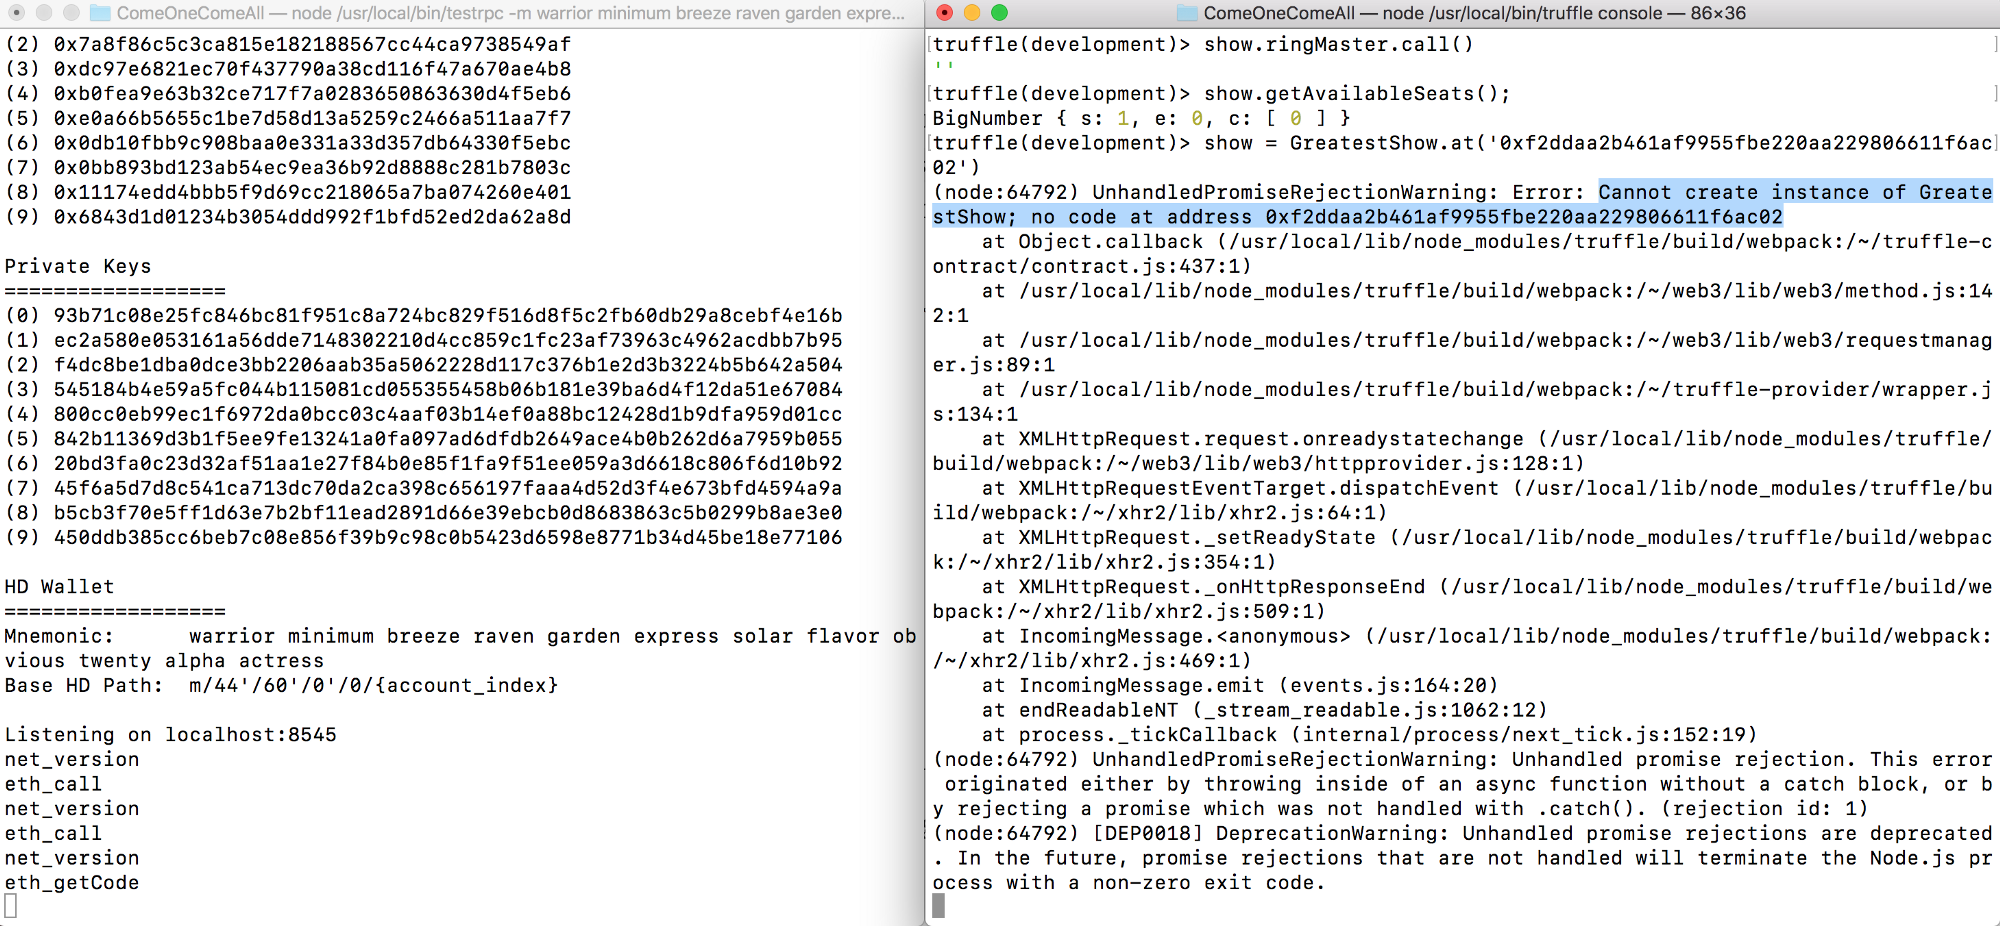
If we keep the code to ourself and our own machine, we can see it but nobody else can. Deploying locally for our own eyes and enjoyment wasn’t what I promised you. Not even close.

It’s empty and dark in our private Blockchain. Let’s deploy somewhere the rest of the world can see it.
For testing that spans development teams more than one person, or for state that must be persisted across many days, one option that is available is working with a real, persistent blockchain. You could start your own private Ethereum blockchain by firing up geth as well as start a few miners, but that gets you into other problems like server infrastructure costs and requires that you start having to figure out who is going to keep up with maintenance. Before you know it, now you’re no longer worrying about your core business, and wasting a lot of time on things outside of your core product or services.
Infura.io provides a way to connect to the popular Ethereum networks for FREE
What if I told you there was a way to connect & deploy to the Ethereum ropsten and mainnet for free? You wouldn’t have to worry about running nodes of your own, you wouldn’t have to worry about maintenance or downtime, and you could stay focused on your GreatestShow? There is.
Go to infura.io. Click ‘Get Started For Free’ & enter info. You’ll get an API Key.
The Mailing List is optional but keeps you up to date with news from Infura. Agreeing to the Terms of Service is required, but the legalese in the agreement is fairly standard. You’re agreeing to use a service that connects you to the ethereum network without requiring your own hardware. You agree to not use the service in a malicious way. Pretty fair terms and asymmetric risk/reward for using this product for free if you ask me.
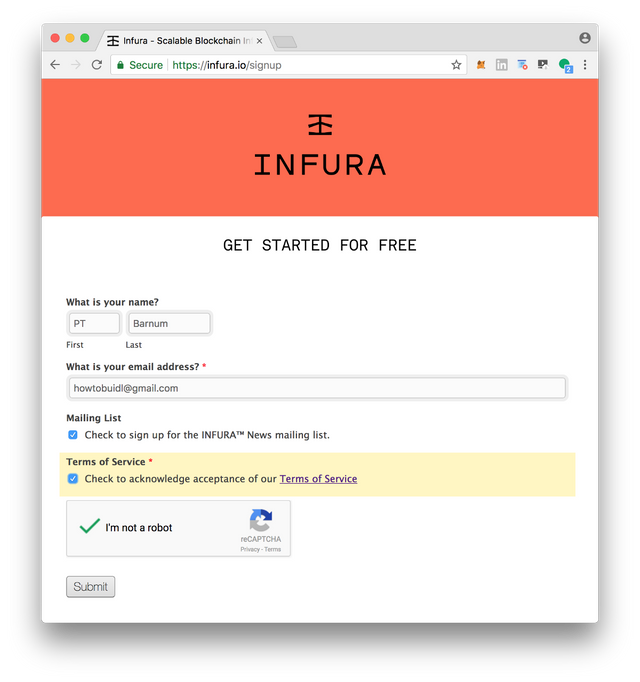
Step 1: Fill Out Your Information to Request API Access
Make note of (your-api-key) which will be a string of random letters and numbers. Be sure to keep that private. Your API Key is associate with your account, and what is used to allow you to connect your application with the various test networks and MainNet. Store it safely.
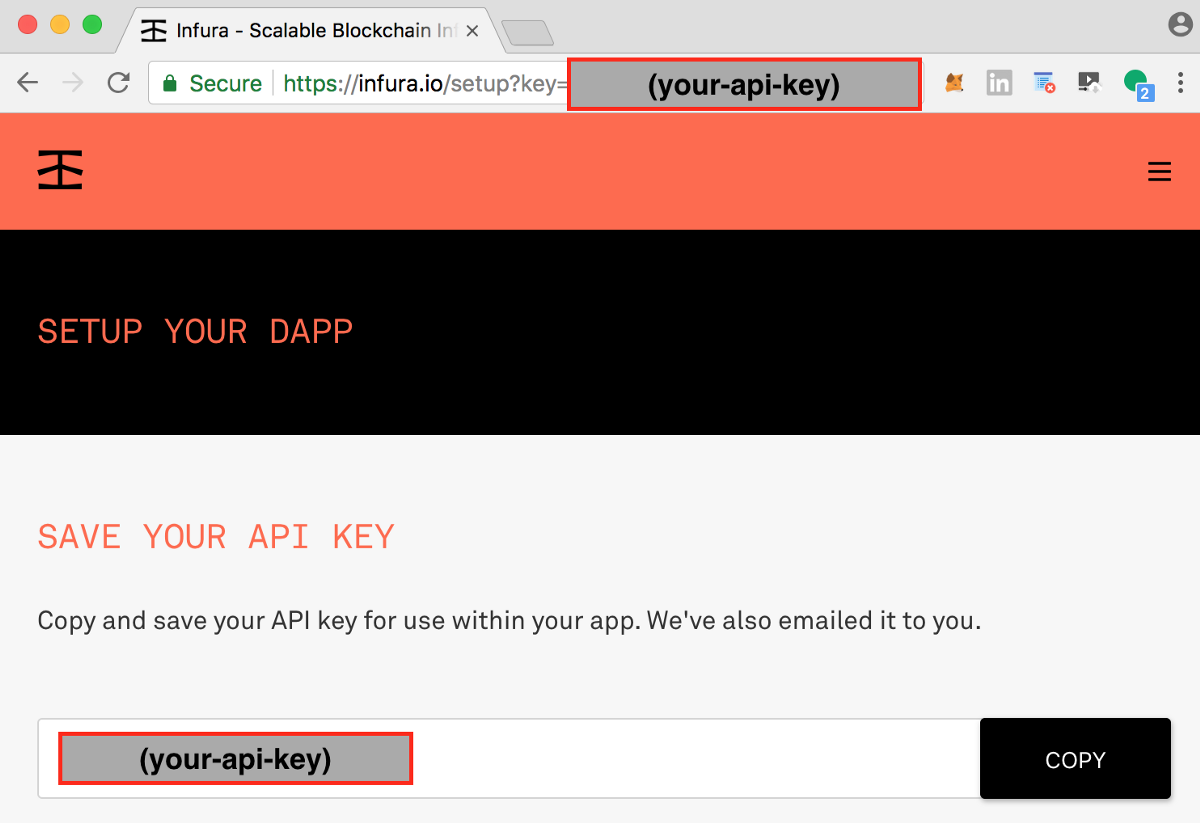
Step 2: Copy and Secure your API Key Safely
When you scroll down, you’ll notice that no matter if you are using mainnet or one of the test networks like ropsten or rinkeby, you will always append the url with / followed by your-api-key. That’s all we have to do to sign up. Now let’s configure our truffle.js file to use this key.
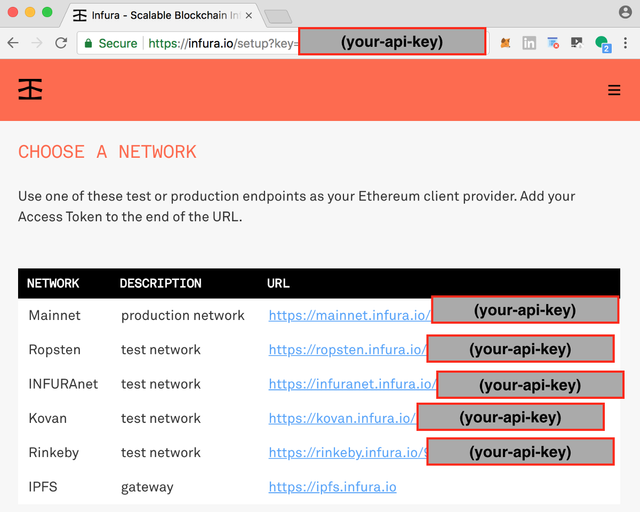
Step 3: Scroll down and make note of the URLs followed by your API Key

Let’s prepare the project for it’s first launch onto the Ropsten test network.
Let’s Prepare the GreatestShow for Deployment
Since we want to keep things like your privateKey and your Infura.io API key secret, let’s create a secrets.js file at the root of your project. For the sake of example, I am using a publicly known private key, but do NOT use this same key for your example in production. Your data and money will be stolen.
var infuraKey = "<your-infura-key>";
var accountPK = "7879d28218d7b2339ec492a6f6ba73c0ea9544080703c4823c9d85b54d165d54";
var mainnetPK = accountPK;
var ropstenPK = accountPK;
module.exports = {infuraKey: infuraKey, mainnetPK: mainnetPK, ropstenPK:ropstenPK};
We separate the data from secrets.js because they will be stored on our computer but not in the github project. Add an entry to your .gitignore file so that we don’t accidentally check it in to your open source project.
secrets.js
We’re going to have to install a couple dependencies to get the job done.
npm install --save-dev truffle-wallet-provider
Now back in truffle.js we need to write something that pulls in those variables. This will flesh out everything we need to get connected to ropsten with globally recognized network_id of “3”, and mainnet (network_id: “1”).
let secrets = require('./secrets');
const WalletProvider = require("truffle-wallet-provider");
const Wallet = require('ethereumjs-wallet');
let mainNetPrivateKey = new Buffer(secrets.mainnetPK, "hex");
let mainNetWallet = Wallet.fromPrivateKey(mainNetPrivateKey);
let mainNetProvider = new WalletProvider(mainNetWallet, "https://mainnet.infura.io/");
let ropstenPrivateKey = new Buffer(secrets.ropstenPK, "hex");
let ropstenWallet = Wallet.fromPrivateKey(ropstenPrivateKey);
let ropstenProvider = new WalletProvider(ropstenWallet,  "https://ropsten.infura.io/");
module.exports = {
  networks: {
    development: { host: "localhost", port: 8545,
                   network_id: "*", gas: 4465030 },
    ropsten: { provider: ropstenProvider,
                   network_id: "3", gas: 4465030 },
    live: { provider: mainNetProvider,
                   network_id: "1", gas: 7500000 }
  }
};

Everything is in place. We’re ready for the GreatestShow
What does it mean to deploy a contract, really?
Deploying a contract, under the surface, will send a signed Transaction to the Ethereum network from a particular address. The owner of the Externally Owned Account (EOA) has control of a private key that has the ability to spend Ether in order to perform operations requested by the network. Each operation inside of a function call requires gas in order to be processed. The data that gets sent in the transaction to deploy contains all the code that has been compiled down to assembly for the Ethereum Virtual Machine (EVM) to store. After deployment, all of the data that is stored will be available for future Transaction state changes to be made through function calls. Since there is no to address specified in a transaction, the network will recognize this particular type of transaction as a request to store the data as an Ethereum Smart Contract at a newly generated Contract Account with a new address. Even the act of deploying involves a transaction cost and gas fees associated with the request. Essentially, we need to get some Ether into our account that we know the private key for, so that our EOA can spend it.
You will need to know your PUBLIC ADDRESS (not your private key) for the following step. If you know your private key, chances are you already also know your public address. But if you don’t, you can use several tools for finding your public key. Here’s one method. From the console:
npm install --save-dev bluebird
truffle console --network ropsten
We installed a handy javascript library that lets us easily create versions of methods on objects asynchronous, and compatible to be called in a console. We’re going to load the bluebird library and make use of it to find our corresponding Ethereum Account Address. Make note of it. In the example below, it would be 0x2a578cbcc561ae8b13cccb0c1212a2262eaa61e0
Promisify = require("bluebird")
Promisify.promisifyAll(web3.eth)
web3.eth.getAccountsAsync()
>> [ '0x2a578cbcc561ae8b13cccb0c1212a2262eaa61e0' ]
Since we do not want to use real money (Ether) required by mainnet, we need to go about obtaining some on the test network.
Head over to the following URL, which is a faucet that gives away “free” Ether for the ropsten test network. There is no actual monetary value to this Ether, since records of who owns each Ether on the ropsten network is stored on a blockchain network entirely separate from mainnet. When people talk about the price of ETH/USD or the value of Ether in US Dollars, they are referring to Ether stored on mainnet and not any other test network.
http://faucet.ropsten.be:3001/
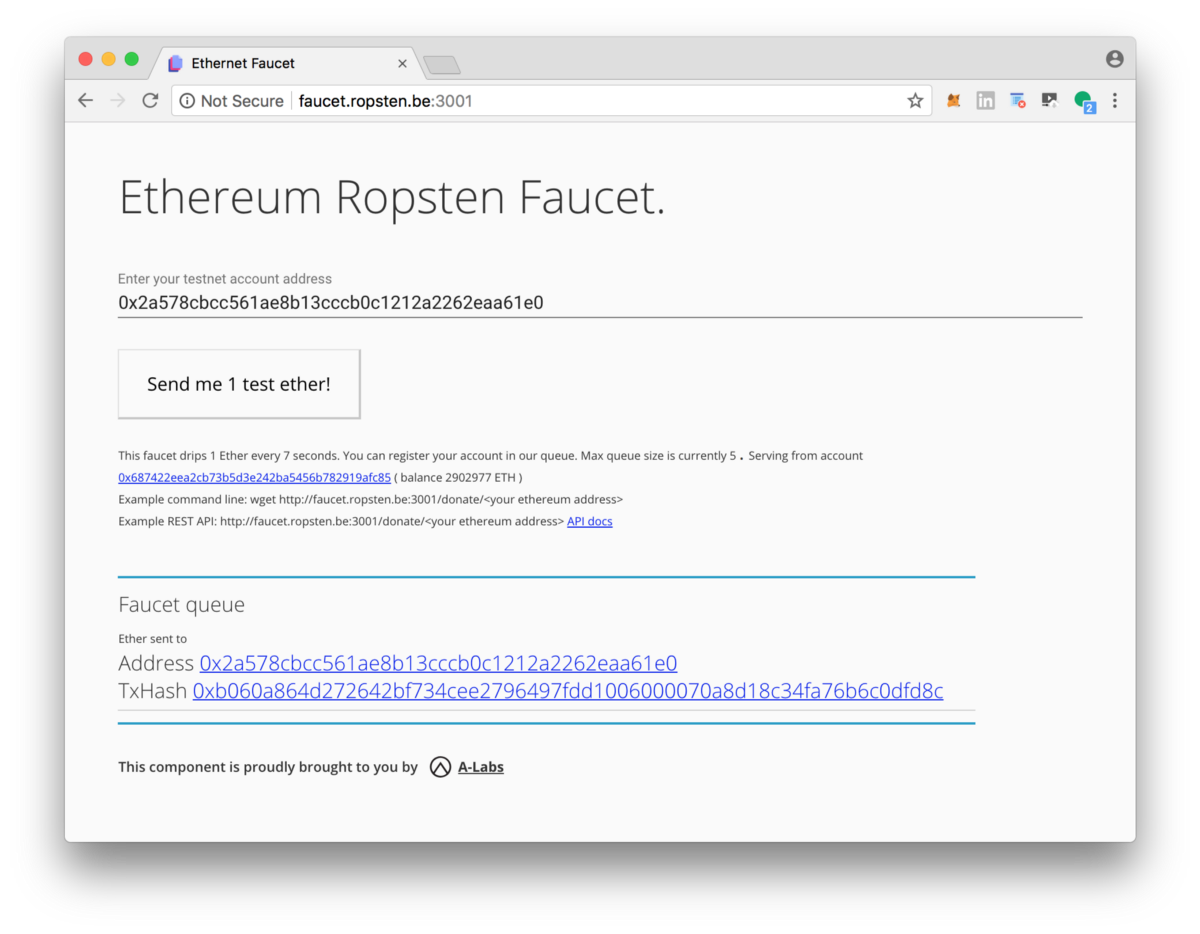
Click the ‘Send me 1 Test Ether’ and wait for the transaction to process. Then click the TxHash and verify that it went through. You can also just head over to ropsten.etherscan.io and type in your Account address to see recent transactions, and verify that the Transaction processed
The Transaction described in this post can be viewed here.
https://ropsten.etherscan.io/tx/0xb060a864d272642bf734cee2796497fdd1006000070a8d18c34fa76b6c0dfd8c
Ladies and Gents, this is the Moment You’ve Waited For
It’s time to try everything out on ropsten. So close you can almost taste it!

We’re just about done. The truffle framework provides migration steps to assist in deployment. The convention is to prefix each step in the ./migrations folder with its step, so we will create a 2_deploy_greatest_show.js file in order to use the deployer object’s deploy method. The complete file looks like this. We require the artifact and deploy. There’s really just one line doing the magic. deployer.deploy(...)
const GreatestShow = artifacts.require("./GreatestShow.sol");
module.exports = (deployer, network, accounts) => {
    let deployAddress = accounts[0]; // by convention
    console.log('Preparing for deployment of GreatestShow...');

    if( network == "mainnet" ) {
        throw "Halt. Sanity check. Not ready for deployment to mainnet. Manually remove this throw and try again.";
    }
    console.log('deploying from:' + deployAddress);

    deployer.deploy(GreatestShow,
        'Dan Emmons', {from: deployAddress});
};
You might notice the if-check for “mainnet”. That’s just an added sanity check so that we don’t accidentally deploy to the live (real) network and waste real money.
From the command line, execute a single line to deploy to ropsten.
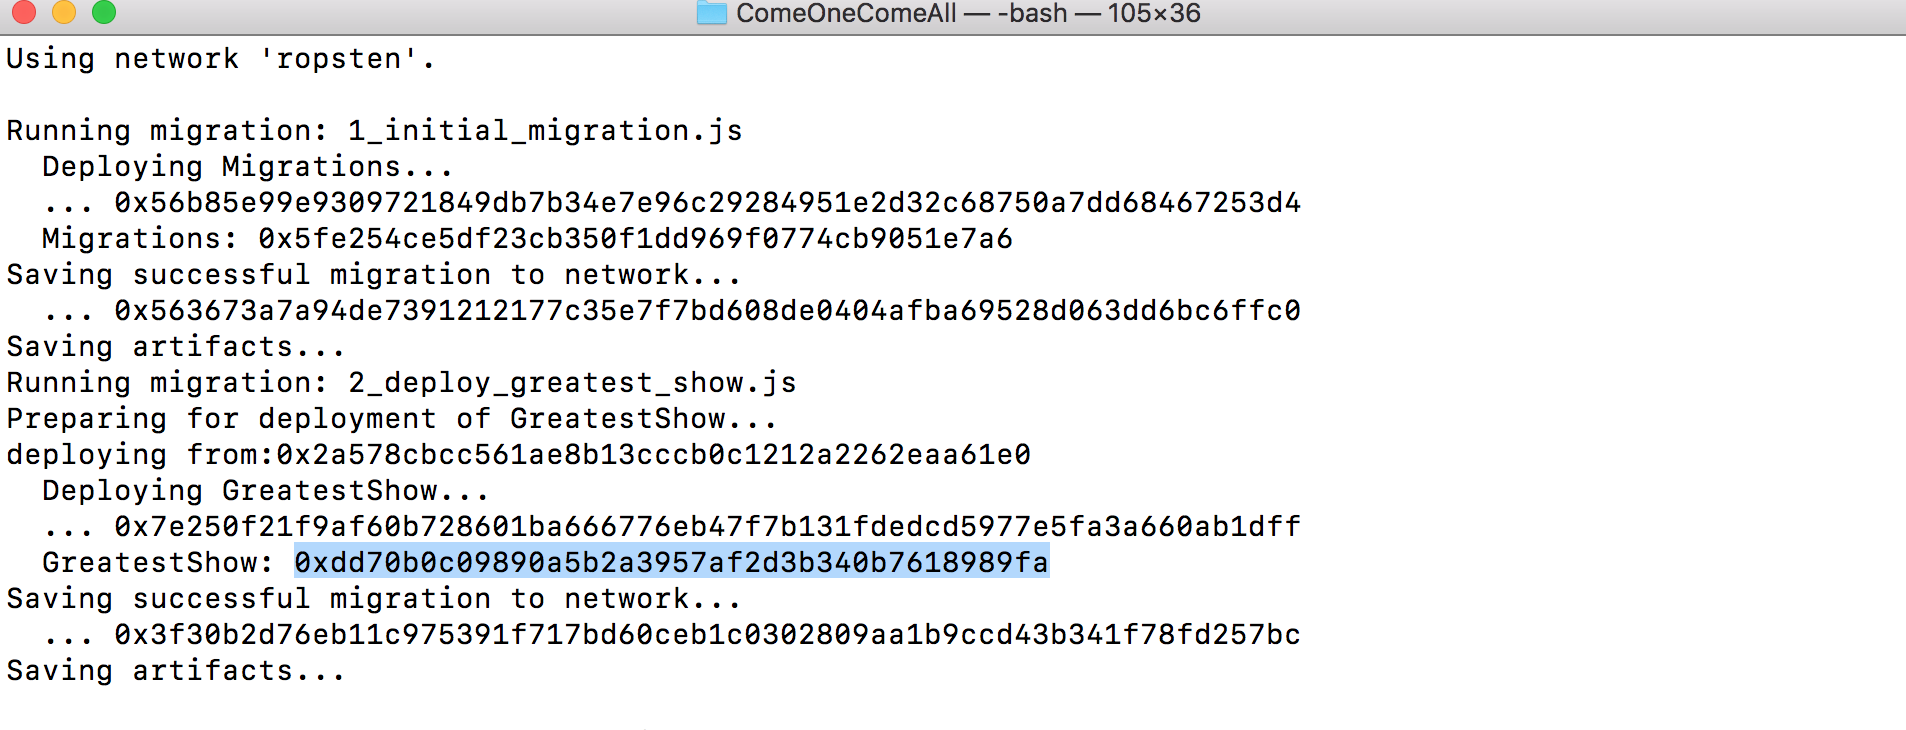
GreatestShow contract deployed to ropsten address 0xdd70b0c09890a5b2a3957af2d3b340b7618989fa
We can verify the contract was deployed on ropsten.etherscan.io
from Externally Owned Account https://ropsten.etherscan.io/address/0x2a578cbcc561ae8b13cccb0c1212a2262eaa61e0 at Contract Address https://ropsten.etherscan.io/address/0xdd70b0c09890a5b2a3957af2d3b340b7618989fa via Transaction https://ropsten.etherscan.io/tx/0x7e250f21f9af60b728601ba666776eb47f7b131fdedcd5977e5fa3a660ab1dff
Note that the data portion matches that of the ABI or Application Binary Interface for the ./build/contracts/GreatestShow.json byteCode.
Showtime. This is the GreatestShow.
Head on over to Etherscan to see it.
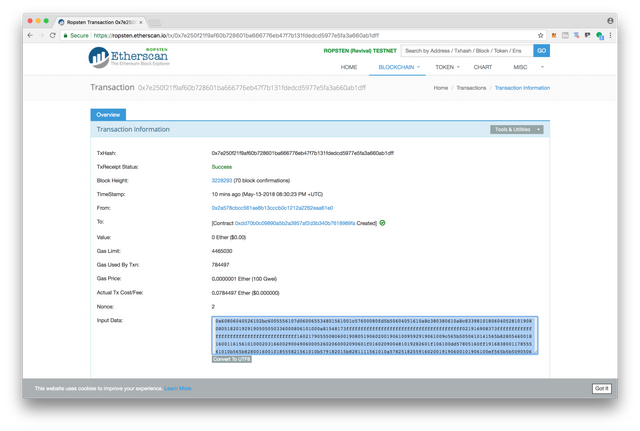
We can even interact with our ropsten deployed contract via the console.
truffle console --network ropsten
When the console loads, obtain a reference to it and get the ringMaster.
GreatestShow.at("0xdd70b0c09890a5b2a3957af2d3b340b7618989fa")
show = _
show.ringMaster.call()
>> 'Dan Emmons'
Let’s see if we can add a performance to it.
show.addPerformance( "Knife Thrower", 2, 0, 0, 0, 180, false );
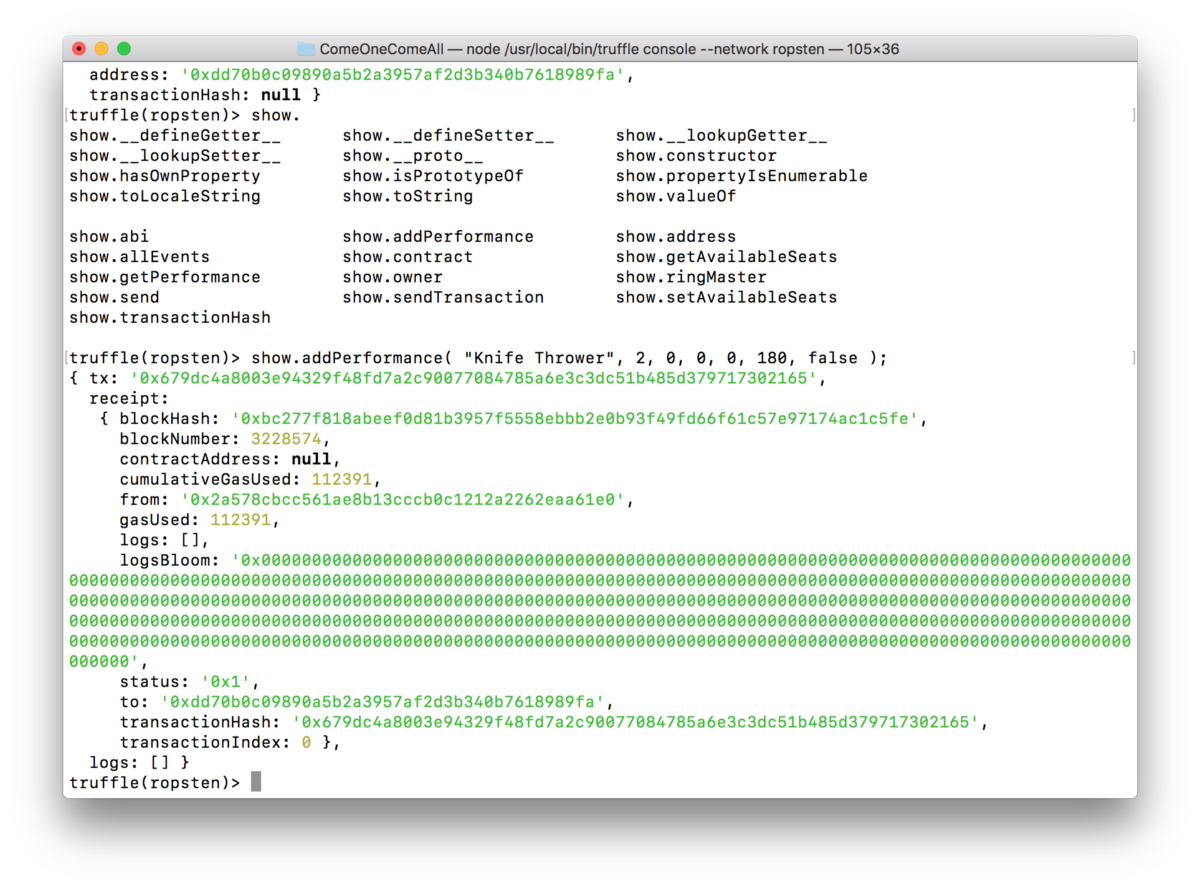
We get back a TransactionReceipt that contains a TransactionHash and we can inspect that on ropsten.etherscan.io to see if it succeeded.
https://ropsten.etherscan.io/tx/0x679dc4a8003e94329f48fd7a2c90077084785a6e3c3dc51b485d379717302165
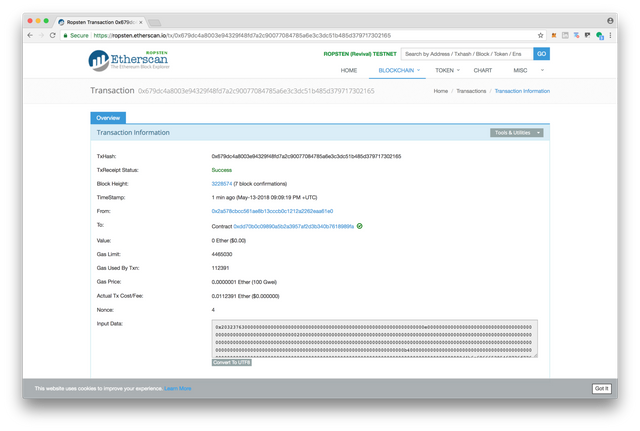
Amazing. ropsten shows that the transaction was successful and the state was modified.

Our “Knife Thrower” performance has been added to the Ethereum blockchain on ropsten.
Whew. That was a lot of work. But the payoff was worth it!
You now know exactly what steps you need to perform in order to get everything up and running on the World’s Computer known as Ethereum.
Now that you deployed it, nobody can stop it, and nobody can censor it.
Your Smart Contract program will continue running on the blockchain indefinitely, and the World has been forever changed.
What about MainNet?
Here’s the beauty of it. All of the same steps that you performed for the ropsten deployment will also work for mainnet but with two minor differences. First, you will be using REAL ETHER which means REAL MONEY. There is not a faucet that will allow you to obtain the amount of Ether you need to deploy your contracts to mainnet so you will have to obtain it a different way, such as through Coinbase.com or localbitcoins.com. You can play around on the ropsten test network and re-deploy to your heart’s content until you get a pristine version of your contract ready, without any consequence. But when it comes to mainnet, you’ll want to be very sure that you’re ready to have your code ready to be stored PERMANENTLY on the mainnet blockchain.
We will discuss other steps you will want to take PRIOR to deploying to mainnet in future posts, such as creating a full suite of unit-tests with the mocha framework, and obtaining a full independent audit of your code. Remember that the data you store on the blockchain is immutable, so it’s important to work out all the bugs to the best of your ability.
Finally, when you’re ready for prime time and you have REAL Ether, comment out the sanity-check in 2_deploy_greatest_show.js so that deployment doesn’t fail, and fire it up.
truffle deploy --network mainnet
This is the GreatestShow!

Dan Emmons is owner of Emmonspired LLC, a Certified Bitcoin Professional, Certified Ethereum Developer, Full Stack Developer and Advisor on Cryptocurrency projects. He is also the creator of a Youtube Channel and iTunes Podcast called #ByteSizeBlockchain.
There’s a lot of one-off methods for experimenting with Remix, the online IDE for Solidity, but there’s a more professional tool available to us in the Truffle Framework.
Congratulations @emmonspired! You received a personal award!
Click here to view your Board
Downvoting a post can decrease pending rewards and make it less visible. Common reasons:
Submit
Congratulations @emmonspired! You received a personal award!
You can view your badges on your Steem Board and compare to others on the Steem Ranking
Vote for @Steemitboard as a witness to get one more award and increased upvotes!
Downvoting a post can decrease pending rewards and make it less visible. Common reasons:
Submit