I gave a review of some of the functions of Ethereum tokens here recently. This tutorial is actually part one of a two-part tutorial to help you get started writing smart contracts in Solidity and deploying them on the Testnet. Here, I will provide some of the basic steps to begin using the Ethereum Wallet. In part two, we will work with some sample Solidity code to create a token contract and deploy it on the Testnet.
If you already have Ethereum Wallet installed and you know how to use it, I'd encourage you to read this tutorial for any additional information you may not know; however, you can skip to part two (coming soon) if you choose.

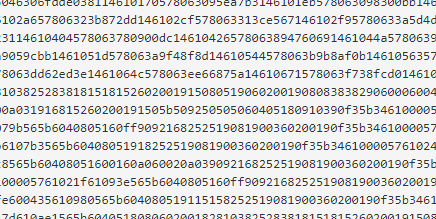
What a contract "looks" like: Bytecode
Getting Started With Mist
Mist is a GUI that provides access to the main Ethereum network and the Testnet to:
- Create accounts
- Send tokens
- Deploy contracts
- Watch contracts
- Watch tokens
- Mine the Testnet
I will discuss each of these functions and relevant terminology in this tutorial as they relate to writing and deploying your first token contract.
Download Mist
Your first step is to download Mist. At the time of this writing, I currently have version 0.8.10 running on my laptop.
Select the appropriate file for your operating system. Then, extract the file once it's downloaded to run the Ethereum Wallet.
Create Your Account
Upon opening Mist, you will be prompted to select the Testnet or the main Ethereum network to get started. Here, we will focus on using the Testnet. So, select "Play with the Testnet" and follow the prompts to create your account. You should create a secure password with a random password generator or password management software, like KeePass. Be sure to keep track of your password: There is no way to recover a lost password, which means any funds held or contracts owned by that account will be lost.
Launching the Application
Navigation Menus
When your wallet opens, you'll see the following navigation menus at the top of the interface:

The drop-down menus at the top of the interface provide access to a number of administrative functions and user settings, including:
- "Ethereum Wallet" > "Quit Ethereum Wallet" does what you might expect.
- "Accounts" > "New account" will prompt you to enter a new password to generate a new key pair.
- "Accounts" > "Backup" will navigate to the relevant directory on your device containing files that you should backup to protect your accounts.
- "View" > "Change language" lets you change the GUI language to one out of a random list of available languages.
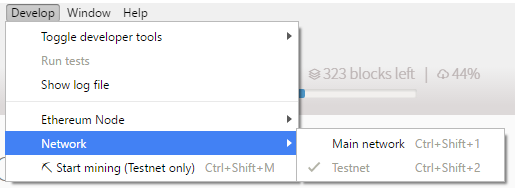
- "Develop" > "Network" allows you to switch between the main network and the Testnet.
- "Help" > "About Ethereum Wallet" will display your current wallet version.
The main navigation menu includes "Wallets", "Send", and "Contracts". In between "Send" and "Contracts" are network status indicators informing you of the following:
- How many peer nodes you are connected to
- How many blocks currently comprise the blockchain
- How long it has been since the last block
If your wallet needs to sync, it will show a status bar with the number of blocks remaining.
This is important: The token contract tutorial will be deployed on the Testnet. If you are on the correct network, you will see a very bright red box in the middle of the navigation menu that says "Testnet". If your wallet doesn't look like the screenshot above, select "Develop" > "Network" > "Testnet" to get to the correct place:

Some Terminology
The "Wallets" tab is where you will start out when you first open Mist. This contains your accounts overview, wallet contracts, and a list of recent transactions. At this point, the terminology here can be a bit confusing: wallet, account, address. They're often used a bit interchangeably and in ways that are less than precise. This is a consequence of the technology still being very new and terms not yet standardized; however, these are my basic definitions:
Account: This term refers to either contract accounts or externally owned accounts (accounts controlled by external actors, mostly people). The most important element of your account are the keyfiles for your public and private cryptographic keys. You created your private key for your account when you entered your secure password earlier.
Address: Each account has an address, which is a hexidecimal hash of your account's public key. While the private key functions as your account password, the public key acts as an identifier for your account. All addresses can contain Ether and all contracts on the Ethereum blockchain have their own address, as well. Clicking on your Main account will display its address:

- Wallet: A smart contract that provides greater control and user-friendly features for your Ethereum account. We will cover this in more detail in another tutorial. For now, just bear in mind that the Ethereum Wallet is not actually a wallet.
Using Mist
In the second part of this tutorial, we will focus on the "Wallets" and "Contracts" menus of the GUI, as described above. Before we get into working with Solidity, though, you'll need to wait for the Testnet to sync the blockchain. Finally, you'll also need to mine some Ether.
Syncing the Testnet
When you first open your Ethereum Wallet, it will start syncing to the blockchain. Depending on your network speeds, this can take well over a day or even longer. You'll also need plenty of space to store the blockchain on your device. At the time of writing, the Testnet blockchain takes up nearly 7.8 GB of storage.
It is very, very important that you keep your wallet open and running until the blockchain is fully synced. This is because Ethereum Wallet only syncs in fast mode when it detects no database present. If you sync a few blocks and close the wallet, it will basically never sync. If you've done this already, you should locate the "chaindata" folder within your "testnet" directory and delete it to start a fresh sync. On my computer (this may be different if you don't have Geth installed) the folder you need to find is located in the path AppData\Roaming\Ethereum\testnet\geth. This same trick applies for downloading the main Ethereum blockchain, as well.
Mining
You need Ether to deploy and interact with contracts on the Testnet, just like you do on the public network. Every transaction requires gas, which will then result in you spending some Ether for the computational resources you've consumed on the blockchain. For a more detailed explanation of gas and transaction costs, read the Ethereum Frontier Guide.
Unlike the expensive kind of Ether that you can buy on cryptocurrency exchanges, some of the only ways you can obtain Ether for the Testnet is by mining it or receiving some from another address. Once you've fully synced Mist to the blockchain, you can select "Develop" > "Start mining (Testnet only)" and then allow some time for your computer to mine blocks on the network.
If you don't want to wait on mining Ether, I'll send you 5 Testnet Ether so that you can get started with deploying your contract right away. All I ask is that you upvote and resteem this post and then reply with your Testnet address below. Please ensure that you are on the Testnet!
Also, please note that while you can receive Ether when syncing the blockchain, you will not be able to mine the Testnet, view your Ether balance or see your most recent transactions (e.g., creating a contract, interacting with a contract, sending Ether) until the blockchain is fully synced.
Further Information
The objectives of this tutorial are to get you ready to work with the token contract in part two. I may create a more in-depth Mist tutorial in the future but, in the meantime, you can review this guide here or this very extensive guide here. You can also ask questions on this blog and I will provide assistance to help you resolve any problems you might encounter.
Please follow me to catch my next tutorial on Ethereum and Solidity programming!
Thank you!!
Downvoting a post can decrease pending rewards and make it less visible. Common reasons:
Submit
Thank you! They can be confusing, yes! I appreciate the feedback. Watch for part two of this tutorial later in the week and then more on Solidity in the future!
Downvoting a post can decrease pending rewards and make it less visible. Common reasons:
Submit
Thanks for sharing this, going to look for your part 2! Edit: Please write your part 2 :p
Downvoting a post can decrease pending rewards and make it less visible. Common reasons:
Submit
Have you ever written a part two?
Downvoting a post can decrease pending rewards and make it less visible. Common reasons:
Submit