If you are interested in learning more about Ethereum tokens but don’t really know where or how to start, this is a resource specifically for you. I spoke with my friends at Nepal Bitcoin, who have just launched a new Ethereum token on the Rinkeby Testnet and we will use their token, Momo Coin, in this exercise.
For those of you who don’t know, momo are amazing and you should learn more about them here.

Momo Coin were publicly announced on Nepal Bitcoin’s Facebook page last week. The post offers free Momo Coin if you comment on the post with your address. Now, the basic information of how to do that is shown below; however, complete beginners might be wondering how they can get in on the early adopter stage of this amazing token. Look no further, my friends!
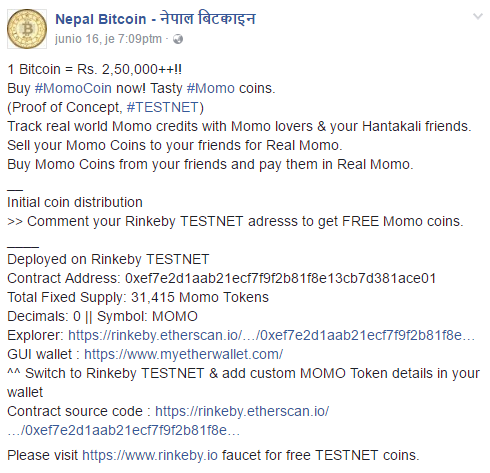
The Process of Obtaining Momo Coin
Setup your Ethereum Wallet
First, you will need to get an Ethereum wallet that can receive tokens. There are a number of ways you can do this, including here, but the best way to go about it is to get a wallet at myetherwallet.com. Follow these steps:
- Navigate to www.myetherwallet.com
- Create a secure password to protect your wallet
- Enter your password in the text field and select “Create New Wallet”
- Download the keystore file to a directory on your computer
- Select “I understand. Continue.”
- Save your private key in a secure place
- Unlock your wallet in one of the following ways:
a. Select “Keystore File (UTC/JSON)” to unlock with your keystore file and your password from Step 2.
b. Select “Private Key” to use the private key you received in Step 6. - Once successfully logged in, scroll down to view your new Ethereum address
Get Momo Coin
Now that you have an Ethereum wallet setup, you are able to send your address to Nepal Bitcoin and receive some tokens. Your address is visible at two different places in your wallet, just below the "View Wallet Info" heading:

Copy your account address and post it as a comment here.
Understanding the Token Transfer
You should receive a response once your Momo Coin are sent and the message will contain the transaction information, known as the TxHash.
The txhash for my Momo Coin transfer is: 0xaf1c45342cb806381e19dea699b8865ab9d3c590e8a25d9262d6c3a1f6595fbc
You can search any address or any txhash on a blockchain browser, which in this case needs to be specifically for the Rinkeby Testnet, such as rinkeby.etherscan.io. So, if you search the txhash from my Momo Coin transfer, you will see the following information:
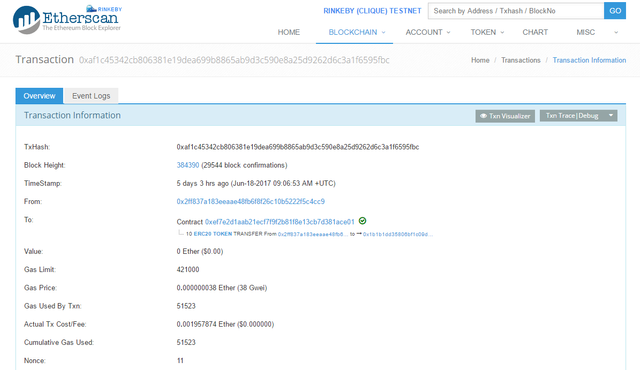
The interesting information to focus on for the purposes of this tutorial can be found in the "From" and "To" sections of this page:

Here, you can see that address 0x2fF837a183eEaae48FB6F8f26C10b5222F5C4cc9 told a contract at address 0xEf7e2d1AaB21ECf7F9F2b81F8e13CB7d381ACe01 to send 10 of ERC20 Token (which is a type of standard for creating Ethereum tokens) from the same address (0x2fF837a183eEaae48FB6F8f26C10b5222F5C4cc9) to my address at 0x1b1b1dd35806bf1c09d13983D230Aeefd7c854bb. Clicking on each of those address links in etherscan will take you to the pages that I linked here in this tutorial.
So, that's how to understand what's going on with the txhash once you receive notice that your Momo Coin have been sent. Alternatively, you can obsessively monitor your own address on etherscan until you see the tokens appear. That's an option, too.
Viewing Your Momo Coin in Your Wallet
You need set up your wallet to display your Momo Coin, as the wallet doesn't know what tokens you're waiting to receive. Go back to your wallet and follow these steps:
- Scroll to “Token Balances” at the right of the interface, located just below “Account Address” and “Account Balance”
- Select “Add Custom Token”
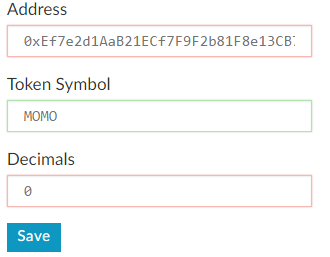
- Enter the contract address: 0xEf7e2d1AaB21ECf7F9F2b81F8e13CB7d381ACe01
- Enter the token symbol: MOMO
- Enter the decimal places: 0
- Select “Save” and you will view your current MOMO coin balance
It should look like this:
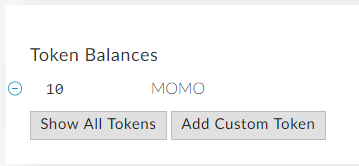
And, if you've already received your Momo Coin, then you will see something like this in "Token Balances":
And that's it! You've created an Ethereum wallet, participated in a token transfer on the Rinkeby Testnet, viewed the details of the txhash to understand how the tokens were transfered, and then you added the custom token to view in your Ethereum wallet. Well done.
What Next?
The first thing I would suggest to do is make some momo. And then, perhaps, you could engage in some commerce with those momo, eat them, or design your own ERC20 token by looking at the source code of the contract, thus taking your Ethereum game to the next level.
Please follow me to catch my next tutorial on how to create your own ERC20 Ethereum token with a central mint that allows the contract owner to issue new coins when needed/desired.