Most tutorials start with an explanation about Blockchain or Ethereum in theory. This is the next thing you need — a hands-on tutorial project that includes usage in React for client side.
This guide is for JS developers with some knowledge in building web apps.
I tried to focus on the Ethereum side and its connection to the React app. So, this is going to be a small app without many explanations about React. Most of the explanations are about the logic of the app and the steps for making the connection between the blockchain and the app.
Preferred previous knowledge:
- JavaScript
- React
- Basic Solidity & Remix
- Mocha
- MetaMask
- What is CryptoKitties
Advanced knowledge (not a must):
Infura, Web3, Truffle, dotenv, NextJS
Main Steps:
- Write a simple React app with NextJS (for routing)
- Write, compile and deploy (to the Rinkeby Test Network) a contract with Solidity
- Connect the contract to the client side with Web3
- Use CryptoKitties API to get data about a CryptoKitty and display in the app
- Add tests to the contract
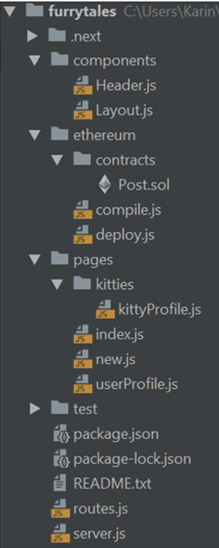
Project Structure:
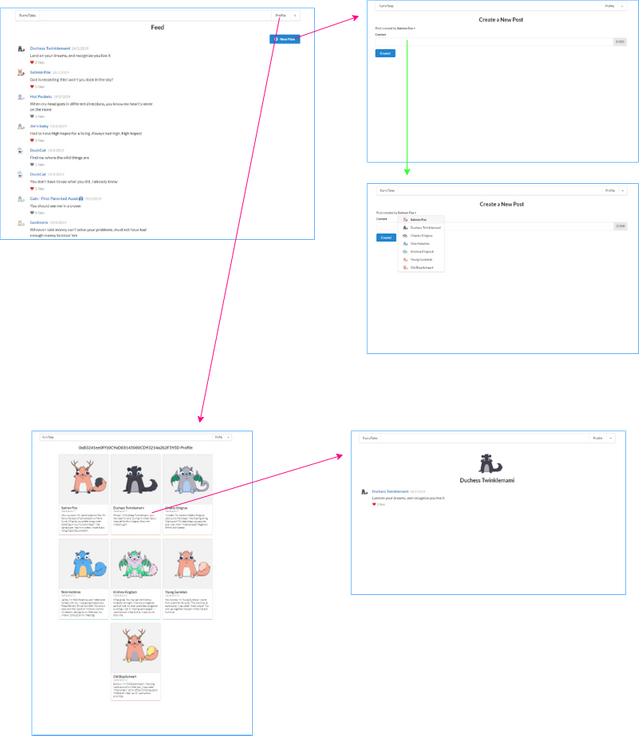
We will build a blockchain-based social media platform (inspired by twitter) for CryptoKitties! Every CryptoKitty could upload a post with a limit of maximum 200 characters to the blockchain.
You can check out the result here:
http://furrytales.herokuapp.com/
Note: It takes some time to load at first because of the server side rendering. Also, when you create a new post or like a post — it takes about 20 seconds to finish the action because it is sending the transaction to the blockchain.
Git repository: https://github.com/karinchechik/FT-Basic
Workflow:
CLIENT-SIDE:
Let’s start by creating a new project folder called furrytales and run these commands to set up React and NextJS:
cd furrytales
npm init (and click enter a few times)
npm install — save ganache-cli mocha fs-extra [email protected]
npm install — save [email protected]
npm install — save [email protected] react react-dom
NextJS
If you are not familiar with NextJS: NextJS uses a folder called ‘pages’ and turns every file inside this folder into a new route so if the URL of our app is www.furrytales.com, then adding a new.js file to the pages folder would create the page www.furrytales.com/new
So now need to create the folder pages in the root directory (You must call it ‘pages’!!!).
Inside, add 3 new JS files:
- new.js (furrytales -> pages -> new.js): A form for adding a new post
- index.js (furrytales -> pages -> index.js): The General feed
- userProfile.js (furrytales -> pages -> userProfile.js): A user kitty selection.
And create a folder called ‘kitties’ with this file inside:
kittyProfile.js (furrytales -> pages -> kitties -> kittyProfile.js): A CryptoKitty profile.
Add the following to all 4 files:
import React from ‘react’;
export default () => { return <h1>This is new!</h1>; };
Also, create a new folder inside furrytales called components. This folder contains the components that we want to use multiple times but don’t represent an entire page (such as the header). Add these files to the components directory:
Header.js
Layout.js
PostRow.js
Now go to the package.json file:
Change the script of test into: “test”: “mocha”
Add a new script: “dev”: “next dev”
**Check if it works: **
Inside the furrytales directory run: npm run dev
In your browser enter localhost:3000 or add /new to see everything in action.
Let’s add dynamic routing logic
next-routes: next-routes is a helper module for NextJS that we will use to set dynamic routing inside our NextJS app. (https://github.com/Fridays/next-routes)
Install on the root directory:
npm install — save next-routes
Create a new file in the root directory: routes.js (inside we will specify the different dynamic routes and the /new because otherwise we will have a problem. We need to make sure this route is searched for before the profiles which are dynamic). This file exports: navigation helpers.
routes.js:
https://gist.github.com/karinchechik/4587efacbe3b00cc31da632fb8b45070#file-routes-js
Now we need to make a set up on our server
(This is the file that tells NextJS to use the router.js file)
This file would start the NextJS app manually and tells it to use routes.js.
Create a new file in the root directory: server.js
server.js:
https://gist.github.com/karinchechik/f5c31ade9719305c197db8b9628db00c#file-server-js
We need to change the package.json file to run the server with npm run dev command:
Change the script of dev into: “dev”: “node server.js”
Run npm run dev
· Note: Every time you change the routes.js file you must rerun the server!
Before we write the Ethereum contract, I would like to build the UI for this app.
I decided to use semantic-ui-react to give this app a great look without writing a lot of CSS code. I am not going to explain how semantic-ui-react works but I will give you the basic information you might need.
First, run these command (in the root folder):
npm install — save semantic-ui-react
npm install — save semantic-ui-css
Here is the code I wrote at this point:
· Note: Not everything is going to work at this point. The components Layout and Header are done, but the pages still need some work.
https://gist.github.com/karinchechik/25209093eb49988e524215bac60e16b1#file-header-js
At this point you can see a basic template of the UI that doesn’t include the information from our contract or from the CryptoKitties API.
First, we need to write & deploy our contract and add a few helpers (such as web3).
Now let’s write the Ethereum contract and connect it to the client side!
ETHEREUM:
In our root directory (furrytales) create a folder called ethereum. Inside create 2 files: compile.js and deploy.js, and a new folder called contracts with the file Post.sol inside:
Post.sol:
https://gist.github.com/karinchechik/ded3a04b4b97438112cdb8e0df09e692#file-post-sol
This file contains two contracts: Post and PostFactory.
We will deploy the PostFactory and use the address we receive from the deployment to connect to this contract. Then, by using the factory we will be able to create posts (according to the Post contract) dynamically from the client side.
We will compile the contract once, write the output to a new file inside the project and then access that compiled version.
Our post.sol file has 2 separate contracts inside. Therefore, we will use the compiler to split it to 2 different files, so one would contain the compiled post and the other the compiled posts factory. These files would be generated in a folder called build.
First, our compiler needs to check if it already exists. If it does, it will delete it and then create it again.
This is the compile.js file (ethereum/compile.js)
I am not going to explain every module, but each line has an explanation:
https://gist.github.com/karinchechik/71317d358e4e84f2bcc58f2d6a2e5f76#file-compile-js
Run the script:
- Enter the Ethereum directory: cd ethereum
- node compile.js
Attention:
- If you get Solidity “AssertionError [ERR_ASSERTION]: Invalid callback specified” errors — that means you might have installed solc in version 0.5.0 which is not stable at the moment. Please uninstall solc and install version 0.4.25.
- You will get back to the command line without any output. To make sure the compile succeeded — you will see a new folder in the Ethereum directory called ‘build’ with 2 files inside (Post.json and PostFactory.json).
TEST:
Before deploying. We should test the contract to make sure we can use it.
Create a new folder called test in the root directory (furrytales/test). This folder can contain both client side and Ethereum tests.
Inside the test folder add a new JS file called Post.test.js.
This file would contain the contracts tests in one file.
I wrote a few examples and you can see them in my git repo or write them yourself 😊. This is just to show you how and where you should write tests.
Deploy (to Rinkeby test network):
In the main folder (furrytale) run the command:
npm install — save [email protected]
I used Infura to connect to the blockchain without creating a local node.
So, if you are not familiar with Infura — sign in, confirm the registration in the mail and create a new project on the rinkeby network.
Deploy.js
The HDWalletProvider requires 2 arguments: MNEMONIC and ENDPOINT
I added my MNEMONIC to ‘.env’ file to keep it secure. You can upload to Heroku using the config vars to set those variables (Read this if you are not familiar with Heroku — https://devcenter.heroku.com/articles/getting-started-with-nodejs#set-up).
Just make sure not to upload your MNEMONIC to git or anywhere else.
Copy the ENDPOINT link from Infura and paste it as the second argument for the HDWalletProvider and paste it to the deploy contract. Again, I put my INFURA_API_KEY in the ‘.env’ file. Make sure you create this file in the root directory and add the variables needed.
deploy.js:
https://gist.github.com/karinchechik/4adcc82f507644d91d8bcf013cd4720e#file-deploy-js
Notice that we are deploying only the factory and we will use it to create a new instance of a post.
Enter the Ethereum directory and run:
node deploy.js
After you deploy the contract you will get the contract address back — Add the address as an environment variable (at the ‘.env’ file of config vars).
The final .env file should contain 4 variables: MNEMONIC, INFURA_API_KEY, ADDRESS (of the contract) and API_TOKEN (we will add later for the CryptoKitties API).
Connect the contract to the client side with Web3
In order to access the Ethereum world and get data from the contract we need to import and configure Web3. Web3 uses a provider to communicate with the Ethereum network.
We will use the provider we get from MetaMask.
Then, we will notify web3 about the factory contract we deployed (give web3 the address and the factory interface) and we will get back a contract instance.
With this instance we can receive the previous posts and display them.
Configure web3 with MetaMask provider:
Create a new file inside Ethereum called web3.js.
Again, every line has a detailed explanation.
web3.js:
https://gist.github.com/karinchechik/72a585f6896a13503674bf8648aef5cd#file-web3-js
Connect web3 to the ‘PostFactory’ contract’s deployed copy:
Create a new file inside Ethereum called factory.js.
We will import web3 and provide the address of the contract.
This would allow us to access a deployed version of the factory by importing this file from inside the project.
factory.js:
https://gist.github.com/karinchechik/1958475db4d7a7ad0c0fa343a1ed3f81#file-factory-js
Now we can use the factory instance to get a list of the deployed posts.
So far, we deployed the post factory without deploying any instances of posts yet. We need to deploy a few posts to have a list to show on the feed. You could use remix to do that and then fix the index.js file or fix the new.js file first and deploy a few posts from there. I would go with the second option (Just to make this tutorial shorter without getting into explaining remix for those who are not familiar with it).
We should also add the CryptoKitties data at this point to get real data to save on the blockchain and display.
I did both steps at the same time — modified the files to connect to the contract and use the CryptoKitties API.
Add CryptoKitties Data:
To get data from CryptoKitties we need to ask for an API Token from the CryptoKitties developers. You can do this from here — https://docs.api.cryptokitties.co/
You will get an Email with the Token and you can start using it.
Note: I hope that by the time you are reading this, they already made this process automatic. Just read the Docs to understand the steps you need to take.
I used fetch() with Async/Await, but you can choose a different way to use the API 😊.
We can start writing the userProfile.js file which will display a list of the users’ CryptoKitties and when he chooses a kitty he can see its profile (kittyProfile.js).
Note: I used someone else’s address and hard coded it to fetch his CryptoKitties info, because I don’t own any CryptoKitties and this information is public. I also wrote the dynamic address option, so you can try to use it if you own CryptoKitties.
I am not going to explain this file because it just uses React and the API. The only Ethereum connection here is getting the user account address with the web3 library and send it to the API.
userProfile.js:
https://gist.github.com/karinchechik/52350ed6dd95084e41232761e92a943e#file-userprofile-js
Connect to the contract:
Whenever we want to display the summary of a certain post (In our app: index.js and kittyProfile.js), we need to:
- Get the deployed posts addresses.
- Get the number of posts, so we can display the latest first.
- Create a new instance of a contract by using the web3 library and send it with the address of a specific post.
- Call getSummary and get the information of the post from the blockchain.
Instead of creating a new instance of Post every time, I added a new file that could be reused in any other file or component as needed just like factory.js. The difference is that we use the Post instance with a dynamic address that we send.
Reminder: we only have 1 PostFactory, but many Posts are being created.
post.js:
https://gist.github.com/karinchechik/70c7dddc52a2888c93a556c136b57244#file-post-js
Update new.js:
Note: Again, when I wanted to deploy new posts, I used someone else’s address and hard coded it to fetch his CryptoKitties info, because I don’t own any CryptoKitties and this information is public.
I also wrote the dynamic address option, so you can try to use it if you own CryptoKitties.
You can see the final pages/new.js file in the repository.
Now, we can create a few posts and display them in Index.js and kittyProfile.js
Update index.js:
We need to fetch the list of posts we created and display them as our feed.
First, we need to import the factory and the post instances that we created inside the Ethereum directory.
Then, we need to loop through the deployed posts and return an array of their summaries.
In renderPosts function we send every summary to the PostRow component and display them to the user.
We do the same in kittyProfile.js but instead of looping through all the posts created we only get the posts of a specific CryptoKitty and show the list of the posts it deployed.
You can see the final pages/index.js, components/PostRaw.js and pages/kitties/kittyProfile.js files in the repository.
I know it was long but
That’s it! We made it!
Now your CryptoKitties can have their own social media account 😊
Glad you joined Steemit karinch welcome and enjoy
Downvoting a post can decrease pending rewards and make it less visible. Common reasons:
Submit
Thanks!
Downvoting a post can decrease pending rewards and make it less visible. Common reasons:
Submit
You're welcome karinch
Downvoting a post can decrease pending rewards and make it less visible. Common reasons:
Submit
Hello @karinch! This is a friendly reminder that you can download Partiko today and start earning Steem easier than ever before!
Partiko is a fast and beautiful mobile app for Steem. You can login using your Steem account, browse, post, comment and upvote easily on your phone!
You can even earn up to 3,000 Partiko Points per day, and easily convert them into Steem token!
Download Partiko now using the link below to receive 1000 Points as bonus right away!
https://partiko.app/referral/partiko
Downvoting a post can decrease pending rewards and make it less visible. Common reasons:
Submit
Congratulations @karinch! You received a personal award!
You can view your badges on your Steem Board and compare to others on the Steem Ranking
Vote for @Steemitboard as a witness to get one more award and increased upvotes!
Downvoting a post can decrease pending rewards and make it less visible. Common reasons:
Submit