I want to show how to combine the functionality of permissionless (public) blockchain such as ARK.io with permissioned (private) blockchain such as Hyperledger. In particular, we'll see how transaction on ARK.io can trigger execution of Solidity Smart Contract deployed in Hyperledger Fabric + Burrow.
You can find out more details about Hyperledger Fabric + Burrow from my previous post: https://steemit.com/ethereum/@vadymus/comparison-of-ethereum-compatible-blockchains
Install Hyperledger Fabric
Delete previous Hyperledger Docker images, if any:
docker kill $(docker ps -q)
docker rm $(docker ps -aq)
docker rmi $(docker images dev-* -q)
Install prereqs:
https://hyperledger-fabric.readthedocs.io/en/latest/prereqs.html
Install dependencies :
https://hyperledger-fabric.readthedocs.io/en/latest/install.html
cd ~
curl -sSL http://bit.ly/2ysbOFE | bash -s 1.3.0
Set environment variables:
vi ~/.profile

PATH="$HOME/bin:$HOME/.local/bin:$PATH"
GOPATH="$HOME/go"
FABRIC_CFG_PATH="$GOPATH/src/github.com/hyperledger/fabric-samples/config"
PATH="$GOPATH/bin:/usr/lib/go-1.10/bin:$GOPATH/src/github.com/hyperledger/fabric-samples/bin:$PATH"

export FABPROXY_CONFIG=$GOPATH/src/github.com/hyperledger/fabric-chaincode-evm/examples/first-network-sdk-config.yaml
FABPROXY_USER=User1
FABPROXY_ORG=Org1
FABPROXY_CHANNEL=mychannel
FABPROXY_CCID=evmcc
PORT=5000

source ~/.profile
Generate network artifacts:
https://hyperledger-fabric.readthedocs.io/en/latest/build_network.html
git clone https://github.com/hyperledger/fabric-samples.git
cd $GOPATH/src/github.com/hyperledger/fabric-samples/first-network
./byfn.sh generate
Install go:
sudo apt-get remove golang-go
sudo apt-get remove --auto-remove golang-go
sudo add-apt-repository ppa:gophers/archive
sudo apt-get update
sudo apt-get install golang-1.10-go
Install Hyperledger go SDK:
go get -u github.com/hyperledger/fabric-sdk-go
go get -u github.com/cloudflare/cfssl/cmd/cfssl

go get -u github.com/golang/mock/gomock
go get -u github.com/golang/protobuf/proto
go get -u github.com/golang/protobuf/ptypes
go get -u github.com/golang/protobuf/ptypes/timestamp
Install EVM Chaincode
cd ~
git clone https://github.com/hyperledger/fabric-chaincode-evm.git $GOPATH/src/github.com/hyperledger

cd fabric-samples/first-network/
vi docker-compose-cli.yaml
add:
 cli:
    volumes:
      - ./../../fabric-chaincode-evm:/opt/gopath/src/github.com/hyperledger/fabric-chaincode-evm
Bring Down the Network (if it was up):
./byfn.sh -m down
Bring up the network:
./byfn.sh -m up
Build and Start the EVM
docker exec -it cli bash
Set Environment variables for PEER0:
  export CORE_PEER_MSPCONFIGPATH=/opt/gopath/src/github.com/hyperledger/fabric/peer/crypto/peerOrganizations/org1.example.com/users/[email protected]/msp
  export CORE_PEER_ADDRESS=peer0.org1.example.com:7051
  export CORE_PEER_LOCALMSPID="Org1MSP"
  export CORE_PEER_TLS_ROOTCERT_FILE=/opt/gopath/src/github.com/hyperledger/fabric/peer/crypto/peerOrganizations/org1.example.com/peers/peer0.org1.example.com/tls/ca.crt
Next install the EVM chaincode on all the peers:
peer chaincode install -n evmcc -l golang -v 0 -p github.com/hyperledger/fabric-chaincode-evm/evmcc
Instantiate the evmcc:
peer chaincode instantiate -n evmcc -v 0 -C mychannel -c '{"Args":[]}' -o orderer.example.com:7050 --tls --cafile /opt/gopath/src/github.com/hyperledger/fabric/peer/crypto/ordererOrganizations/example.com/orderers/orderer.example.com/msp/tlscacerts/tlsca.example.com-cert.pem
Deploy a Smart Contract
We'll be playing with Simple Storage contract: https://solidity.readthedocs.io/en/v0.4.24/introduction-to-smart-contracts.html
peer chaincode invoke -n evmcc -C mychannel -c '{"Args":["0000000000000000000000000000000000000000","608060405234801561001057600080fd5b5060df8061001f6000396000f3006080604052600436106049576000357c0100000000000000000000000000000000000000000000000000000000900463ffffffff16806360fe47b114604e5780636d4ce63c146078575b600080fd5b348015605957600080fd5b5060766004803603810190808035906020019092919050505060a0565b005b348015608357600080fd5b50608a60aa565b6040518082815260200191505060405180910390f35b8060008190555050565b600080549050905600a165627a7a723058203dbaed52da8059a841ed6d7b484bf6fa6f61a7e975a803fdedf076a121a8c4010029"]}' -o orderer.example.com:7050 --tls --cafile /opt/gopath/src/github.com/hyperledger/fabric/peer/crypto/ordererOrganizations/example.com/orderers/orderer.example.com/msp/tlscacerts/tlsca.example.com-cert.pem
Note the output which contains the contract address:
2018-11-10 00:15:28.257 UTC [chaincodeCmd] chaincodeInvokeOrQuery -> INFO 001 Chaincode invoke successful. result: status:200 payload:"7ec1f20fced5ed8d47f94cdab140644a28a85441"
To verify that your contract has deployed successful you can query the evmcc for the runtime bytecode of the contract:
root@3e4b9a88b2b6:/opt/gopath/src/github.com/hyperledger/fabric/peer# peer chaincode query -n evmcc -C mychannel -c '{"Args":["getCode","7ec1f20fced5ed8d47f94cdab140644a28a85441"]}'
6080604052600436106049576000357c0100000000000000000000000000000000000000000000000000000000900463ffffffff16806360fe47b114604e5780636d4ce63c146078575b600080fd5b348015605957600080fd5b5060766004803603810190808035906020019092919050505060a0565b005b348015608357600080fd5b50608a60aa565b6040518082815260200191505060405180910390f35b8060008190555050565b600080549050905600a165627a7a723058203dbaed52da8059a841ed6d7b484bf6fa6f61a7e975a803fdedf076a121a8c4010029
Interacting with a Deployed Contract
peer chaincode invoke -n evmcc -C mychannel -c '{"Args":["7ec1f20fced5ed8d47f94cdab140644a28a85441","60fe47b1000000000000000000000000000000000000000000000000000000000000000a"]}' -o orderer.example.com:7050 --tls --cafile /opt/gopath/src/github.com/hyperledger/fabric/peer/crypto/ordererOrganizations/example.com/orderers/orderer.example.com/msp/tlscacerts/tlsca.example.com-cert.pem

2018-11-10 00:25:31.005 UTC [chaincodeCmd] chaincodeInvokeOrQuery -> INFO 001 Chaincode invoke successful. result: status:200

peer chaincode query -n evmcc -C mychannel -c '{"Args":["7ec1f20fced5ed8d47f94cdab140644a28a85441","6d4ce63c"]}' --hex
Getting the User Account Address
root@3e4b9a88b2b6:/opt/gopath/src/github.com/hyperledger/fabric/peer# peer chaincode query -n evmcc -C mychannel -c '{"Args":["account"]}'
03F3C6F335B678F65B41820D97F01BA1151CDF62
Using Web3
Set up the Fab Proxy
We have already defined these in our .profile:
export FABPROXY_CONFIG=$GOPATH/src/github.com/hyperledger/fabric-chaincode-evm/examples/first-network-sdk-config.yaml
export FABPROXY_USER=User1
export FABPROXY_ORG=Org1
export FABPROXY_CHANNEL=mychannel
export FABPROXY_CCID=evmcc
export PORT=5000
Open port:
sudo ufw allow 5000
Build the proxy:
cd $GOPATH/src/github.com/hyperledger/fabric-chaincode-evm
go build -o fab3 ./fabproxy/cmd
Start the proxy:
cd ~/go/src/github.com/hyperledger/fabric-chaincode-evm
./fab3
You should see:
Starting Fab Proxy on port 5000
Interacting with a Previously Deployed Contract
In a different terminal window:
Install web3:
npm install [email protected]
Launch node session:
node

Web3 = require('web3')
web3 = new Web3(new Web3.providers.HttpProvider('http://159.89.146.143:5000'))
web3.eth.defaultAccount = web3.eth.accounts[0]

simpleStorageABI = [
    {
        "constant": false,
        "inputs": [
            {
                "name": "x",
                "type": "uint256"
            }
        ],
        "name": "set",
        "outputs": [],
        "payable": false,
        "stateMutability": "nonpayable",
        "type": "function"
    },
    {
        "constant": true,
        "inputs": [],
        "name": "get",
        "outputs": [
            {
                "name": "",
                "type": "uint256"
            }
        ],
        "payable": false,
      "stateMutability": "view",
      "type": "function"
    }
  ]
SimpleStorage = web3.eth.contract(simpleStorageABI)

myContract = SimpleStorage.at('7ec1f20fced5ed8d47f94cdab140644a28a85441')
myContract.set(10)

myContract.get().toNumber()
ARK.io plugin to trigger the Smart Contract
If you haven't already done so, follow this post to install Ark Relay and Hyperledger plugin:
https://steemit.com/hyperledger/@vadymus/running-smart-contracts-in-ark-io-via-hyperledger-fabric
The latest plugin code can be found at:
https://github.com/Ark-Labs/ark-hyperledger-plugin
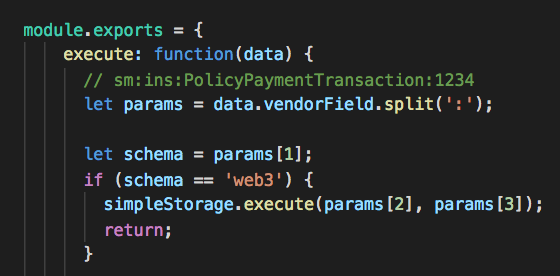
Notice, the parts related to web3 integration. First, we check - if "schema" == "web3" then we delegate execution to simpleStorage:

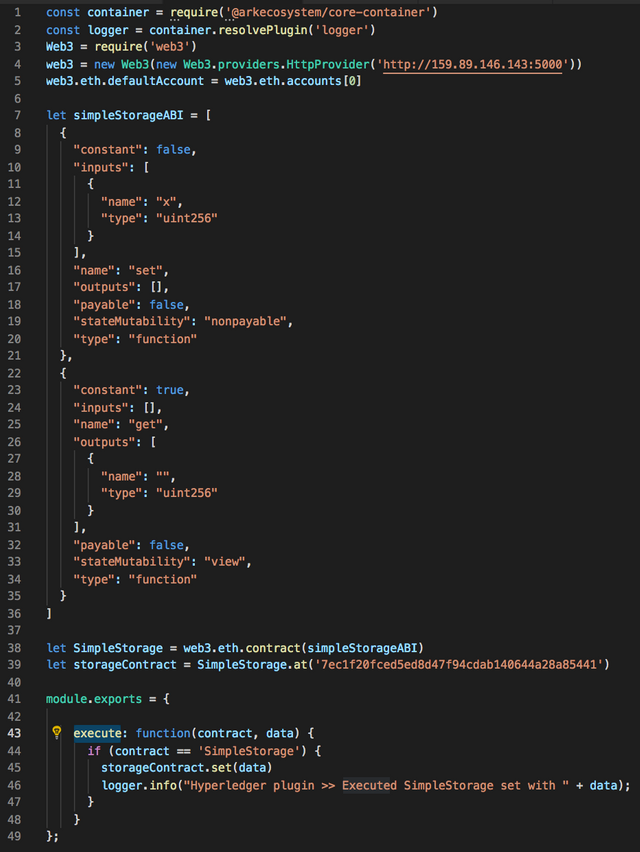
There we call our smart contract via web3 and fab proxy:

Triggering Smart Contract via ARK.io desktop wallet
Make sure ark-hyperledger-plugin is installed and the relay is running. You should see this last entry in your relay logs after starting it:

Make sure fab proxy is running on Hyperledger instance, and it is listening on port 5000:

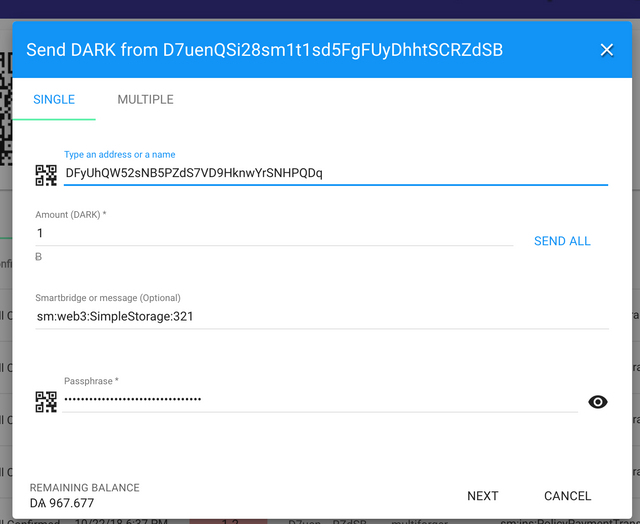
Submit Ark transaction via desktop wallet:

Observe output in Ark relay logs with details of the newly applied transaction:

Open up node console and check whether Smart Contract picked up the new value:

Congratulations @vadymus! You received a personal award!
You can view your badges on your Steem Board and compare to others on the Steem Ranking
Do not miss the last post from @steemitboard:
Vote for @Steemitboard as a witness to get one more award and increased upvotes!
Downvoting a post can decrease pending rewards and make it less visible. Common reasons:
Submit
Congratulations @vadymus! You have completed the following achievement on the Steem blockchain and have been rewarded with new badge(s) :
Click here to view your Board of Honor
If you no longer want to receive notifications, reply to this comment with the word
STOPDownvoting a post can decrease pending rewards and make it less visible. Common reasons:
Submit
Congratulations @vadymus! You received a personal award!
Click here to view your Board
Downvoting a post can decrease pending rewards and make it less visible. Common reasons:
Submit