Facebook Business Page - For Local Businesses - Hate it or love it Facebook is still the most popular social media network in the world and with over 2 billion active users it's one of the best places to promote your business and one of the simplest and effective ways of doing that is with a free Facebook business page.
If you've been thinking about building a Facebook page for your business or if you haven't you should, but we're not sure where to start I'm going to show you how step-by-step so by the end of this tutorial you have a fully-fledged business page ready to generate some fresh leads.
step number one, setting up your page. Head over to facebook.com and before we start you need to understand you can't create a business page on Facebook unless you have a personal Facebook account attached to it. This is because
Facebook requires every business page to have at least one administrator to manage the page and this is only feasible by tying a Facebook business page with a personal account. Now before you ask anyone seeing your business page
will not be able to trace it back to your personal profile as they are two separate entities so you can relax.
If you haven't got a Facebook account yet create one it only takes a couple of minutes. If you already have an account
just log in to your profile, once you've logged in in the top blue ribbon, click on the create link and select the page option:
d":1066,"sizeSlug":"large"} -->
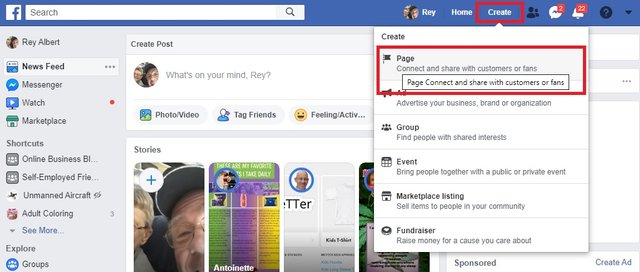
this will bring you to a screen where you will be given the choice of creating your page between two
categories the first category is called business or brand you should select this category if you are a business of any size or type that sells services or product.
d":1068,"sizeSlug":"large"} -->
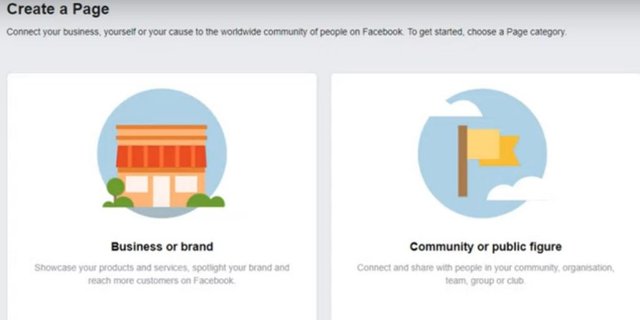
If you are a public figure like a musician, a sports team, a church group, or any kind of organization you should select the second option community or public figure since this post is mainly targeted at local business owners let's choose business or brand.
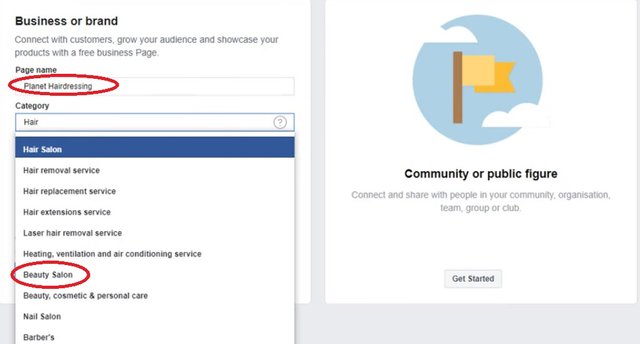
The next step is choosing a name for your page what you want to do here is to use your business name today I'm going to create a page for a fictitious hairdresser that I'm going to call Planet hairdressing the next thing you need to do is to pick the right business category that best represents your business just start typing what you think the category should be and select the appropriate one based on the suggestions.
d":1069,"sizeSlug":"large"} -->
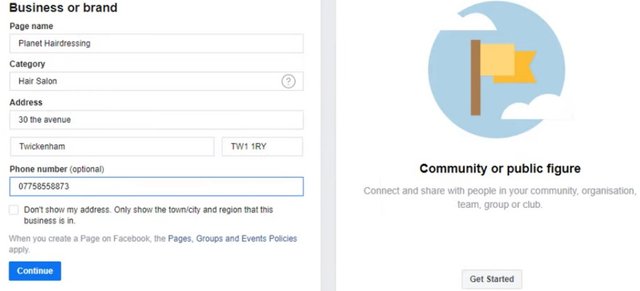
Next add the address where your business is located the phone number is optional so it's up to you but my recommendation would be to add it then click Next.
d":1070,"sizeSlug":"large"} -->
You will then be asked to add a profile picture and a cover photo skip these steps, for now,
d":1071,"sizeSlug":"large"} -->
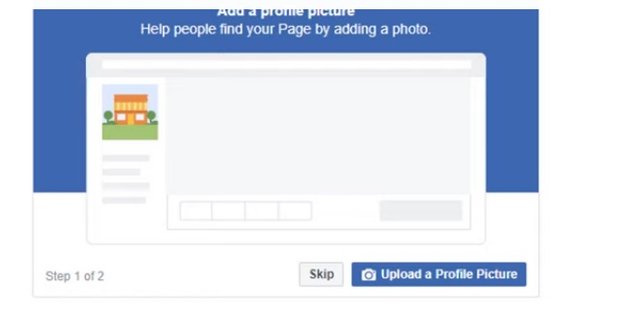
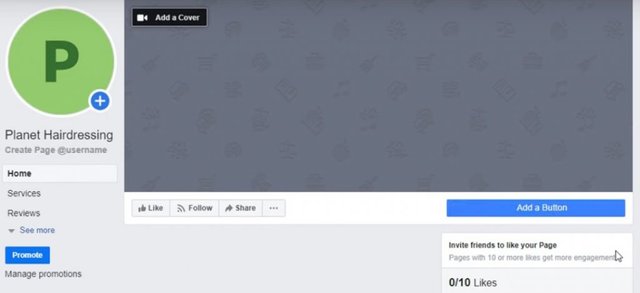
Your page is now set up and live on Facebook for everyone to see at this stage it looks very bare and doesn't really reflect your business at all that's why I would recommend to unpublish it until we have finished creating it.
d":1072,"sizeSlug":"large"} -->
Just go to settings in the general tab choose page visibility click on edit select page unpublished and click Save select the reason why you want to unpublish your page click on next then click on unpublish.
d":1073,"sizeSlug":"large"} -->
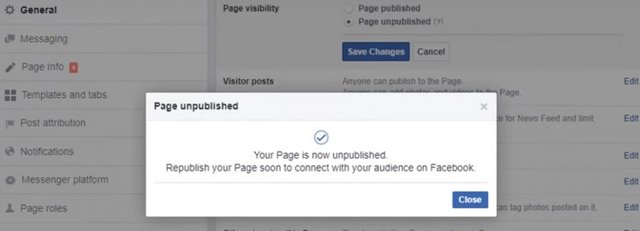
Close the dialog box then on the top left-hand side click back on the page link which will take you back to your newly created page time to move on to step number two branding your page the first thing we're going to do is add a profile picture to your page your profile picture will appear on every post or comments that you make across Facebook using your Facebook business page so that's why it's a good idea to add your logo in there the ideal size is currently at 360
pixels by 360 pixels if you do not have any logo available but yet want to make your page look as professional as possible here is a little tip.
You can use head over to a website called canva.com and log in using your Facebook account once logged in on the left-hand side menu click on create a design and choose the custom dimension option in the fields set the dimensions to be 360 and 360 so it fits the profile picture of your Facebook page perfectly and choose px which stands for pixels.
d":1074,"sizeSlug":"large"} -->
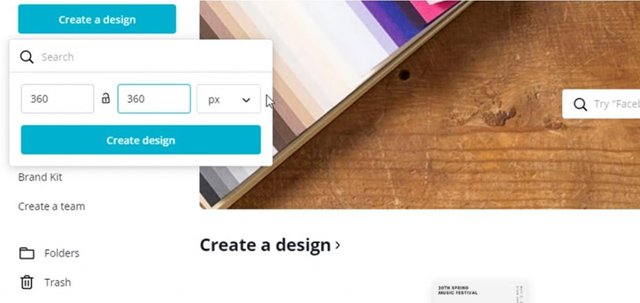
Then click on create a design this will take you to a design area where you can start making your logo by simply dragging and dropping elements directly on the canvas. I personally love canva.com as a tool and use it regularly because you can design pretty much anything very easily using their free pre-made templates and images.
Using the search box look for something in relation to your line of business in this instance I need a logo for my hairdressing salon so I'm going to type hair. As you can see they are quite a few options to choose from. I want something simple so I am going to go for this one here just by clicking on it once.
d":1075,"sizeSlug":"large"} -->
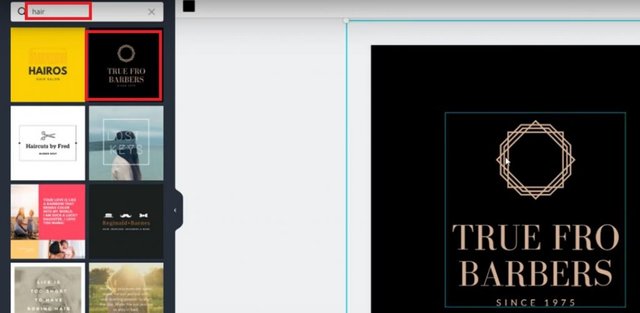
On my work area I can modify the elements by just clicking on them here I just want to modify the background from black to orange to do this I just need to click on the background and modify the color using the palette accessible
at the top each element can be modified in the same way including the copy so you can really craft something unique for your business.
d":1076,"sizeSlug":"large"} -->
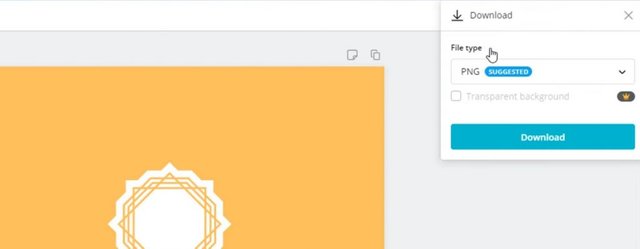
Once you're done creating your profile picture click on the publish button on the top right hand side and download it on your computer all you need to do now is load your profile picture on your Facebook page just go back to your Facebook page and hover on the profile picture you should see an update option appearing click on it and select the upload photo option to fetch your newly created logo.
d":1077,"sizeSlug":"large"} -->
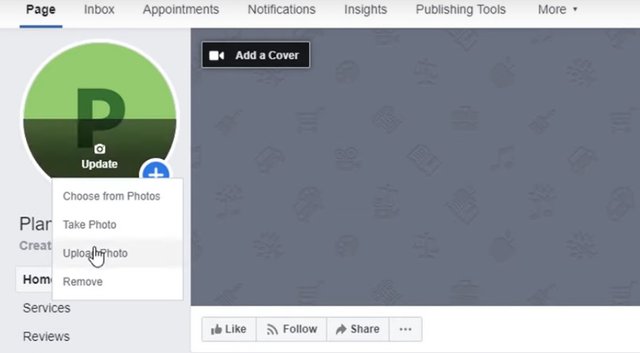
Add a description to it and click Save time to add a cover to our page let's follow the same process and go back to canva.com this time we don't even need to specify the dimension because canva has already set this up as a default design in its library just click on create a design and search for Facebook cover once again choose something in relation to your business and modify according to your needs.
d":1078,"sizeSlug":"large"} -->
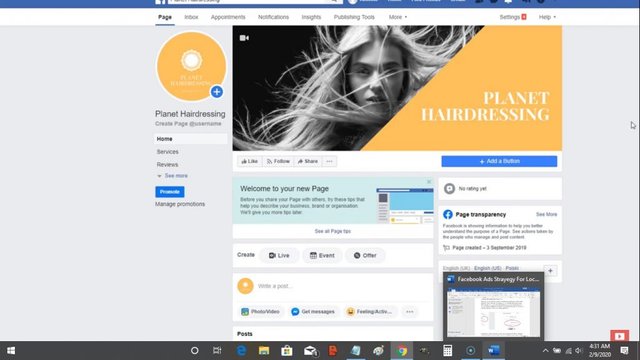
Try keeping the same colors and font so it looks consistent with your profile picture within canva you can also add images which makes your work even more professional once you're done go back to your Facebook page click on the add a cover button load your Facebook cover you just created in canva and save it just like your profile picture.
For those of you who don't want to use canva and need to know the exact dimensions of the cover photo, they are 820 pixels by 312 pixels our page is now looking a lot better and nicely fits with our brand last step before we move on to our next step. If you click on your Facebook cover you can add a description of the image tag some people who are in it add a link to your site and write comments.
d":1079,"sizeSlug":"large"} -->
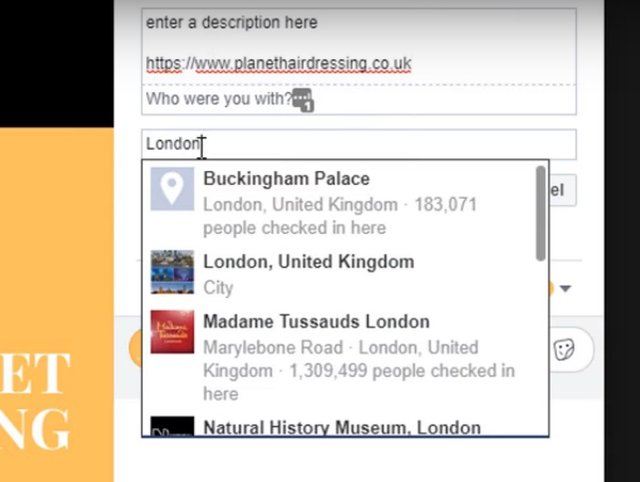
This can be particularly useful when people decide to share your cover as it will give you an opportunity to direct people to your website or simply give them more information step 3 add a call to action button to your page on every Facebook page. There is an option to add a call to action button located right below your cover photo this is a great opportunity to encourage your visitors to take action such as visiting your website make a booking learn more about your business and overall help generate more leads and in return increase sales.
d":1080,"sizeSlug":"large"} -->
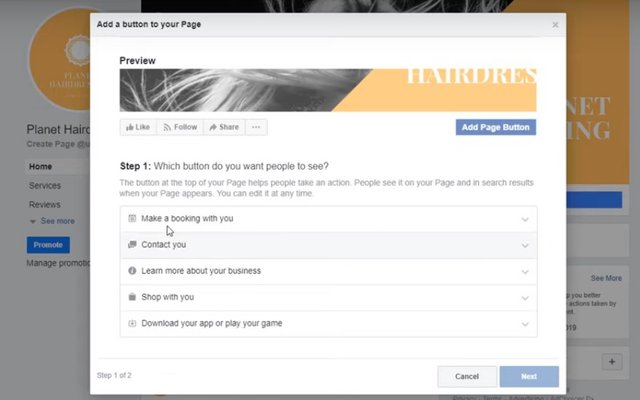
To select the type of call to action you want to add just click on add a button you should see a list of categories you can choose from within each category you have several options available. Browse through the various categories and
select the most appropriate one for your business in my example I want people to call the salon directly to book a hair appointment so I am going to choose the contact us category and the call now option then add my phone number and save.
d":1081,"sizeSlug":"large"} -->
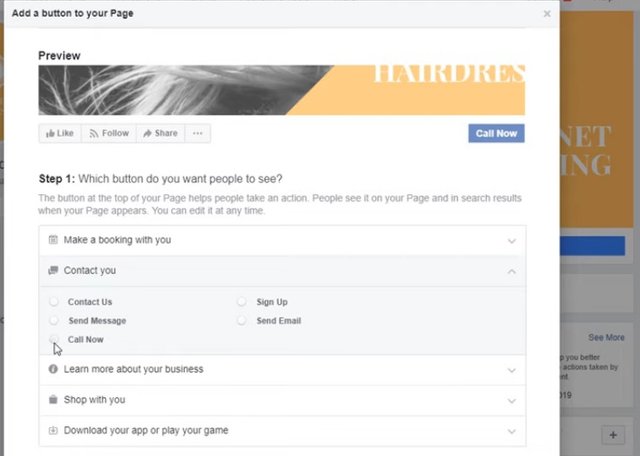
Anyone tapping on this button from their phone will trigger a call to my business so I can schedule an appointment with them Step number four, complete your business details. very often when you are searching for a local business in Google one of the first results that comes up organically is a Facebook business page this is because Facebook is so dominant that it will trump many other results in Google's organic search results even your own website that's why it's
important you fill in all possible information on your page as it is likely to be the first impression you will give to your visitors the good news is it's very simple to do.
d":1082,"sizeSlug":"large"} -->
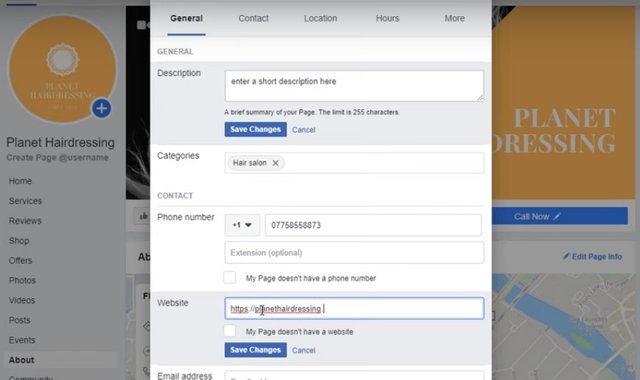
Go to your page and on the left-hand side menu select the about option if you can't see the option just click on see
more that will expand the menu then select about. Right below your call-to-action button click on the link edit page info and fill in all your business details including a short description of your page your website address your business email address your opening hours and everything else that is blank.
Still in the About section add your business story to give relevance and context to visitors who want to find out about you add an image some great copy with relevant keywords and another link to your website in there Step number five, interact with your audience with automated messages one great thing about running a business page is that you can interact with your audience even when you are not online which is very useful when you are a busy local business owner.
First, you can display a greeting message that people will see the first time they open a conversation with you on messenger. To set this up just click on your page setting option on the top right-hand side. Choose the messaging option and click on the jump to your section link.
Next to the response assistant turn on the show a messenger greeting option and customize your message by clicking on the Change button an example of the message your visitors will see automatically appears here to change it to
whatever you want you can customize it further and personalize your message by using the dynamic options in the copy which is a very nice touch.
Let's choose first name option so anyone opening a conversation with you will receive the following greeting which includes their first name if somebody responds to the greeting and you're not available to start a conversation or answer their questions you can set up the response assistant functionality that will send instant replies to any message to set this up.
Just click on the go to automated responses link switch on the instant reply button and click on edit to write your own message. You can also automate some of the answers which is great. Once you're done click on save and then on
the top left-hand side click back on your page.
So we can move on to our next step number six, configure your page menu. By default, Facebook will set up
your page with a standard navigation menu on the left-hand side you can customize this upon your needs and your business type just go to your page settings and select the template and tab option if you scroll down you will see a
list of the default options available in your current menu.
d":1083,"sizeSlug":"large"} -->
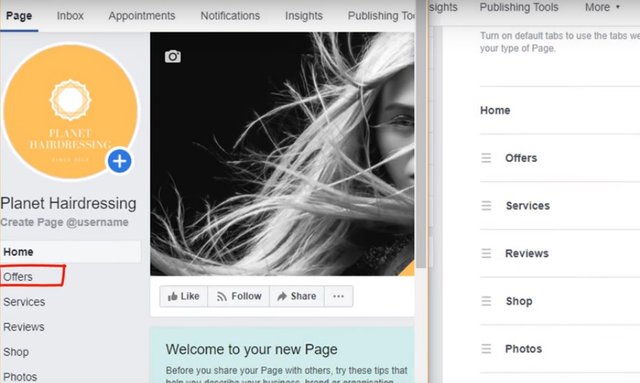
If I put my Facebook business page side-by-side with the menu settings you can see what I'm talking about to change the ordering simply drag-and-drop the menu tab you want to move let's say I want the offer tab to sit right at the top to entice more customers all I need to do is grab the component and drop it right at the top just refresh your page and you'll see the changes.
Step number seven time to publish your first post. Your page is now all ready to go it's now time to start making the most of it and publish a few posts but before you do that remember at the beginning of this tutorial we made this page private so it's time to make it available to the world go to your page settings once more and in the general
tab select page visibility and click on edit tick the page published option and save changes go back to your page and publish.
Your first post here is an example of a few posts I have published on my hairdressing page. So it makes it look a little bit more alive once you've published a few posts and your page looks like it's active. It's time to move on to our final step number 8 invite your friends and create a vanity URL. Facebook will suggest you invite friends to like your page and this is a good idea for three reasons.
First, it will give your page an initial boost and help gather some momentum since you currently have 0 followers. Second, your friends might share the page with their friends which will amplify your reach and third when you reach 25 likes you will be able to create what is known as a vanity URL. If you don't know what a vanity URL is let me explain
Currently, your Facebook page is accessible via a unique address just like a website in our case the address file page is unlike a website this is very difficult to remember for anyone. You can, however, give your page an address that is much easier to remember just like my own Facebook page. facebook.com/reyalbertmarketing this is what is known as a vanity URL.
To do this just click on the link called create a page. At username under your profile picture this will trigger a pop-up in which you can set up a memorable username and give you an easy to remember address of your page in the username field add your business name without any space and then click on create username. If you see a red man
telling you you are not eligible it is because you haven't reached 25 likes yet so keep trying until you get there.
To be honest, it's super easy after that your Facebook page will be a hundred percent complete that's it for today you should now be all set and able to post on your brand-new business page. But remember Facebook is a social network and not a platform to flog your products and services.
Engage with your local community be helpful and respond to comments and questions and don't leave your page unattended for too long. I hope you found this tutorial "Facebook Business Page For Local Businesses" helpful remember to post any questions in the comments below and press the thumbs up button if you feel like it and until next time
happy marketing
As found on Youtube
Posted from my blog with SteemPress : https://reyalbert.com/facebook-business-page-for-local-business-step-by-step-2020-instructions/