Hello steemians,
I am participating in the SEC S20W4 contest organized by @mohammadfaisal, which focuses on creating interactive user interfaces in Flutter. This contest highlights dynamic elements such as cards, scrolls, and ClipRRects to develop effective and visually appealing layouts. My goal is to demonstrate my skills in designing innovative interfaces while following the proposed design principles.
Task Title: How to create a user profile card layout in flutter?
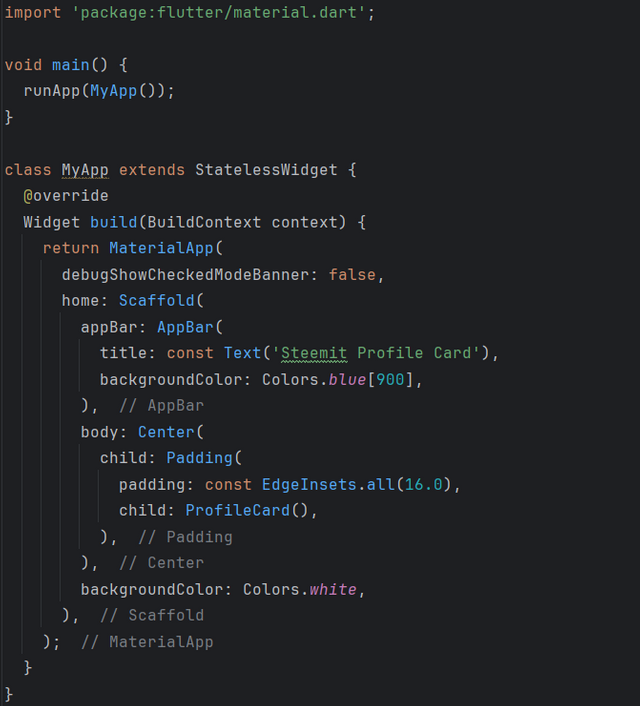
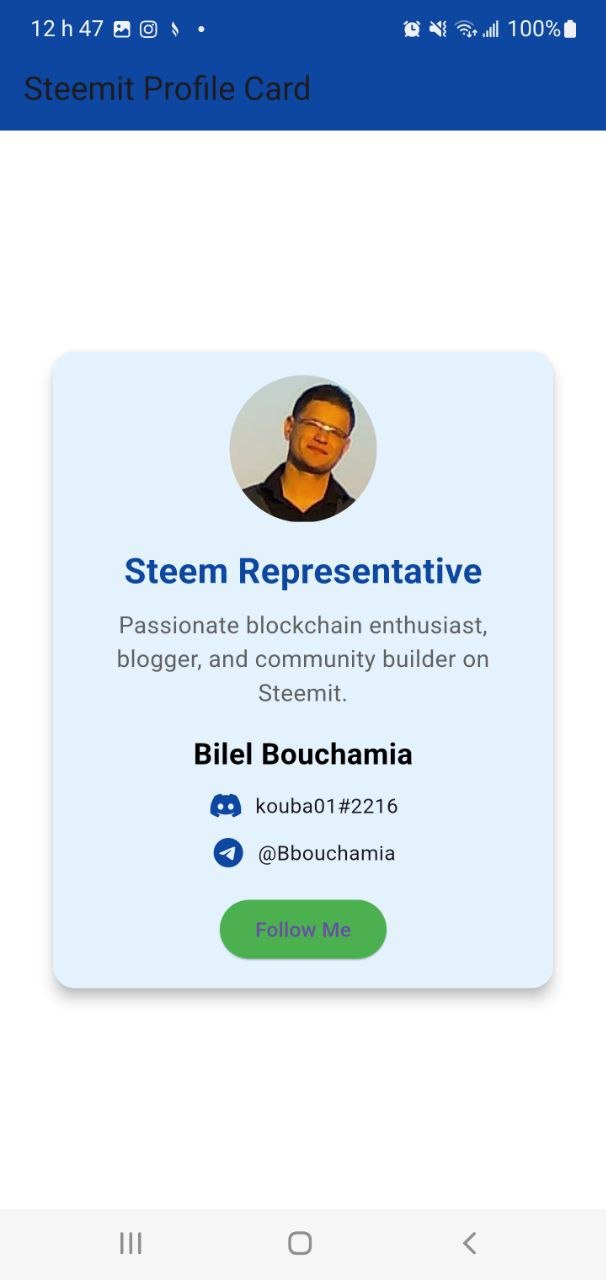
I start by creating a Flutter app by defining a MyApp class that extends StatelessWidget. Inside this class, I define the root widget MaterialApp that will contain the entire app. I use Scaffold to structure the UI of the app. The Scaffold contains an AppBar with the title "Steemit Profile Card" and a blue background defined by Colors.blue[900].
Next, I create a ProfileCard widget, also a StatelessWidget. In this widget, I return a Card widget with the following properties:
- Elevation : I use
elevation: 8to add a soft shadow to the card and give it some dimension. - Rounded Border: I apply
borderRadius: BorderRadius.circular(15)to make the corners of the card rounded, which gives a modern aesthetic effect. - Margin: I set
EdgeInsets.all(20)to add space around the card. - Background Color: I choose a light blue background color for the card with
Colors.blue[50].
| Code1 | Code2 |
|---|---|
 | 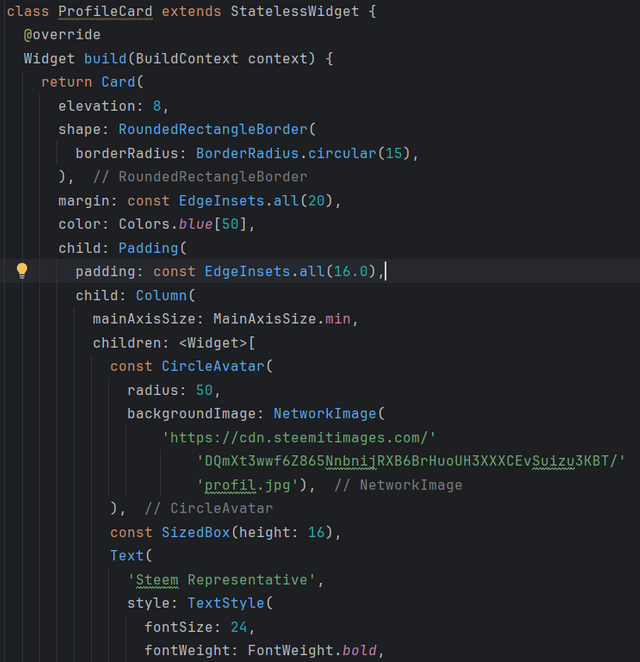 |
In the Card widget, I use a Padding widget to add 16px internal padding around all the card content. Then, I structure the content using a Column widget, which vertically stacks the following elements:
- Circle Avatar:
- I use a
CircleAvatarwidget with a radius of50to display a profile image. The image is loaded from a link withNetworkImage.
- Username:
- After the avatar, I display the text
"Steem Representative"with a bold font (fontWeight: FontWeight.bold) and a font size of24px.
- Description:
- I then place a description
"Passionate blockchain enthusiast, blogger, and community builder on Steemit.". This description is centered and has a font size of16px, with a gray color to differentiate from the title.
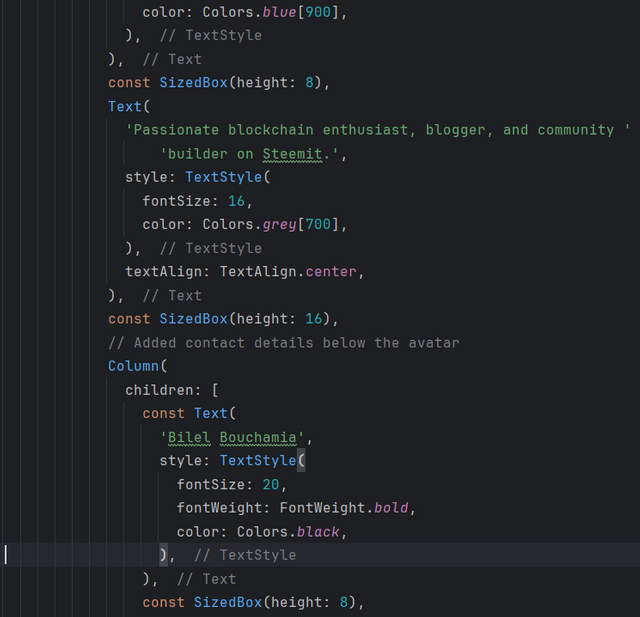
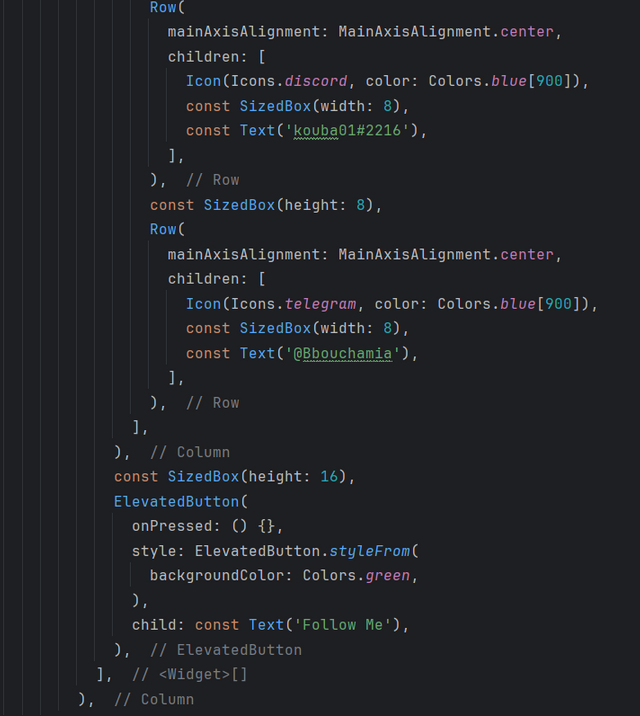
Below the description, I add contact information like the user's name, Discord and Telegram ID. I do this using an additional Column that contains:
- Full Name:
"Bilel Bouchamia"with a bold font and a size of20px. - Discord ID and Telegram ID: I use two
Rowto display the icons (withIcons.discordandIcons.telegram) next to the texts"kouba01#2216"and"@Bbouchamia". These icons and texts are aligned in the center horizontally.
Finally, I add a button with a label "Follow Me". This button is an ElevatedButton, styled with a green background color (backgroundColor: Colors.green). The button is ready to perform an action when clicked.
| Code3 | Code4 |
|---|---|
 |  |
Using the widgets provided by Flutter like Card, CircleAvatar, Column, and Row, I manage to create an attractive and functional profile card. Thanks to the elevation, border, and color properties, the card has a modern design. Everything is well organized, with each element spaced coherently to provide a pleasant and intuitive user interface.
Final Result:
Task Title: How to create a weather card layout in flutter?
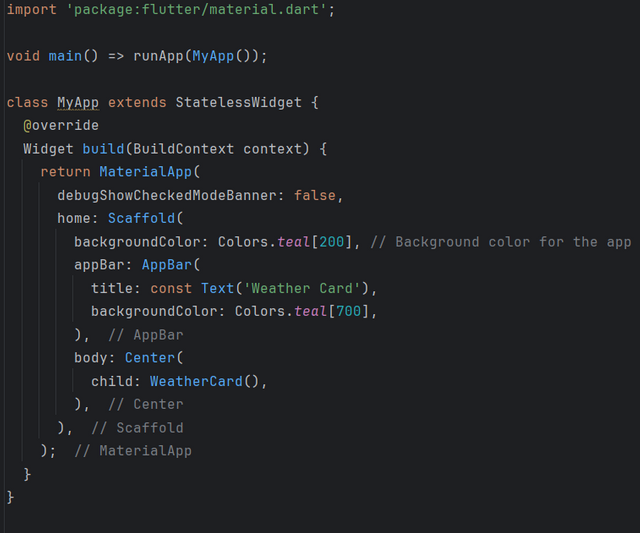
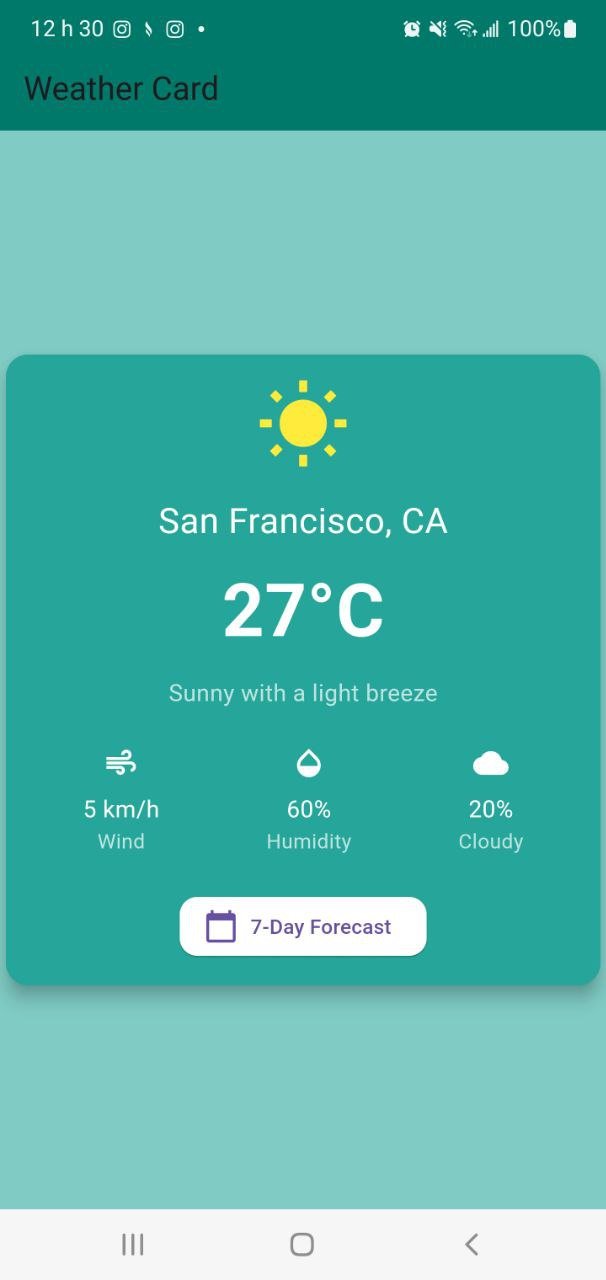
I start by defining a MyApp class that extends StatelessWidget as the base of the application. The MaterialApp widget is used to structure the UI and contains an AppBar with the title "Weather Card" and a custom background color (Colors.teal[200]). The Scaffold handles the overall UI with a Center containing the weather card.
In the WeatherCard class, I use a Card widget to display the weather information. The card has properties such as:
- Rounded Border: I use
RoundedRectangleBorderto make the corners of the card rounded. - Elevation: I add a slight shadow with
elevation: 10. - Background Color: I choose a light
tealshade for the background (Colors.teal[400]).
| Code1 | Code2 |
|---|---|
 | 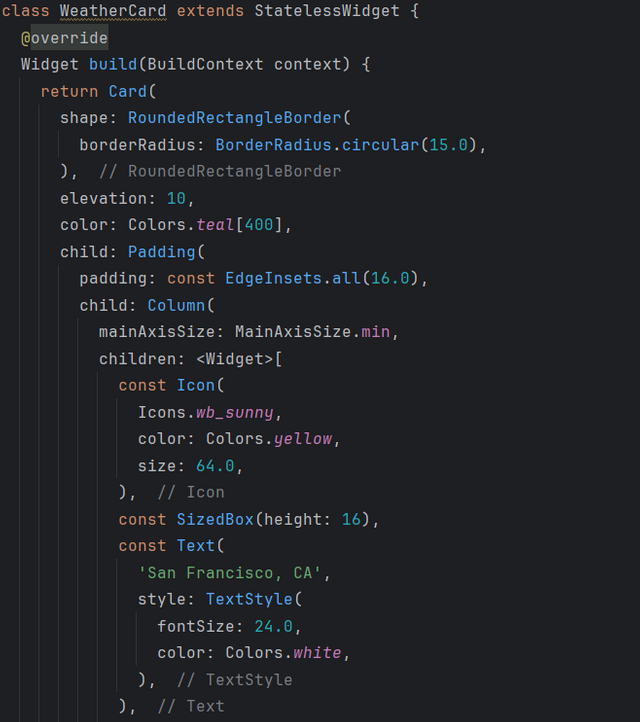 |
Inside the map, I add a Padding to provide space around the content. Then, I use a Column to vertically stack the following elements:
- Weather Icon:
- The sun icon (
Icons.wb_sunny) is displayed with a size of 64 and a yellow color.
- Location and Temperature:
- I show the location
"San Francisco, CA"with a white font of size24. - The temperature
"27°C"is displayed in a large size (50) and bold.
- Weather Description:
- I add a description like
"Sunny with a light breeze", with a slightly smaller and semi-transparent font (white70).
| Code3 | Code4 |
|---|---|
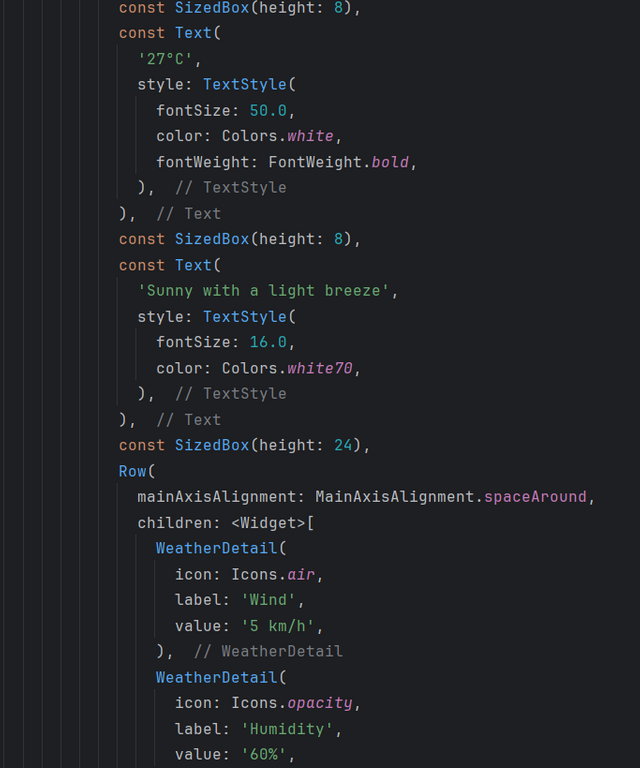 | 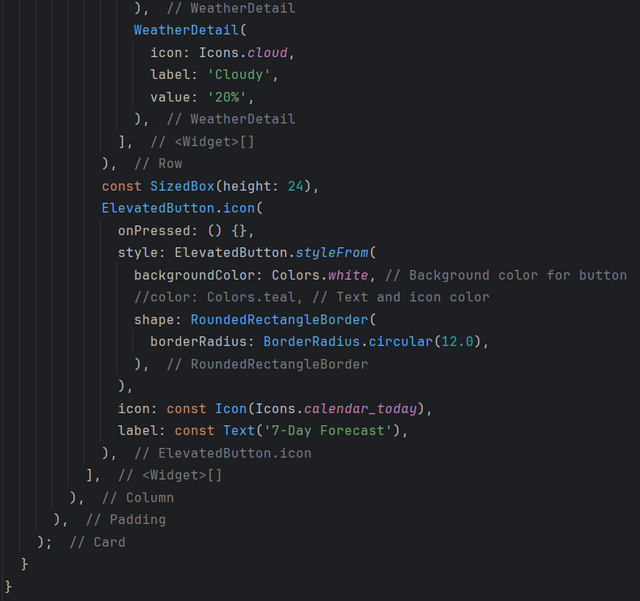 |
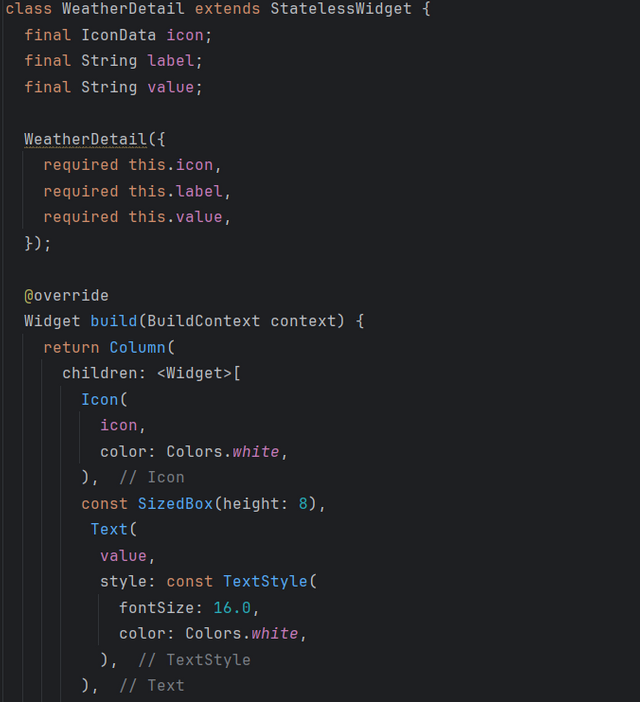
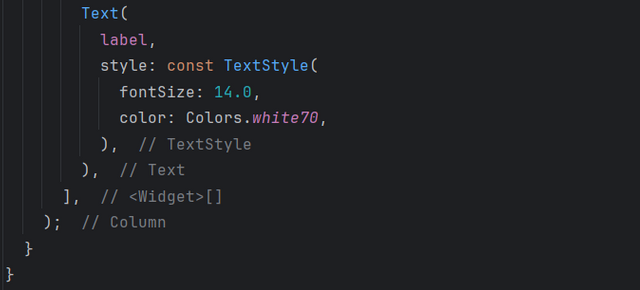
Below the description, I add a row of icons and text to display additional information like wind speed, humidity, and cloud cover. Each weather detail is wrapped in a WeatherDetail widget that takes an icon, a label, and a value.
At the end, I add an action button with the calendar icon (Icons.calendar_today) and the text "7-Day Forecast". This button is styled with a white background color and a rounded border. The button can be configured to perform an action when pressed.
| Code5 | Code6 |
|---|---|
 |  |
By combining the Card, Column, Row, and other basic Flutter widgets, I can create an aesthetic weather map that displays all the necessary weather information. The map uses a combination of text, icons, and buttons to provide an intuitive and informative user interface.
Final Result:
Task Title: How to create a scrollable image gallery in flutter?
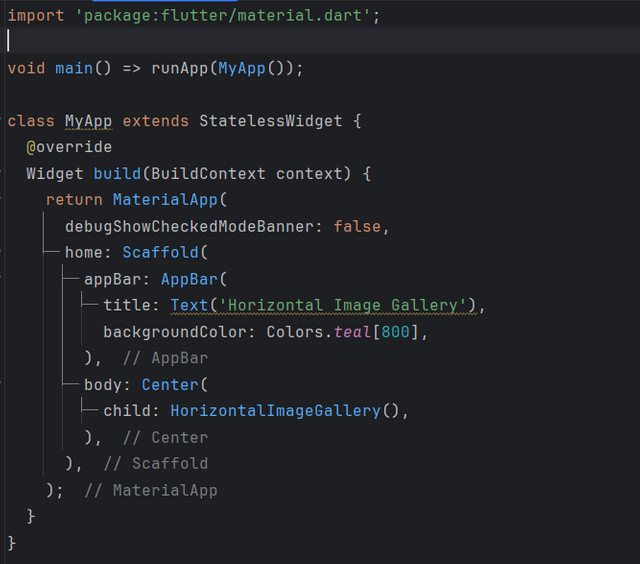
I start by creating a MyApp class that extends StatelessWidget. This class contains the root widget of the MaterialApp application, which defines the overall theme and main user interface. I use a Scaffold to structure the interface, including an AppBar with the title "Horizontal Image Gallery" and a teal background.
I add a HorizontalImageGallery class, which is also a StatelessWidget. This class is responsible for displaying the image gallery with horizontal scrolling.
In this class:
- List< String > imageUrls: I define a list of image URLs that I want to display in the gallery. Each image is retrieved via a URL using the
Image.networkwidget.
In the build() method of HorizontalImageGallery, I use a Container widget to set the height of the gallery to 250. Inside this container, I set up a ListView.builder to display the list of images.
| Code1 | Code2 |
|---|---|
 | 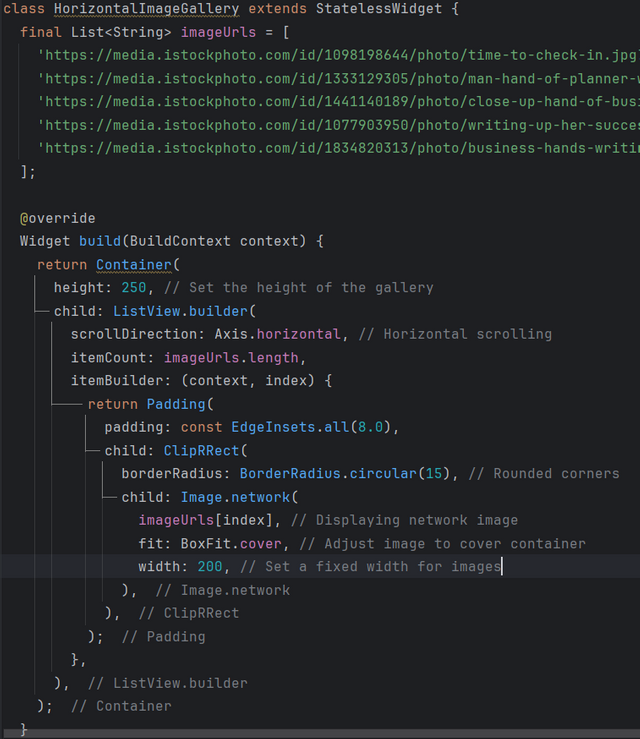 |
ListView.builder : This widget is used to create a list of scrollable items, and it is configured to scroll horizontally by setting
scrollDirection: Axis.horizontal.itemCount : The number of images is determined by the length of the
imageUrlslist.itemBuilder : For each item in the list, I use a
Paddingwidget to add space around each image. Inside the padding, I add aClipRRectwidget to give rounded corners to the images, then useImage.networkto load each image from its URL.Image.network : This widget loads the image from a specified URL. For each image, I use the
fit: BoxFit.coverproperty so that the image covers the entire available space without being distorted.Fixed Width : I give each image a fixed width of
200to ensure a uniform and adjusted layout within the gallery.
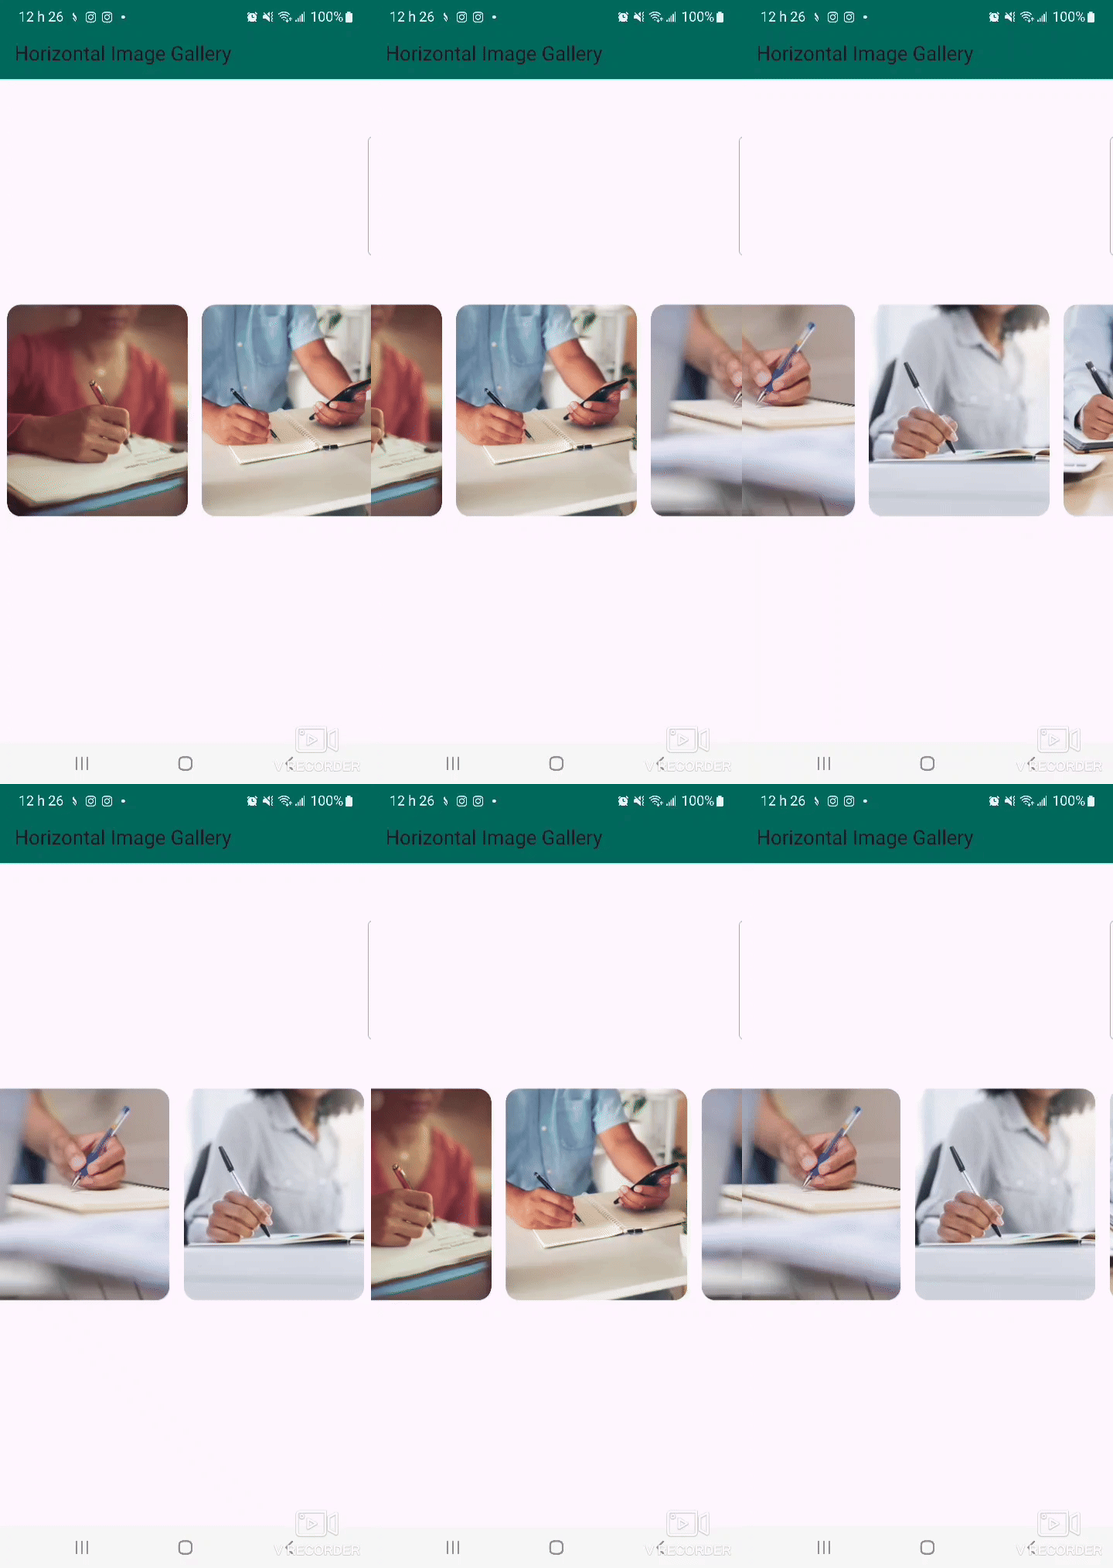
Final Result:
Project: How to create news feed user interface in flutter?
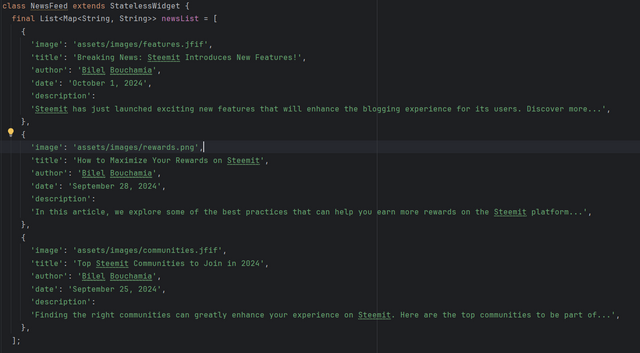
I start by defining a MyApp class that extends StatelessWidget. This class contains the root widget of the MaterialApp application, which defines the overall theme and main user interface. The root widget uses Scaffold for structure, and I add an AppBar with the title "Steemit News Feed".
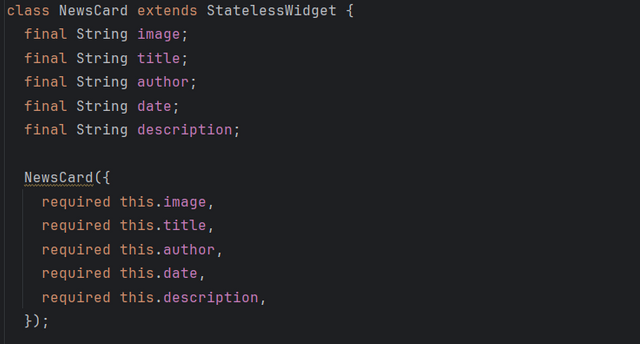
For each news card, I define a NewsCard class, which also extends StatelessWidget. Each card contains:
- Image: A cover image, displayed at the top of the card.
- Title: A text displaying the title of the news story.
- Author and Date: A line of information displaying the author and publication date.
- Description: A brief description of the news story.
- Read More Button: An
ElevatedButtonwith a"Read More"text that can be configured to redirect to a link or to show more information.
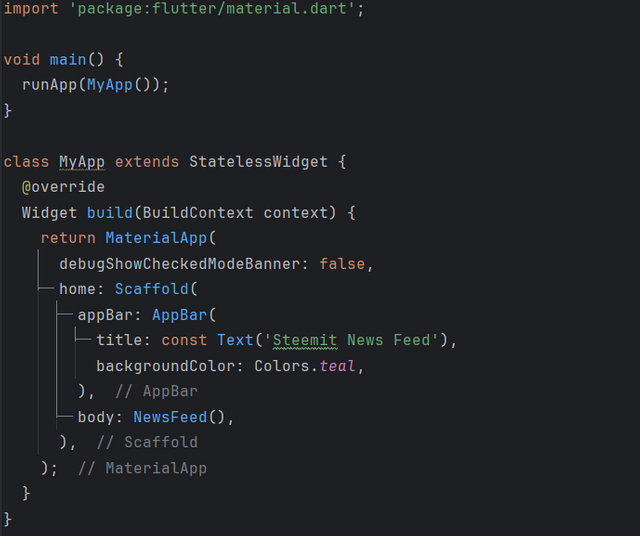
I create a list of news items using a List< Map< String, String > structure. Each news item is defined by a dictionary containing keys for image, title, author, date, and description.
| Code1 | Code2 |
|---|---|
 |  |
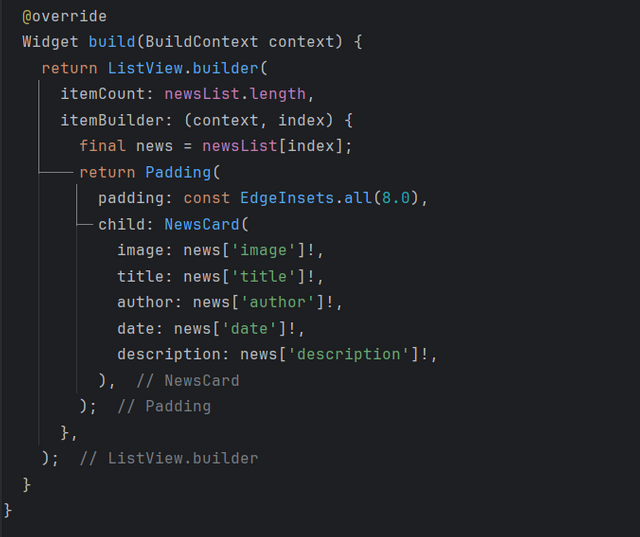
In the NewsFeed class, I use ListView.builder to create a vertically scrollable list. This allows a card to be generated dynamically for each item in the news list. The ListView.builder widget ensures that only the cards visible on the screen are rendered, which improves performance.
- itemBuilder : This method creates each news card with the appropriate information extracted from the news list.
- Padding : I add padding around each card to give space between items.
| Code3 | Code4 |
|---|---|
 |  |
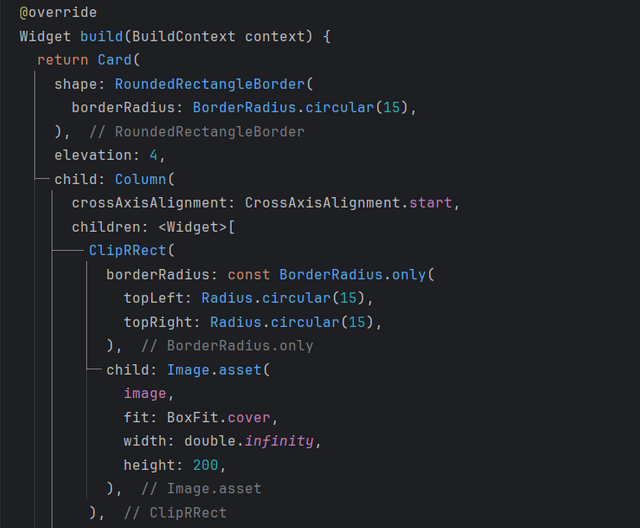
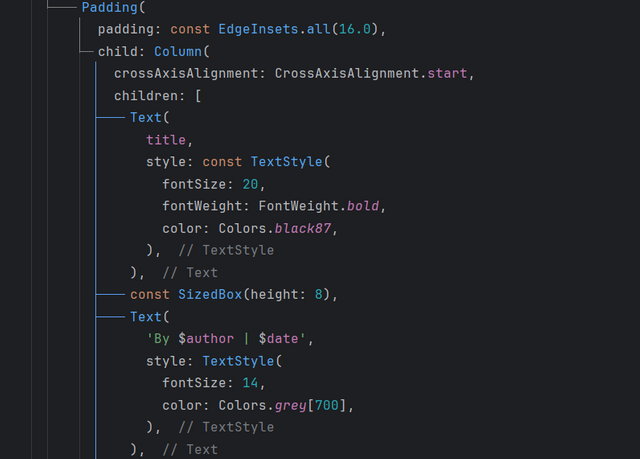
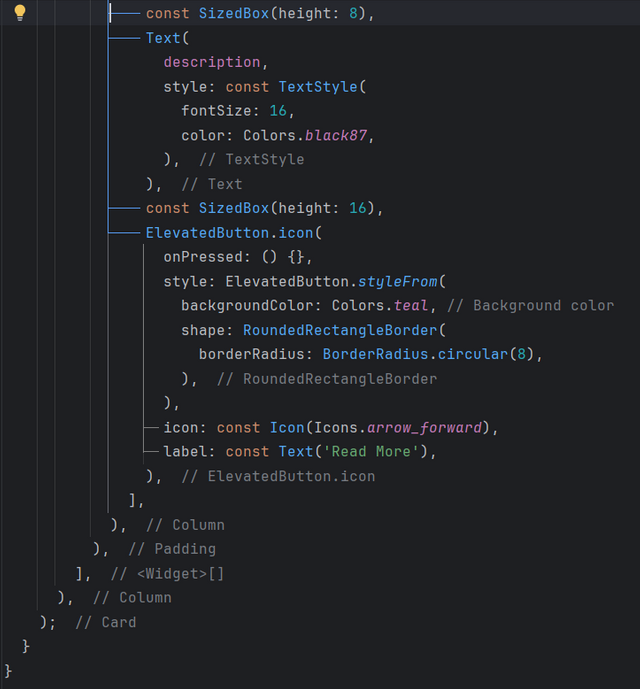
The Card widget contains a Column that stacks the following elements:
- ClipRRect to round the corners of the cover image.
- Text Widgets for the title, author, date, and description.
- ElevatedButton.icon for the "Read More" button with an icon.
By combining the Card, Column, ListView.builder, and other basic Flutter widgets, I create a complete and functional news feed UI. Each news item is displayed in a card that can be scrolled vertically. This structure is extensible and allows to handle large amounts of content without compromising performance.
| Code5 | Code6 |
|---|---|
 |  |
| Code7 |
|---|
 |
Final Result

Thank you very much for reading, it's time to invite my friends @khursheedanwar, @stream4u, @steemdoctor1 to participate in this contest.
Best Regards,
@kouba01

Your post has been rewarded by the Seven Team.
Support partner witnesses
We are the hope!
Downvoting a post can decrease pending rewards and make it less visible. Common reasons:
Submit
Upvoted. Thank You for sending some of your rewards to @null. It will make Steem stronger.
Downvoting a post can decrease pending rewards and make it less visible. Common reasons:
Submit
This post has been upvoted/supported by Team 5 via @httr4life. Our team supports content that adds to the community.
Downvoting a post can decrease pending rewards and make it less visible. Common reasons:
Submit