WordPress is one of the most popular platforms for creating a blog in the world, so it's not surprising that there is always a question: How to install WordPress. It turns out that it is quite simple and does not require special knowledge and skills. There are several ways to install WordPress, which we will speak about below. Do not be surprised if in just 5 minutes you can achieve the desired one - get your own blog on WordPress. You can install WordPress either through the automation service provided by most hosting providers, either with FTP access, or on a personal computer (local server - OpenServer, Denwer). Lets look at these options closer.
How to install WordPress using Auto Installer
Currently, most hosting providers offer the ability to auto-install the most popular scripts. The only problem is to find where the auto installation section is located. The placement of the corresponding menu may vary, depending on the usage panel used by the hosting provider. Perhaps this is the only problem (if at all it can be called a problem) in order to install WordPress. For an example, let's consider how easy I was able to install WordPress on the hosting I myself use.
There is a Web Scripts menu. It helps you not only to see the installed scripts but also to install the desired one using the Install button from the right upper corner section (see the screenshot). Clicking on this button you'll see the pretty large list of the different scripts to install automatically. 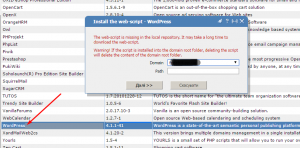
After selecting the desired script (in our case WordPress) click on its name 2 times, select the domain from the list (the domain should be created before that) and click Next. In the next window we should agree to the terms of use and click Next again. At the last stage of the WordPress installation, you need to fill in the fields with the appropriate values. After filling in the fields just click Next and if everything is correct you'll see the list of the links to the administraive side of your blog and to the blog itself.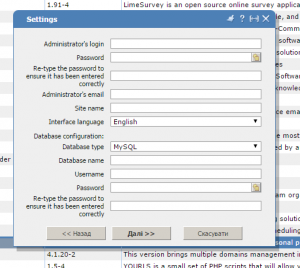
How to Install WordPress with FTP
What to do if there is no auto-install function on the hosting service that you've chosen? Well you can choose the other one with that feature or just install WordPress manually without much efforts. First of all you need to have an FTP client and FTP access to your files. It can be good old Total Commander with FTP support or special software, for example, FileZilla, or just use the File Manager of the hosting.
Next you need to download the latest version of WordPress script from the official site. Unzip the files and upload them to the public_html folder using the FTP client. To access the site using FTP you need to know the login, password and the server address, which can be found through the hoster support, FAQ section or simply through the panel. Such information should also be sent to you by e-mail after the order of the hosting itself.
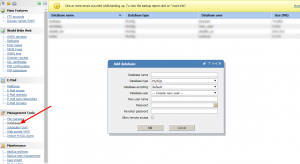
Next, you need to create a database for WordPress and it's actually not as scary as it sounds. In my case, there is the Databases tab in the Management Tools section. Clicking on it I see the page with created databases. And with the help of with the New button from the top right menu on the same page I can create the new database filling in the fields on the popup window (see the screenshot). It is important to give the user all the rights, so if you have such a box put a tick in all the points, if it does not appear, then it's okay - it means all necessary privileges were provided automatically. At this point, copy the database name, username and password to some safe place. We will need these data soon.
After you have created the database, you can start installing WordPress. For this, go to the site by entering "http: //address_our_site/wp-admin/install.php" or "http: //address_our_site / folder / wp-admin/install.php" (if WordPress installation was implemented in the subdirectory) and see a strange and an incomprehensible inscription of the following content: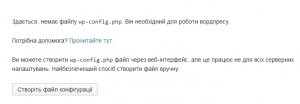
Ok, its not so scary as it sounds. Just click on the Create a configuration file icon to create it.
It can happen that the configuration file can not be created via the web interface. In this case, you need to find the file with the name wp-config-sample.php in the installation directory, open it in any text editor (better use Notepad ++ for this) and make the necessary changes.
Change:
- database_name_here to the name of database you've created earlier;
- username_here to the username of the database;
- password_here to the password from the database;
- localhost - in the most cases you can leave it as is or enter the server's name (this information can be found in the Databases menu).
Regardless of whether you've created the wp-config.php file automatically or if you had to make changes yourself for the security of your site, make such changes to this file - go to the url api.wordpress.org/secret-key/1.1/salt and copy the automatically generated values to the corresponding rows.
Just copy and paste the generated values between the quotes and save the file. Don't forget to rename it to wp-config.php if it doesn't happen automatically.
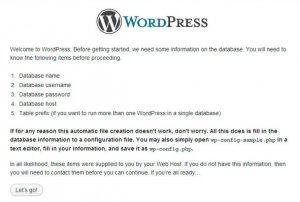
If you did everything right you'll see the message like this:
We are again reminded carefully that you need to know the database name, database user name, database password, database server address and table prefix (if more than one WordPress content management system is planned to be installed in one database). To move further we press Let's go !, enter the necessary information into the fields, click "Send" and see an encouraging inscription:
We gladly press the inscription Run the install and in the new window we enter the information that we are asked to - the site name, login, password, password confirmation, email address and tick if you want the site to be indexed, and then click Install WordPress. After few seconds you'll be able to log in the administrative part of your blog using the username and the password.
Well, that's all. You;ve just installed WordPress on the hosting using FTP access or Fle Manager of the hosting service.
How to Install WordPress to PC
The question of whether it is possible to install WordPress on a personal computer can often arise from users who want to become familiar with this content management system. Of course, you can install WordPress on a personal computer (local server), although while there are free hosting and Internet access a great need for this in my opinion is not. On the other hand, you can install WordPress on your local computer to create and test themes or plug-ins for WordPress before sharing it with the world.
To install WordPress on your computer, you need to have a local server, for example, Denwer or Open Server. Great problems with installing a local server should not arise, so immediately move on to setting up the WordPress itself. In general, this procedure is similar to the steps we take to establish WordPress for hosting. First we create a database. If you use Denwer as a local server, go to localhost / Tools / phpMyAdmin / and create a new database. In this case, be sure to specify the UTF-8 encoding. The next step is unpacking the files from the downloaded archive with WordPress to the folder X: homelocalhostwwwimya_yashe_sayta (here again if you use Denwer). After unpacking, you can start installing WordPress. At the same time, you need to make almost similar steps with those that we do when installing on hosting, as described above. The difference is that in the wp-config file in the define ('DB_USER "," user name ") by default the user will be root, there's no password at all, so leave this field blank, and the string define (' DB_HOST", " localhost '); do not change it at all.
That's all. Now you can try to install WordPress yourself.
Posted from my blog with SteemPress : https://butord.com/en/how-to-install-wordpress-a-step-by-step-instruction.html
✅ @butord, congratulations on making your first post! I gave you an upvote!
Please take a moment to read this post regarding commenting and spam. (tl;dr - if you spam, you will be flagged!)
Downvoting a post can decrease pending rewards and make it less visible. Common reasons:
Submit
Congratulations @butord! You received a personal award!
Click here to view your Board
Downvoting a post can decrease pending rewards and make it less visible. Common reasons:
Submit
Congratulations @butord! You received a personal award!
You can view your badges on your Steem Board and compare to others on the Steem Ranking
Vote for @Steemitboard as a witness to get one more award and increased upvotes!
Downvoting a post can decrease pending rewards and make it less visible. Common reasons:
Submit