This is my homework post for Steemit Crypto Academy Season 3 Week 5 for Professor @sapwood’s lesson Multisig Wallet (Electrum) -- "m of n" Combinations.

Note : I performed this task on Windows 10 PC, Google Chrome browser, and Android phone.
(1) What is a Multi-sig wallet? How is it different from a Single key wallet? What are the different uses of a Multisig wallet?
1.a. What Is A Multisig wallet
A multisig wallet is a public address that is linked to more than one wallet, in other words: it allows setting conditions to require more than one signature to be able to access it. Every wallet connected to a multisig wallet is called a cosigner. A multisig wallet can have at least 2 cosigners. The number of authorization holders and the number of authorizations required to access them can be set. For example, a multisig wallet that has 5 cosigners and it takes at least 3 cosigners' approvals (signatures) to be able to access it, then the multisig wallet is called a 3-of-5 type.
1.b. How Is It Different From A Single Key Wallet
It differs from single key wallets since that single key wallets only require one key to access it. An example of a single key wallet is steemitwallet.
1.c. Different Uses of A Multisig wallet
Among the uses of Multisig wallet are:
- Shared wallet. Shared wallets can be used in a family or organization. Whether it's within a family or an organization, the method remains the same.
- Example of a family multisig wallet: a family consisting of a father, a mother, and two children, they have a 1-of-2 multisig wallet that requires a minimum of one authorization (the father's or the mother's) before one or both children can access the funds in the multisig wallet.
- An example of an organizational multisig wallet: a school organization locking their funds in a multisig wallet that has five distributed keys and requires at least three authorization keys to be able to access the funds in it (3-of-5 type).
- Additional security features for personal use. For example, Robert has some cryptocurrencies and stores it in a 2-of-3 multisig wallet, and he stores all three wallets on different devices: one on a laptop, one on a smartphone, and one on cloud storage. If someone steals his laptop and gets the wallet, the thief will not be able to open the wallet because he needs another key that is not stored there.
- Escrow wallets. An example is in peer-to-peer trading facilitated by third parties, for example on Binance P2P or on LocalCryptos . An escrow wallet is a wallet that is used to secure traded assets so that the possibility of fraud from one party is minimalized. For example, Andy and Bob want to transact a certain amount of STEEM with a mutually agreed set of rules. Before all conditions were reached, they decided to lock up the amount of STEEM they wanted to transact, and for that they involved a third person, Clara. They take advantage of the 2-of-3 multisig wallet type. If later all the agreed conditions have been met and all parties reach an agreement, then one of Andy or Bob can open the wallet with Clara's intervention (if, for example, Andy or Bob could not do that for a reason). So, Clara will be the key so that no one –whether Andy or Bob- will commit fraud in the transaction and get away with it.

(2) Download, install & set up a 2-of-3 BTC Multisig wallet (Electrum). What is the difference between Seed key and MPK? Would you share the seed key or MPK with your co-signer and Why?

2.a. Download, Install & Set Up A 2-of-3 BTC Multisig wallet (Electrum)
- I opened the Electrum webpage. The front page of the Electrum was a very informative concise page. There were two buttons on the page that will take the users to the download page, in the menu bar at the top right corner of the page.
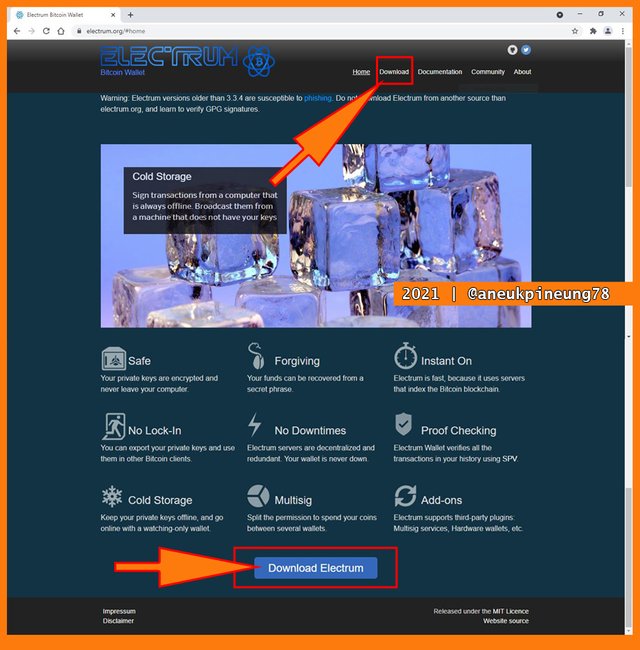
There were 2 download buttons on the Electrum homepage. - On the download page, users can choose the installation package that suits their needs. Currently when I was accessing the page, installation packages were available for Python, Linux, Windows, Apple iOS, and Android. Since I was using Windows 10 Operating System on my PC, then I proceeded with it.
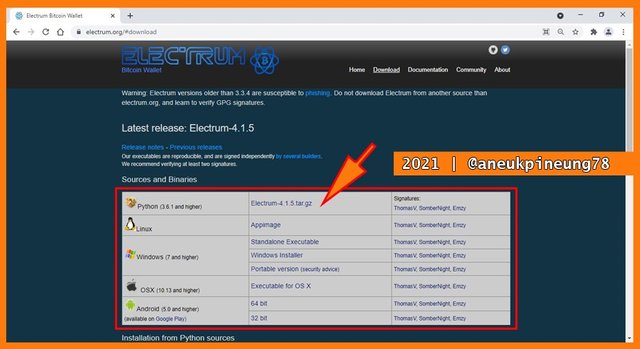
Users should pick relevant installer package. - However, before moving any further it's a good idea to first read the relevant information at the lower part of the download page.
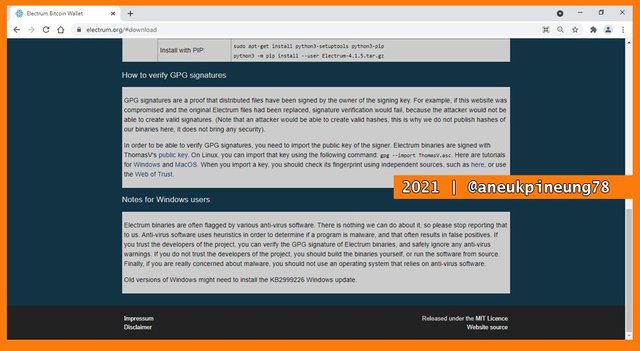
There were brief notes on the lower part of the page. It would be good if users read and understand them. - After downloading the installation file, it was time to install it on my computer. I double-clicked the downloaded installer.
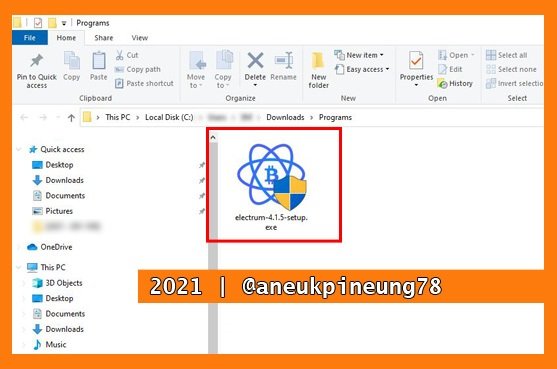
The downloaded installer package. - I chose the destination folder where the installation will take place, and I clicked the [Install] button.
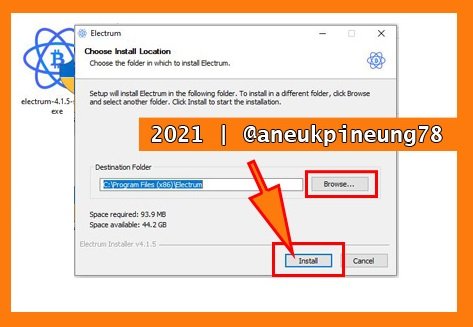
Choose where to install and start installing. - Windows executed the installer file.
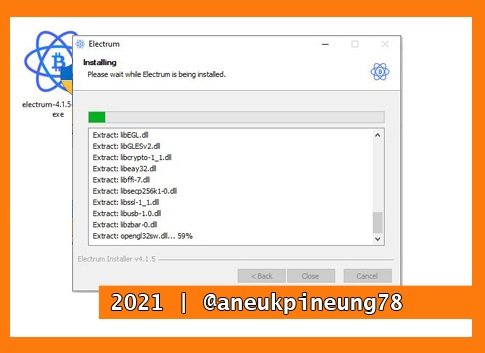
Installation in progress. - Not long after, the installation process was complete. I click the [Close] button.
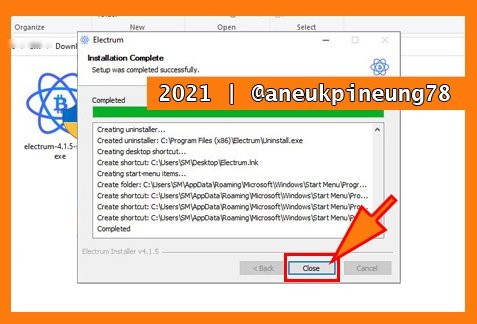
Installation process completed. - I opened the newly installed Electrum. In the window that appeared, I was asked to choose how I connect to the server, I chose the automatic option, and then I clicked the [Next] button.
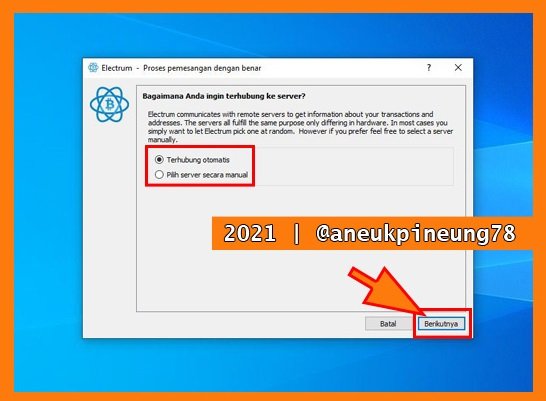
Choosing the server connection method. - I clicked next again to proceed with creating new wallet.
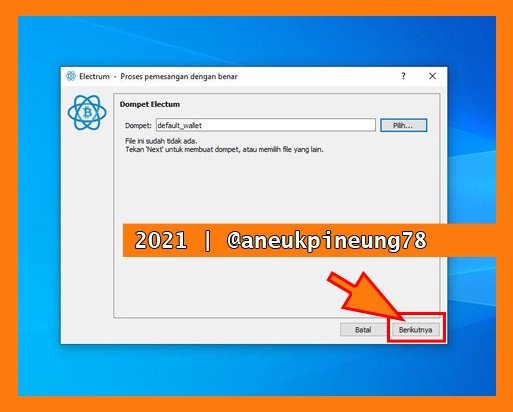
Users might want to change the name of the wallet or might just proceed as it is. - There were four types of wallet could be created in Electrum. I chose the relevant one for this task and proceeded by clicking the [Next] button.

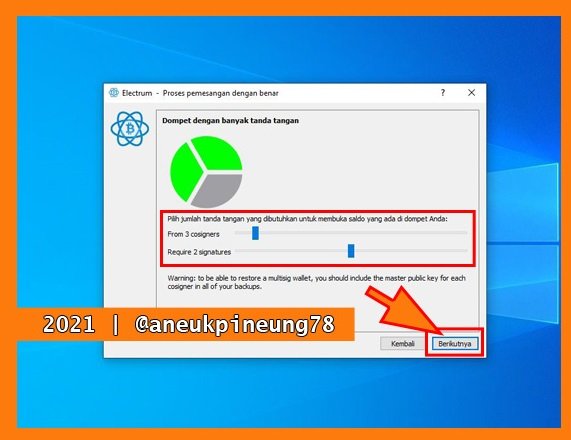
Choosing the wallet type to create. - 2-of-3 multisig wallet type means that there are three cosigners and it will need at least two signature to access it. So I set the parameter by sliding both the sliders horizontally to fill my need.
Determining the multisig wallet type. - Next, the Electrum showed me the generated seed which contains twelve words. This seed is important and confidential, I needed to save it somewhere. After saving the seed, I clicked [Next].
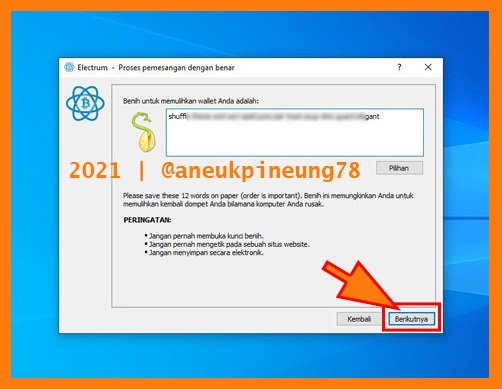
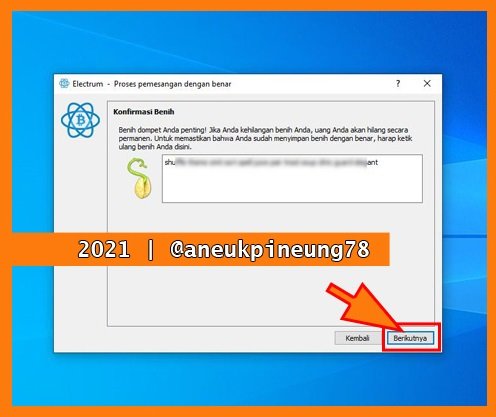
That's the seed. Treat it carefully. It's like a master password that would generate or re-create the wallet if needed. - Next I was asked to type the seed in the box. It was to make sure that I had already have the seed saved. So I typed the twelve words and clicked the [Next] button.
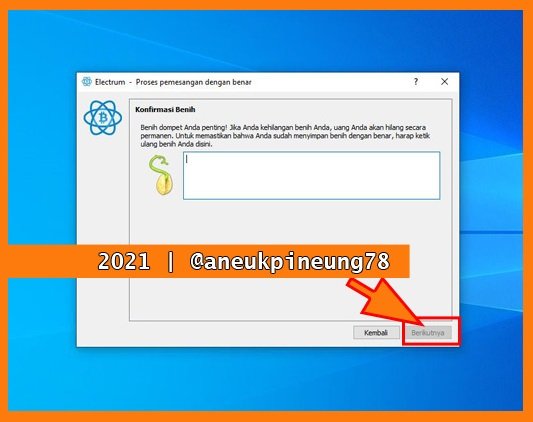
Typing the seed as in order as shown on the previous step. It is to make sure that users have successfully saved the seed.
- Electrum showed my MPK. I copied it and saved it somewhere else, then I clicked the [Next] button.
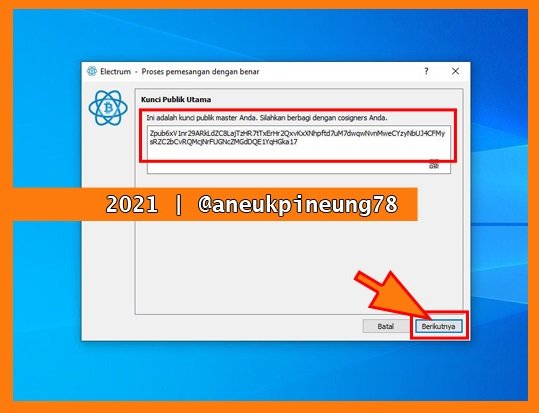
It is what needed to be added as a cosigner. - Next I was asked to add a second cosigner. There are three ways to add a cosigner: 1) by entering their MPK, 2) by entering their seed, 3) by cosigning with hardware device. I chose the first way.
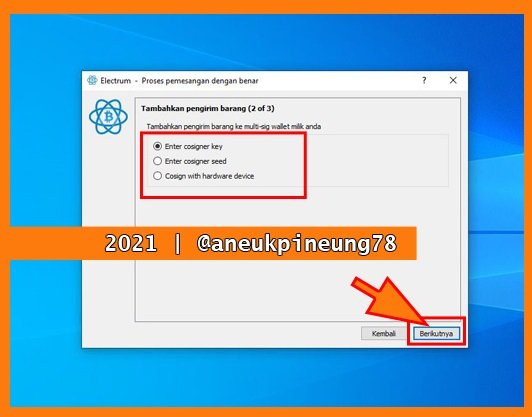
Choosing method to add a cosigner. - I got the MPK from the second cosigner and enter it.
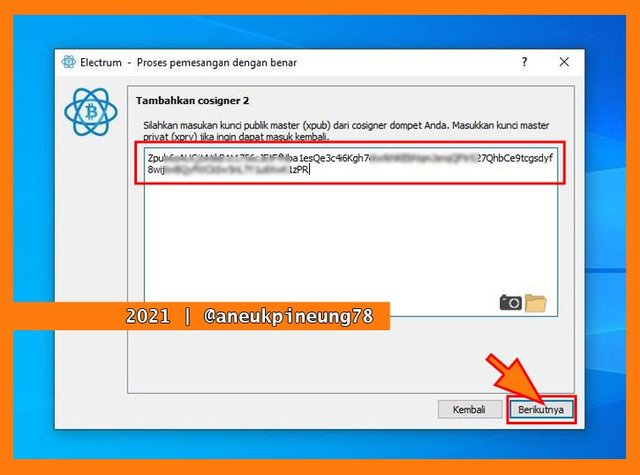
Entering the cosigner 2 MPK. - Then I chose the same method to add another cosigner.

The last cosigner addition method choosing.
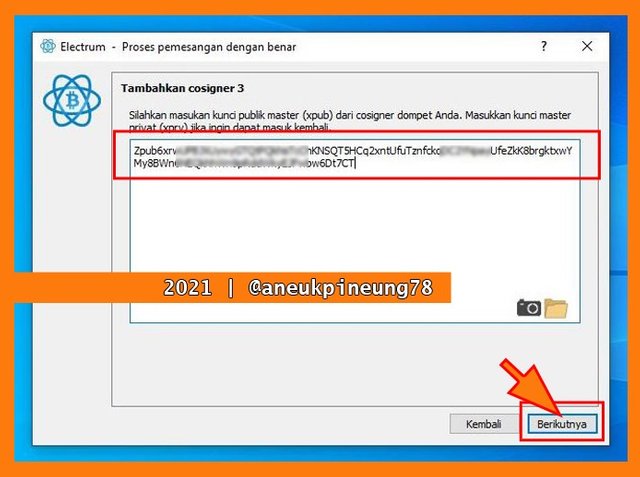
The cosigner 3 MPK. - I was asked to create a password for my wallet. When I was done, I clicked the [Next] button.
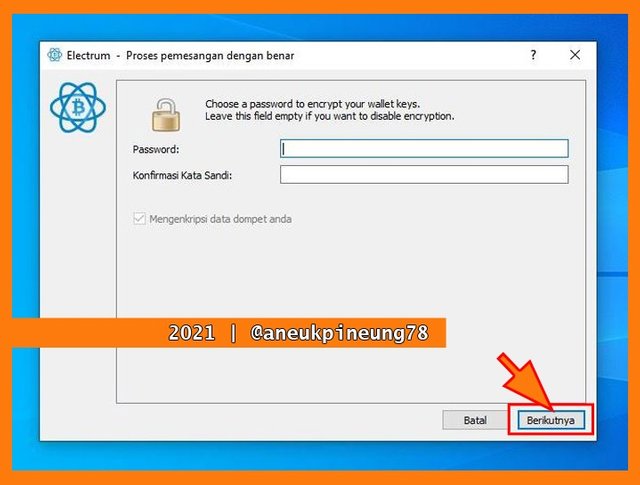
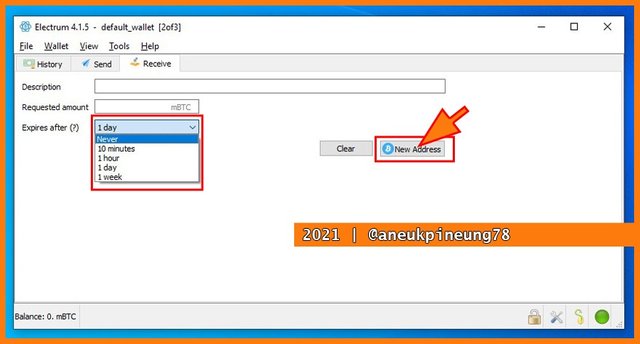
Better do that. - Now I needed a new address for the Electrum multisig wallet. To generate a new Bitcoin address in Electrum multisig wallet, users need to open the [Receive] tab in the wallet. The Description box and Requested amount are optional at this time. I set the wallet to never expires. And lastly, I clicked the [New Address] button.
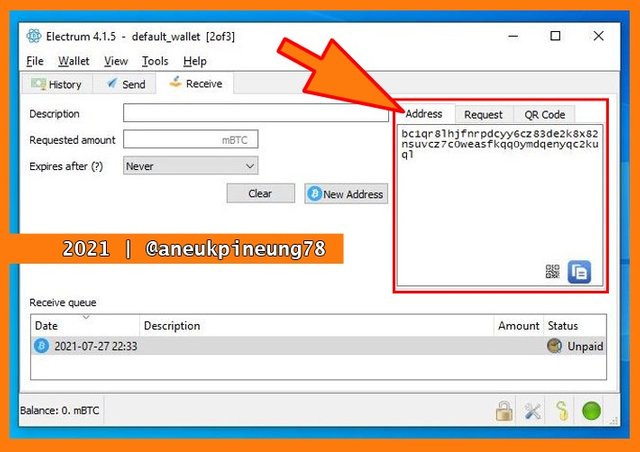
How to create a new Receiving Address. - Next, I saw the newly generated Bitcoin address for the Electrum multisig wallet.
The newly generated Receiving Address. - The Bitcoin address for the Electrum multisig wallet on the cosigner two wallet is shown in the below picture.
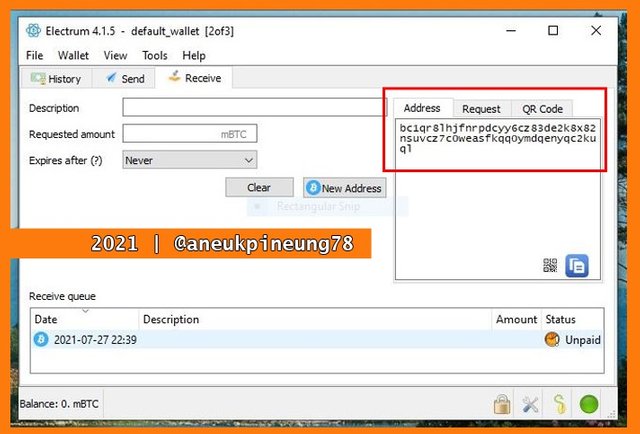
The screenshot of cosigner 2 Receive Address, it was identical to cosigner 1's. - And cosigner 3 had in installed in a smartphone. The Electrum multisig wallet shown in the picture below.
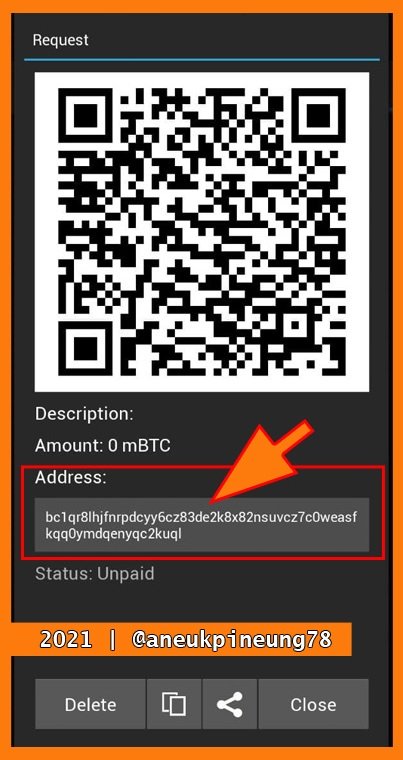
The screenshot of cosigner 3 Receive Address, it was identical to another 2 cosigners' Receiving Address.
2.b. The Difference Between Seed Key and MPK
Seed Key is used to restore the wallet if one day the wallet is lost or deleted. Meanwhile, MPK (Master Public Key) is useful as a kind of identity that is used to become one of the cosigners in a multisig wallet. The Seed Key in the Electrum multisig wallet consists of twelve consecutive words separated by spaces whose order cannot be wrong when used. While MPK is a long and random alphanumeric code.
2.c. Would You Share The Seed Key Or MPK With Your Co-Signer And Why
It is highly recommended that users do not share their Seed Key with others and store it in a safe and separate place from the multisig wallet, for example the multisig wallet is installed on smartphone, it is recommended that the Seed Key be stored in a notebook. Because by having a Seed Key, one can restore and access the wallet on another device. So, I would not share my Seed Key with anyone else, including my cosigner, because if I did, my cosigner would have a chance to act on my behalf.
The opposite happened to MPK. Since cosigners need all of the MPK to add each other as cosigners to their multisig wallet, each cosigner must have all the MPK of the other cosigners. So, yes, I have to share my MPK with other cosigners, because otherwise I can't be added by another cosigner (or cosigners) as one of the cosigners.

(3) How many different "m of n combinations" Multisig wallet you can construct in Electrum? How do you Export your Seed & Private Key (Electrum) in a Multi-sig wallet? (Screenshots needed)
3.a. How many different "m of n combinations" Multisig wallet you can construct in Electrum
The maximum number of cosigners in one multisig wallet that is possible is 15 people and the minimum number is 2 people. And every multisig wallet requires at least one signature to authorize access. So, there are a total of 119 "m-of-n combinations" that can be created in the Electrum multisig wallet.
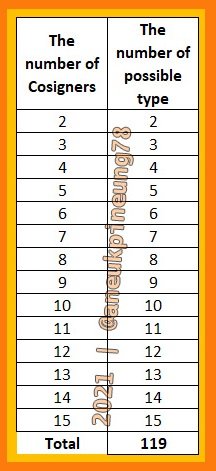
3.b. How To Export Electrum Multisig Wallet Seed & Private Key
3.b.1. Exporting Electrum Multisig Wallet Seed
- To export the Electrum Multisig Wallet Seed, open the wallet and select the [Wallet] tab, from the dropdown list that appears select [Seed].
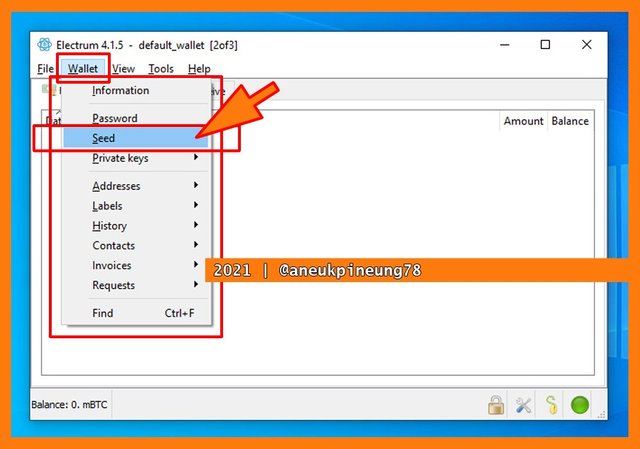
It's in the [Wallet] tab. - Next, a pop-up box will appear that has a message box containing a Seed consisting of 12 words, each separated by a space. To export a Seed, it is done by the copy-paste method: select the twelve words and then copy and paste them to another place, or the most recommended way: write all the words in their order to another place, for example into a notebook.
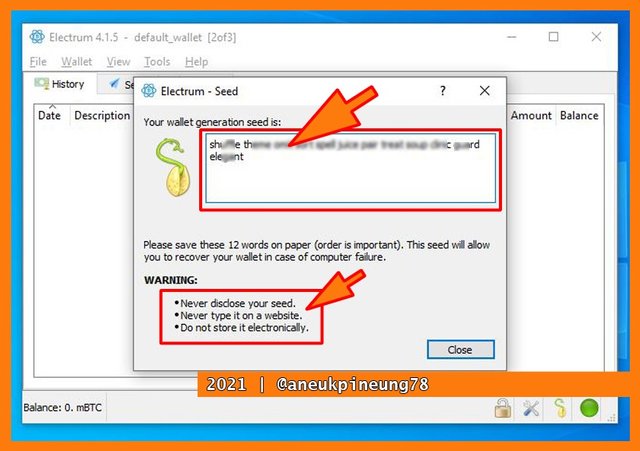
Write it down somewhere safe.
3.b.2. Exporting Electrum Multisig Wallet Private Key
- Exporting the Electrum multisig wallet Private Key, also to be done through the [Wallet] tab. Click the [Wallet] tab, hover over the [Private key] button and click the [Export] button.
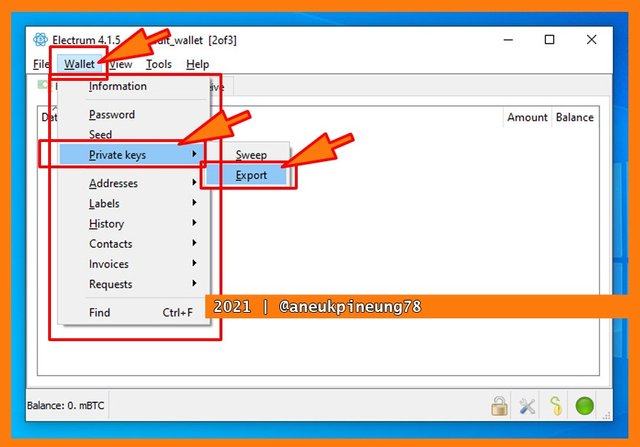
It is also inside the [Wallet] tab. - On the pop-up message, click the [OK] button.
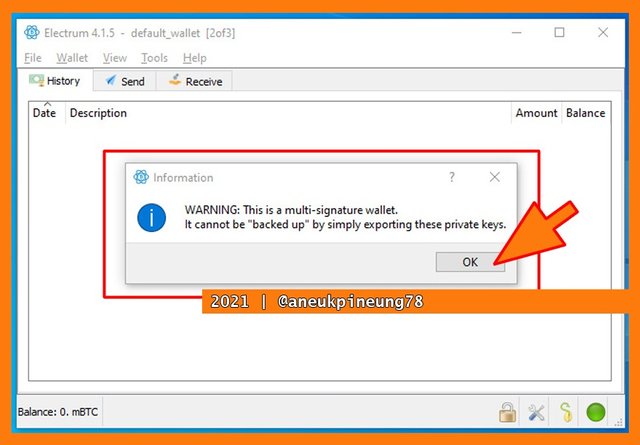
The warning. - A new pop-ub box appears as shown at the picture below. I have divided it into four part. Marked number (1) or part 1 is the message box containing all the private keys of the currently opened Electrum multisig wallet. It should be kept secret. On part 2 (marked number (2)), users can select the file format to export the private keys to. On marked number (3) is the button to browse to where the file will be exported (saved). And finally execute by clicking the [Export] button (marked number (4)).
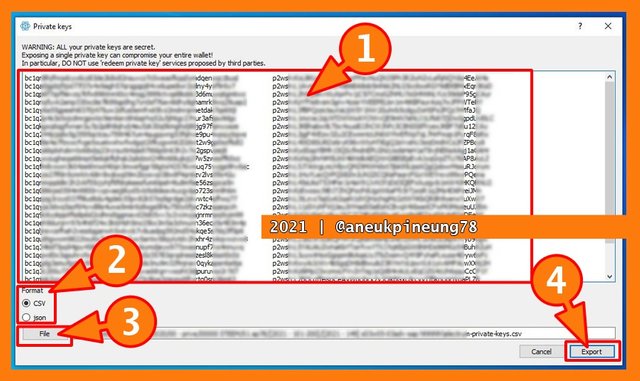
Two format of file are available to save: CSV and json. - A pop-up message box appears and informs that the keys have been exported succesfully.
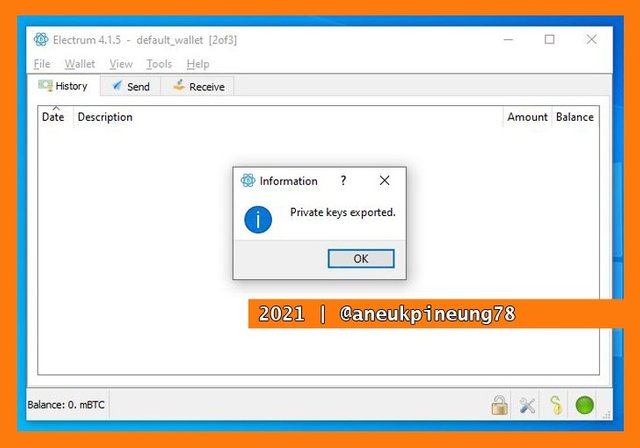
Private Key successfully exported.

(4) Perform a real transaction (Send BTC) to another Address using a 2 of 3 Multisig wallet? (You can perform a micro-transaction for this Task, also send a partial amount to demonstrate your experience with Change Address, screenshots needed).
- To be able to do this transaction, I need BTC in my Electrum multisig wallet. I sent 0.001 BTC (= 1 mBTC) from my UPbit account. The Transaction ID for it is 4279ee6eff89801a3a91df3e9879531283e10724484c2b38e8095a56910984e9, and the detail could be read here.
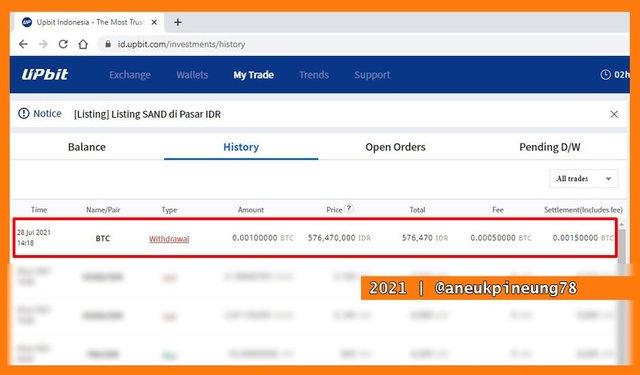
1 mBTC was successfully sent to my Electrum standard wallet address. - A few moments later I saw that the funds I sent were available in my Electrum standard wallet.
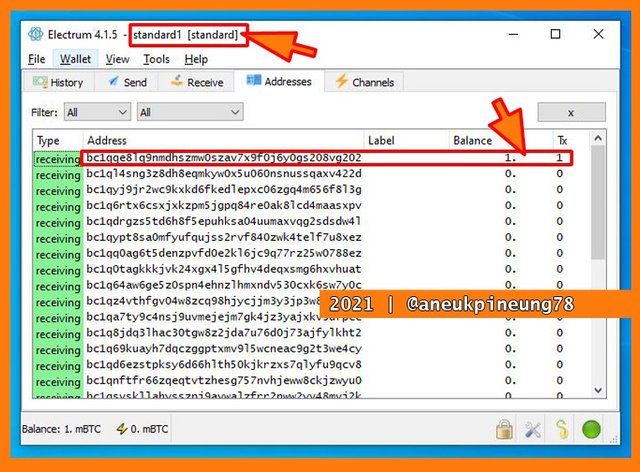
What it looked in my Electrum standard wallet. - Now I needed to make the BTC available in my Electrum multisig wallet. I clicked the [Send] tab in my Electrum standard wallet. I filled in my Electrum multisig wallet address. Description box is optional, I left it blank. I filled in the amount for as much as 0.47 mBTC. Lastly, I clicked the [Pay…] button.
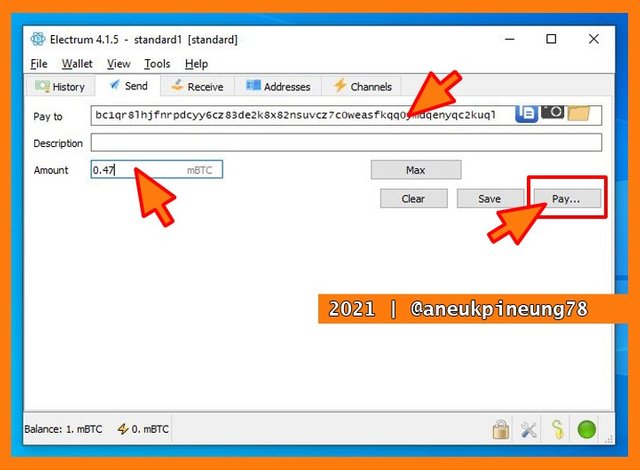
Sending some BTC to my Electrum multisig wallet. - A pop-up confirmation box appeared. The default fee rate for this transaction was set to 0.001 mBTC, I moved the slider to the left and it changed to 0.002 mBTC. I entered the password and hit the [Send] button.
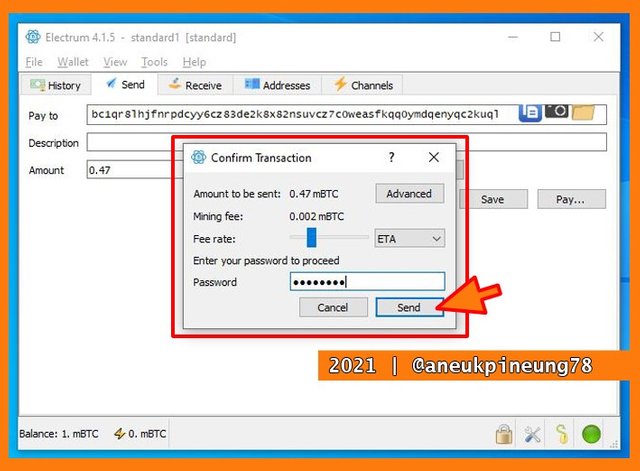
Confirmation box. - A moment later, an information pop-up box appeared informing that the payment (transfer) has been made. I clicked the [OK] button to get rid of it.
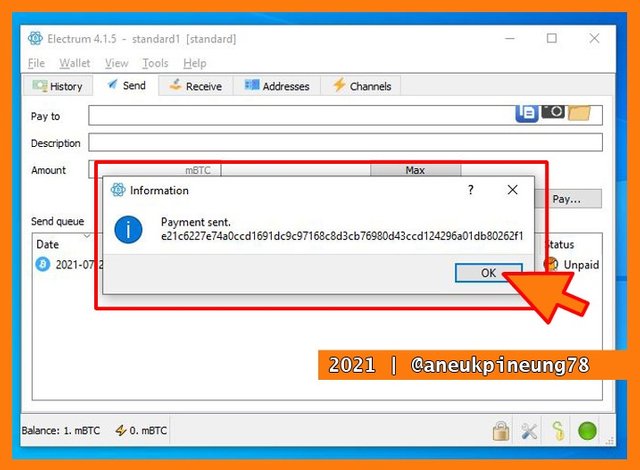
Transfer (payment) was successful. - Then I checked the Electrum multisig wallet and I saw that the 0.47 mBTC was there already. So, the transaction is really fast.
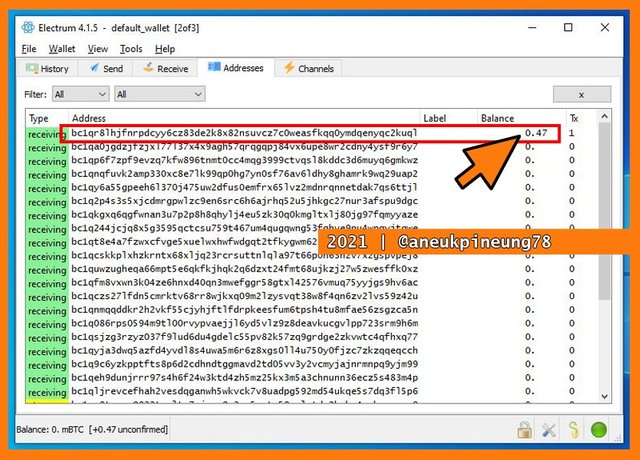
Inside the Electrum multisig wallet of mine. - That I already had some amount of BTC in my Electrum multisig wallet, I can proceed to do a multisig transfer (payment). I wanted to send the BTC to my Electrum standard wallet. So I opened my Electrum multisig wallet. I filled in all the needed information, and clicked the [Pay…] button to proceed.
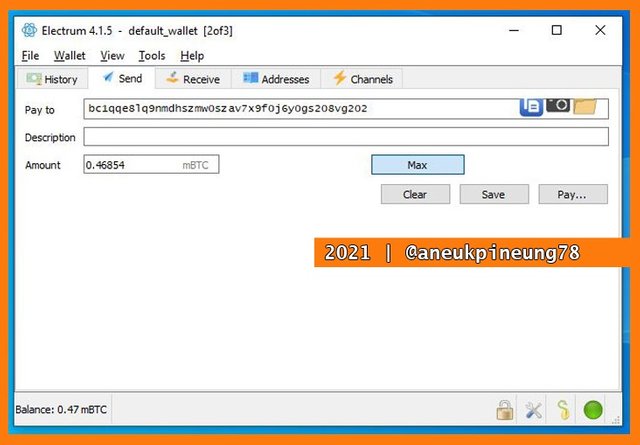
The first step in making the payment in Electrum multisig wallet. - The confirmation pop-up box appeared. I clicked the [Send] button.
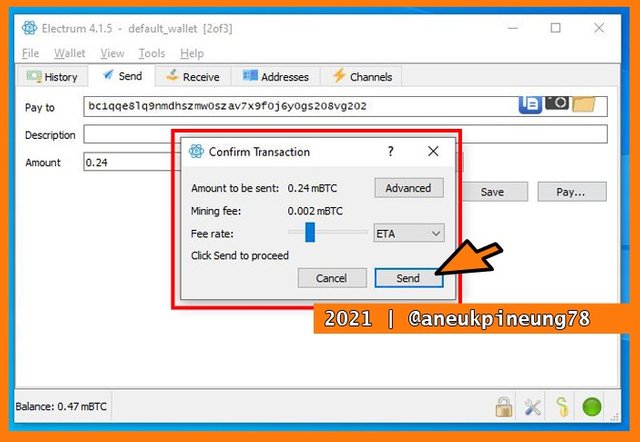
It asked for a confirmation. - The transaction note window appeared. This note showed the transaction ID, the transaction status, and another relevant information. The input section showed the wallet address in which the transacted BTC will be taken. And the output section showed the address in which the change for the transaction will be put, since in the output address I had 0.47 mBTC and I was sending 0.24 mBTC which meant there is a change as much as 0.23 mBTC. The change showed 0.228 mBTC because some was used to pay the transaction fee.
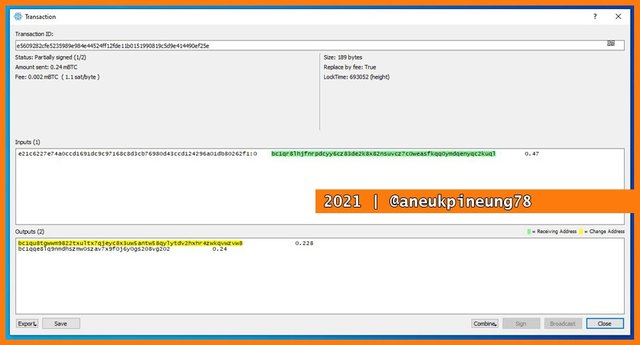
It was partially signed (1/2) which meant It needed one more signature. - I would deliver the second signature from the smartphone (cosigner 3). I clicked the [Export] dropdown button on lower left side of the Transaction window, and I clicked the [Show as QR] button.
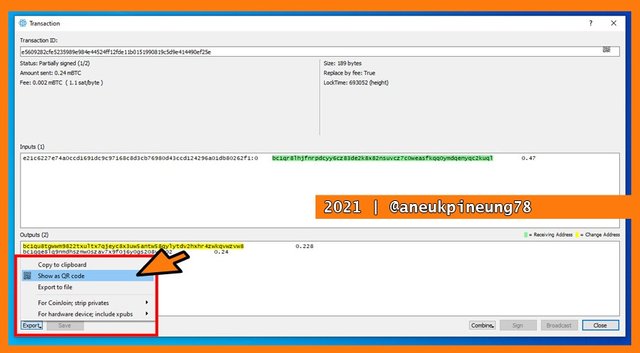
Let's show the QR Code. - The QR appeared.
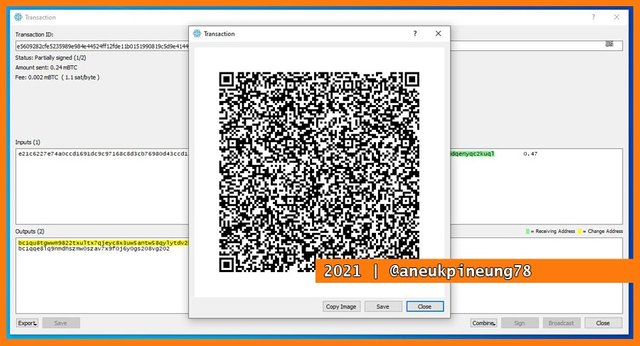
The QR Code was displayed on my PC screen. - I opened Electrum wallet on the smartphone. And entered the password.
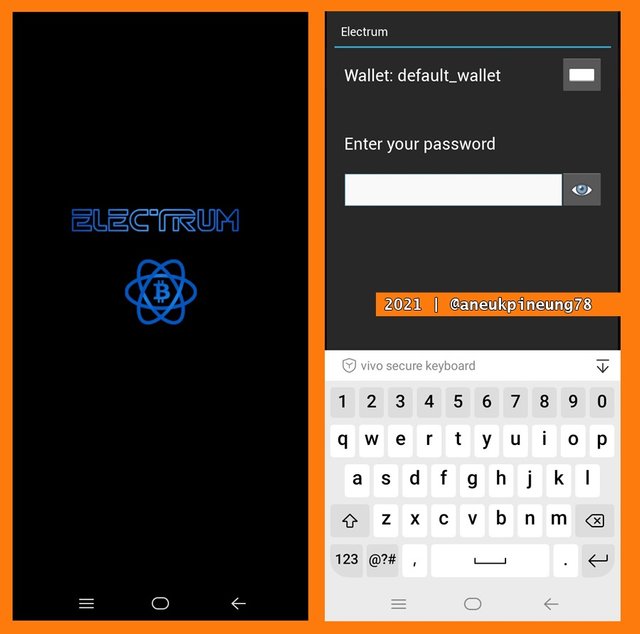
Electrum multisigwallet on my smartphone. - I saw the History tab had 1 record.
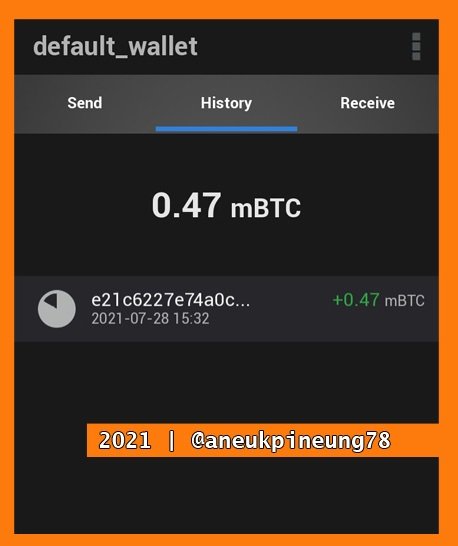
The record from the transaction when I sent some BTC to the Electrum multisig wallet. - I tappen on the [Send] tab and clicked the [Scan] button.
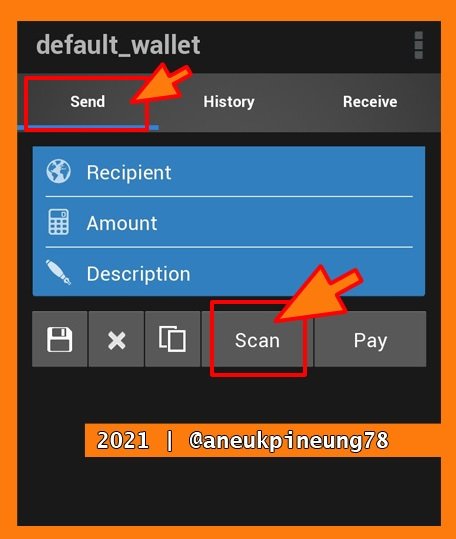
Preparing to scan the QR Code. - I chose the relevant option to proceed.
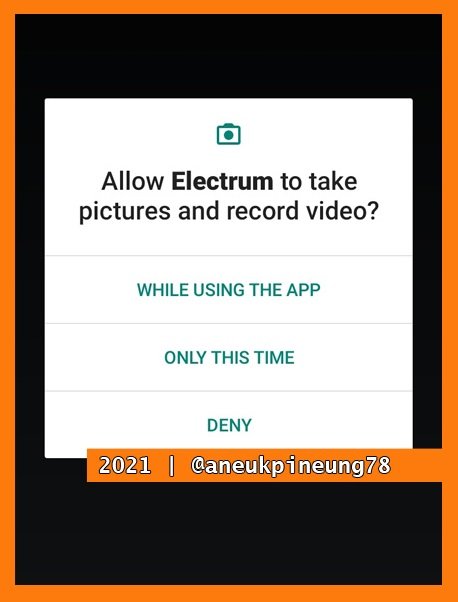
The first two option on top are relevant. - I scanned the QR Code on the PC.

Scanning the QR Code. - Once the scanning was done, the screen displays the information as in the following image. I clicked the [Sign] button on the lower left corner of the screen.
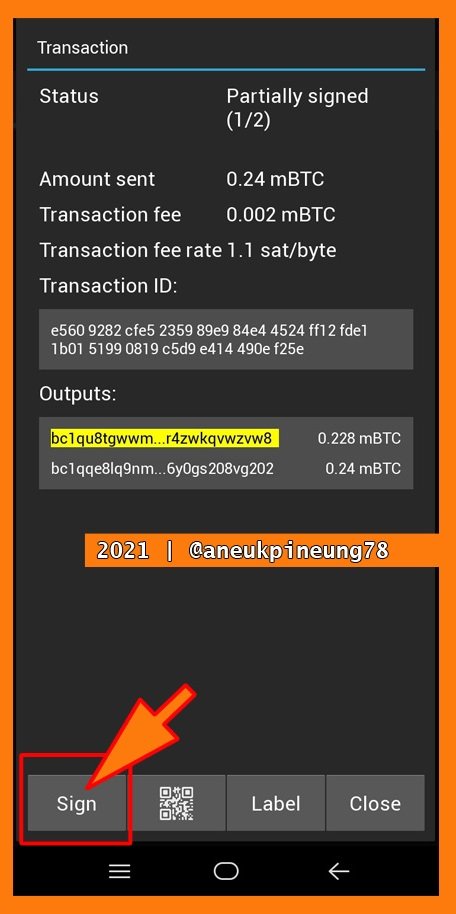
The note on the transaction showed on my smartphone Electrum multisig wallet. It said that it needed one more signature. - On the confirmation pop-up box that followed, I clicked the [OK] button.
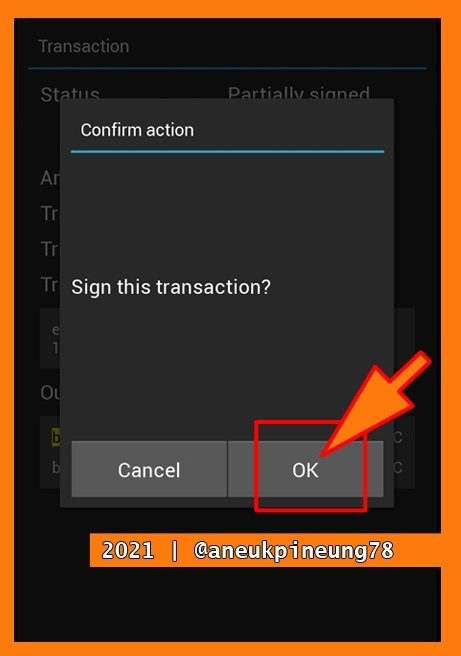
Executing the signing. - The signing was successful. I hit the [Broadcast] button.
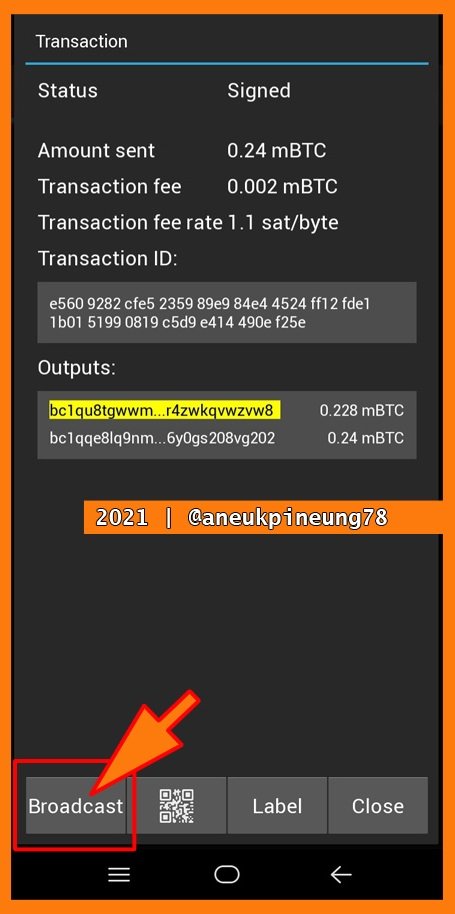
Broadcasting after a successful signing. - The transaction was successful. Don't get confused when you see the input address is yellow (Change Address), because I cancelled the first transaction for a reason and redo it (I did not make screenshots for the second time I did it), the cancelled transaction return the fund to the Change Address that was used to execute the tansaction I made later. That's it, the Change Address can also act as the source of fund when one make a transfer out, if one has not enough fund in the Receive Address.
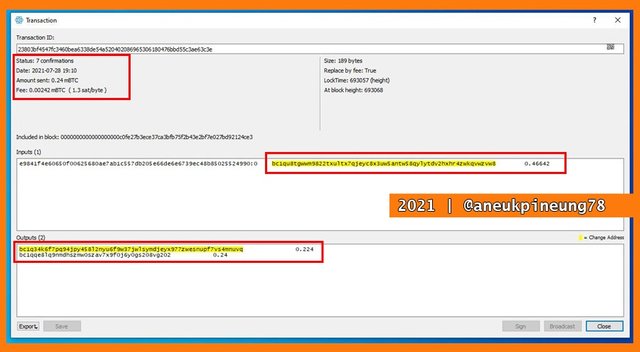
It was a successful transaction. Yes it might take times, you know the scalability problem that Bitcoin is still facing, just give it times until the transaction is confirmed. - The transaction ID is 23803bf4547fc3460bea6338de54a520402086965306180476bbd55c3ae63c3e. The detail can be seen here.
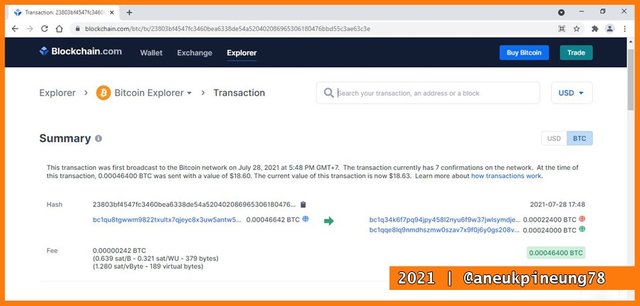
The transaction note on Bitcoin blockchain explorer.

(5) What is the difference between Receiving Address & Change Address? Demonstrate your experience with a Change Address?
5.a. The Difference Between Receiving Address & Change Address
Receiving Address is an address whose main purpose is to receive payments or transfers in. For example, A wants to send B an amount of Bitcoin, then B needs to tell A the Receiving Address it has so that A can send the Bitcoin. In addition, the Receiving Address will also be used as a source of funds when an outgoing transfer is made.
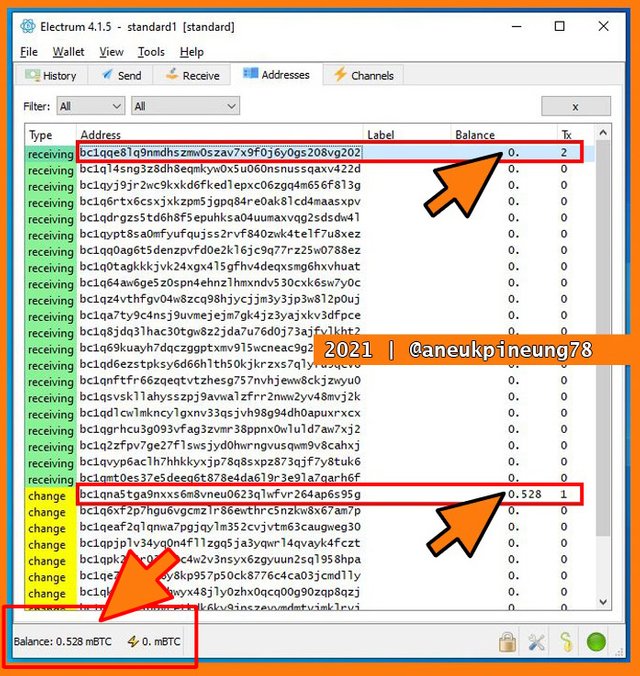
Change Address is the address used to store the change from a transaction. For example, I want to send as much as 0.07 mBTC out while I have 0.1 mBTC in an address (no matter was it Receiving Address or Change Address), then the wallet would use the 0.1 mBTC to do the transaction, and the change – after cut for transaction fee- (let's say the fee was 0.02 mBTC) so the change (0.01 mBTC) would be sent to a Change Address of mine. The funds available in the Change Address can also be used to make outgoing transfers, and if there was change, it would be sent to another Change Address.
5.b. Demonstrate Experience With A Change Address
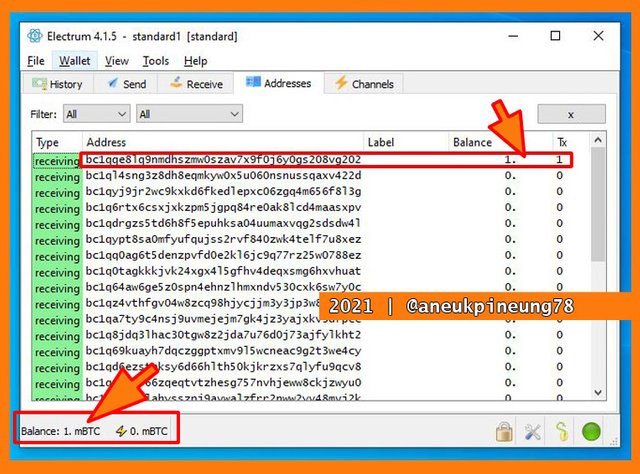
My experience with the Receiving Address was when I sent 0.47 mBTC from my Electrum standard wallet to my Electrum multisig wallet. I had 1 mBTC in my Electrum standard wallet, all in one address. So I was gonna get some change for this transaction. If the transaction fee was 0.02 mBTC, then I would get a change as much as 0.528 mBTC. The picture below shows the balance before I did the transfer.
Look at the picture below. This is the picture when the transfer of 0.47 mBTC has been made. It shows that the balance in the Receiving Address is 0. And the change was transferred to the Change Address. And if I was going to transfer anymore BTC out, then the BTC in the Change Address would be used.

Thanks
Thanks Professor @sapwood for the lesson titled Multisig Wallet (Electrum) -- "m of n" Combinations.
Pictures Sourcing
- The editorial picture was created by me.
- All another pictures were screenshoots and were edited with Photoshop CS 3.
Sources and Reading Suggestion
- https://www.coindesk.com/what-is-a-multisignature-crypto-wallet;
- https://support.bitpay.com/hc/en-us/articles/360032618692-What-is-a-Multisignature-Multisig-or-Shared-Wallet-;
- https://academy.binance.com/id/articles/what-is-a-multisig-wallet;
- https://en.bitcoin.it/wiki/Multi-signature;
- https://bitcoinelectrum.com/creating-a-multisig-wallet/;
- https://bitcointalk.org/index.php?topic=5037320.0;
- https://electrum.readthedocs.io/en/latest/multisig.html;


Shared to Twitter : https://twitter.com/aneukpineung78a/status/1421313550325145608.
Downvoting a post can decrease pending rewards and make it less visible. Common reasons:
Submit