This is very informative lecture about creating token and understanding about token and coin. I have learned lot of things from this lecture specially creation of new token on blockchain. Professor explain well about creation of token process. Overall, this is very good lecture on Token creation.

Introduce how to create your own Cryptocurrency by differentiating between token and coin.
Today we are living is modern and technological world. We should know about the cryptocurrencies. Because the cryptocurrencies are the present and future of this world. So, we need to know about cryptocurrencies and understand the working of cryptocurrencies. Basically, there are two types of cryptocurrencies. One is called Crypto Coin and second is called Crypto Token.
What is Coin
Crypto Coin is cryptocurrency that is created on its own blockchain. We take an example of Ethereum Coin that is created on its own Ethereum Blockchain. It is not dependent on another blockchain. If we want to create Coin, then we should have technical knowledge about programming and blockchain technology. The process of creating the Coin on its own blockchain is costly. Lot of time required for coin creation.

What is Token
On other hand, Crypto Token is created on blockchain that is not its own. We take an example of AXS Coin that is created on its own Ethereum Blockchain. It is dependent on Ethereum blockchain. Token is created without proper technical knowledge about programming and blockchain technology. The process of creating the Token is approximately. We can create Token within is few minutes.
Now, I will differentiate Token and Coin
| Coin | Token |
|---|---|
| It is created on its own blockchain | It is not created on its own blockchain |
| Creation of Coin required technical skill and knowledge | Token is created without coding and knowledge |
| The process of Coin creation is costly | We can create Token approximately free |
| A lot of time required for coin creation | Token can be created within a few minutes |
| Coin is basically used for exchanging money. | There are many use cases of Token other than payment |
| Bitcoin, Ethereum, Ripple and Cardano are the examples of Coin. | Vechain, osmisego, Augur, and Byton are the example of Tokens |

Demonstrate how to prepare everything needed to create a crypto token, such as making a wallet and adding a few coins to it to pay the gas fee. (Here you should deposit at least 15$ worth of BNB coins from your exchange wallet to the newly created wallet)
The process of token creation is comprised of several steps. In this question, we will cover the initial steps that are taken first for creation of Token. In the basic steps, we should Metamask Wallet. And Binance Smart Chain network should be added on Metamask. Because I want to create Token on Binance Smart Chain. Next, we should deposit few amounts of BNB on Metamask for the purpose of pay gas fee. We will do all these above
initial steps one by one.
How to Install and Add Metamask Wallet to Chrome?
This is the fundamental step to create token. You need to do the following procedure for creating the Metamask Wallet. I will write the procedure in Bullets.
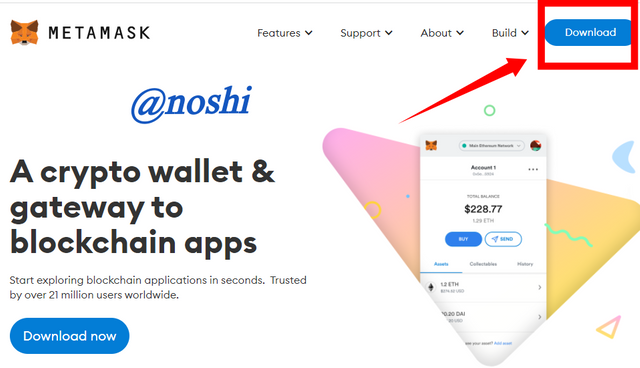
- Visit the Metamask.io site, and find the Download button and click on it.
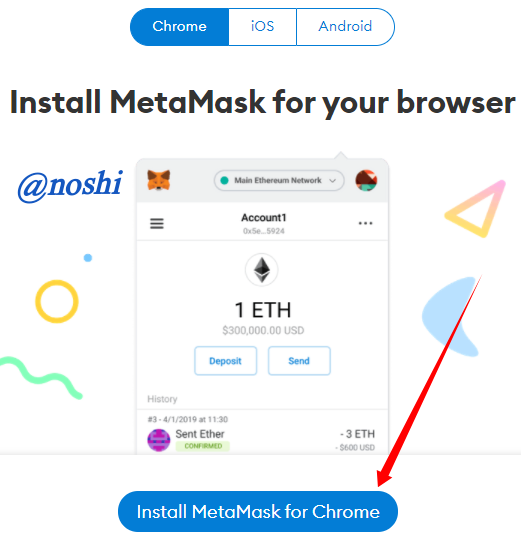
- In the next window, you need to click on the Install Metamask for Chrome button.
- Click on the Add to Chrome Button for adding the Metamask extension to chrome.


How to create Metamask Wallet to Chrome?
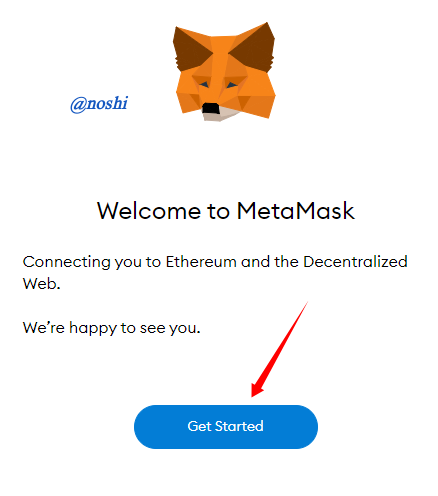
- After adding the extension to chrome, click on the Get Started button.
- In next window, click on the Create a Wallet button.
- Next you need to set the password for your Metamask wallet and then click on Create button.
Screenshot fromMetamask Wallet
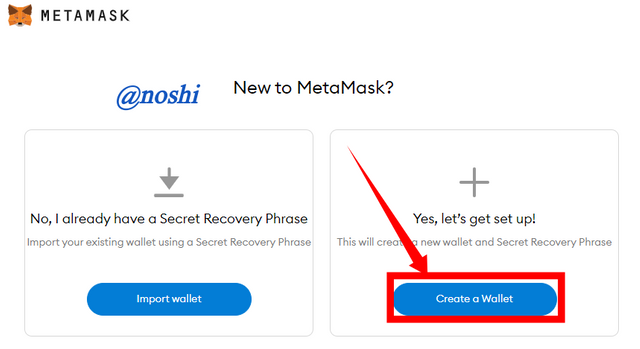
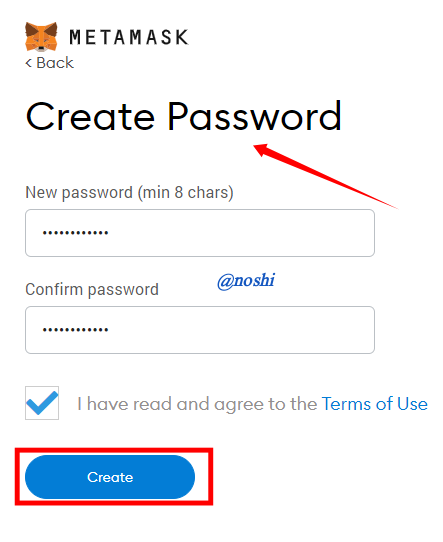
- In the next step, we need to click Lock button to reveal our wallet Mnemonics Keys. We need to copy and paste in safe place. It is recommended to write it on the piece of paper.
- Next, we need to select mnemonics world in the same order as we copy in the previous step and then click on the Confirm button. This is the final step.
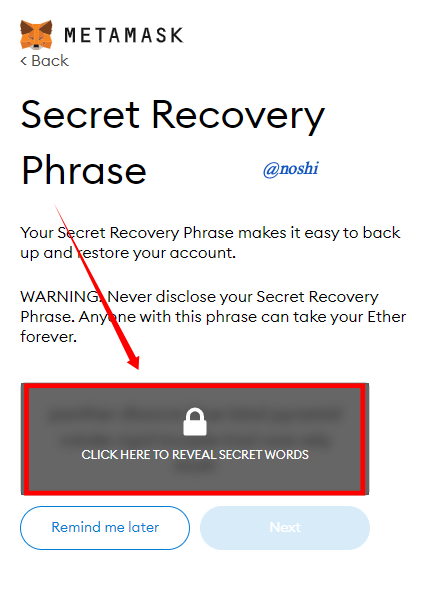
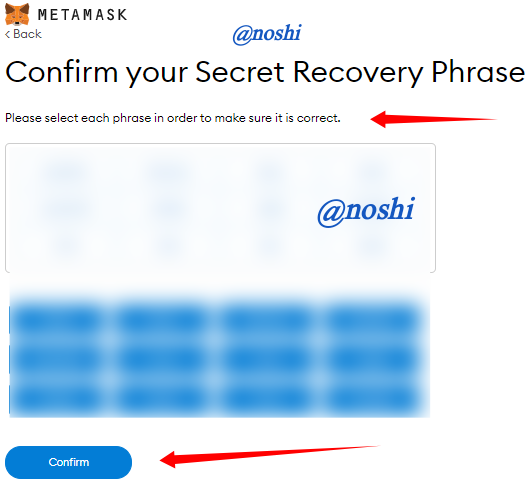
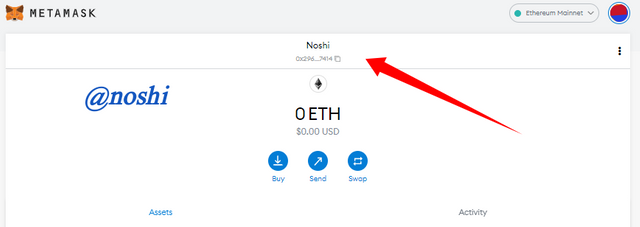
In this way we can create our Metamask wallet.

How to add Binance Smart Chain Network to Metamask.
For adding the BSC network on Metamask, you need to do the following steps.
- Click on the profile icon and then click on the Setting Button.
- In the next window, make sure you are in Network tab. And Click on the Add a Network button at top right.
- Next, you need to copy and paste the BSC network addition data. I get the BSC network addition data from Binance Website. After adding the data click on the Save button as you can see in the figure.
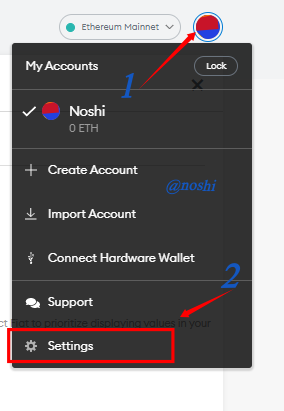
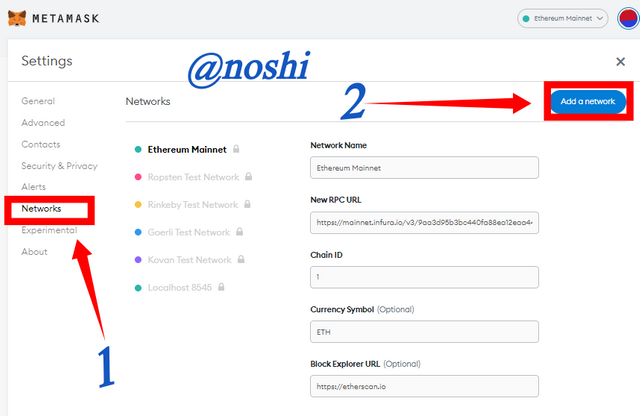
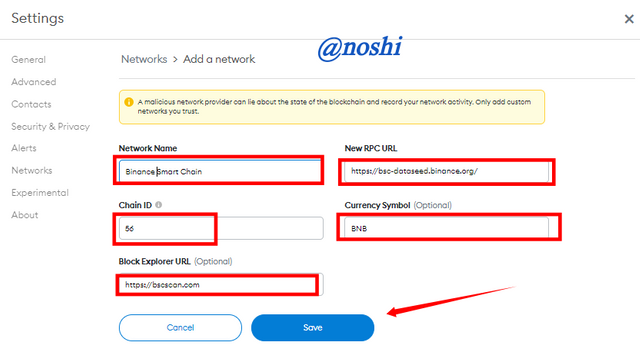
In this we can add Binance Smart Chain network to our Metamask wallet.

Depositing $15 worth BNB in Metamask Binance Smart Chain?
To adding the BNB on Metamask wallet, first you need to select the Binance Smart chain network on the Metamask. Then next process is started. To deposit the BNB on Metamask, you need to do the following steps.
- Go the Metamask wallet and select the BSC network.
- Then Copy the Address of BNB on Metamask you can see in the figure.
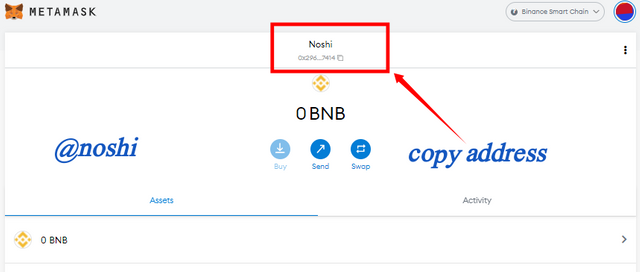
- Next step is to visit our Exchange wallet. I have wallet on Binance.
- Search for BNB and click on the Withdraw button.
- Next, you need to paste the Metamask wallet address in to the address textbox.
- Select the BSC (BEP20) network. Then add the amount of BNB.
- Last step is to click on the Withdraw button.
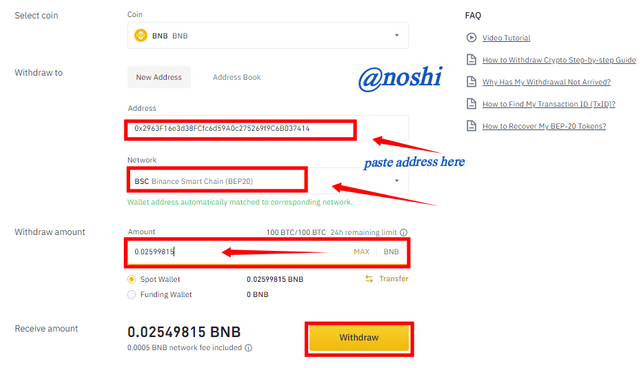
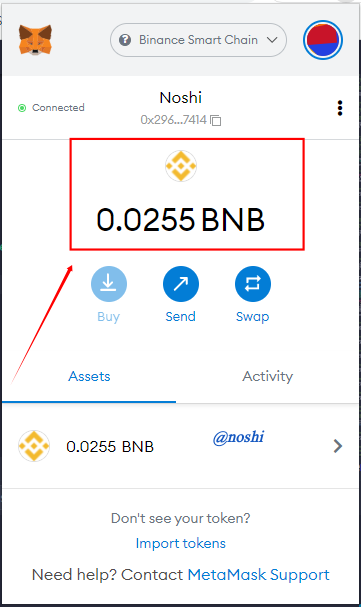
In this way we can deposit BNB to our BSC Metamask wallet.

Explain the Remix IDE and download the source code by showing each step. (Screenshots required)
Remix IDE is web-based platform that helps us to create the Token. It is use for coding purpose. In this web-based application we can edit and compile the code easily. Remix IDE works as a source code editor. It is also use to creating and deploying the Binance Smart chain contracts.
To Download the Source Code, you need to do the following step that I wrote in the form of bullets.
- First, you need to visit the Binance Chain Docs.
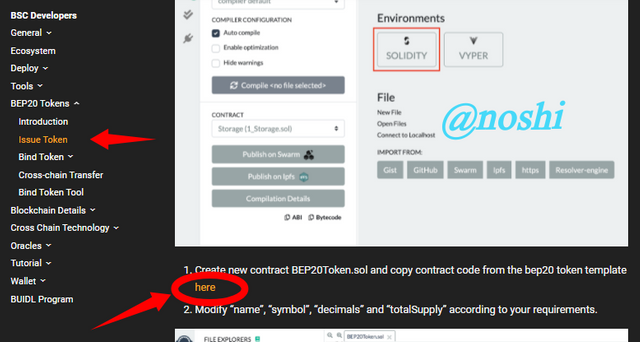
- Next make sure, you select the BEP20 Asset At middle of right side. Then Click on the Issue BEP20.
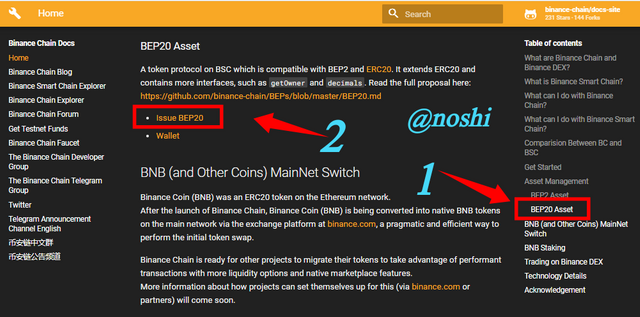
- In the windows, we can download the source code by clicking on the here button at the bottom as you can see in the figure.
- Open the download file in any code editor like Microsoft Word and Word pad. The copy the all-source code by putting the command Control+A and then Control+C. In the figure you can see that I paste the copied code in Word pad application.
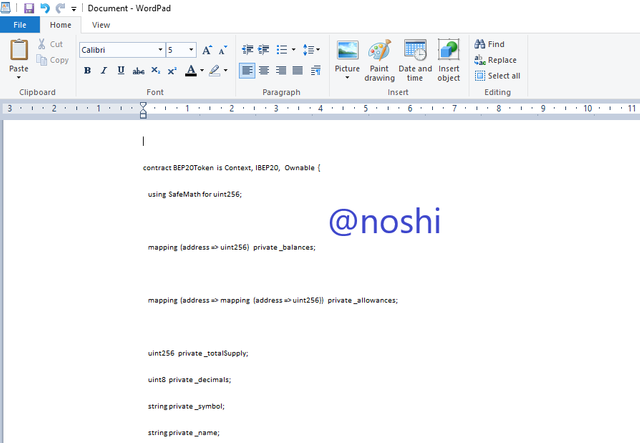
In this way we can down the source code from the Binance doc page.

Customize the source code according to your imagined future project. (In addition to simply stating the steps, you should provide a clear explanation about each customized code)
This is the second major step to creating our Token. In this step, we customize our source code according to our imagination. To customize the source code, you need to do the following steps.
Go the Remix IDE editor.
Here we want create new token So, right click the contract and then click on the New File.
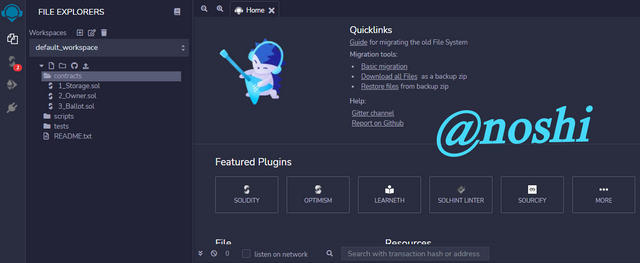
Screenshot fromRemix IDE Ethereum
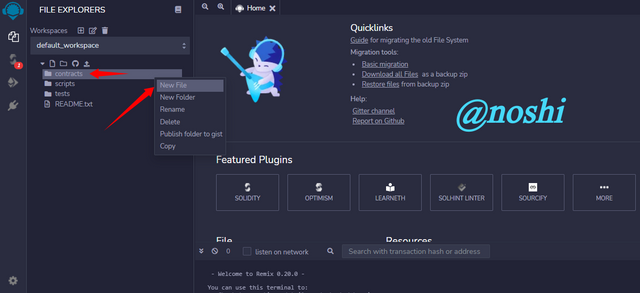
Screenshot fromRemix IDE Ethereum New file is created. Next you need to change the name of file to BEP 20 Token .sol .sol is a file extension.
New file with name BEP 20 Token .sol is created. You need to paste the copied Source Code here.
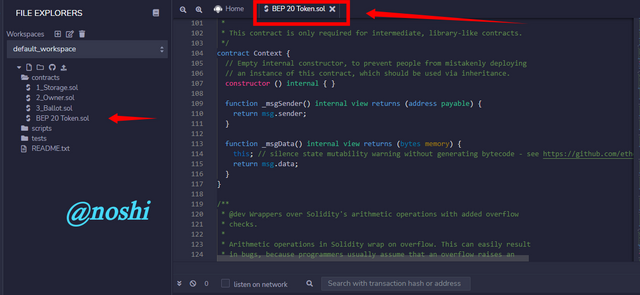
Screenshot fromRemix IDE Ethereum
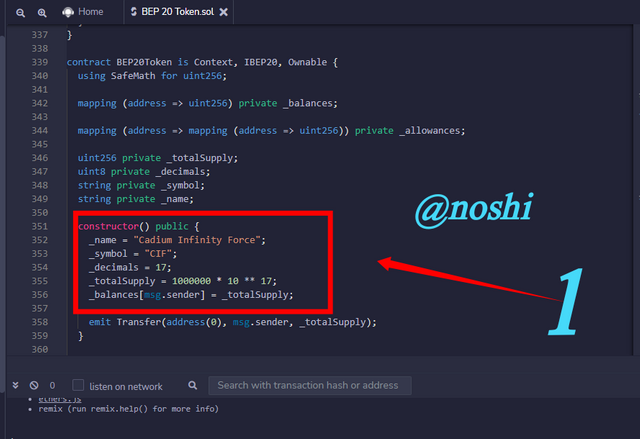
- In this step, we need to go to line 351 for customization.
- I Change the token properties as.
- Token Name = Cadium Infinity Force
- Symbol = CIF
- Decimal = 17
- Total Supply = 1000000 * 10 ** 17
- In the next step, we need to compile our code. For, click on the second tab at top left and then click on the Compile BEP 20 Token. Sol button as you can see in the figure. In this way, our code in successfully compiled.
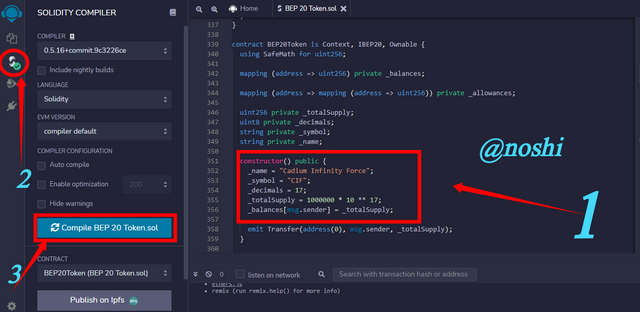
Screenshot fromRemix IDE Ethereum
- After compilation, need to deploy and run the transaction. For this, you need to click on third tab at top left of screen and then click on the Deploy button as you can see in the figure.
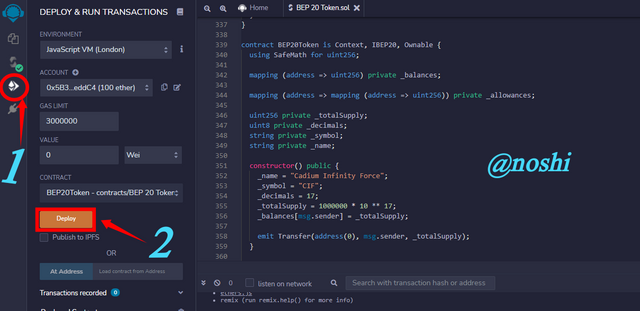
Screenshot fromRemix IDE Ethereum
In this way we can customize, compile and run our Token project on Remix IDE.

Demonstrate all the steps to add your created crypto token into your any wallet such as Trust Wallet and MetaMask wallet. (Screenshots required)
Before adding the token in to our Metamask wallet, we need to create the contract completely. Our contract finalization is pending because we have to pay some gas fee for contract creation. For this, first, we need to connect our Metamask wallet to Remix IDE site. You need to do the following steps for wallet connection.
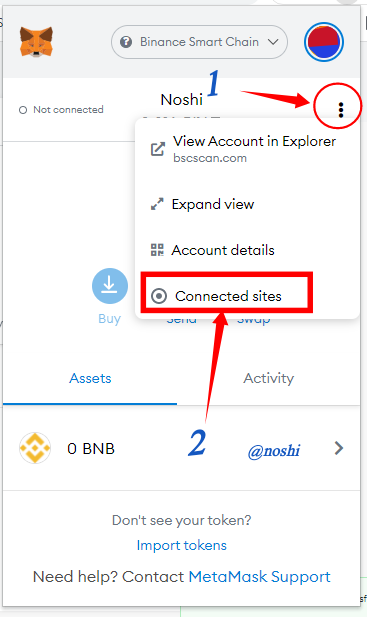
- Make sure you are on Remix IDE editor page, and click on the Metamask wallet.
- Next, clock on the three dots and then click on the Connected sites button.
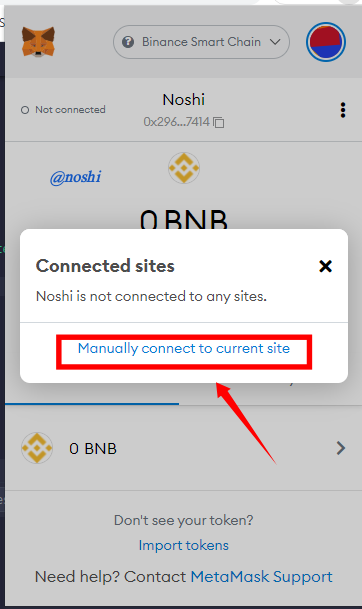
- In next window, click on the Manually connect to current site
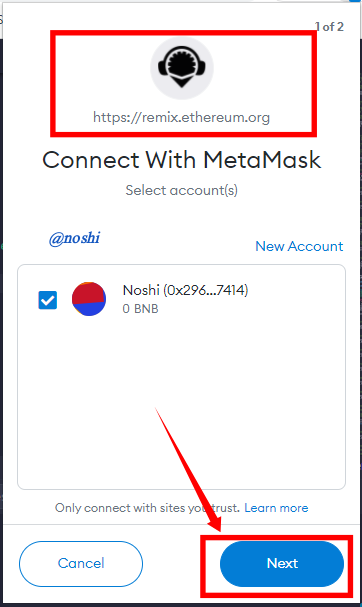
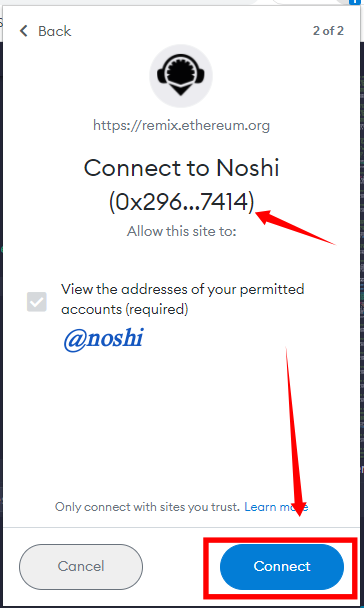
- Then click on the Next button, next click on the Connect button.
Screenshot fromRemix IDE Ethereum and Metamask Wallet
In this way we can connect our Metamask wallet to Remix IDE site.

For deploying the contract, you need to go on Remix IDE editor page and do the following steps.
- Click on the Third tab at the top left of screen and then Select the Injected Web3 Environment.
- Next you need to click on the Deploy button.
- Metamask Wallet popup is appeared for paying the gas fee. Click on the Confirm button.
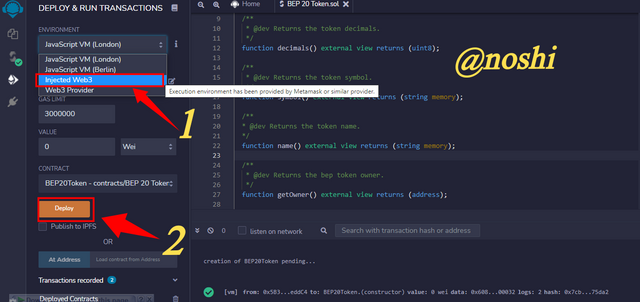
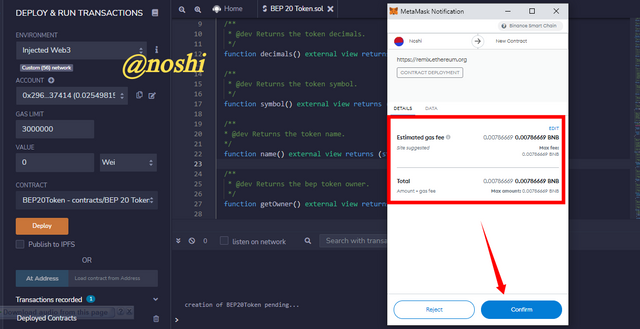
In this way our token is deployed successfully.

How to add created Token to our Metamask Wallet?
To add the token in to our Metamask wallet, we need our contract address. To get our contract address, first we need transaction hash that we have done on the Remix IDE. To copy the transaction hash, you need to go on Remix IDE and Click on the Debug arow. Next transaction hash is shown. Copy the transaction hash and then go the Binance Block Explorer and paste the transaction hash then click on Search.
Hash of Transaction
0x286f550928bd01153930167c7e5a491ef7c8ea021c09398892d9078387f2521d
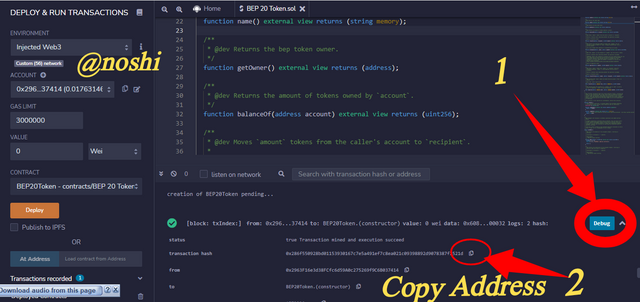
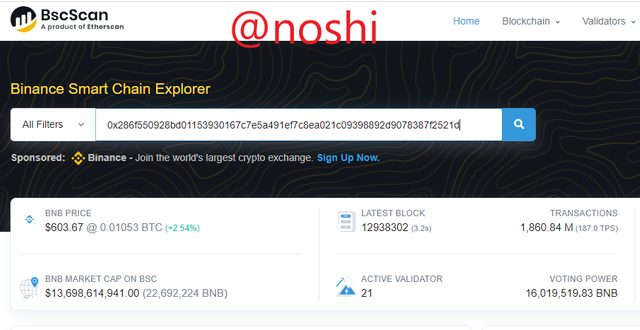
After that our transaction result is shown in figure. To get the contract address you need to click on the bottom at the Name of our Contract that is Cadium Infinity Force.


In the next screen, we get the contract address at the right side of window as you can see in the above figure. Copy the contract address and go to Metamask wallet. Next to add the token in to Metamask wallet, you need to do the following steps.
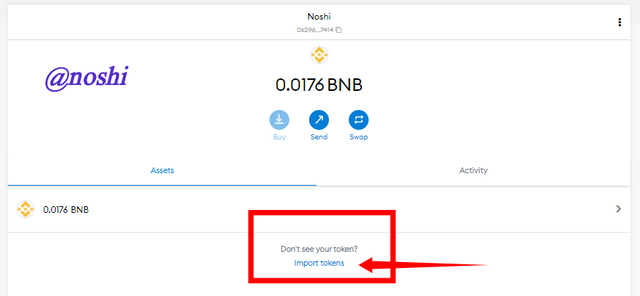
- Go to Metamask wallet and click on the Import Tokens as mentioned in figure.
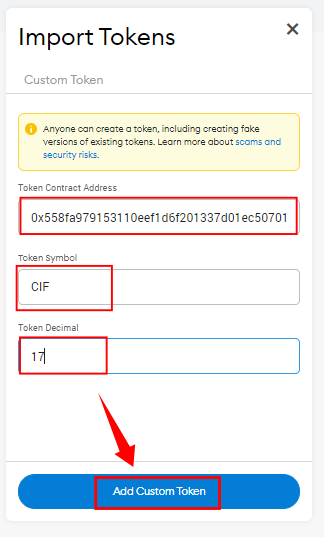
- In the next form, we paste the address of our contract. In the second textbox we enter the Symbol that is CIF. At the end we enter the decimal value that is17. Then click on the Add Custom Token button.
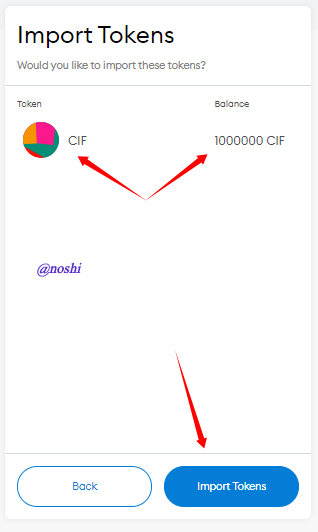
- Next, click on the import token button.
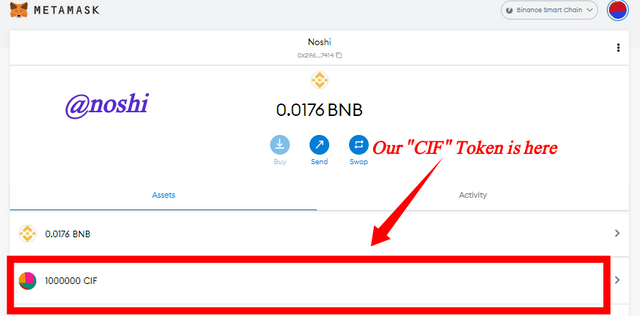
Finally, our CIF Token is added to our Metamask wallet. You can check in the my Metamask wallet screen.

Verify transactions and other details through the relevant Block Explorer. (Screenshots required)
Verify the transaction we need a transaction hash. We can get transaction hash from Remix IDE editor page. To copy the transaction hash, you need to go on Remix IDE and Click on the Debug arow. Next transaction hash is shown. Copy the transaction hash and then go the Binance Block Explorer and paste the transaction hash then click on Search.

After that our transaction result is shown in figure. In the transaction you can see that the transaction status is Success. At the middle of figure you can see that contract is created. Token are transferred for 1,000,000. The name of Token is mentioned at right bottom that is Cadium Infinity Force. The Transaction fee is charge is 0.00786669 BNB that is approximately $4.64.
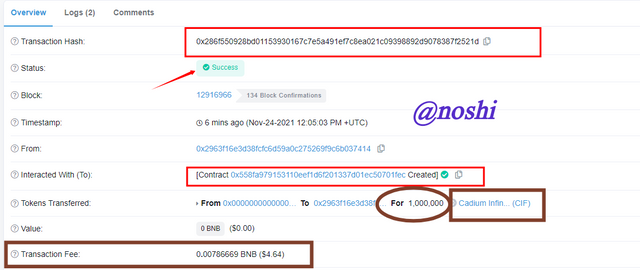
In is the information about our Token. In the following figure, you can see that the address of our contract is shown.

In the following figure, the transaction data is taken from the my metamask Wallet. you can check all the details about contract and project creation.
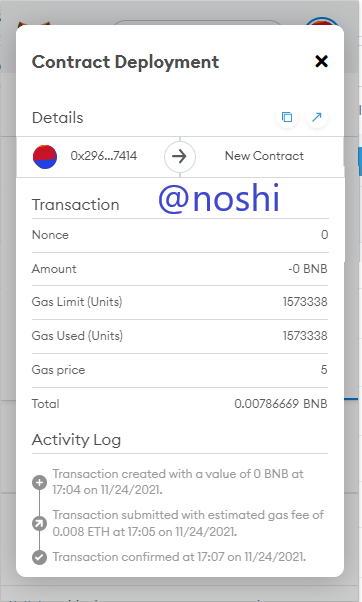

This is very informative lecture. In this lecture, we have learned about types of cryptocurrencies and learn differences between these cryptocurrencies. We have learned that how to create token our own token by using the blockchain that is owned by us. First of all, we get source code of contract, then we use Remix IDE editor for customization of source code.
After that we create our token by pay some gas fee in the form of BNB because we create our token on Binance smart chain. Next, we learned that how to add our created token in our Metamask wallet. Overall, this is good lecture. I have learned lot of things from this lecture. Thank professor for this outstanding lecture.
